NavSource Online: Aircraft Carrier Photo Archive
Special Thanks to Bob Fish,
Trustee, USS Hornet Sea, Air and Space Museum,
and
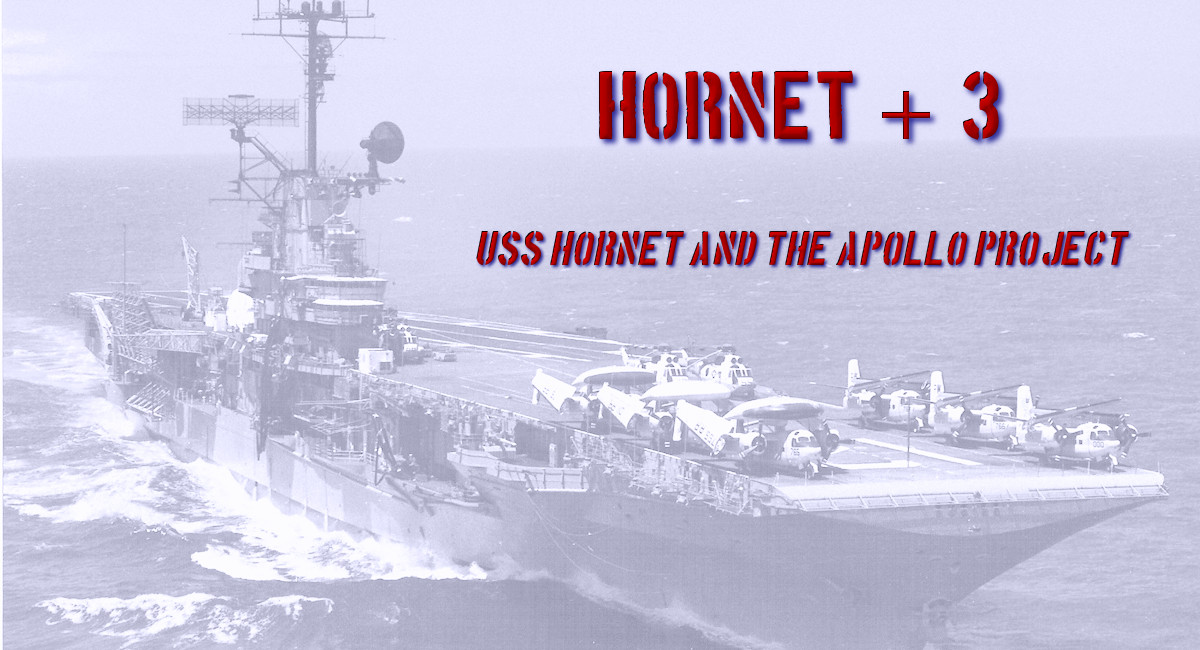
Author, Hornet Plus Three: The Story
of the Apollo 11 Recovery,
for his invaluable help in preparing this gallery.
|
||||
| Click on Thumbnail for Full Size Image |
Size | Image Description | Source | |
|---|---|---|---|---|
| Apollo Project: The Beginning |
||||
 NS-ha-001 |
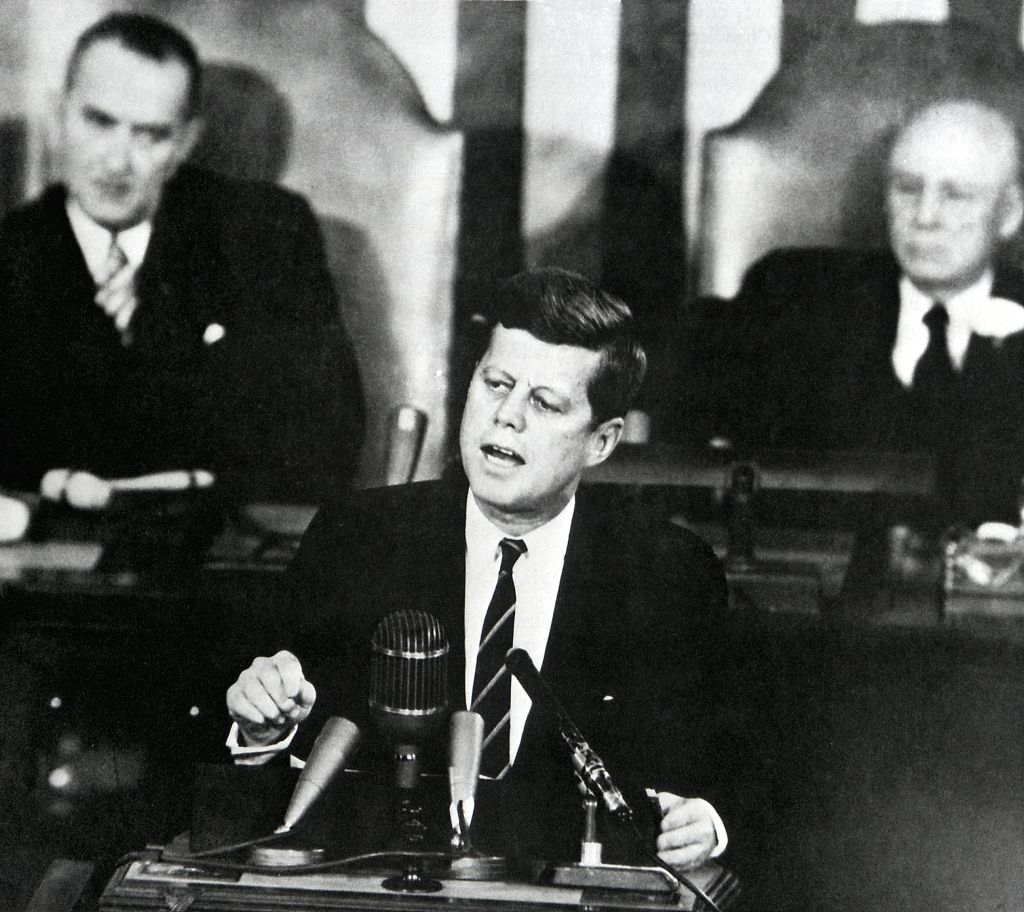
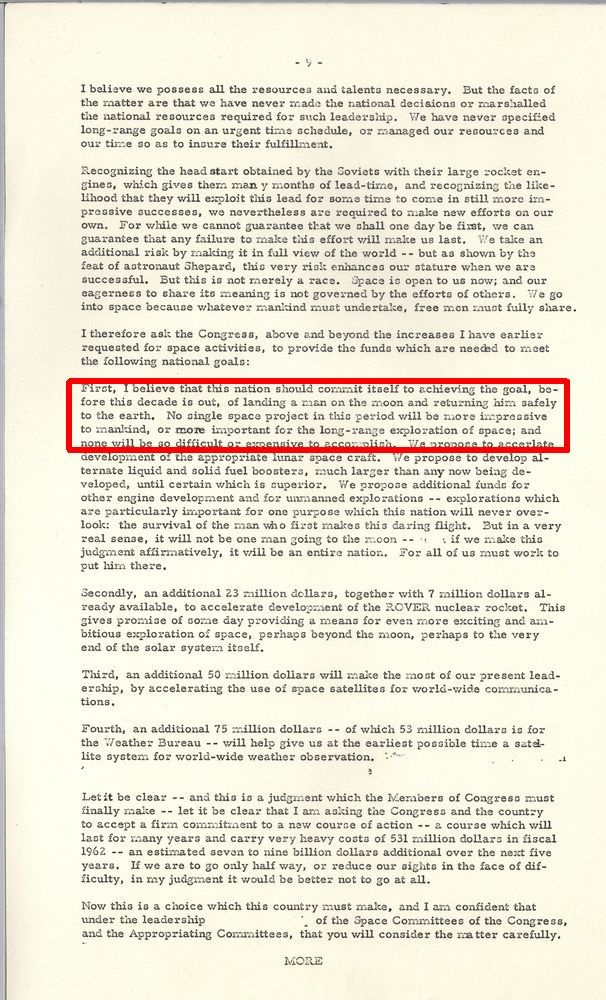
156k | During an address to Congress in May 1961, President John F. Kennedy declared the nation should commit itself to landing a man on the moon, and returning him safely to the earth, before the end of the decade. Clearly, it was a challenge to the Soviet Union for world leadership in the science and technology fields. "First, I believe that this nation should commit itself to achieving the goal, before this decade is out, of landing a man on the moon and returning him safely to the earth. No single space project in this period will be more impressive to mankind, or more important for the long-range exploration of space; and none will be so difficult or expensive to accomplish." NS-ha-001a: Video clip, 41" length (.mp4 format). NS-ha-001b: Page 9 of President Kennedy's Special Message to the Congress on Urgent National Needs, 25 May 1961. |
JFK Library photo, via Bob Fish | |
 NS-ha-001a |
5.20M | Courtesy of Movietone News | ||
 NS-ha-001b |
157k | Courtesy of the JFK Presidential Library & Museum | ||
 NS-ha-552 |
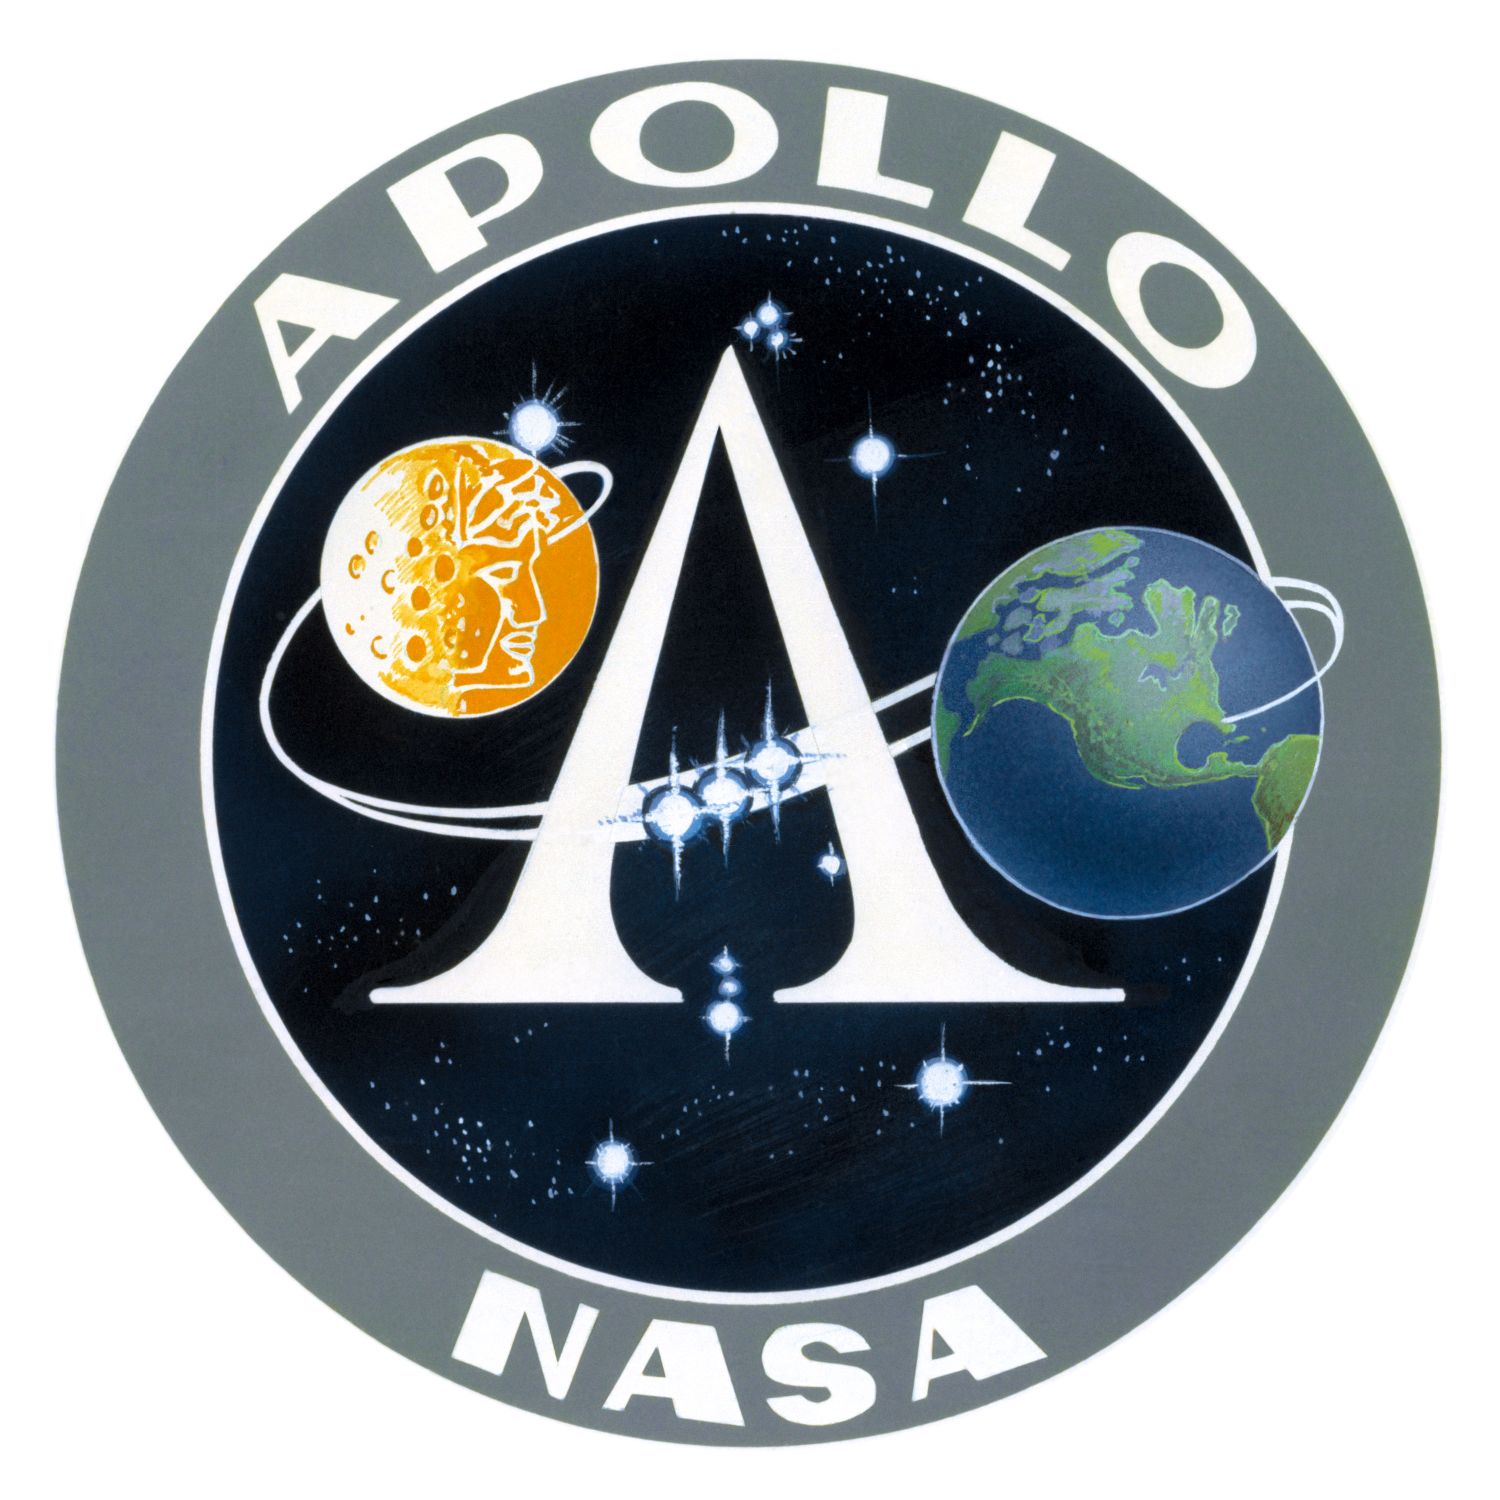
244k | The Apollo emblem. The center disc bears a large letter "A" with the constellation Orion positioned so its three central stars form the bar of the letter. To the right is a sphere of the Earth, with a sphere of the Moon in the upper left portion of the center disc. The face on the Moon represents the mythical god, Apollo. A double trajectory passes behind both spheres and the central stars. National Aeronautics and Space Administration (NASA) photo S65-55202. |
Courtesy of NASA | |
| Apollo 11 |
||||
 NS-ha-002 |
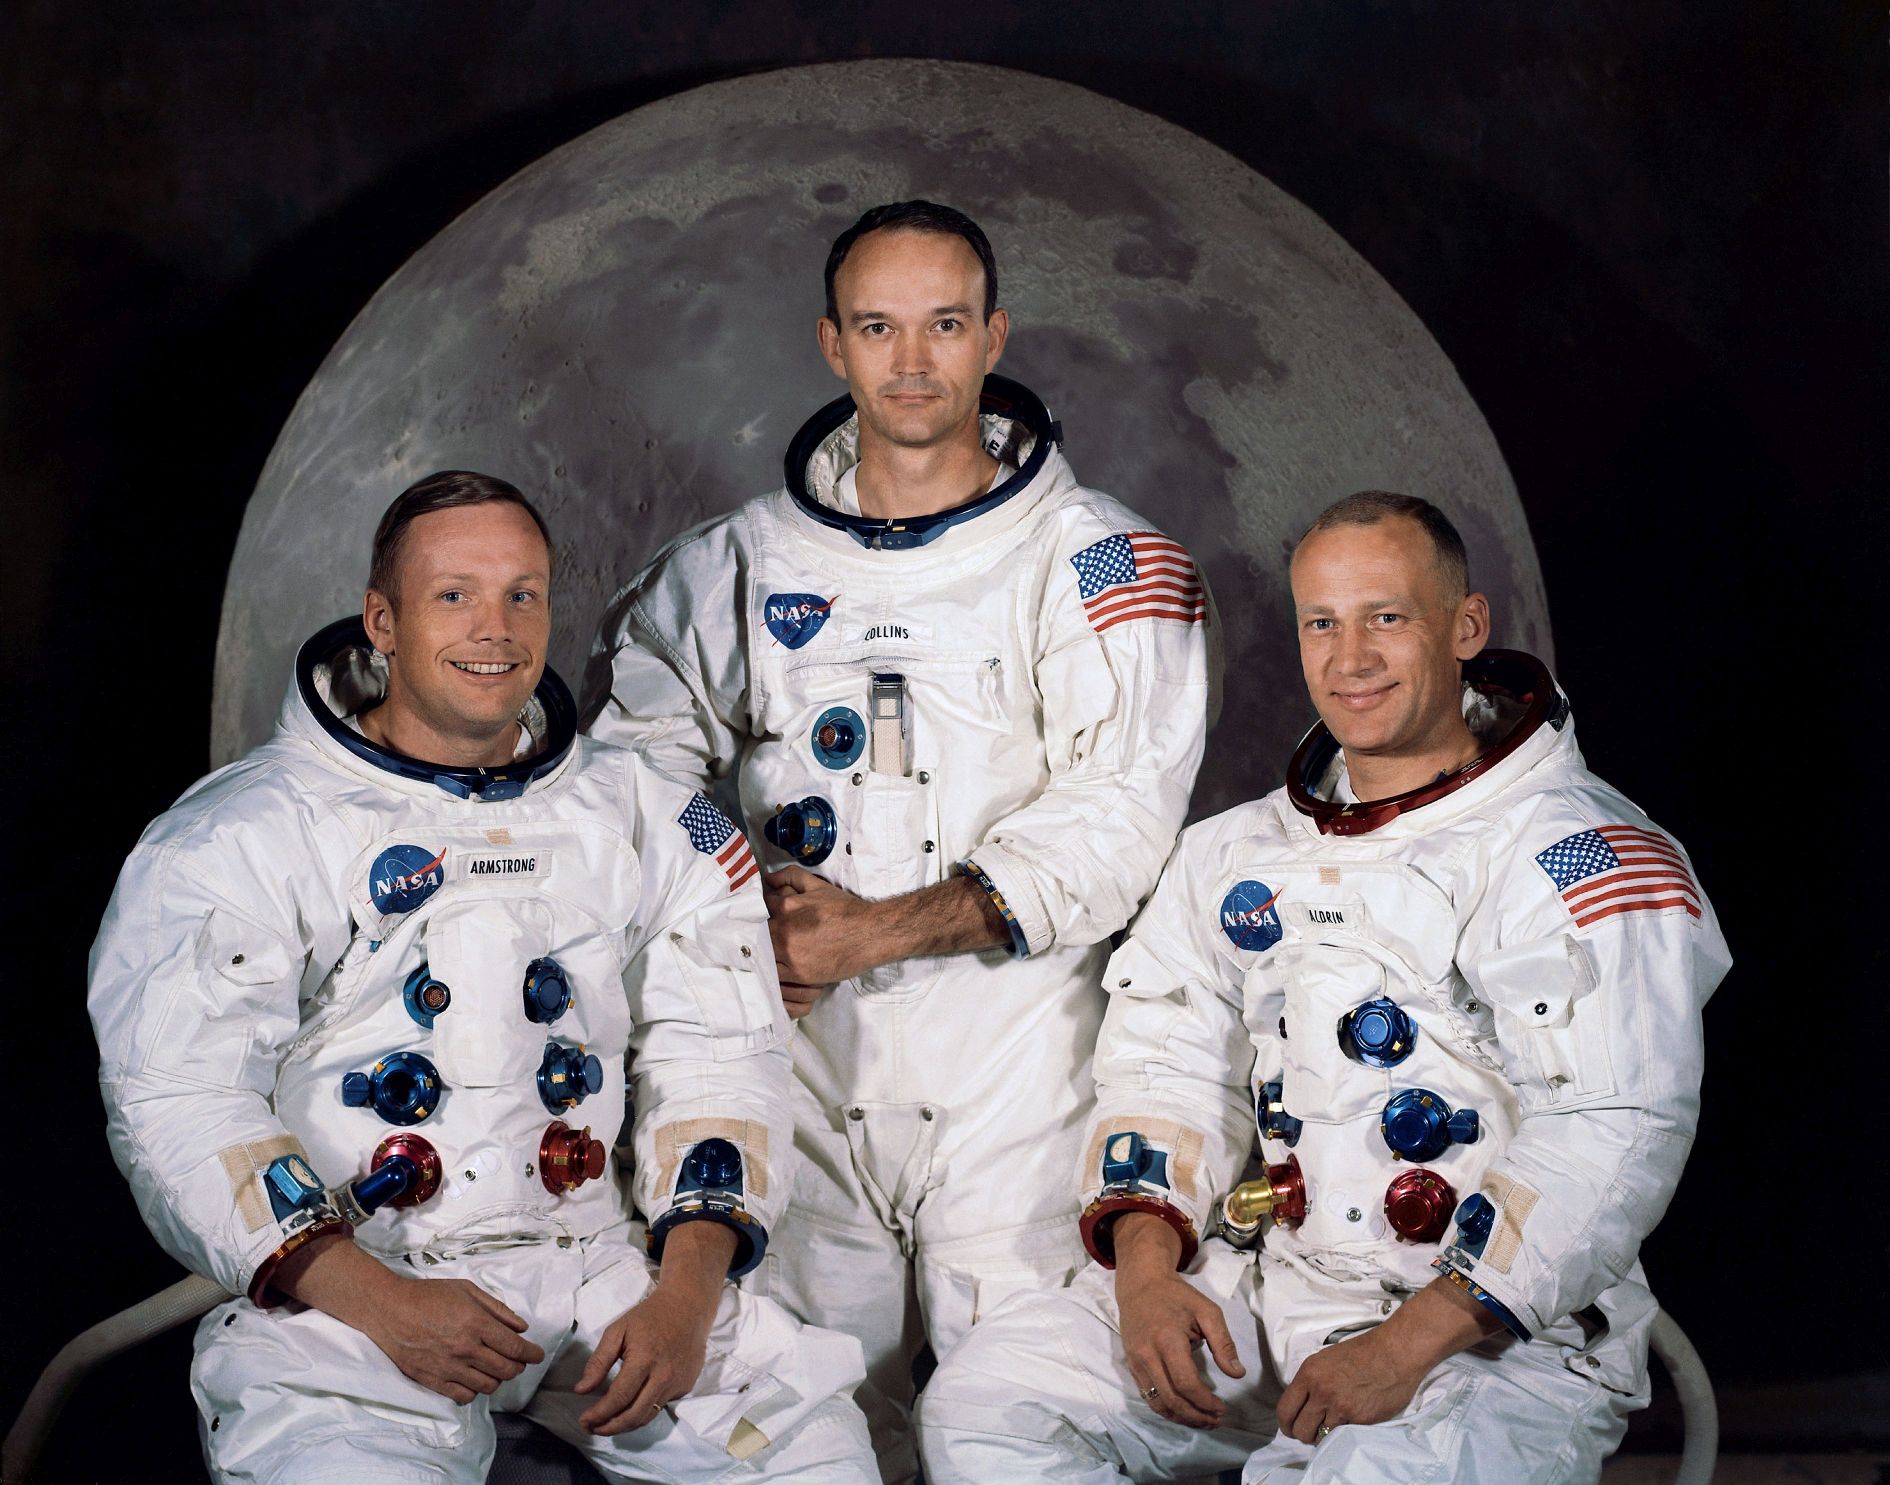
386k | After Apollo 8 and 10 had successfully flown around the moon, NASA felt July 1969 was the time to attempt a lunar landing with the Apollo 11 flight. The crew consisted of Mission Commander Neil Armstrong (l), Command Module Pilot Michael Collins (c) and Lunar Module Pilot Edwin "Buzz" Aldrin (r). National Aeronautics and Space Administration (NASA) photo S69-31739. |
Courtesy of NASA, via Bob Fish | |
 NS-ha-566 |
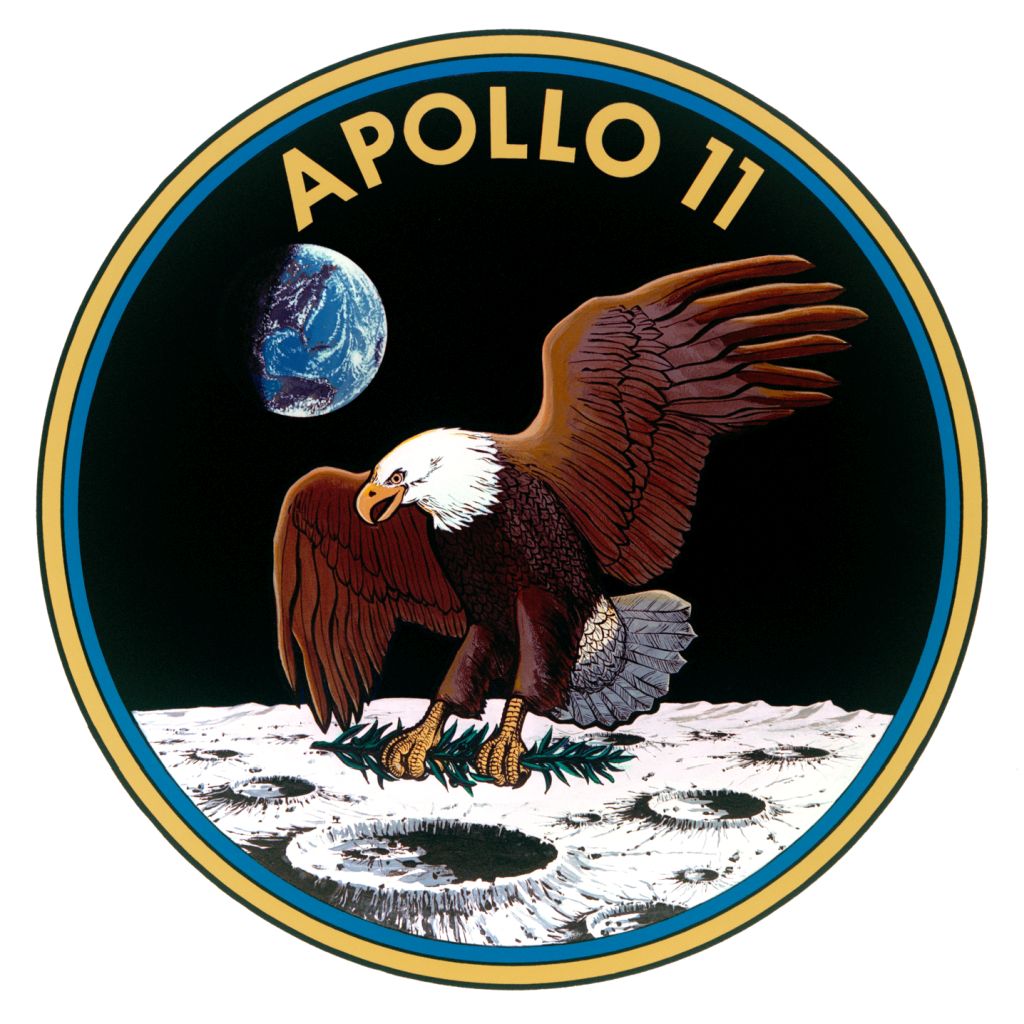
172k | Apollo 11 insignia. The American Eagle, symbolic of the United States (and the name given to the Lunar Module), is about to land on the Moon. In its talons, an olive branch indicates the crew "came in peace for all mankind." The Earth, the place from which the crew came and would return safely in order to fulfill President John F. Kennedy's challenge to the nation, rests on a field of black, representing the vast unknown of space. Although highly realistic (the crater-pocked moon is colored grey, the eagle brown and white, the Earth blue, and the sky black, just as it would be from the lunar surface), the Earth is in fact incorrectly drawn: the patch shows the Earth to be shadowed on the left side, while the Earth, if viewed from the lunar surface, would be dark on the bottom; this mistake was never corrected. |
Courtesy of NASA | |
 NS-ha-007 |
131k | The WWII Essex-class aircraft carrier USS Hornet (CVS-12) was selected as the Primary Recovery Ship (PRS) for the Apollo 11 mission. Because of the Vietnam War, major US Navy combatant vessels in the Pacific Fleet were being carefully scheduled. Hornet had just completed her third (and final) tour off the coast of Vietnam and was available for special assignment. |
Bob Fish | |
 NS021214 |
571k | USS Hornet (CVS-12) had a long and distinguished lineage in US history starting with World War II. Her immediate predecessor, USS Hornet (CV-8) had launched the famous Doolittle Tokyo Raid in WWII. As an aircraft carrier, she was a very stable platform with redundant propulsion systems, could launch and recover fixed wing aircraft, and had a major medical facility aboard. She was precisely what NASA needed for this epic mission. US Navy photo by LCDR Charles Kerlee, USNR, now in the collections of the National Archives and Records Administration (NARA), # 80-G-469319. (See NS021214 for a description.) |
Bob Fish | |
 NS-ha-009 |
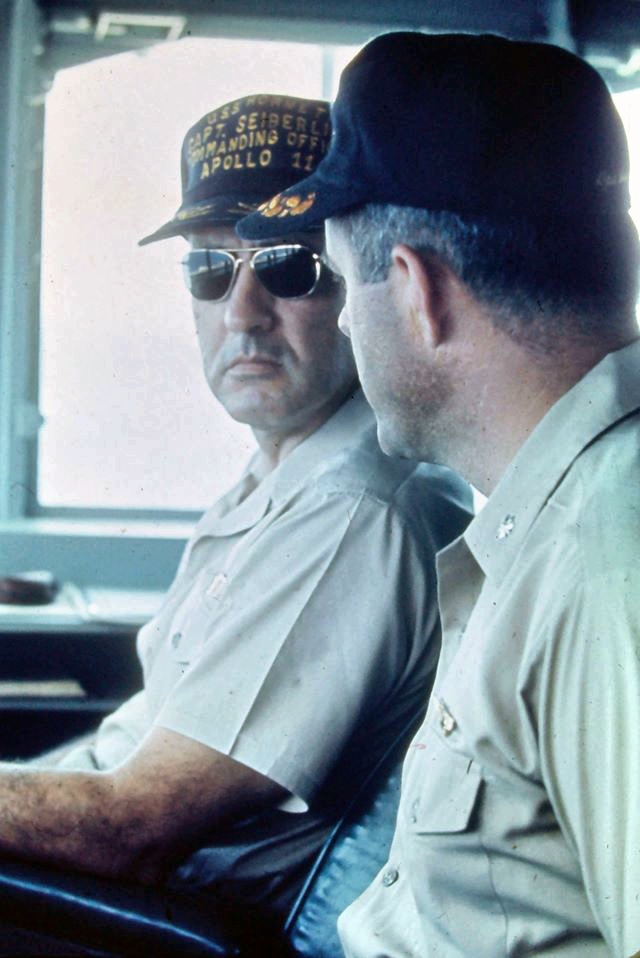
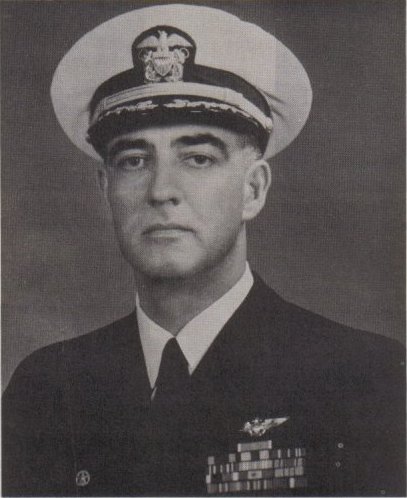
341k | Recovery operations for all NASA missions that splashed down in the Pacific Ocean were managed by Task Force 130, headquartered in Kunia, HI. RADM Donald Davis (r) was the CO in July 1969 when the Apollo 11 mission occurred. The CO of the Primary Recovery Ship USS Hornet (CVS-12), Captain Carl Seiberlich (l), was also the Commander of all Pacific Ocean recovery forces assigned to that space mission. US Navy photo. |
Bob Fish | |
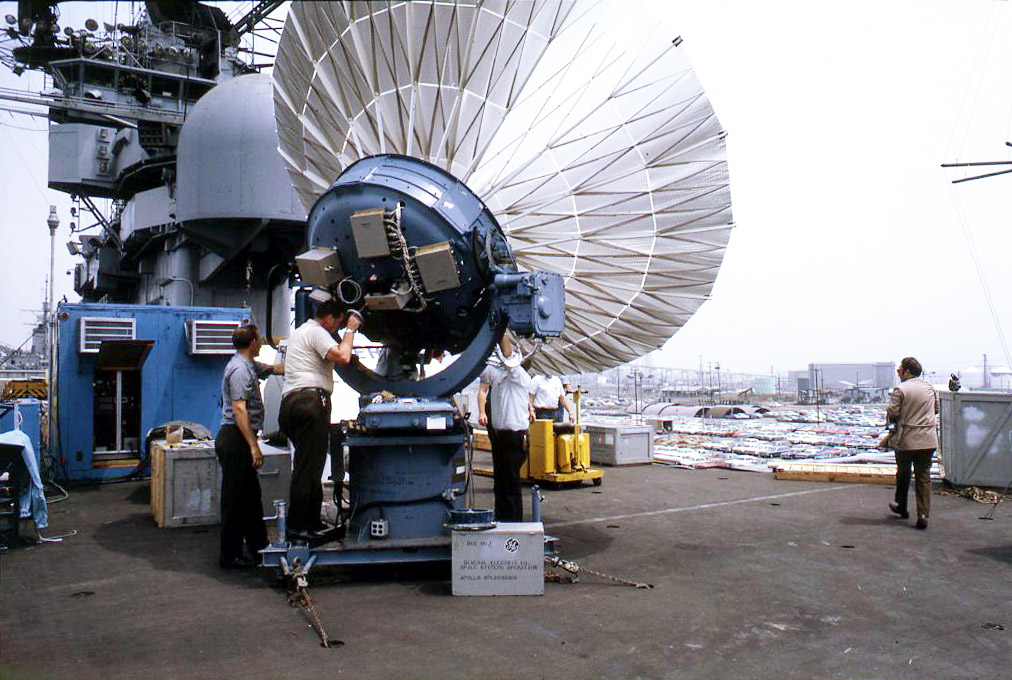 NS-ha-556 |
219k | At the Long Beach Naval Base, General Electric installed a one-way (broadcast) earth terminal to be used by ABC to broadcast video live via satellite back to the mainland USA, from where it was distributed worldwide. This photo shows the antenna before the white weather dome was placed over it. |
Bob Fish | |
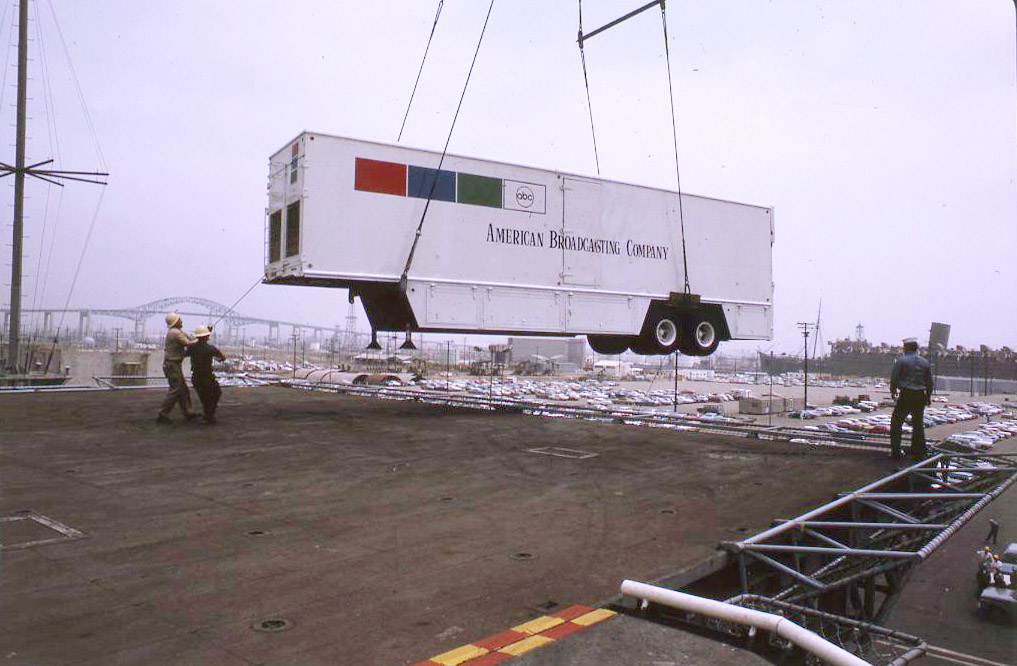 NS-ha-557 |
162k | ABC had two mobile semi-trailers with tons of video recording and editing equipment in them (along with cameras, etc.). They were redundant, in case one had a problem. This photo shows one of them being loaded aboard at Long Beach. |
Bob Fish | |
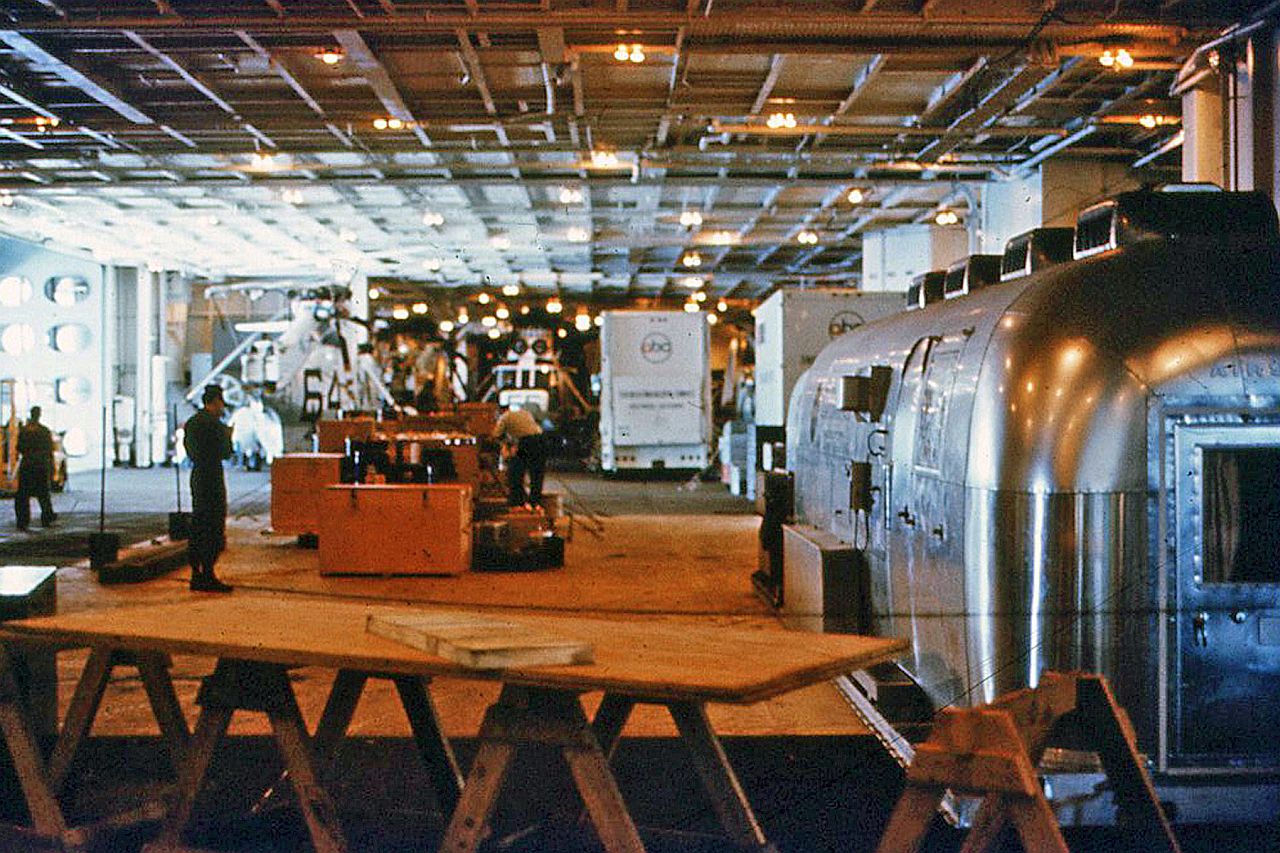 NS-ha-558 |
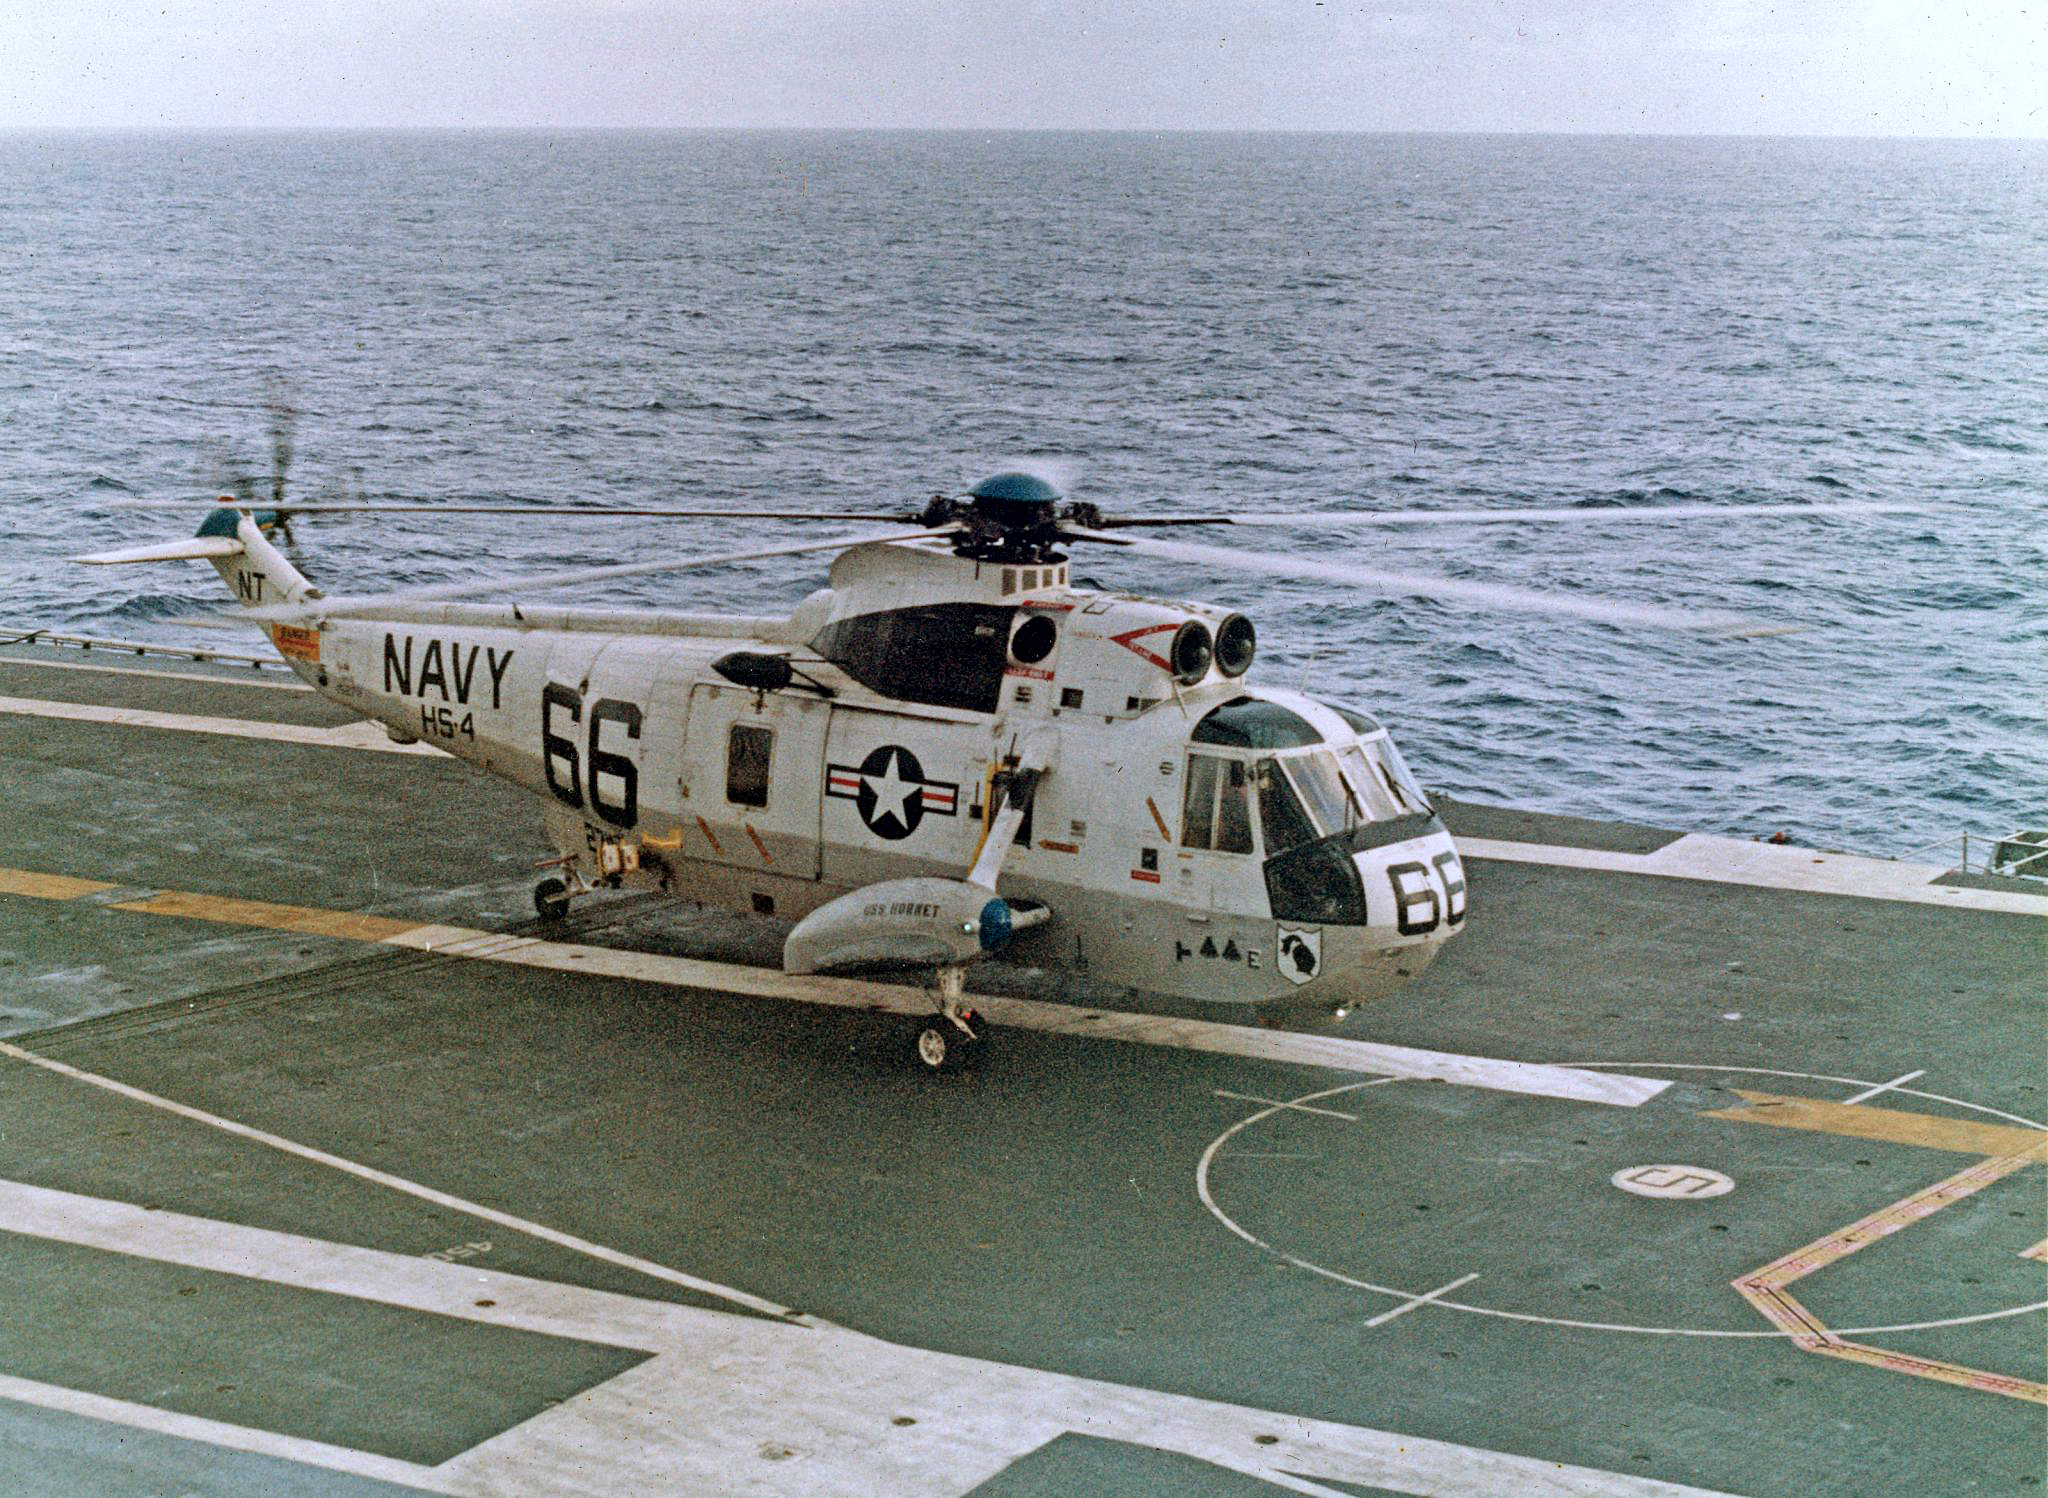
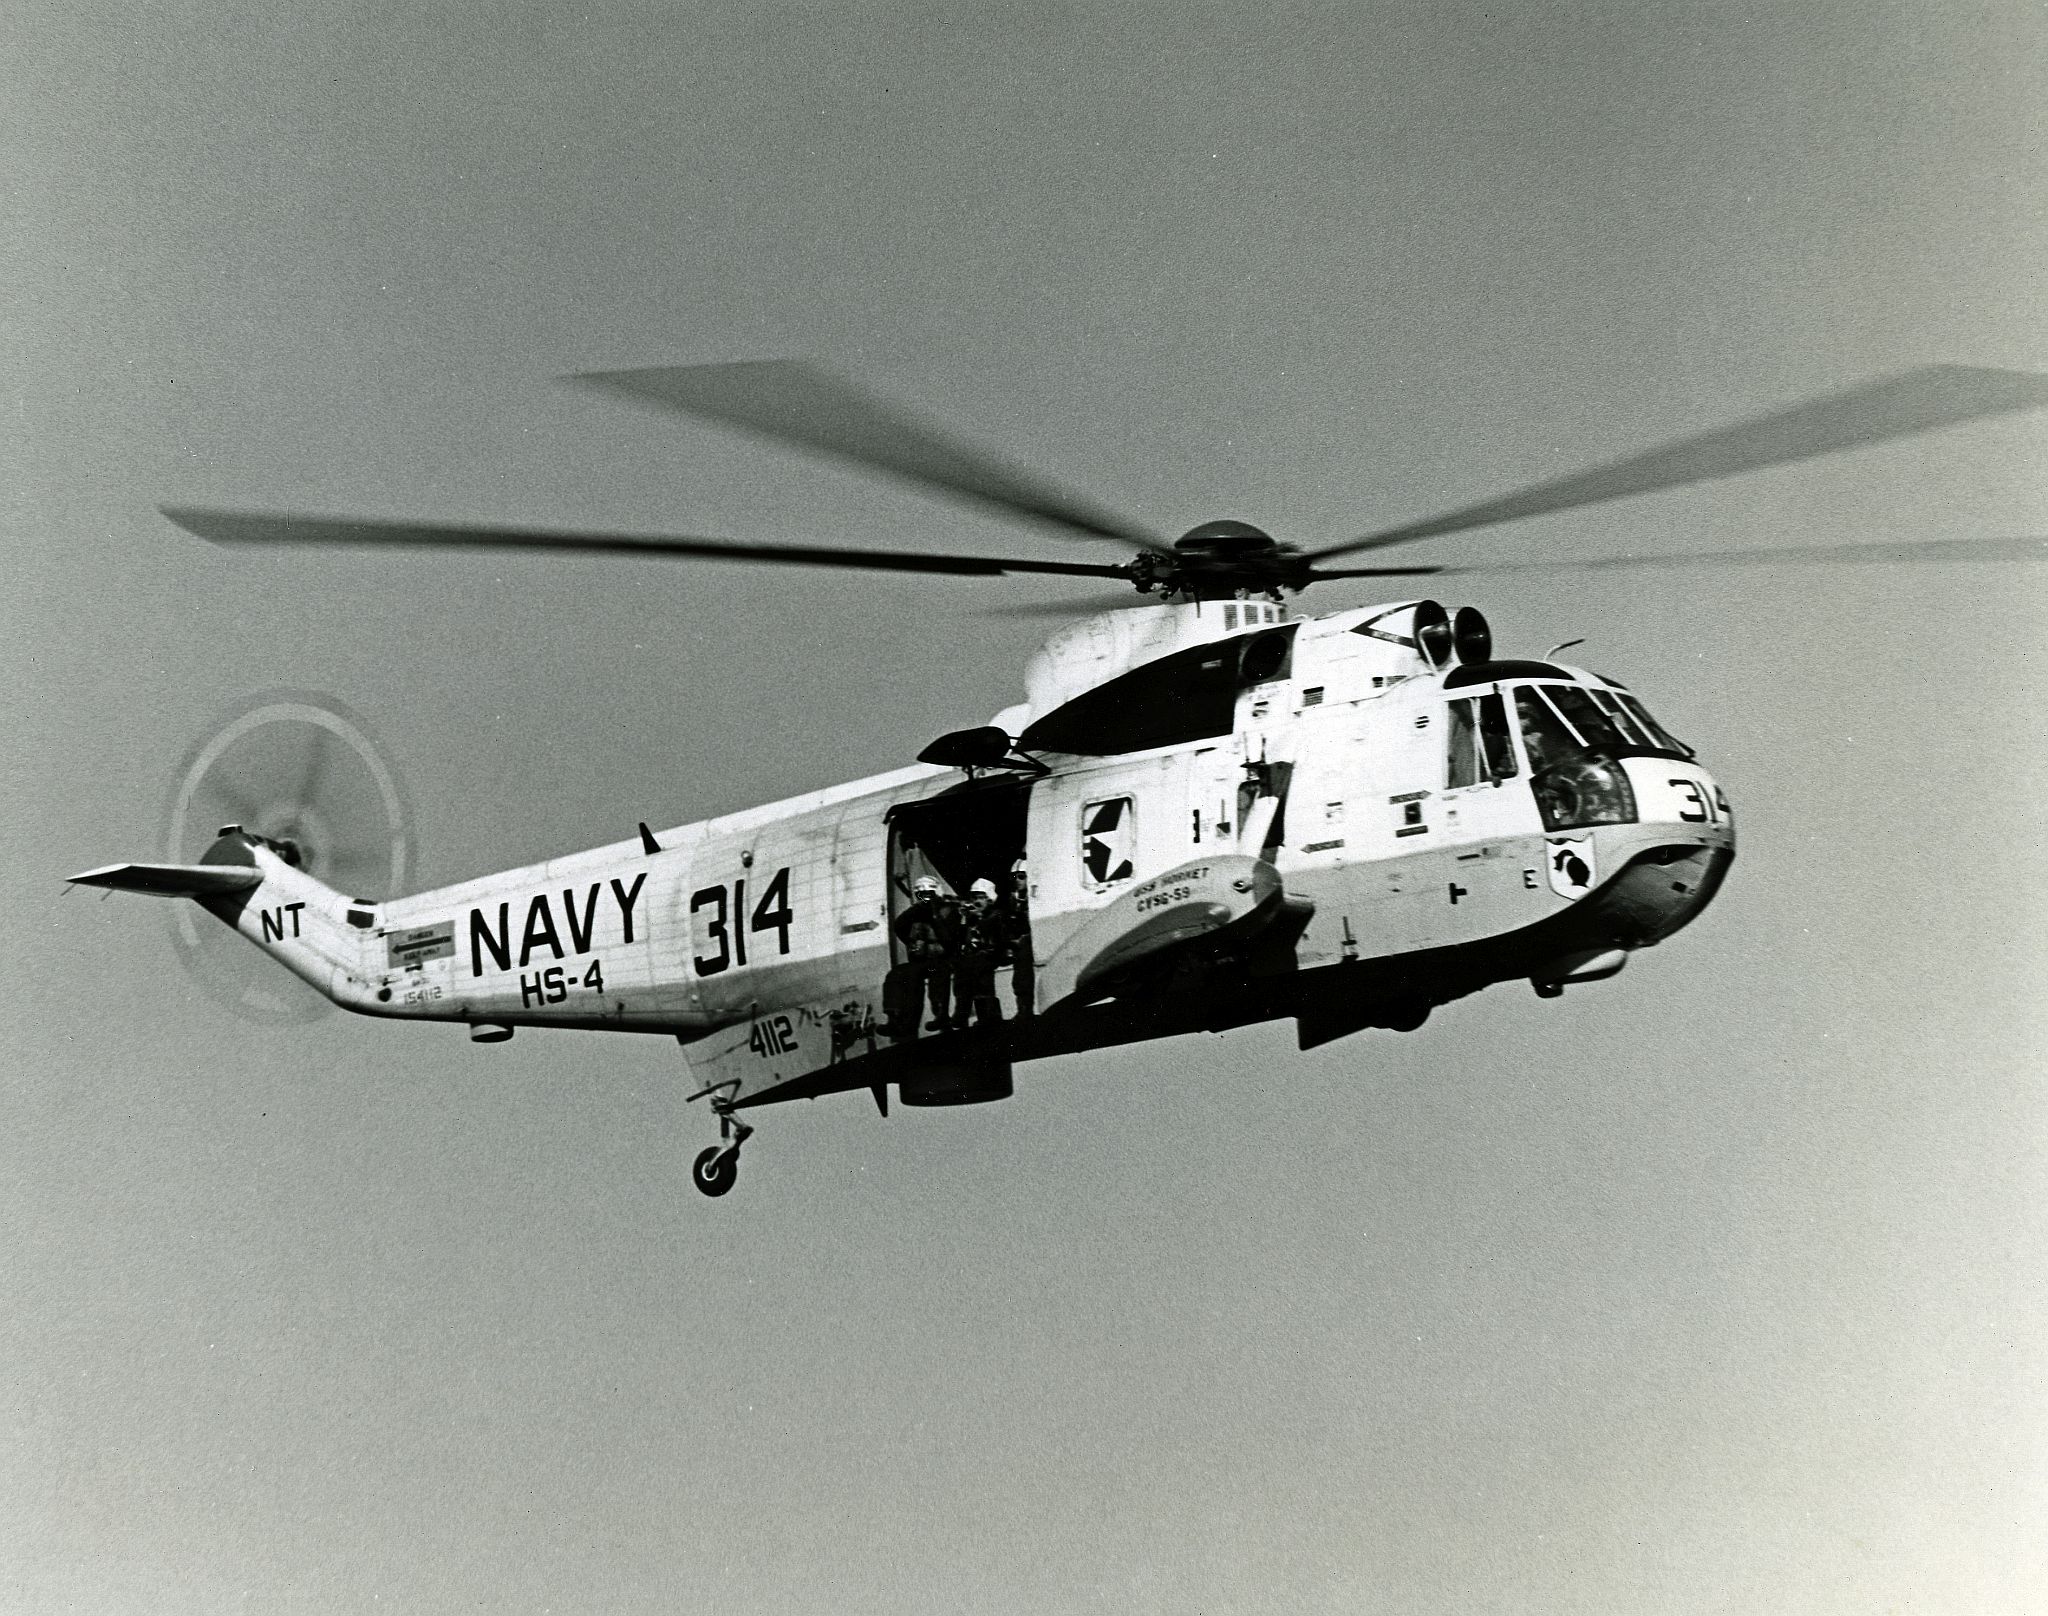
275k | This photo shows both vans (see above) chained down in front of the secondary Mobile Quarantine Facility (MQF) in Hangar Bay 1. The HS-4 astronaut recovery Sea King helo # 66 is sitting next to them with helo #64 by the port side elevator—it was an Underwater Demolition Team (UDT) helo. Helicopter Anti-Submarine Squadron Four (HS-4), nicknamed "Black Knights," was assigned to Carrier Anti-Submarine Air Group 59 (CVSG-59) from late 1968 through the spring of 1970. During that period, HS-4 participated in and pioneered Search and Rescue (SAR) techniques for the Apollo capsule recoveries. The Black Knights were on-scene for Apollo missions 8 (aboard USS Yorktown (CVS-10)), 10 (USS Princeton (LPH-5)), 11 and 12 (USS Hornet (CVS-12)), and 13 (USS Iwo Jima (LPH-2)). The recovery was always made by one of the most recognized helicopters of all time, "Helicopter 66," whose actual serial number was BuNo 152711. After the Apollo 11 recovery the U.S. Navy adopted a three-number squadron designator and the helicopter's side number was changed several times—however, the helicopter always bore the number "66" for public relations reasons. HS‑4 was awarded a Meritorious Unit Commendation (MUC) for these recoveries. |
Bob Fish | |
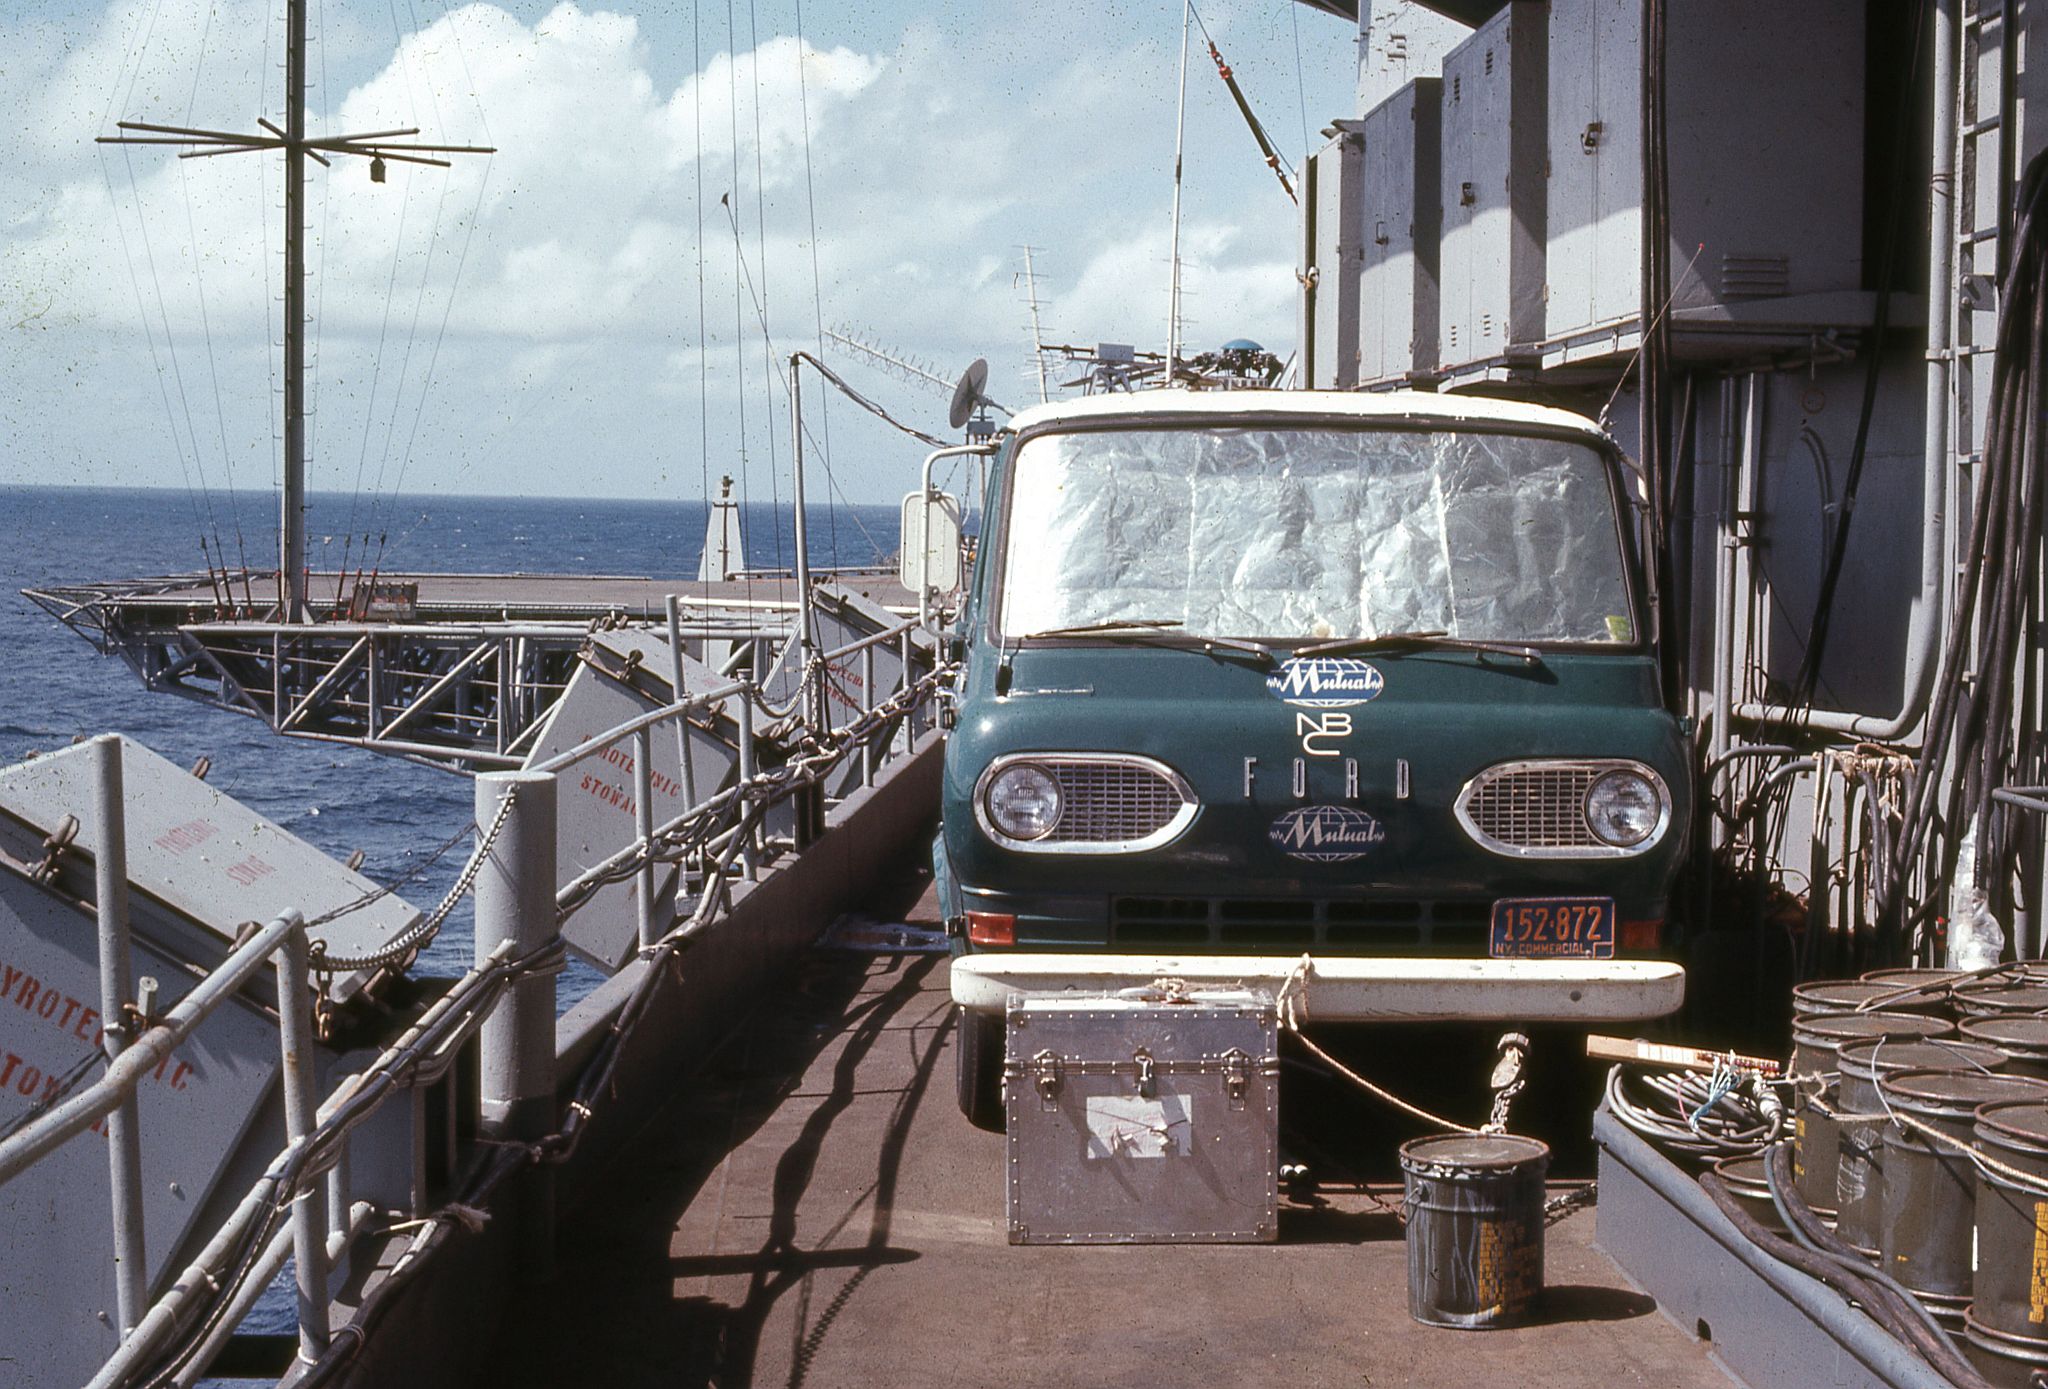 NS-ha-559 |
489k | The NBC Mutual Radio Network van, lashed down to the starboard side of the island so radio announcer Don Blair could broadcast the recovery live over radio. |
Courtesy of Don Blair, via Bob Fish |
|
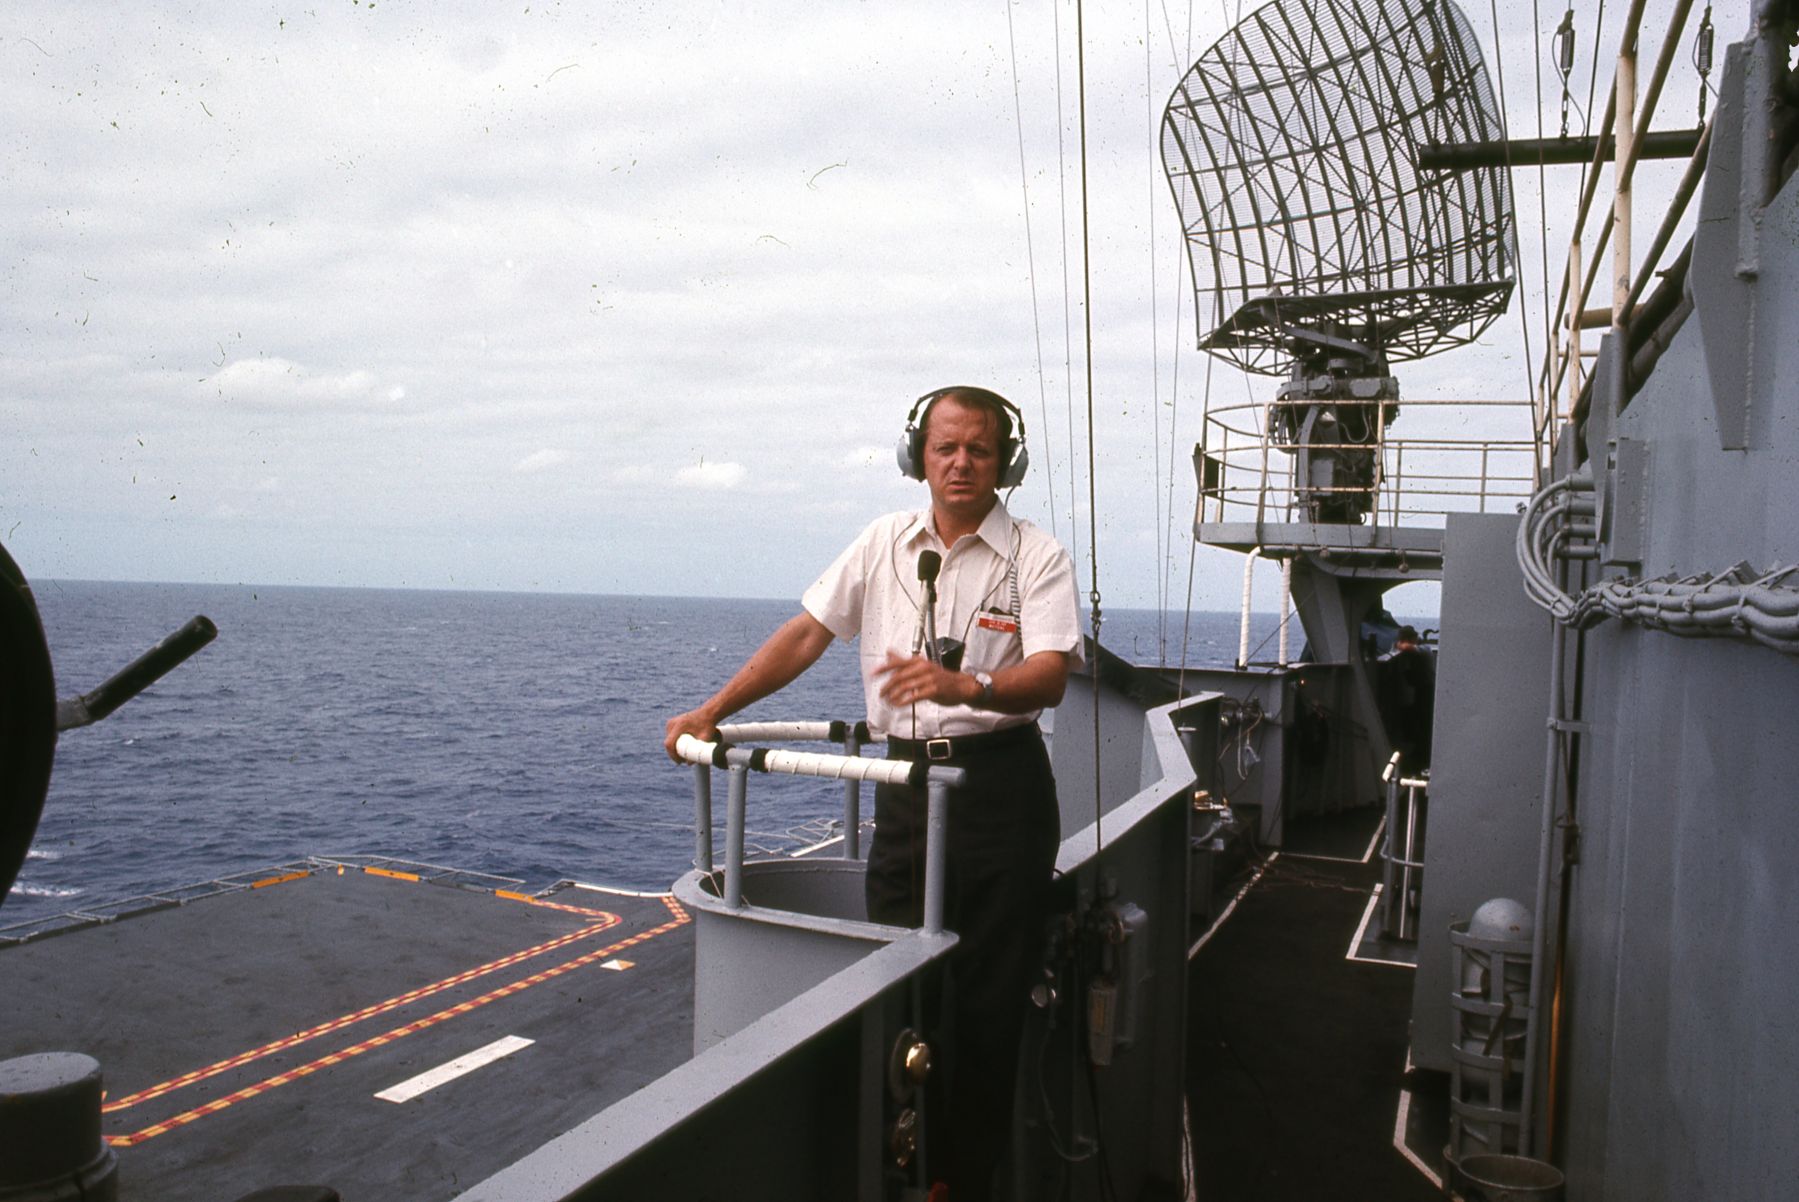 NS-ha-560 |
275k | Don Blair (see above) broadcasting from the O-6 level. |
Courtesy of Don Blair, via Bob Fish |
|
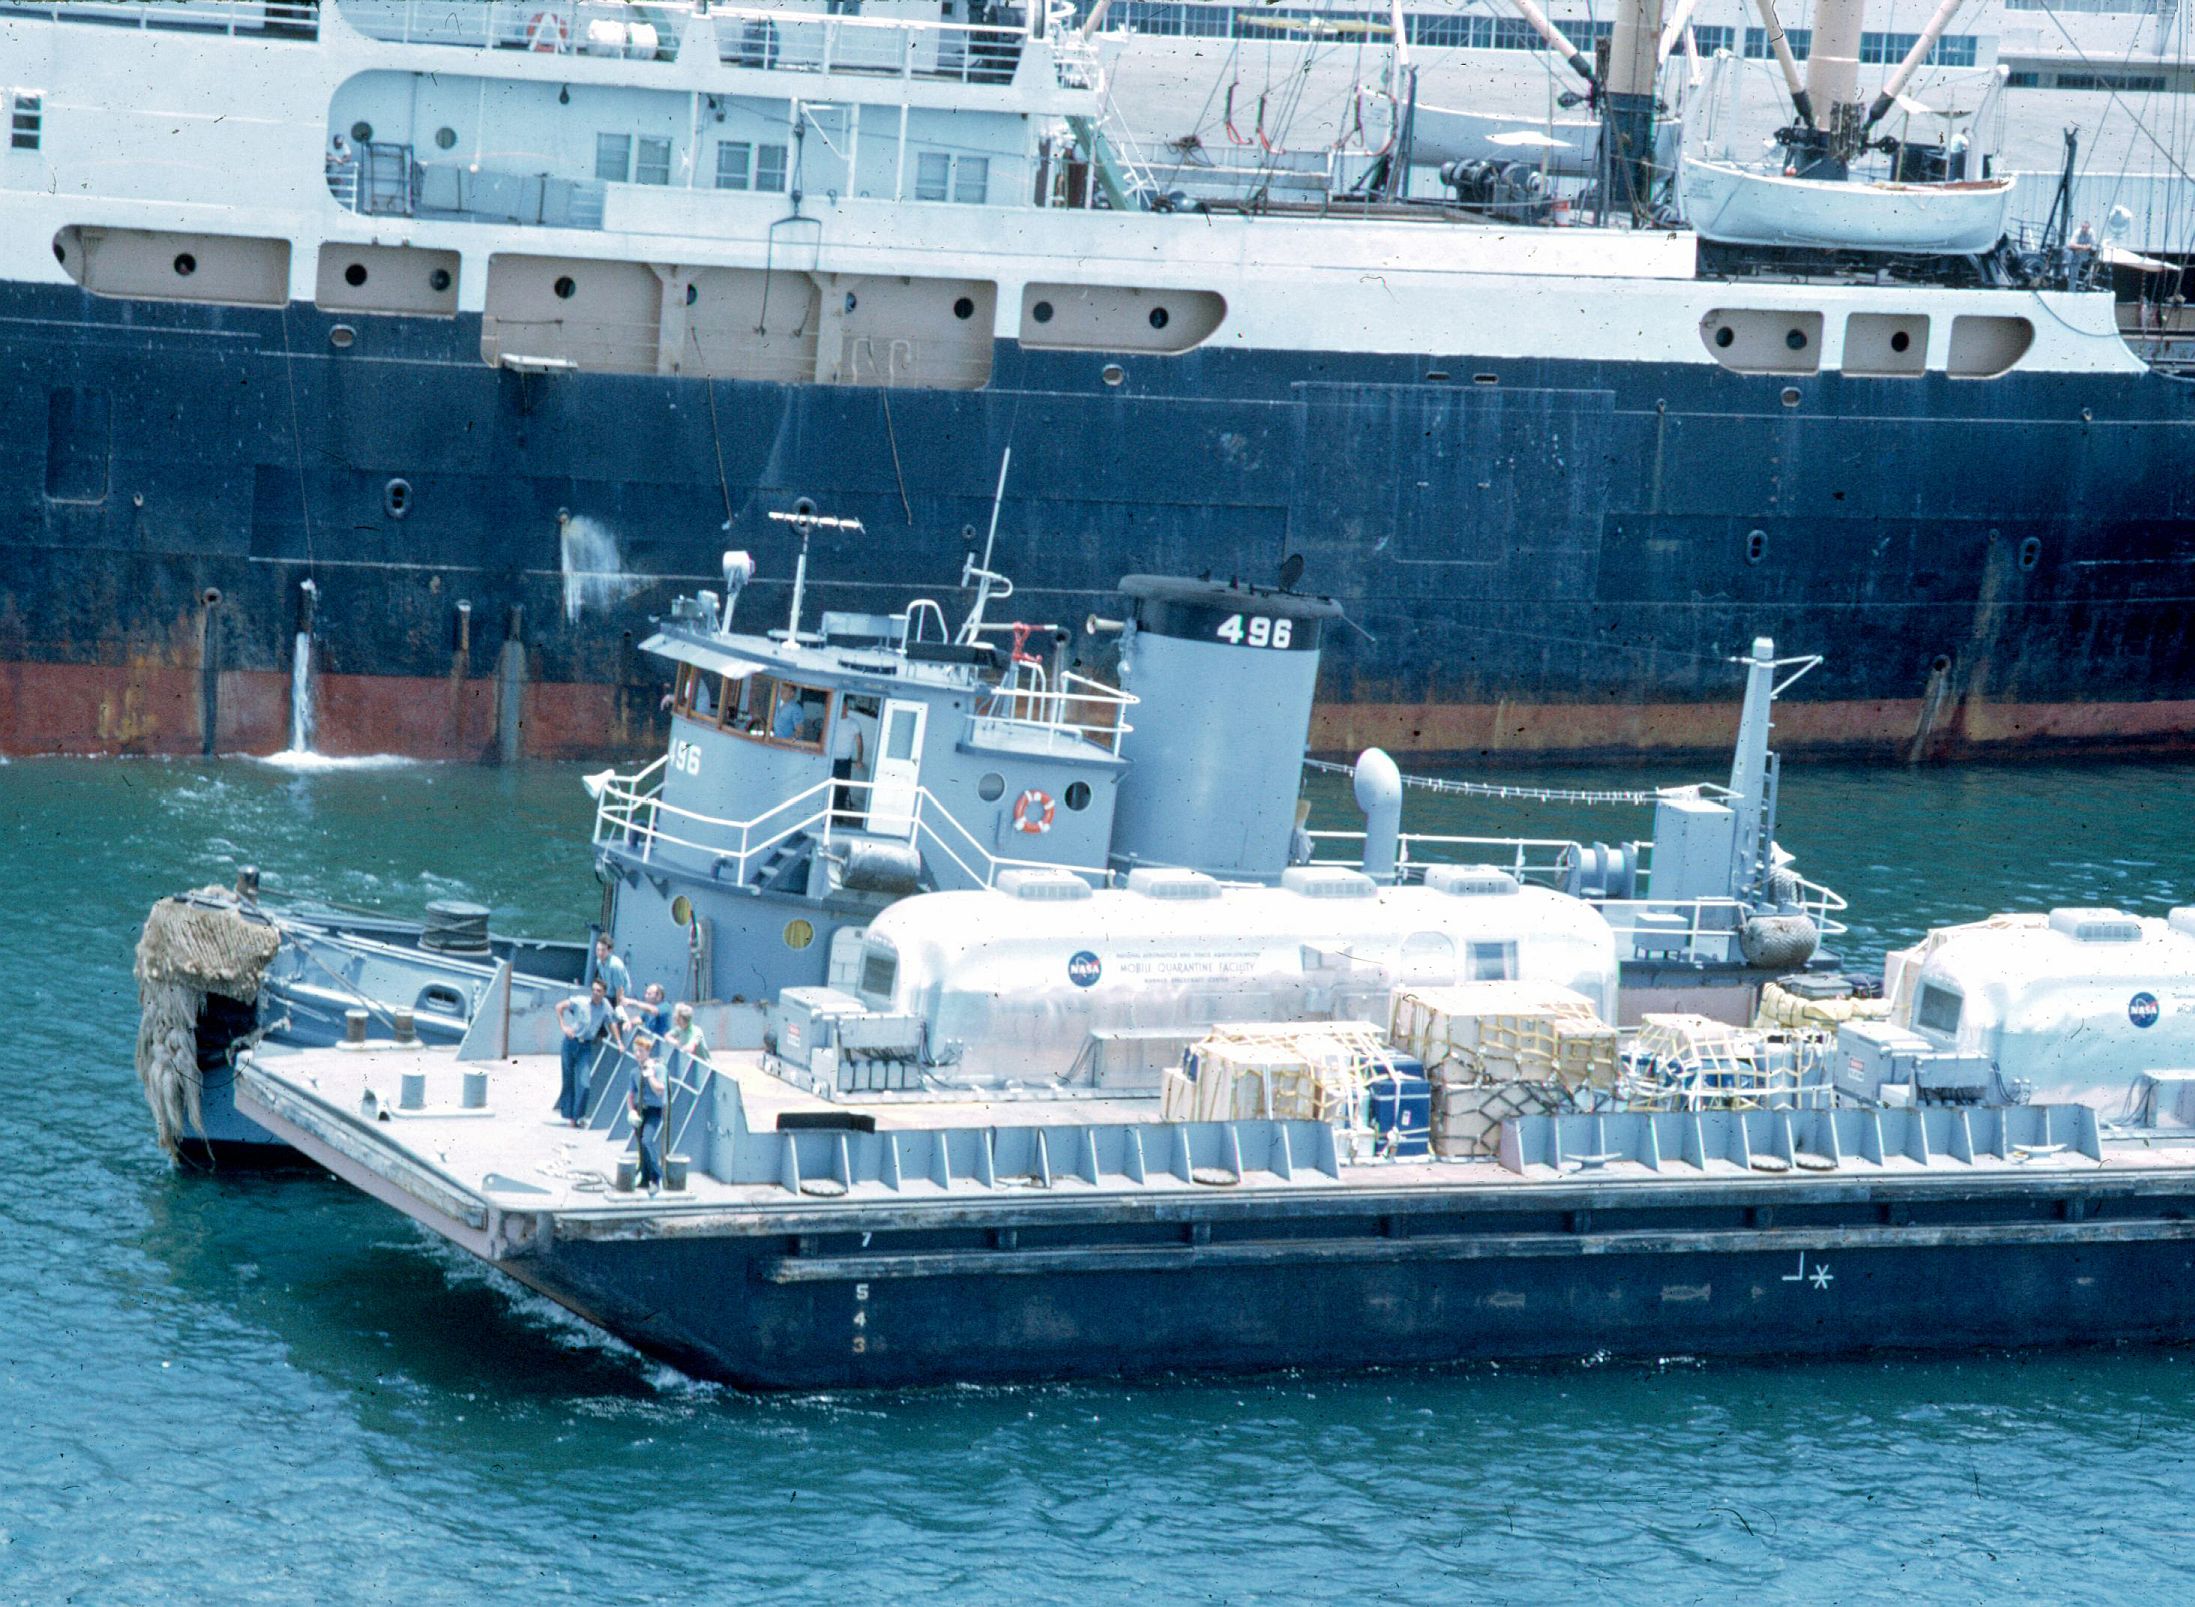 NS-ha-015 |
643k | In late June, Hornet steamed to Hawaii and was "chopped" to TF-130. Two Mobile Quarantine Facility (MQF) trailers and other NASA recovery equipment was flown to Pearl Harbor by USAF cargo aircraft and then barged to Hornet's location at the Pearl Harbor Navy Base. US Navy photo. |
Bob Fish | |
 NS-ha-553 |
440k | On 12 July USS Hornet (CVS-12) departed Pearl Harbor, steaming south to the equator and her assigned "launch abort" recovery site on 16 July. This location was designated by NASA in case Apollo 11 was unable to successfully complete its lunar orbit insertion procedure. Image: Hornet-Apollo 11 patch. |
Tommy Trampp | |
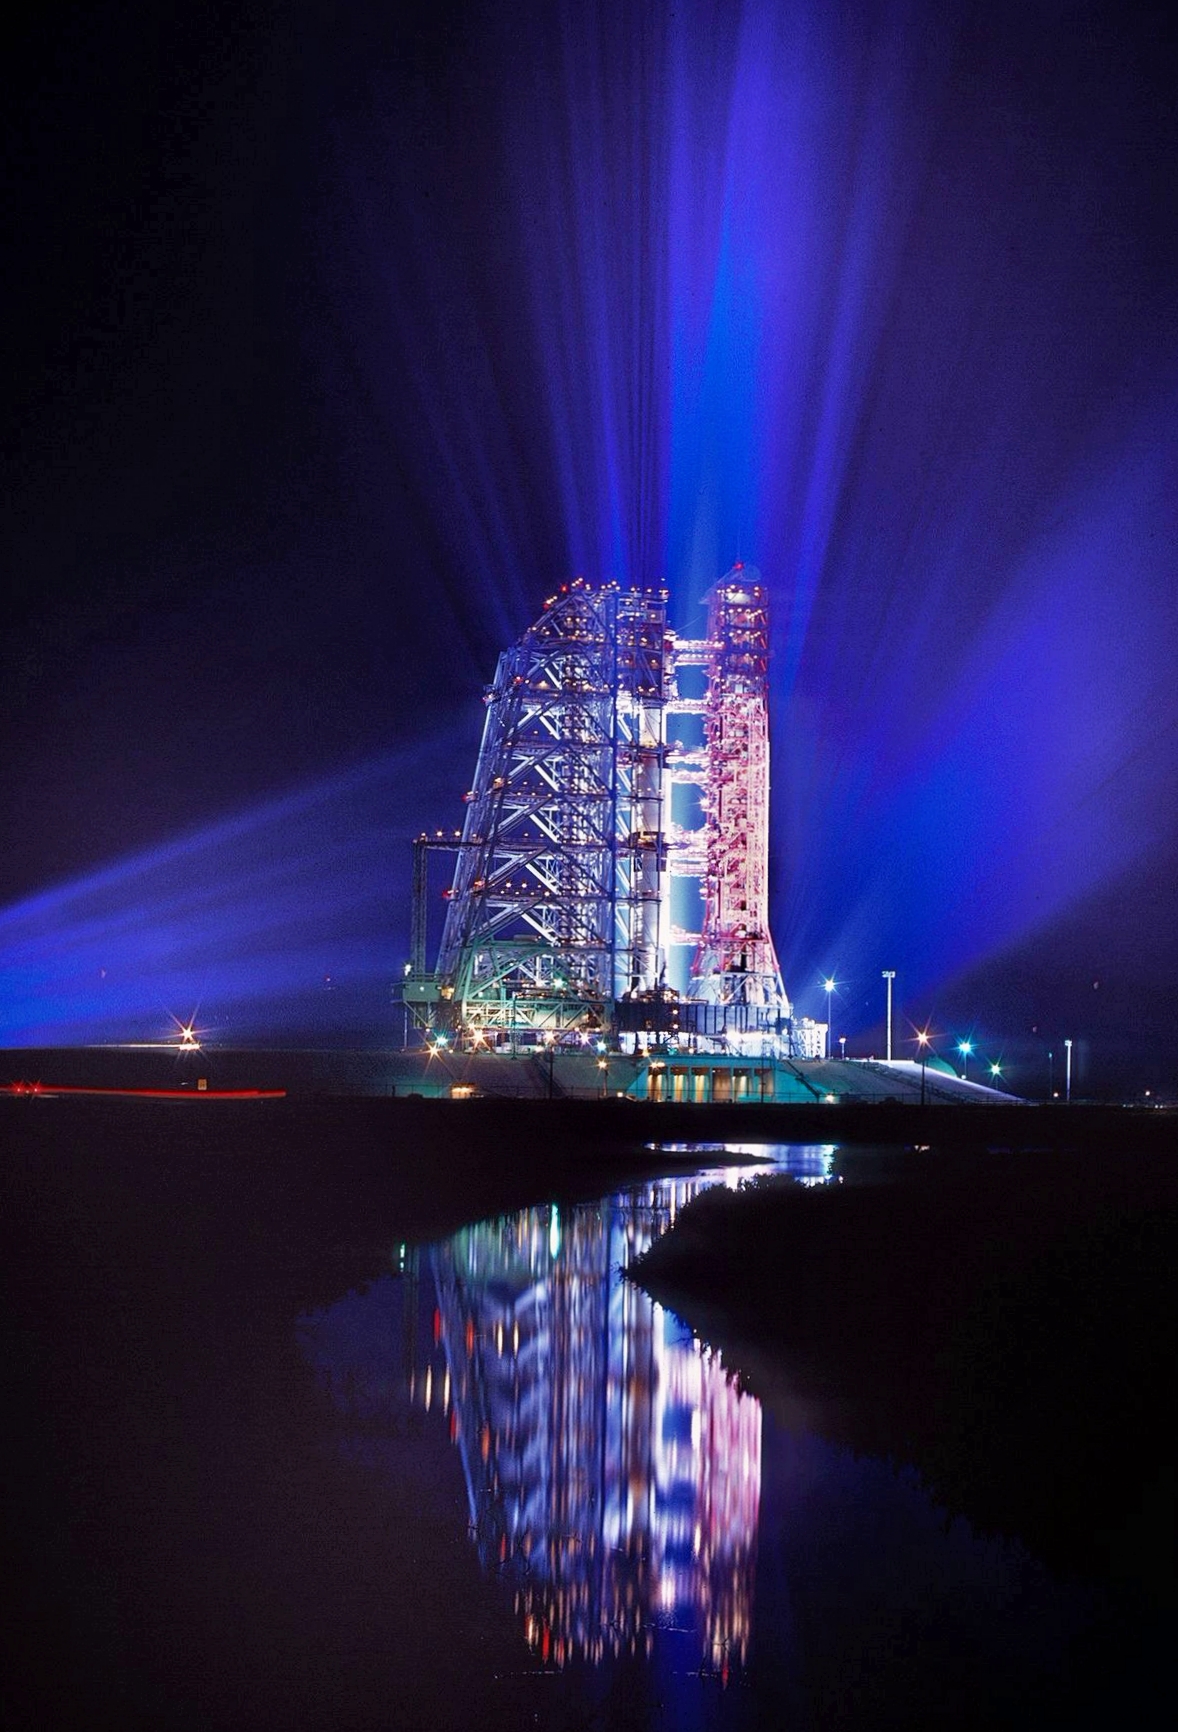 NS-ha-024 |
1.17M | Reflected in a pond, the Apollo 11 spacecraft sits high atop the Saturn V rocket on its launch pad on 15 July 1969, the eve of its historic mission to the moon. Photograph by O. Louis Mazzatenta, National Geographic Image Collection. |
Via Bob Canchola | |
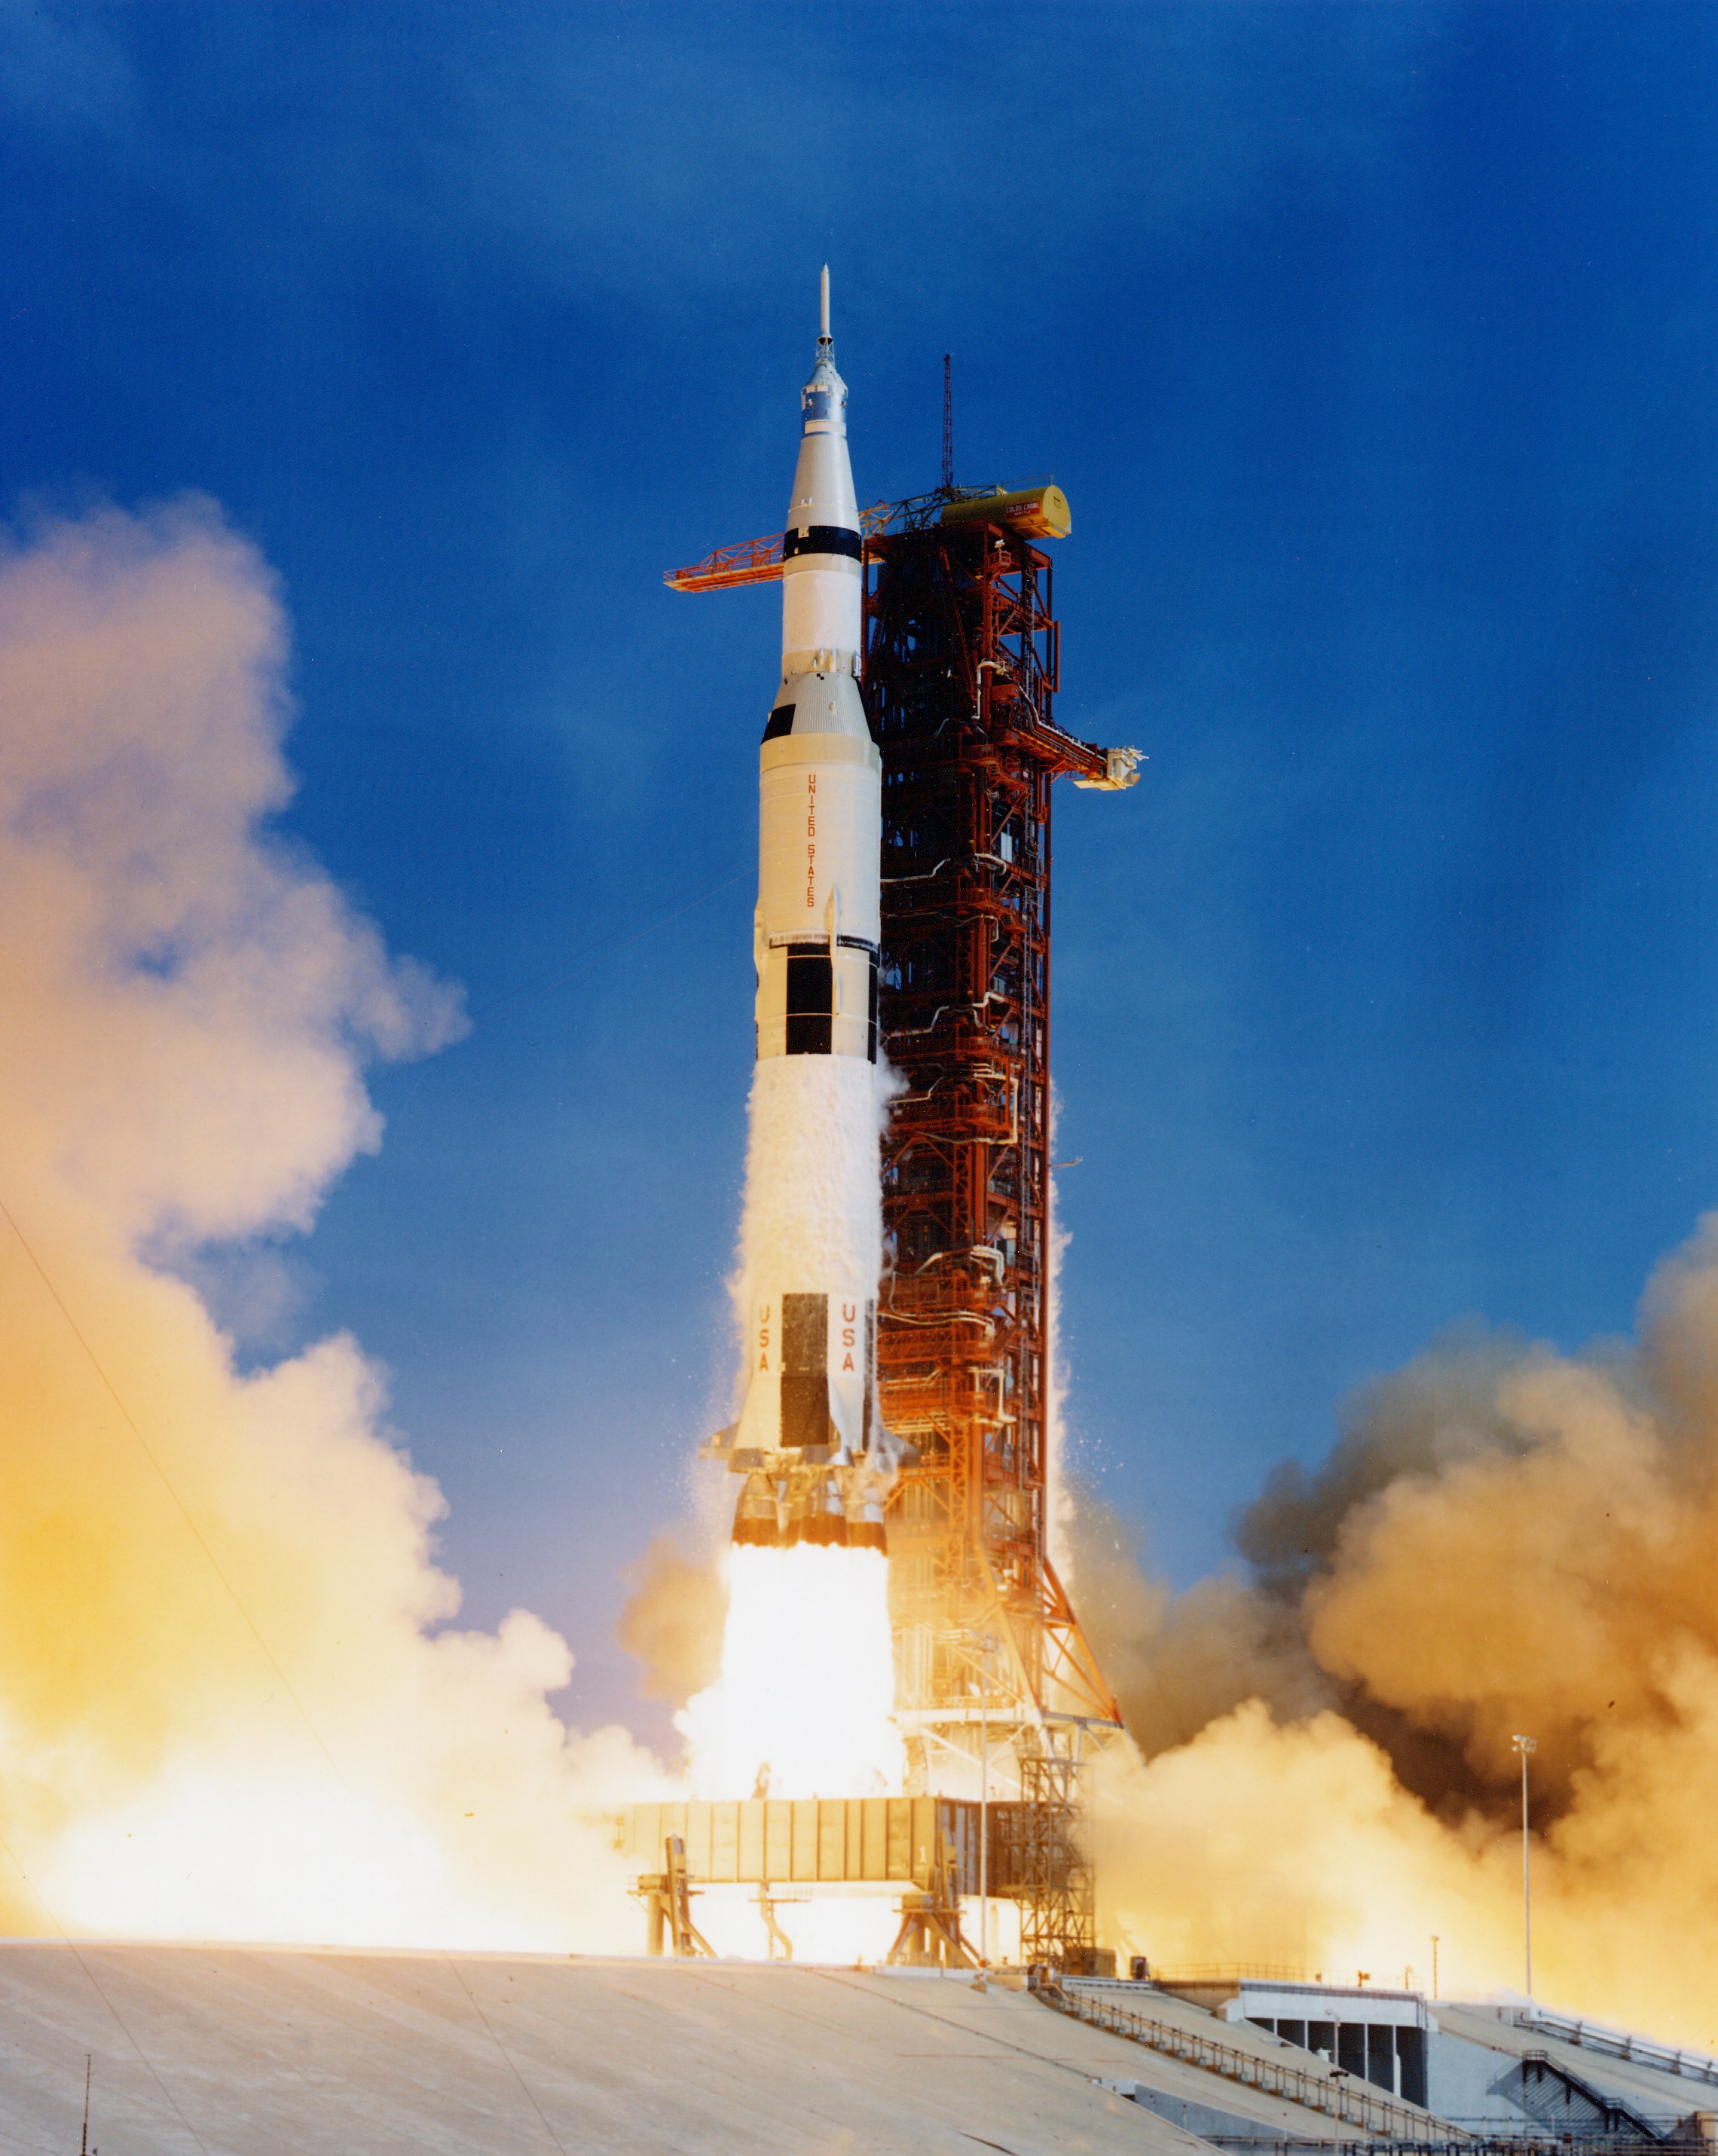 NS-ha-025 |
951k | On 16 July 1969 at 9:32am EDT, the Saturn V carrying the Apollo 11 spacecraft and crew blasted off from Kennedy Space Center. After one and a half orbits of the earth, the S-IVB booster rocket was fired just west of the Gilbert Islands in the southwest Pacific, inserting the spacecraft into a lunar orbit. It was night time and a few personnel on Hornet watched an unusual event—a "meteor" ascending into the heavens overhead. Apollo 11 was on its way to the moon. National Aeronautics and Space Administration (NASA) photo, # 6901001. |
Courtesy of NASA, via Bob Fish | |
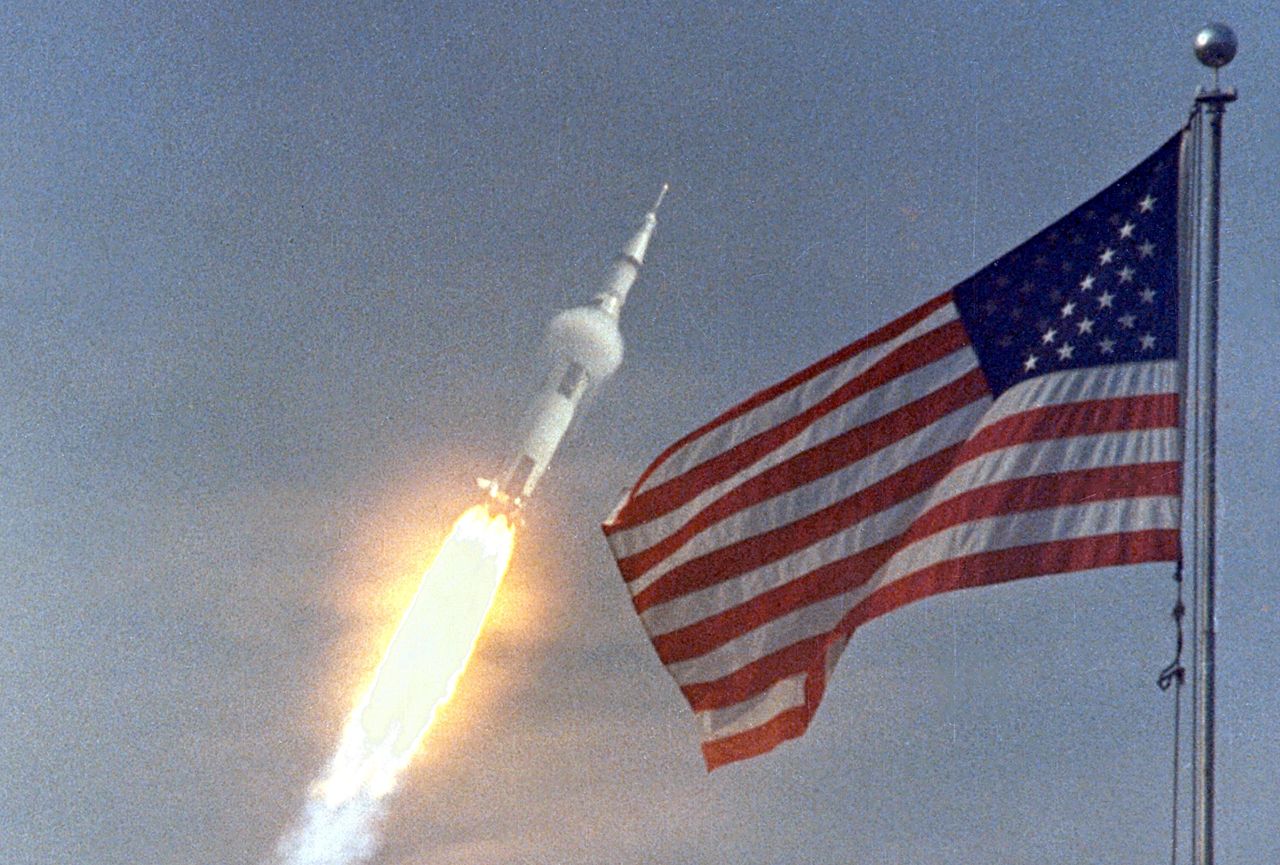 NS-ha-025a |
231k | Apollo 11 after pitchover. Note the condensation cloud that has formed in air expanding aft of the first-stage/second-stage transition. National Aeronautics and Space Administration (NASA) photo, # KSC-69PC-397. |
Courtesy of NASA, via Bob Canchola, BT, USN (Ret.) |
|
 NS-ha-030 |
1006k | During the 8-day Apollo 11 space flight, Hornet conducted 26 Simulated Recovery Exercises (SIMEX). A SIMEX always began with Hornet dropping the NASA boilerplate into the water and steaming a short distance away. Various helicopters, Underwater Demolition Teams (UDT), and crane operations were then practiced to ensure the real recovery would be flawless. In addition to using the ship's Boat and Aircraft (B&A) crane to recover the Command Module (CM), the bright yellow aircraft crash crane (Tilly) was also tested. "Practice" was considered a critical success factor for NASA since no one had ever walked on the moon before. US Navy photo by PH2 Milt Putnam. |
Bob Fish | |
 NS-ha-030a |
891k | During practice recovery, July 1969, Navy UDT swimmers (wearing orange and standing on flotation collar) finish attaching the flotation collar around the NASA boilerplate (a dummy capsule), with USS Hornet in background. US Navy photo by PH2 Milt Putnam, HS-4. |
Bob Canchola, BT, USN (Ret.) | |
 NS-ha-030b |
498k | Simulated Recovery Exercise (SIMEX). This photo makes an interesting comparison to the actual recovery. |
Naval History & Heritage Command,
Dwayne Day |
|
 NS-ha-034 |
439k | A close-up photo of a SIMEX. After the UDT "practice astronauts" had been hoisted into the recovery helicopter, the UDT swim team that stabilized the spacecraft is now preparing the boiler plate to be recovered. The person in the green Biological Isolation Garment (BIG) suit is the UDT decontamination swimmer, LTJG Clancy Hatleberg. At this moment they are waiting for Hornet to pull nearby and crane the capsule out of the water. US Navy photo. |
Bob Fish | |
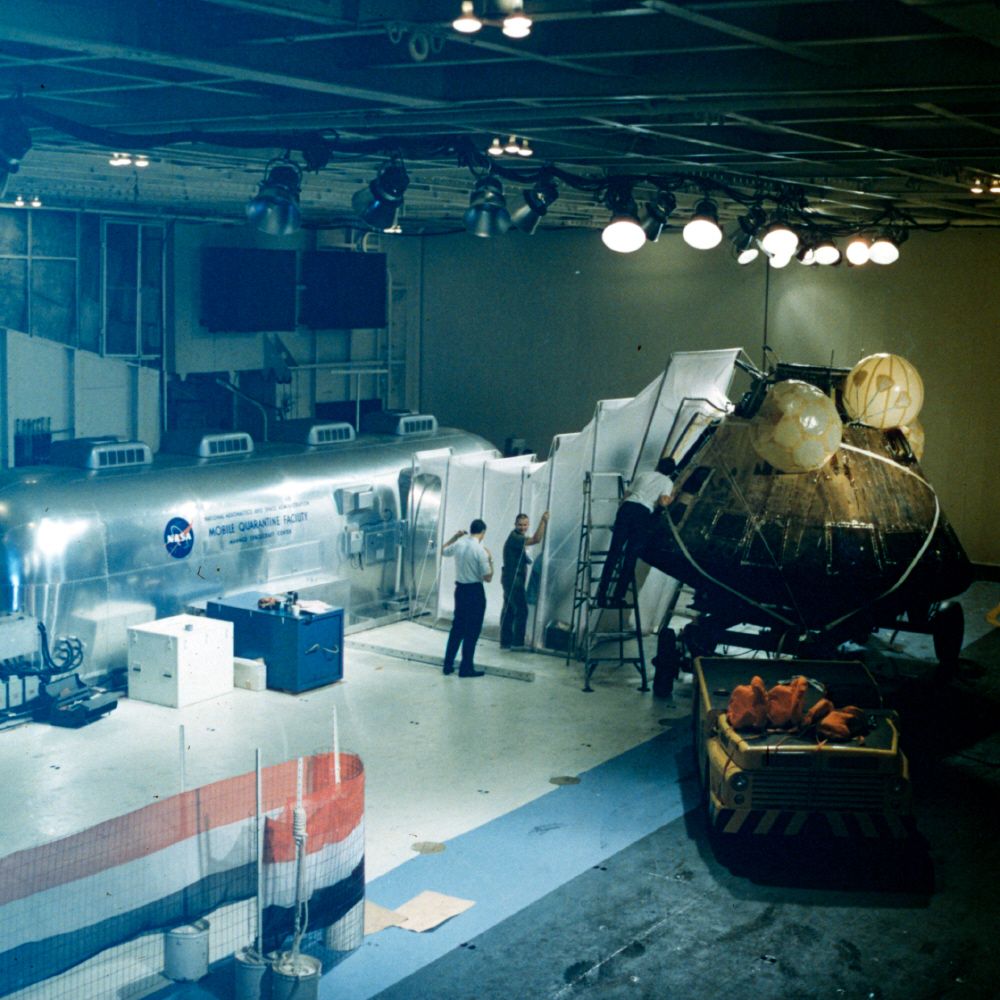
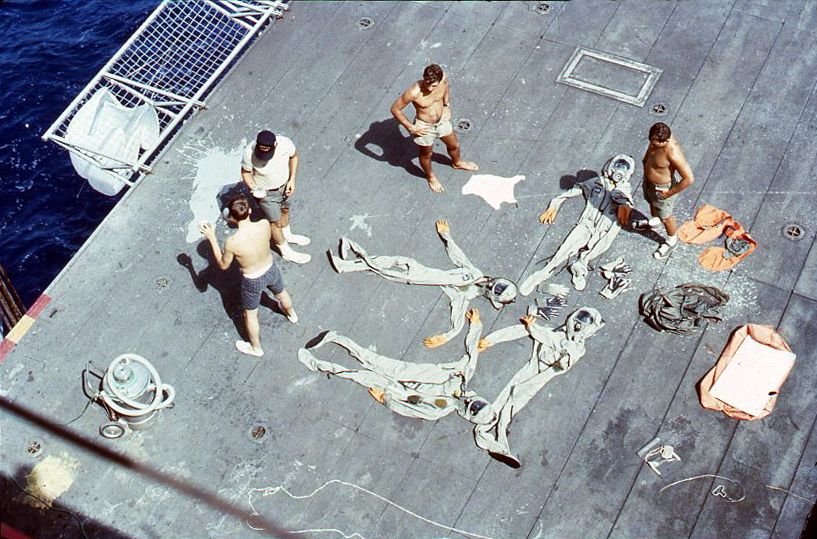 NS-ha-036 |
114k | After a SIMEX, all teams involved had to clean, dry and prepare their equipment for the next practice session. In this case, the UDT-11 swimmers have washed their BIG suits and are drying them on an elevator. They are also discussing the results of the SIMEX with a NASA person. Photo by Don Blair. |
Courtesy of Don Blair, via Bob Fish |
|
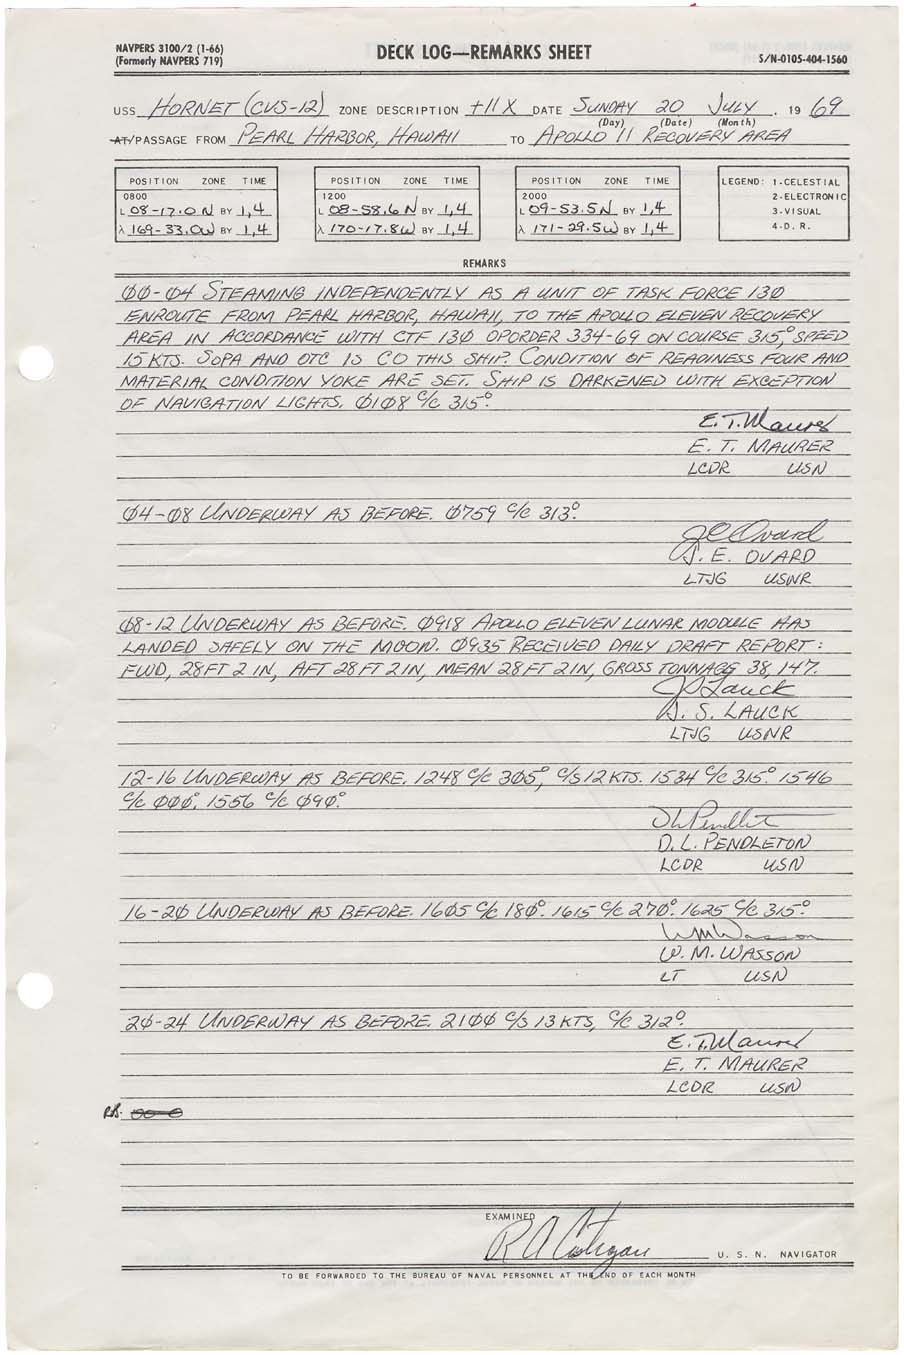 NS-ha-701 |
199k | USS Hornet (CVS-12) Deck Log, 20 July 1969, the day Apollo 11's Lunar Module (LM) Eagle landed on the Moon. |
USN | |
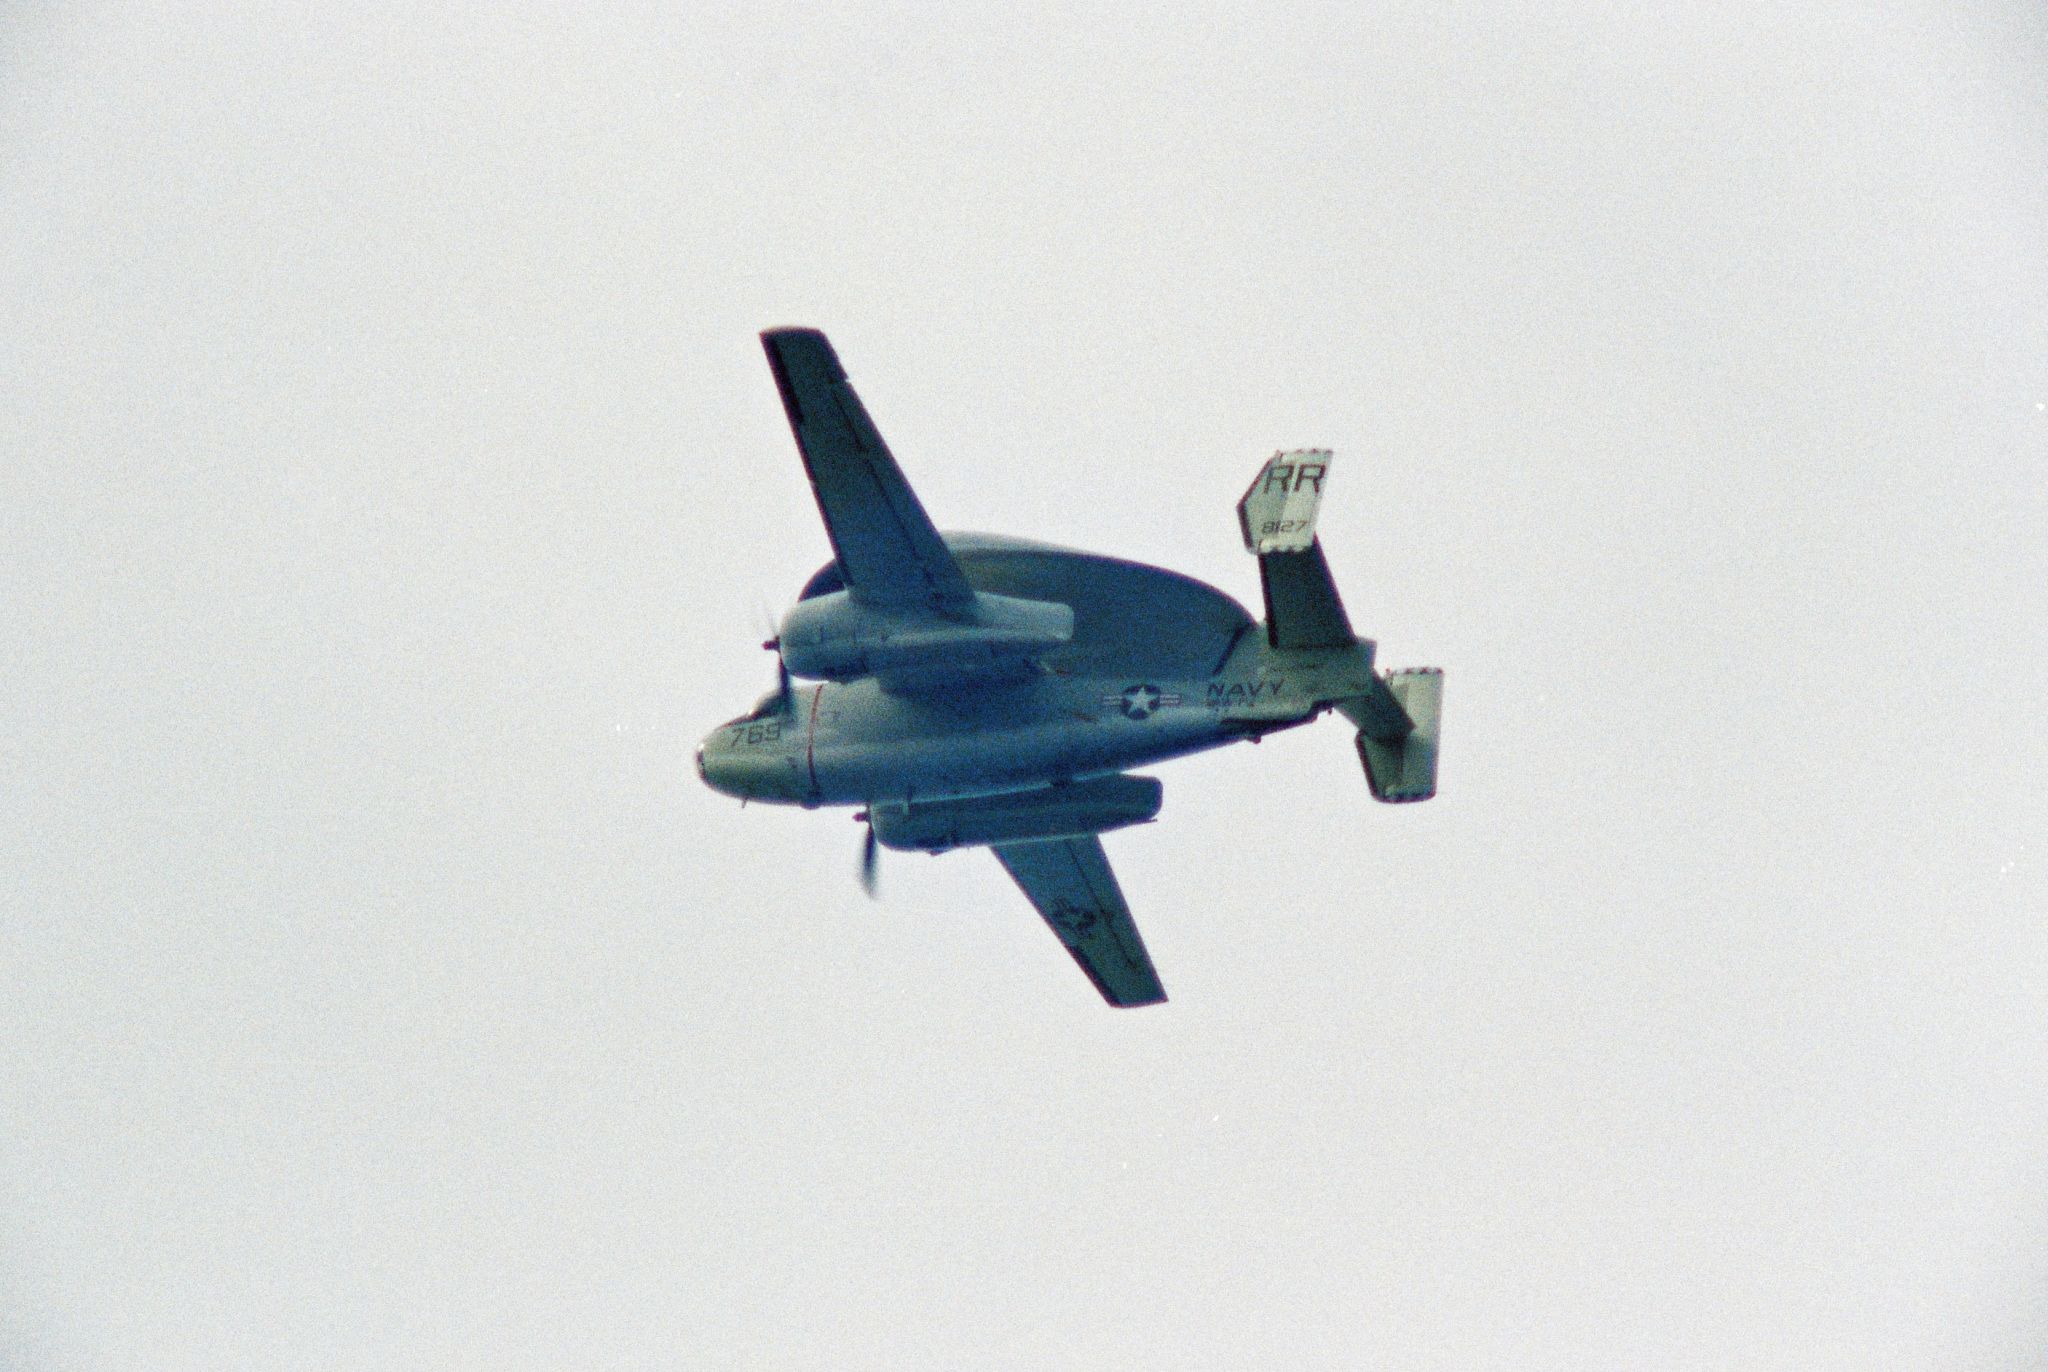 NS-ha-801 |
339k | Carrier Airborne Early Warning Squadron (VAW) 111 Det. 12 "Hunters" was called upon to provide four E-1B Tracers, with crews and support personnel, to assist in the recovery of Apollo 11. The E-1Bs were assigned two separate and distinct missions requiring three out of the four aircraft to be airborne simultaneously. One aircraft, "Airboss One," was assigned as Air On-Scene Commander until such time as the PRS, USS Hornet (CVS-12), could assume those duties. In addition, Airboss One provided radar air control of the recovery, swim and photo helicopters during night and IFR recovery operations. A second E-1B, "Relay One," was assigned to relay communications between the PRS, the command module and the recovery aircraft to CTF-130. The third E-1B, "Airboss Two," served as an airborne standby for either of the other two E-1Bs, as well as being able to assist in search operations if needed. (From VAW-111 Det. 12 Ops Summary.) NS-ha-801: One of the Tracers, BuNo 148127, modex RR769, in flight. NS-ha-801a: BuNo 147211, modex RR011, (Airboss ONE?). |
Bob Fish | |
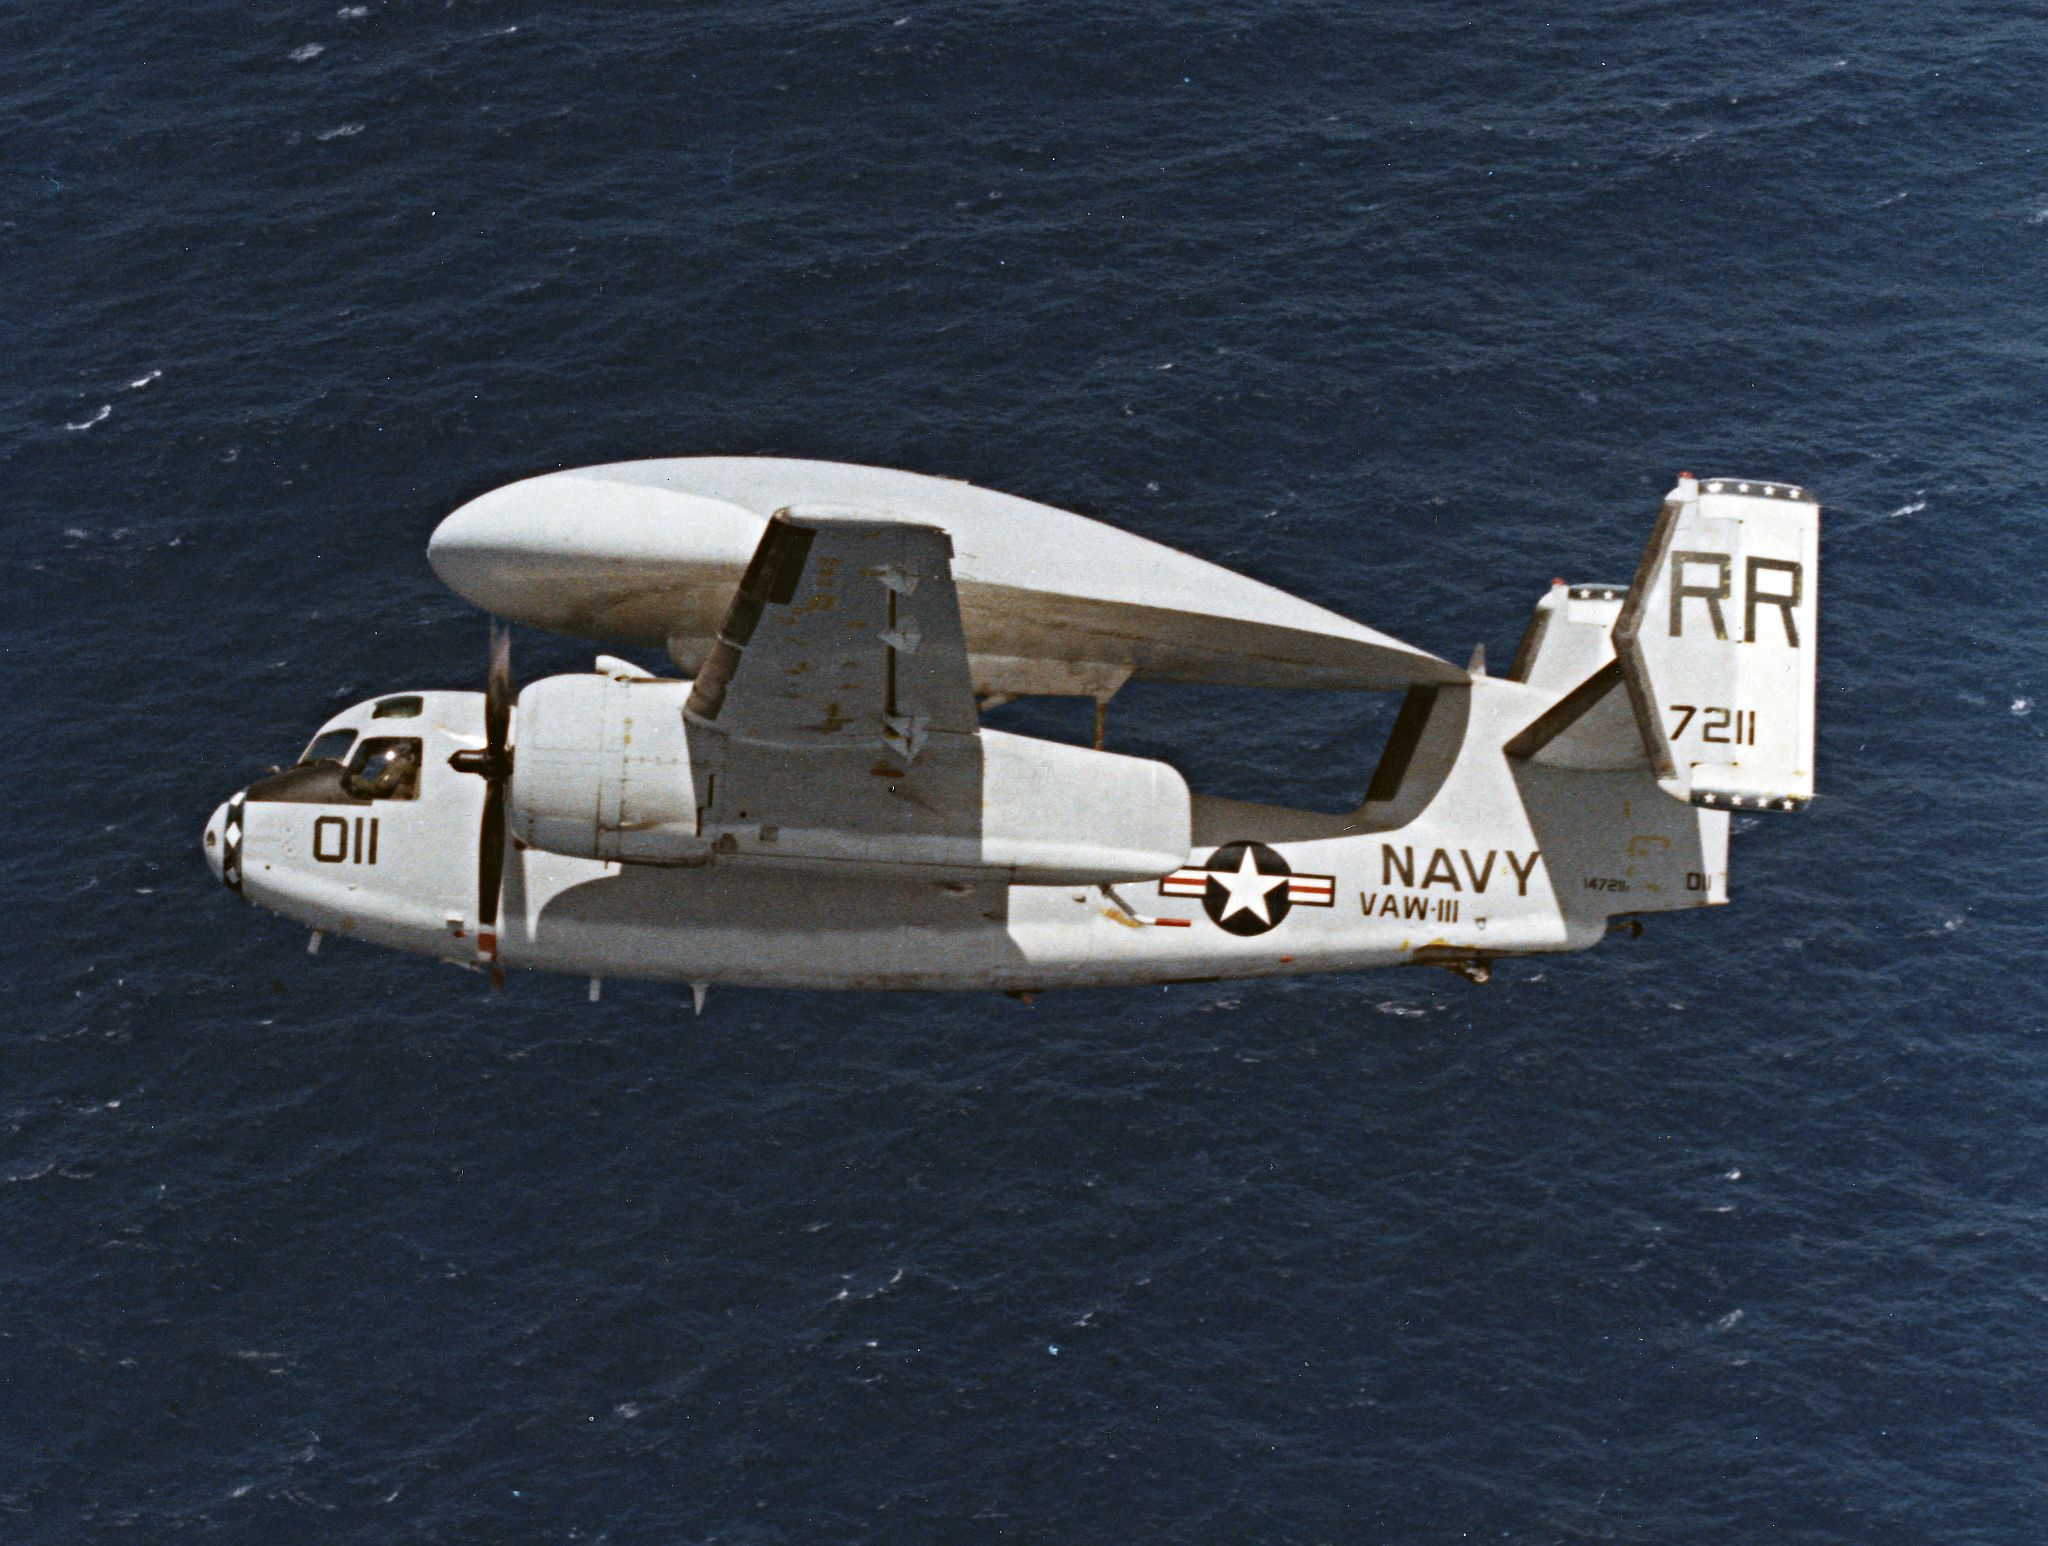 NS-ha-801a |
413k | |||
 NS-ha-802 |
726k | One of the colorful US-2Cs from Fleet Composite Squadron (VC) 1 "Blue Alii"—engine gray, yellow and red. |
Bob Fish | |
 NS-ha-042 |
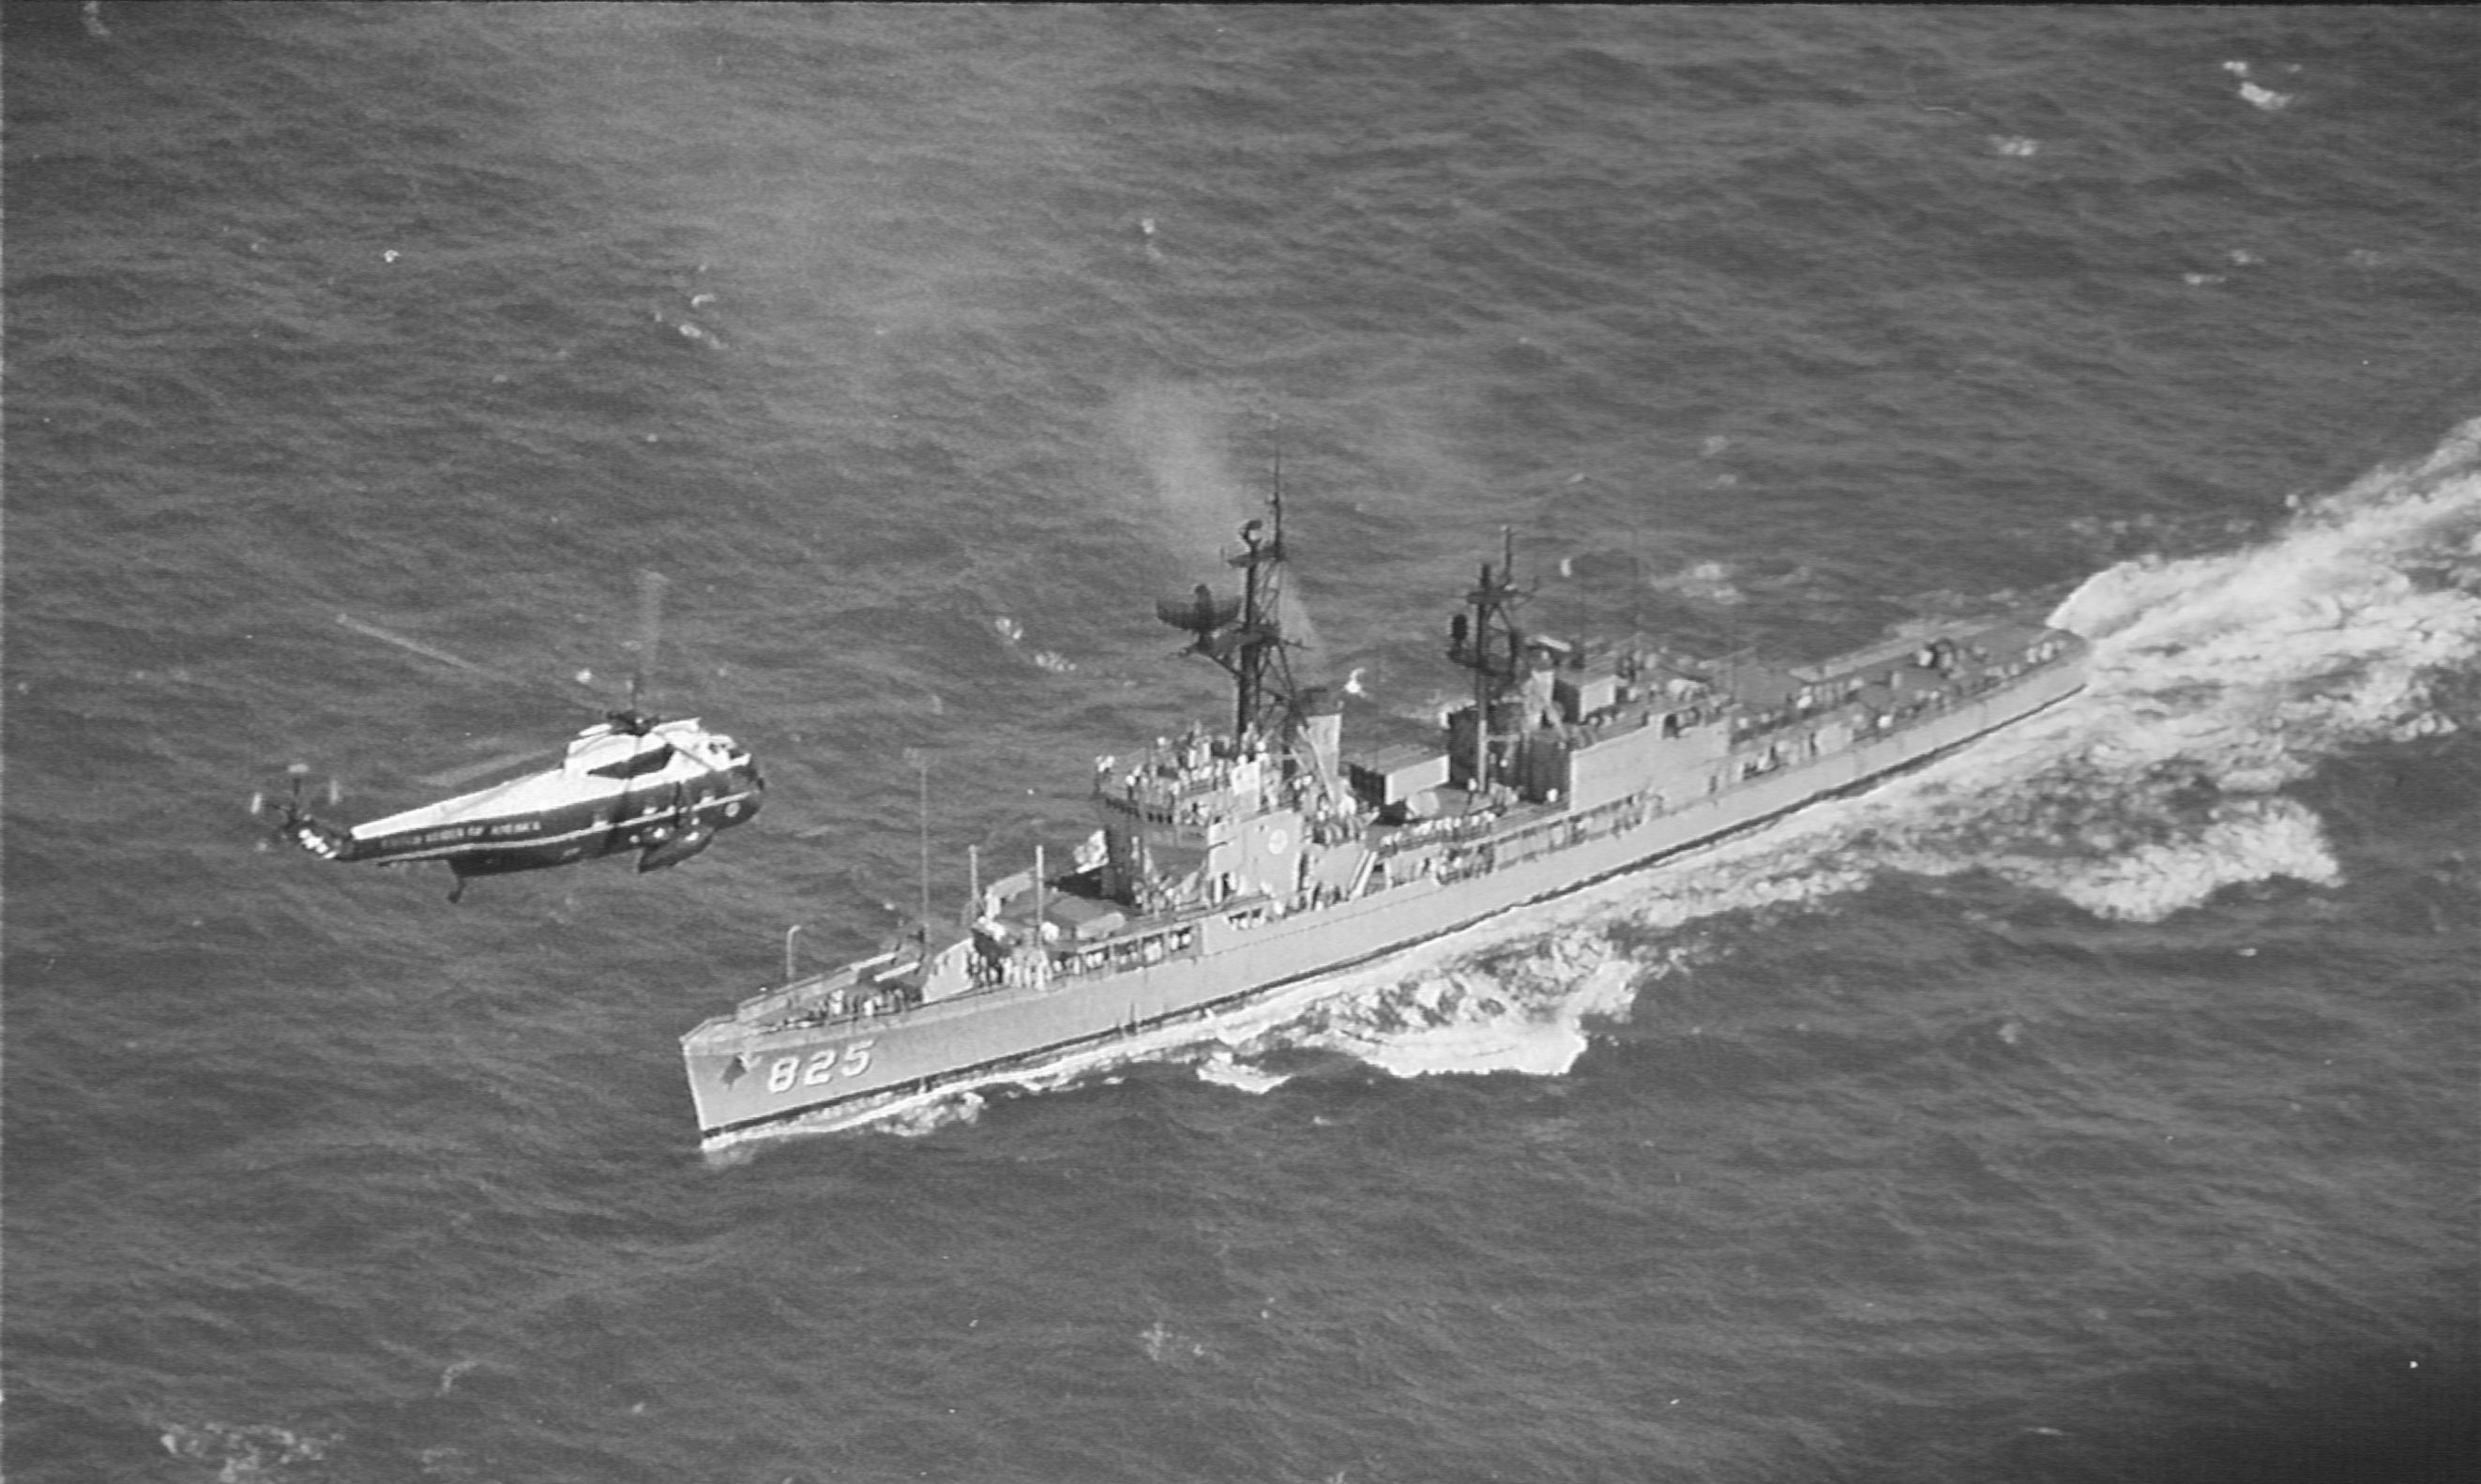
487k | In the early afternoon of 23 July, President Nixon and his party flew by HMX-1 helicopters from Johnston Island to the predicted vicinity of the Apollo 11 splashdown, where a ship awaited their arrival. The destroyer USS Carpenter (DD-825) had been assigned as a navigation aid and rescue ship for the President's flight. As a salute to her crewmen, President Nixon (a naval officer in WWII) had his pilot, Colonel Ed Sample, do a "fly-by" overflight. USMC photo by Dan McDyre. |
Bob Fish | |
 NS-ha-043 |
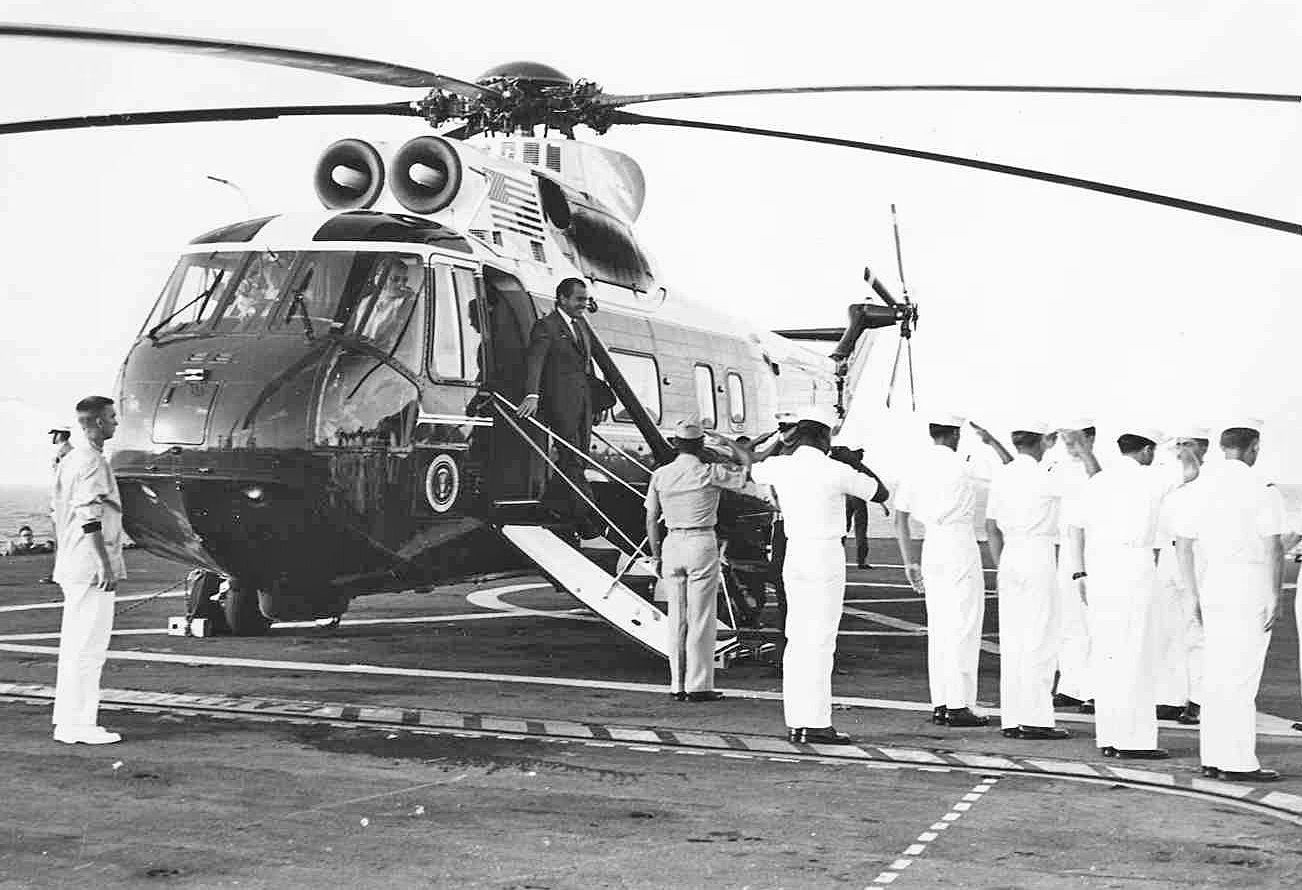
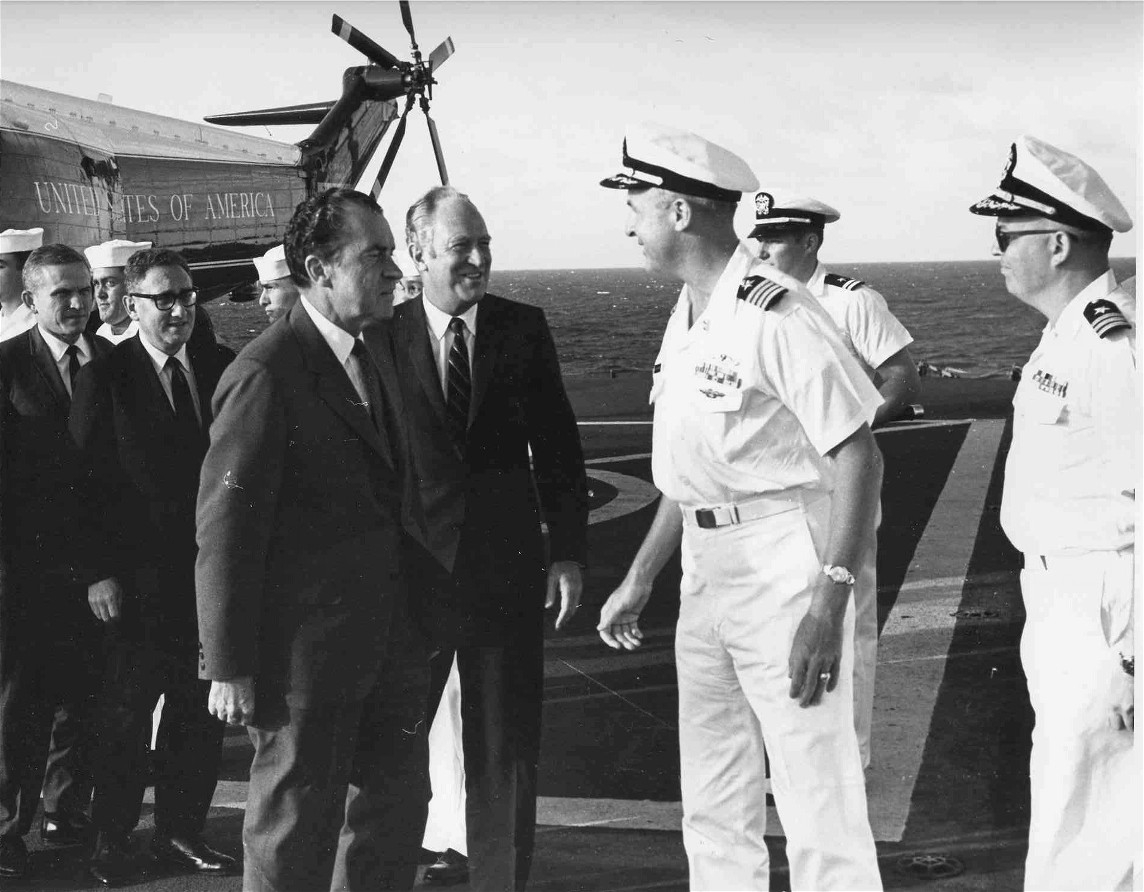
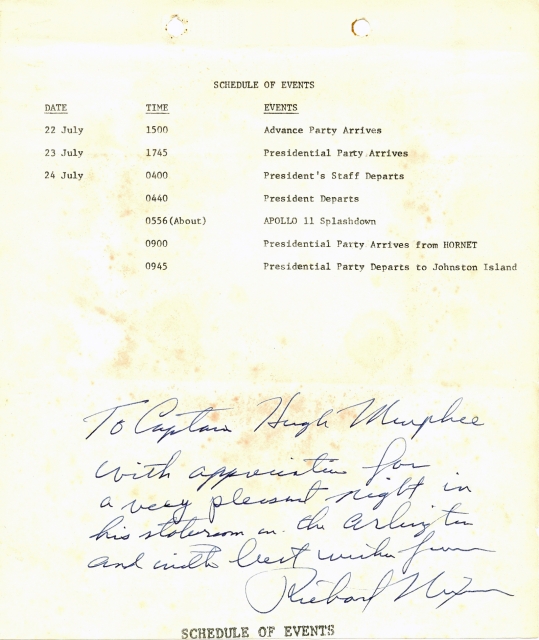
184k | Waiting at the predicted Apollo 11 splashdown location was the major communications relay ship USS Arlington (AGMR-2). She had supported the two previous Apollo lunar flights (8 and 10) and had hosted President Nixon earlier in June for a meeting with Nguyen Van Thieu in Guam. After his helicopter landed on her flight deck, he was welcomed aboard by the ship's CO, CAPT Hugh Murphree. The president spent the night on Arlington and left at 0445 on 24 July, helicoptering a few miles to Hornet to participate in the recovery activities. US Navy photos. |
Bob Fish | |
 NS-ha-561 |
331k | |||
 NS-ha-562 |
226k | |||
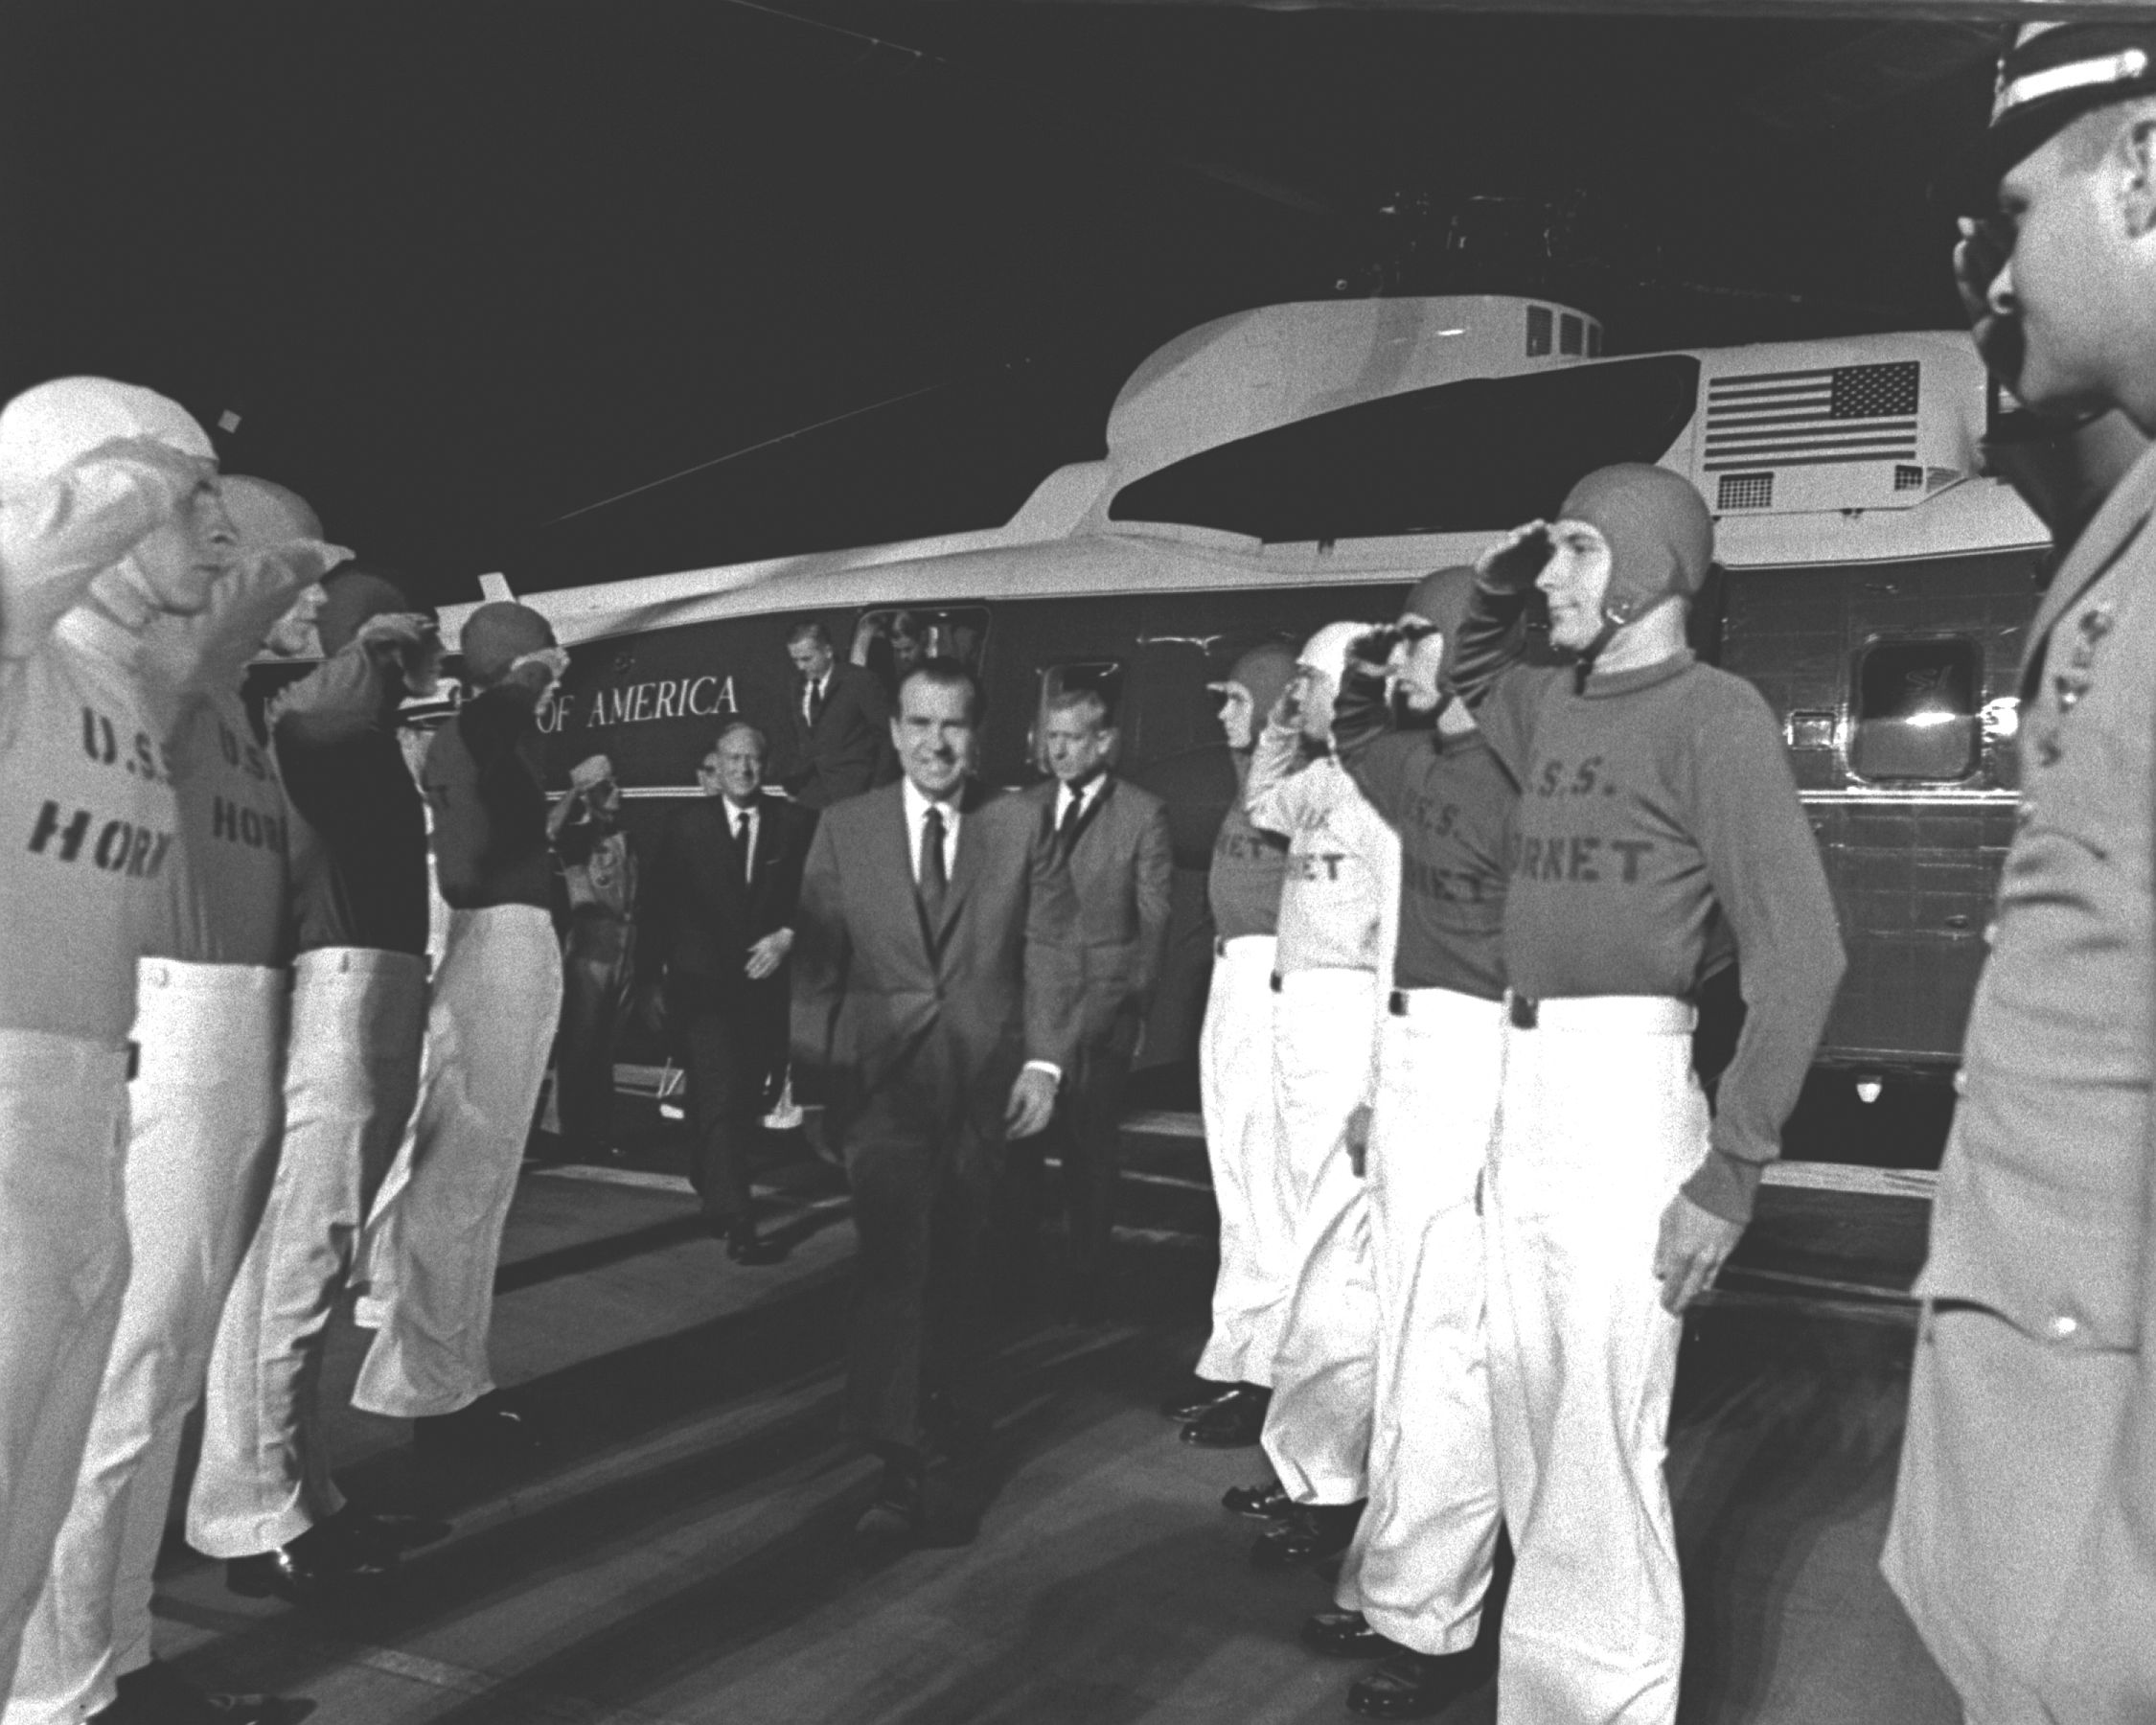 NS-ha-045 |
404k | President Richard Nixon arrived aboard USS Hornet (CVS-12) at 0512 on 24 July 1969. He and his party were honored with a traditional "side boy" salute before being greeted by Commander In Chief, Pacific (CINCPAC) Admiral John S. McCain, Jr., and Hornet Commanding Officer CAPT Carl J. Seiberlich. National Aeronautics and Space Administration (NASA) photo, # 6900597. |
Courtesy of NASA, via Bob Fish | |
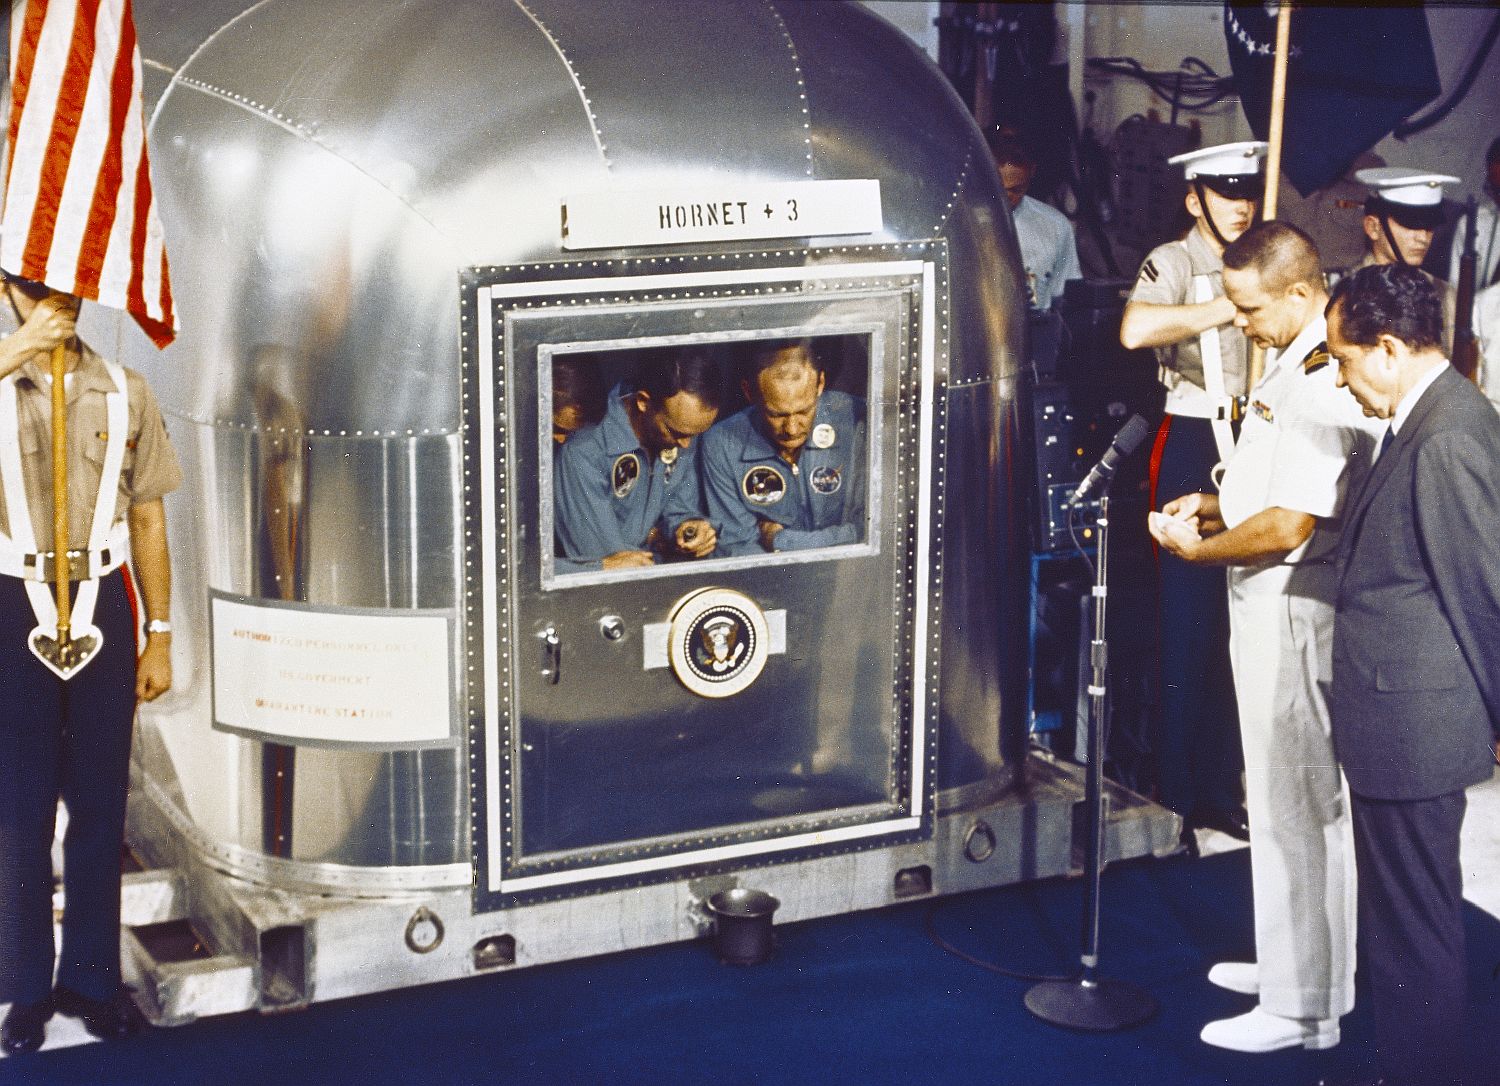
 NS-ha-046 |
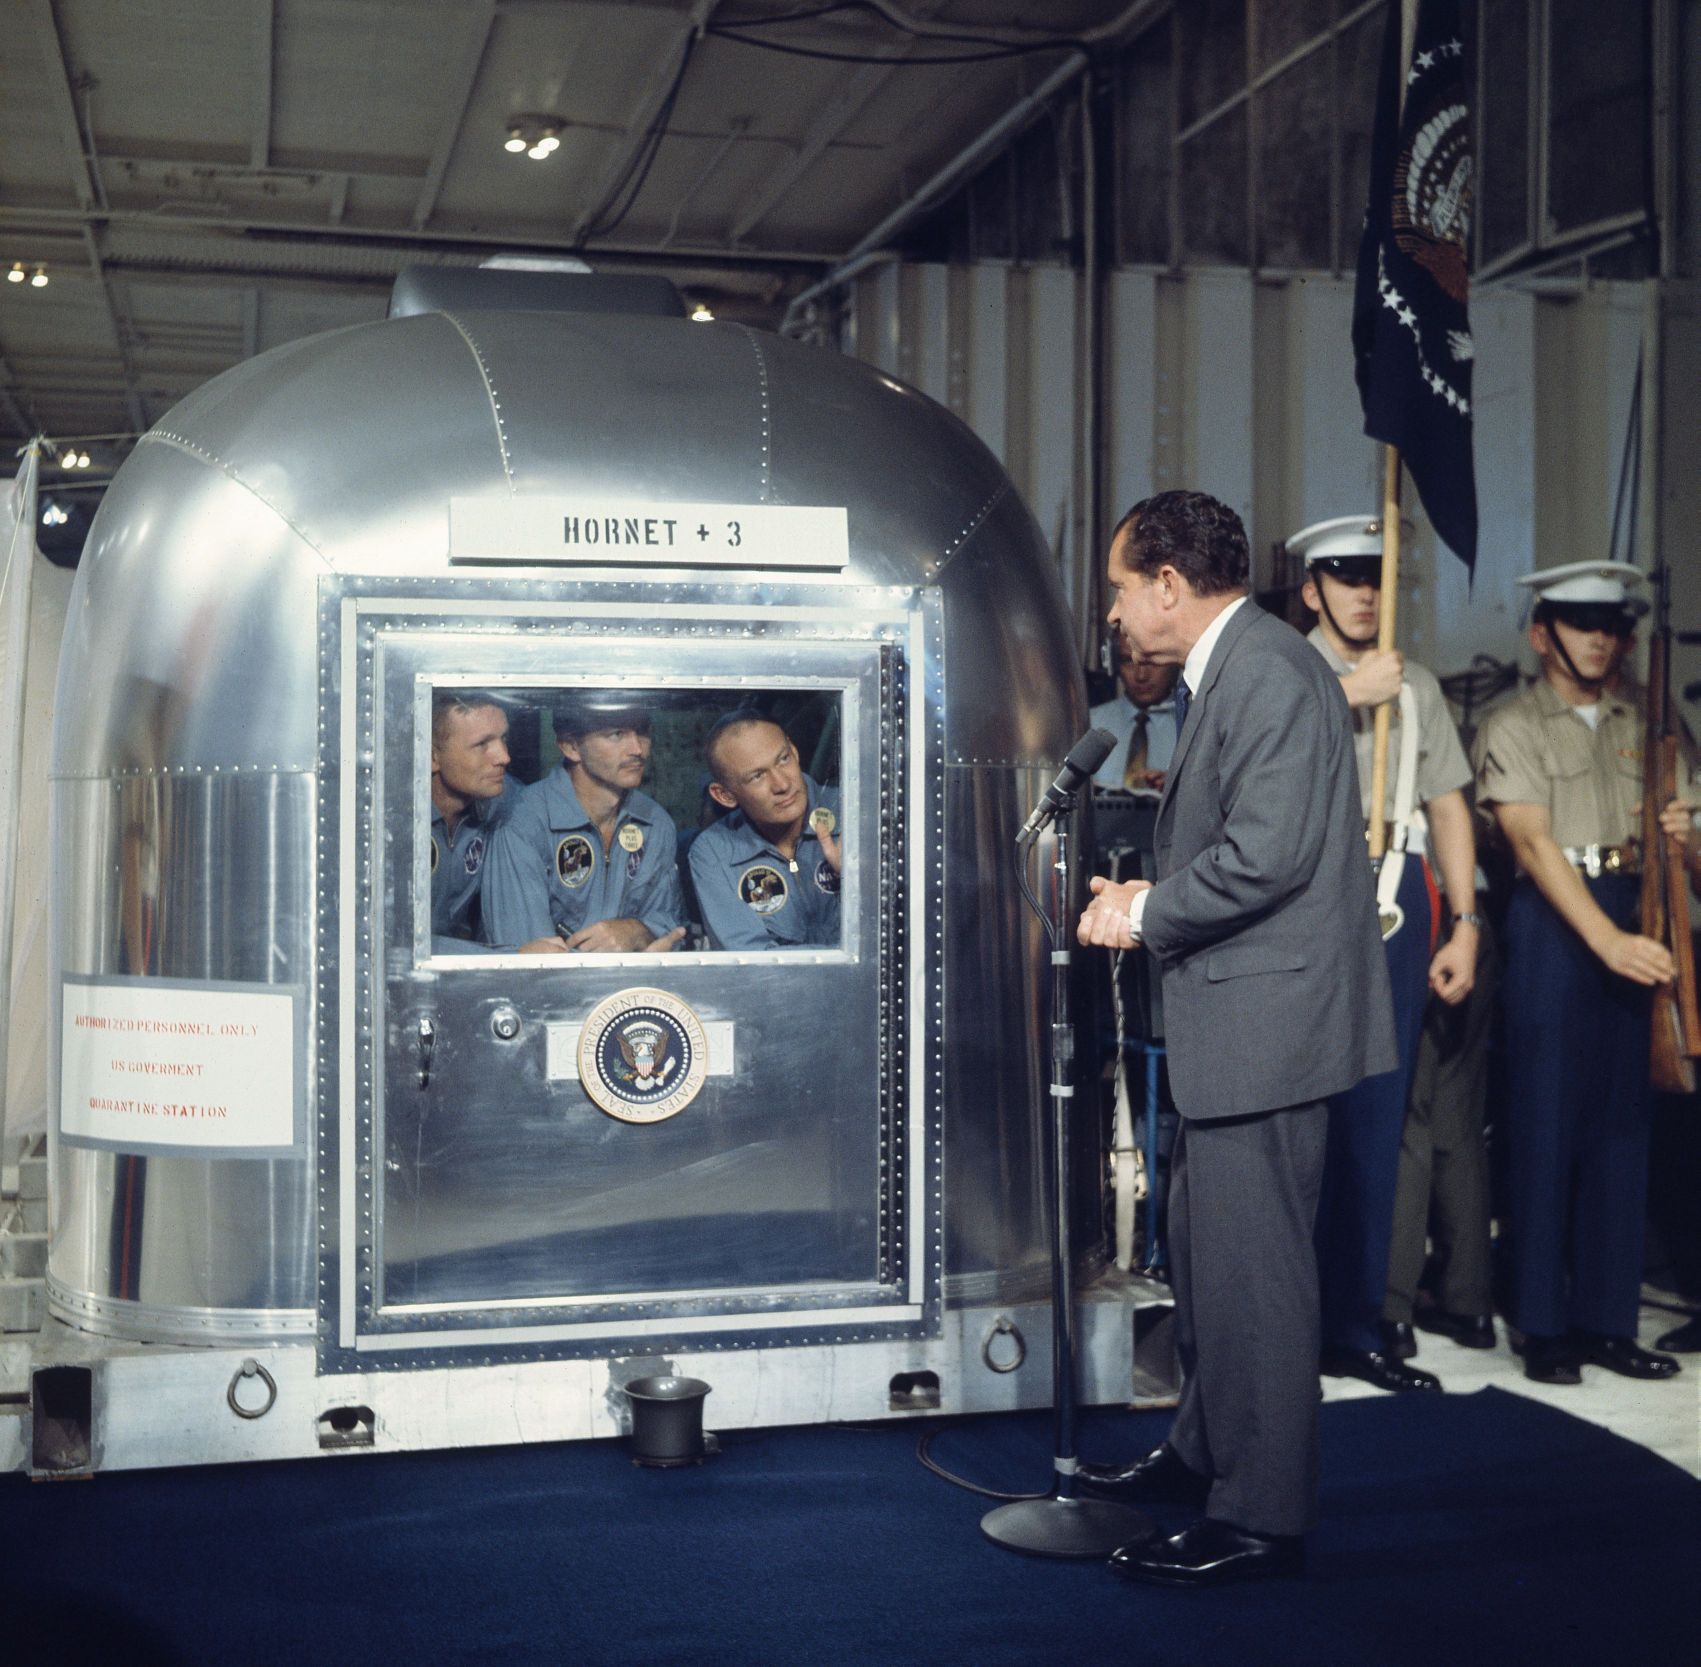
139k | Twenty minutes before the splashdown of Apollo 11, NASA Quarantine Manager John Stonesifer briefed President Nixon, ADM McCain and LCDR Charles B. Larson about the special quarantine equipment designed to provide biological isolation of the astronauts who may be potentially carrying moon germs. They are standing in front of the NASA Mobile Quarantine Facility (MQF). Of note, LCDR Larson was Nixon's Naval Aide at this time and arranged the complex trip to the recovery site. US Navy photo by PHCS Robert Lawson. |
Bob Fish | |
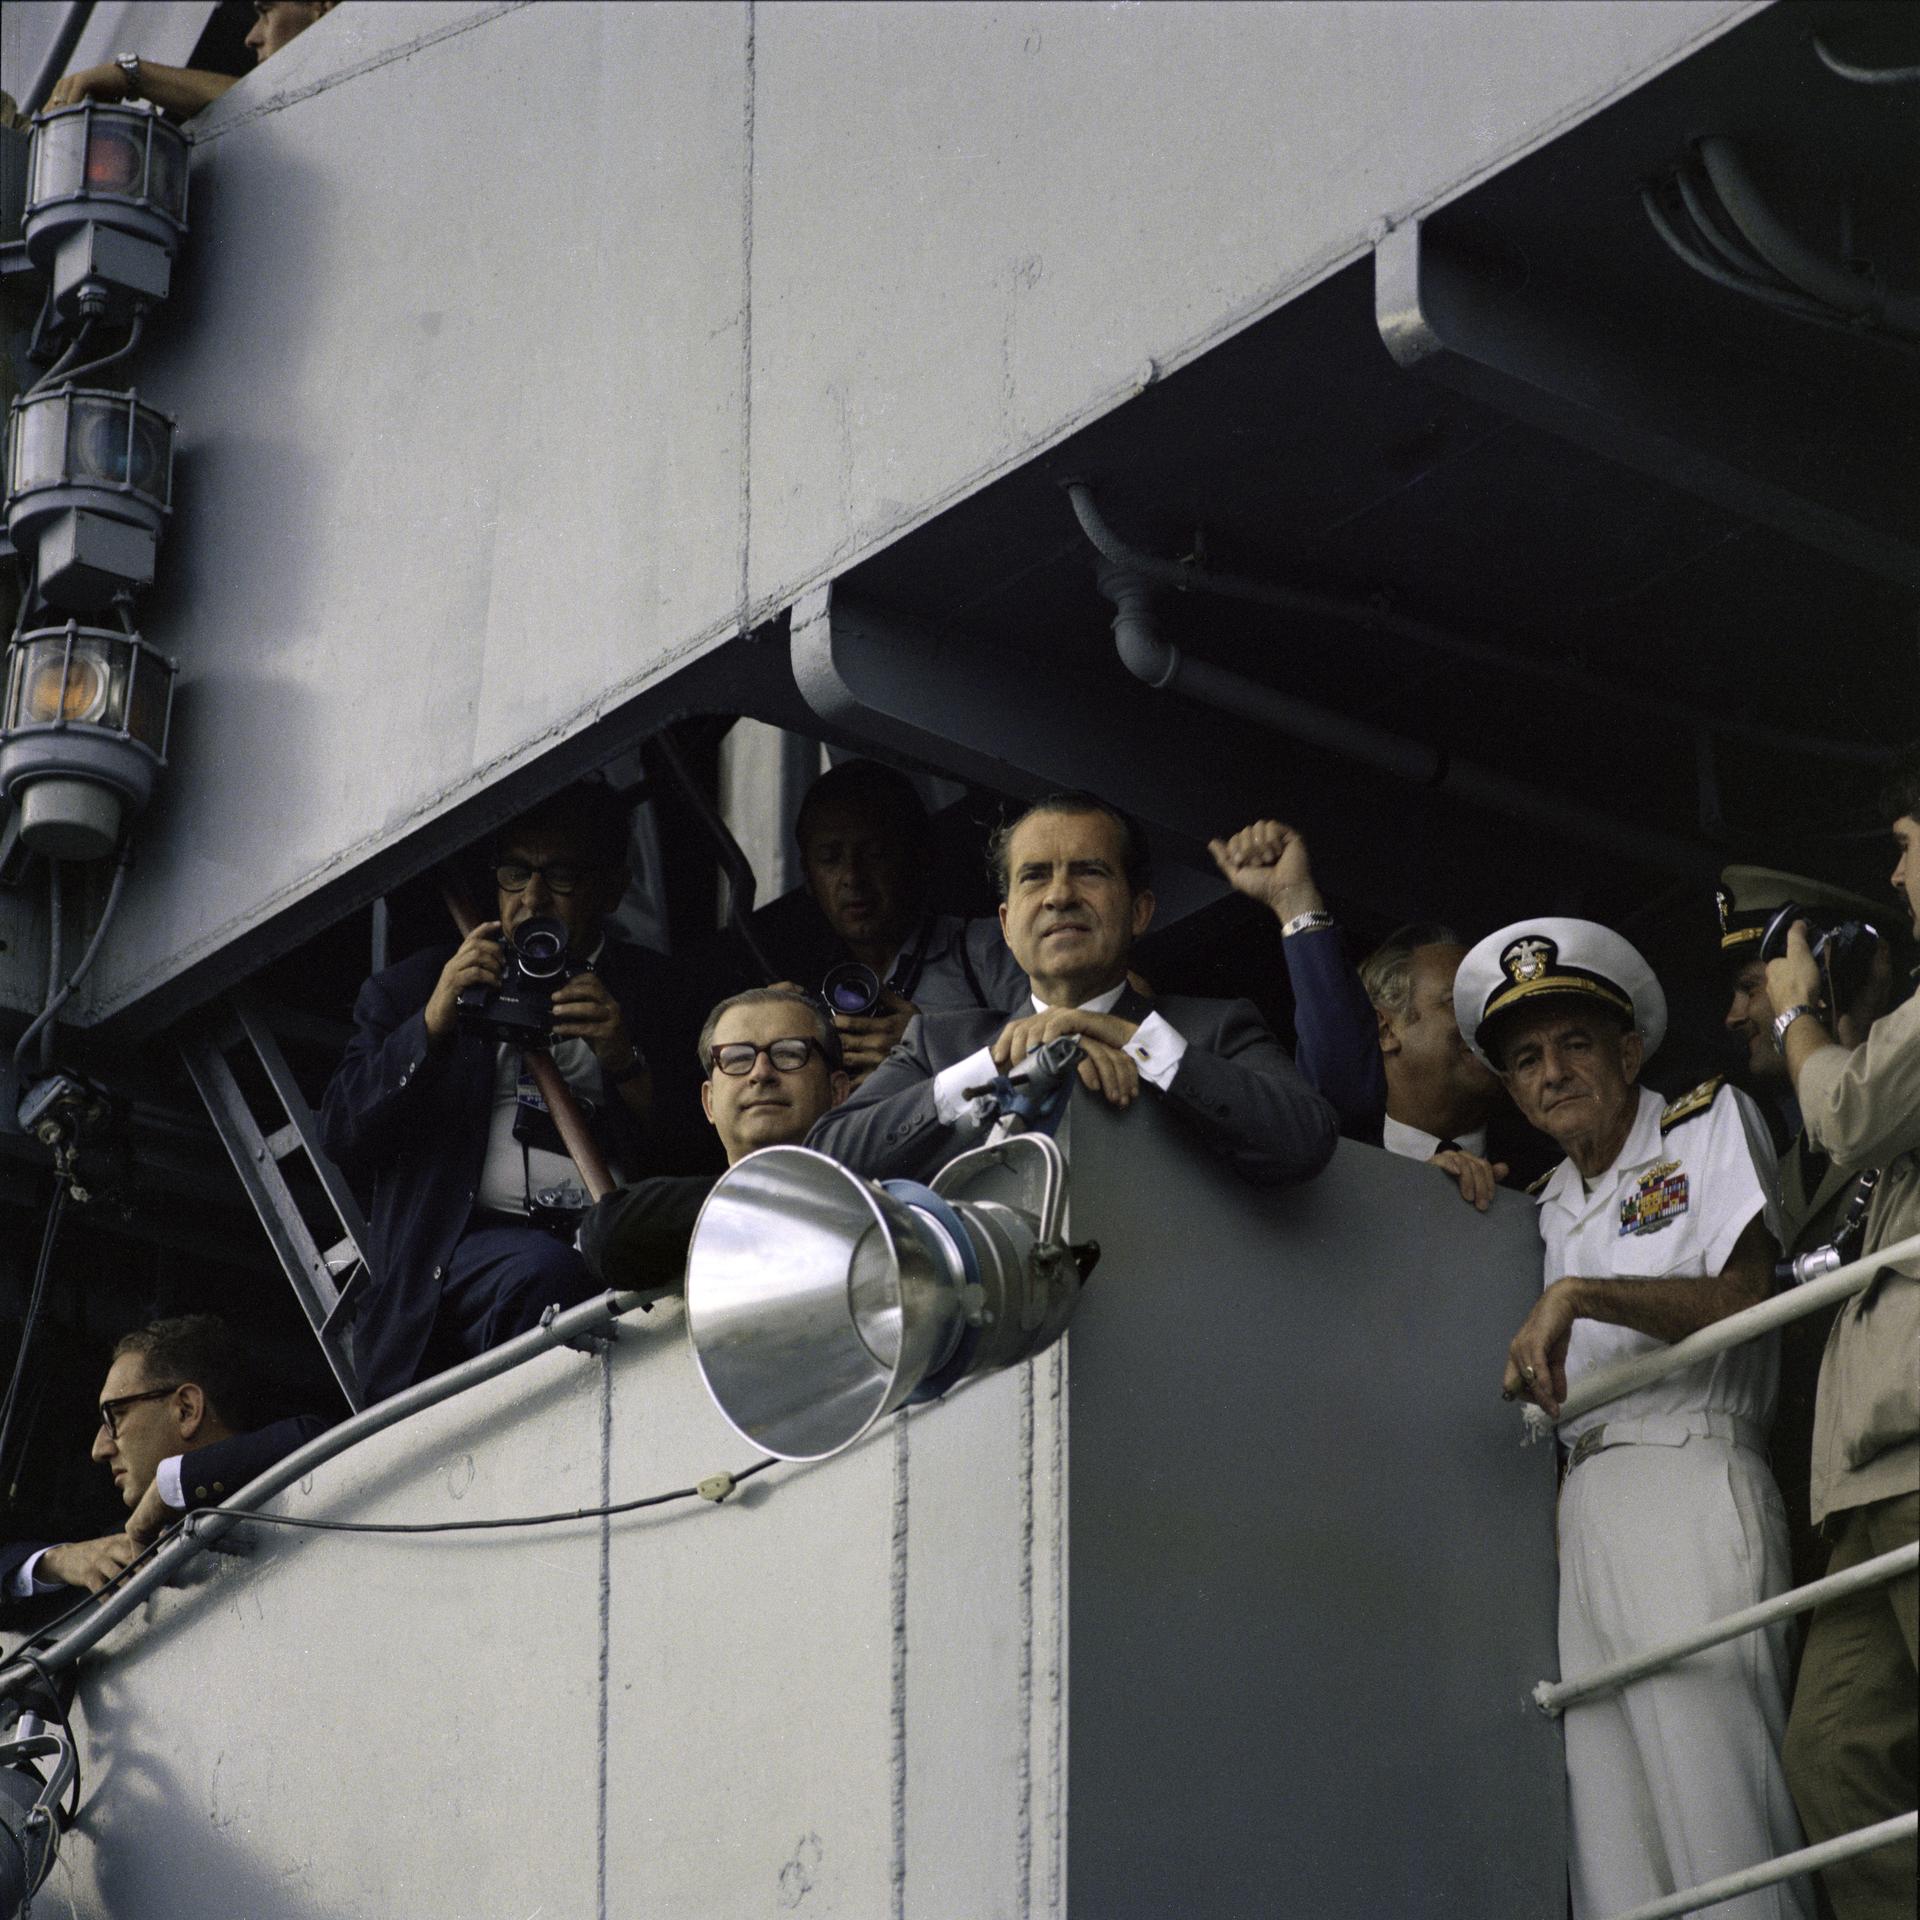
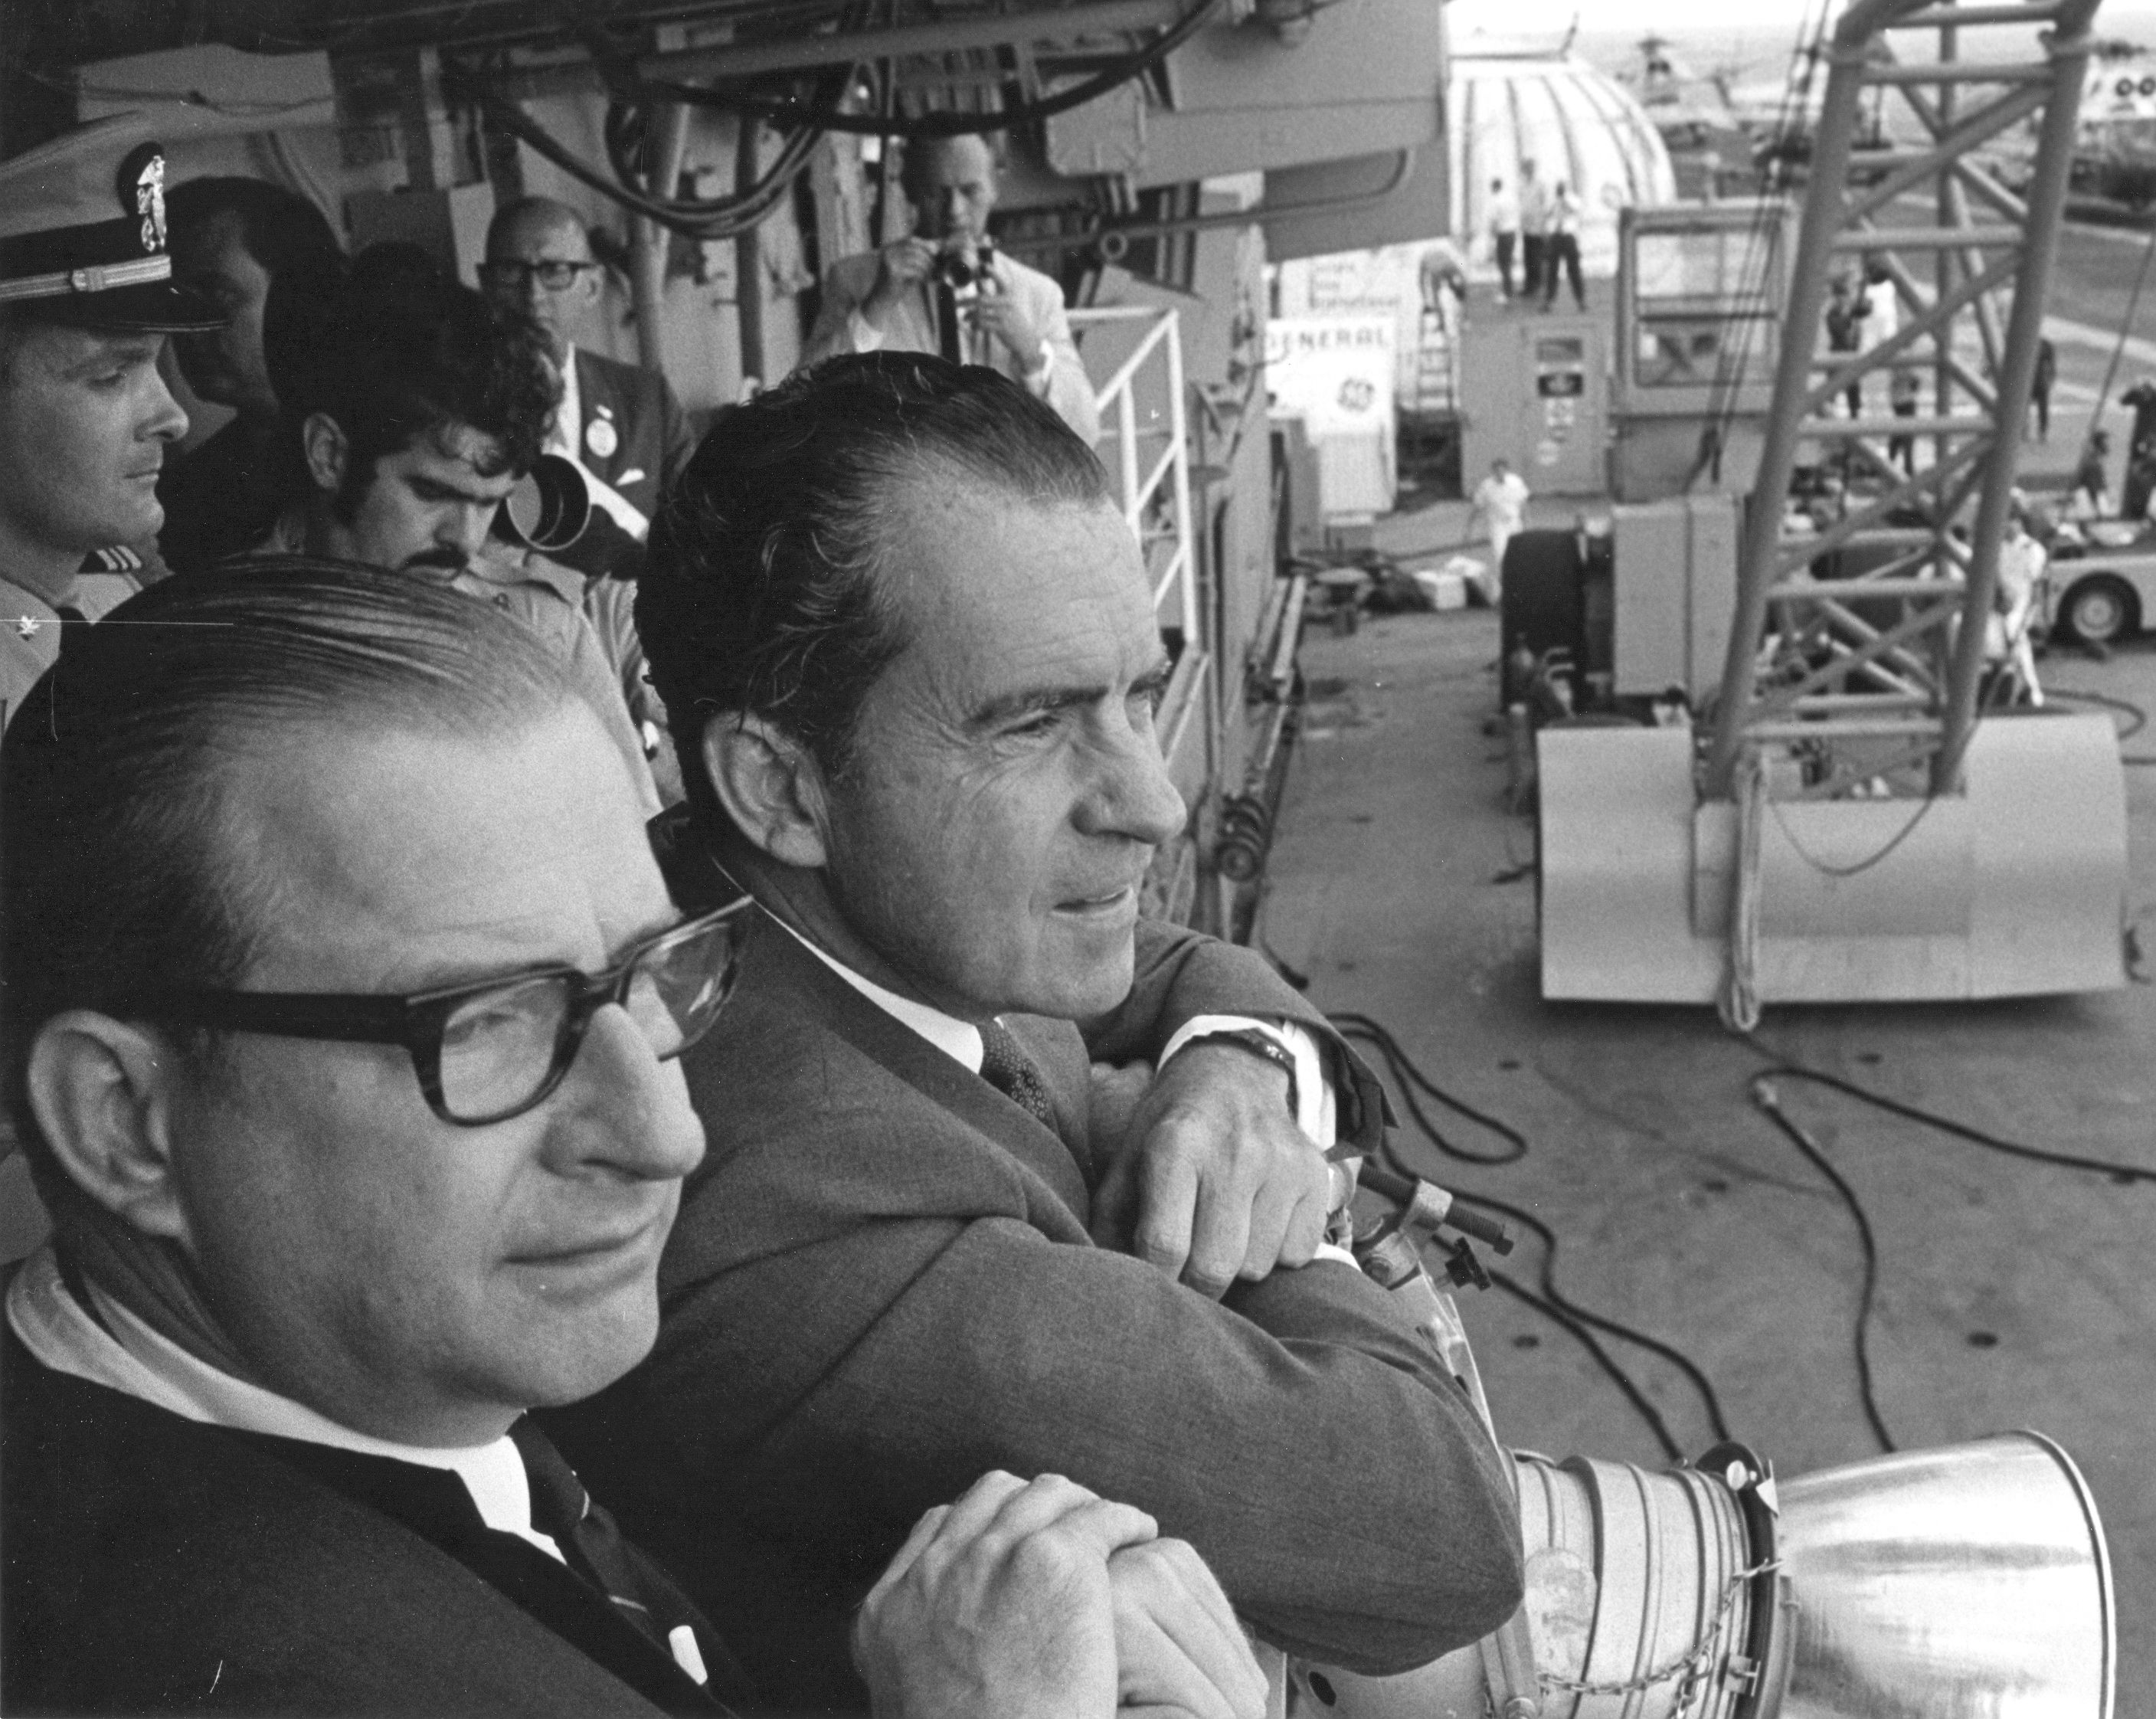
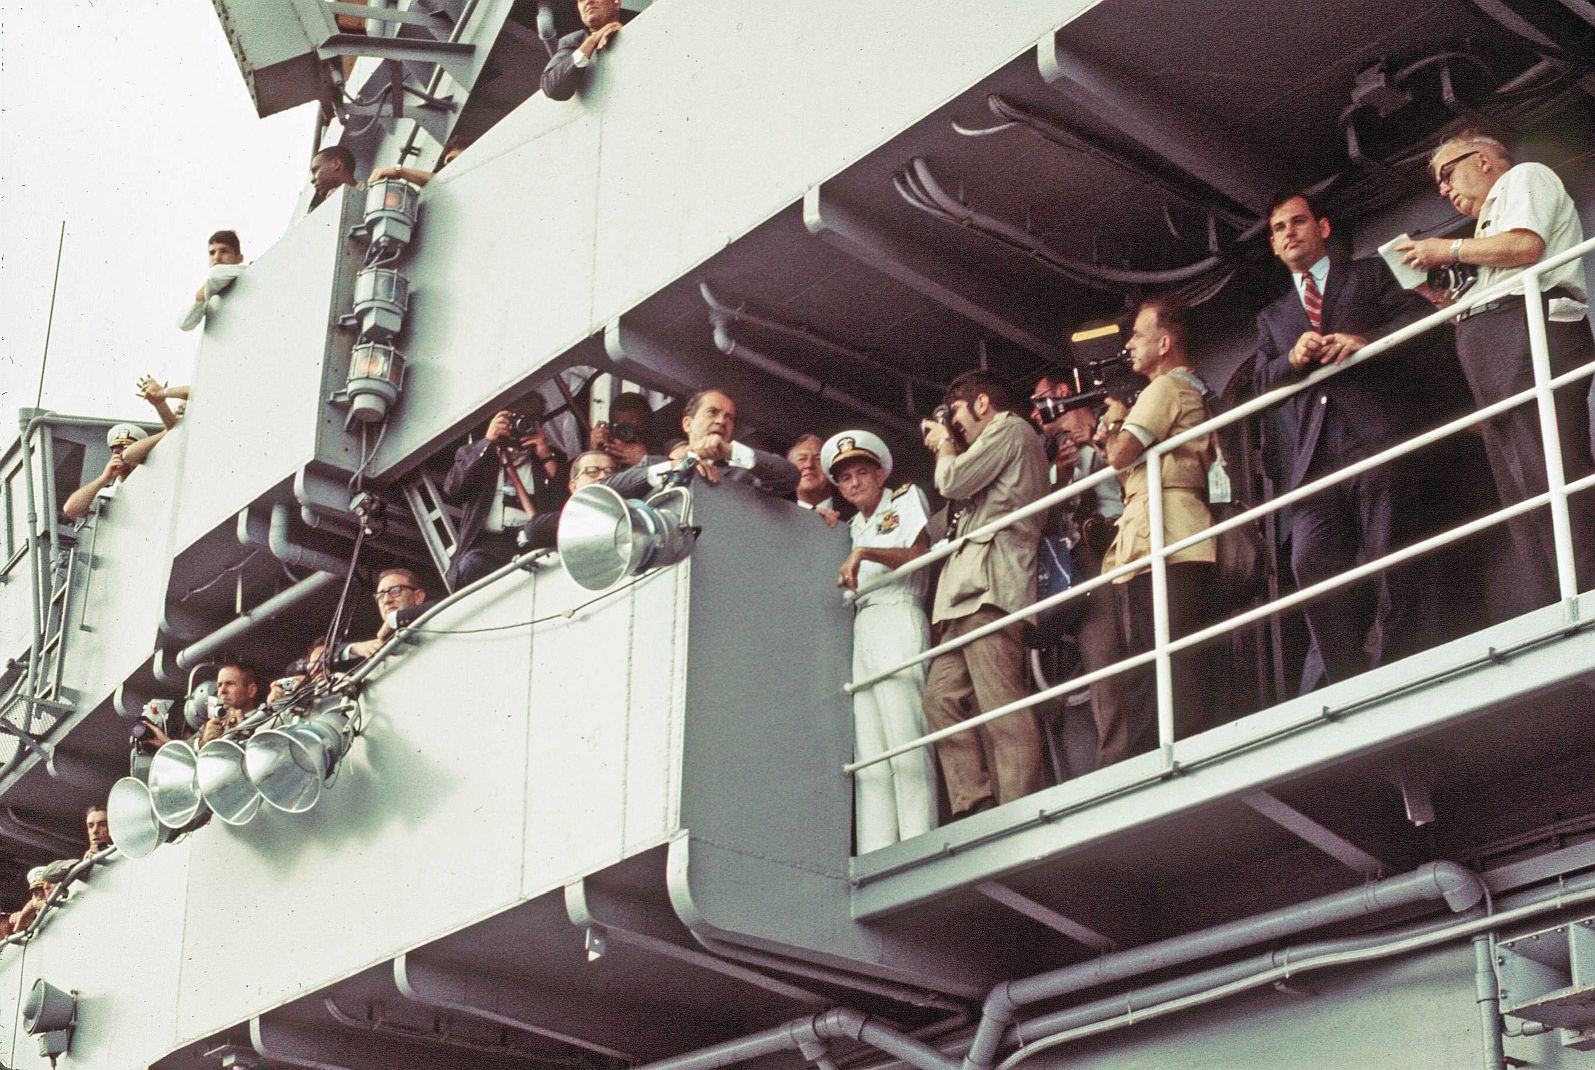 NS-ha-047 |
376k | President Nixon spent 15 minutes on the Flag Bridge, candidly chatting with members of the media and various ship's crewmen, thoroughly enjoying the moment. At 0544, the sonic boom of the spacecraft dropping below the sound barrier alerted the ship to its impending arrival. The president watched the following astronaut recovery activities from this spot. History buffs should be able to identify Harry R. Haldeman, Assistant to the President and (White House) Chief of Staff; Henry A. Kissinger, Assistant to the President for National Security Affairs; Richard M. Nixon, President of the United States; Admiral John S. McCain, Jr., Commander-in-Chief, US Pacific Command; and Ron Ziegler, White House Press Secretary. US Navy photo. |
Bob Fish | |
 NS-ha-047d |
397k | Bob Canchola, BT, USN (Ret.) | ||
 NS-ha-047c |
842k | President Richard M. Nixon and Dr. Thomas O. Paine, NASA Administrator, watch Apollo 11 astronauts Neil A. Armstrong, Michael Collins and Edwin "Buzz" Aldrin Jr., walk from the recovery helicopter to the Mobile Quarantine Facility aboard USS Hornet (CVS-12). The President later congratulated the astronauts by microphone, speaking through a window of the quarantine trailer. National Aeronautics and Space Administration (NASA) photo, # 108-KSC-69P-662. |
Bob Canchola, BT, USN (Ret.) | |
 NS-ha-047a |
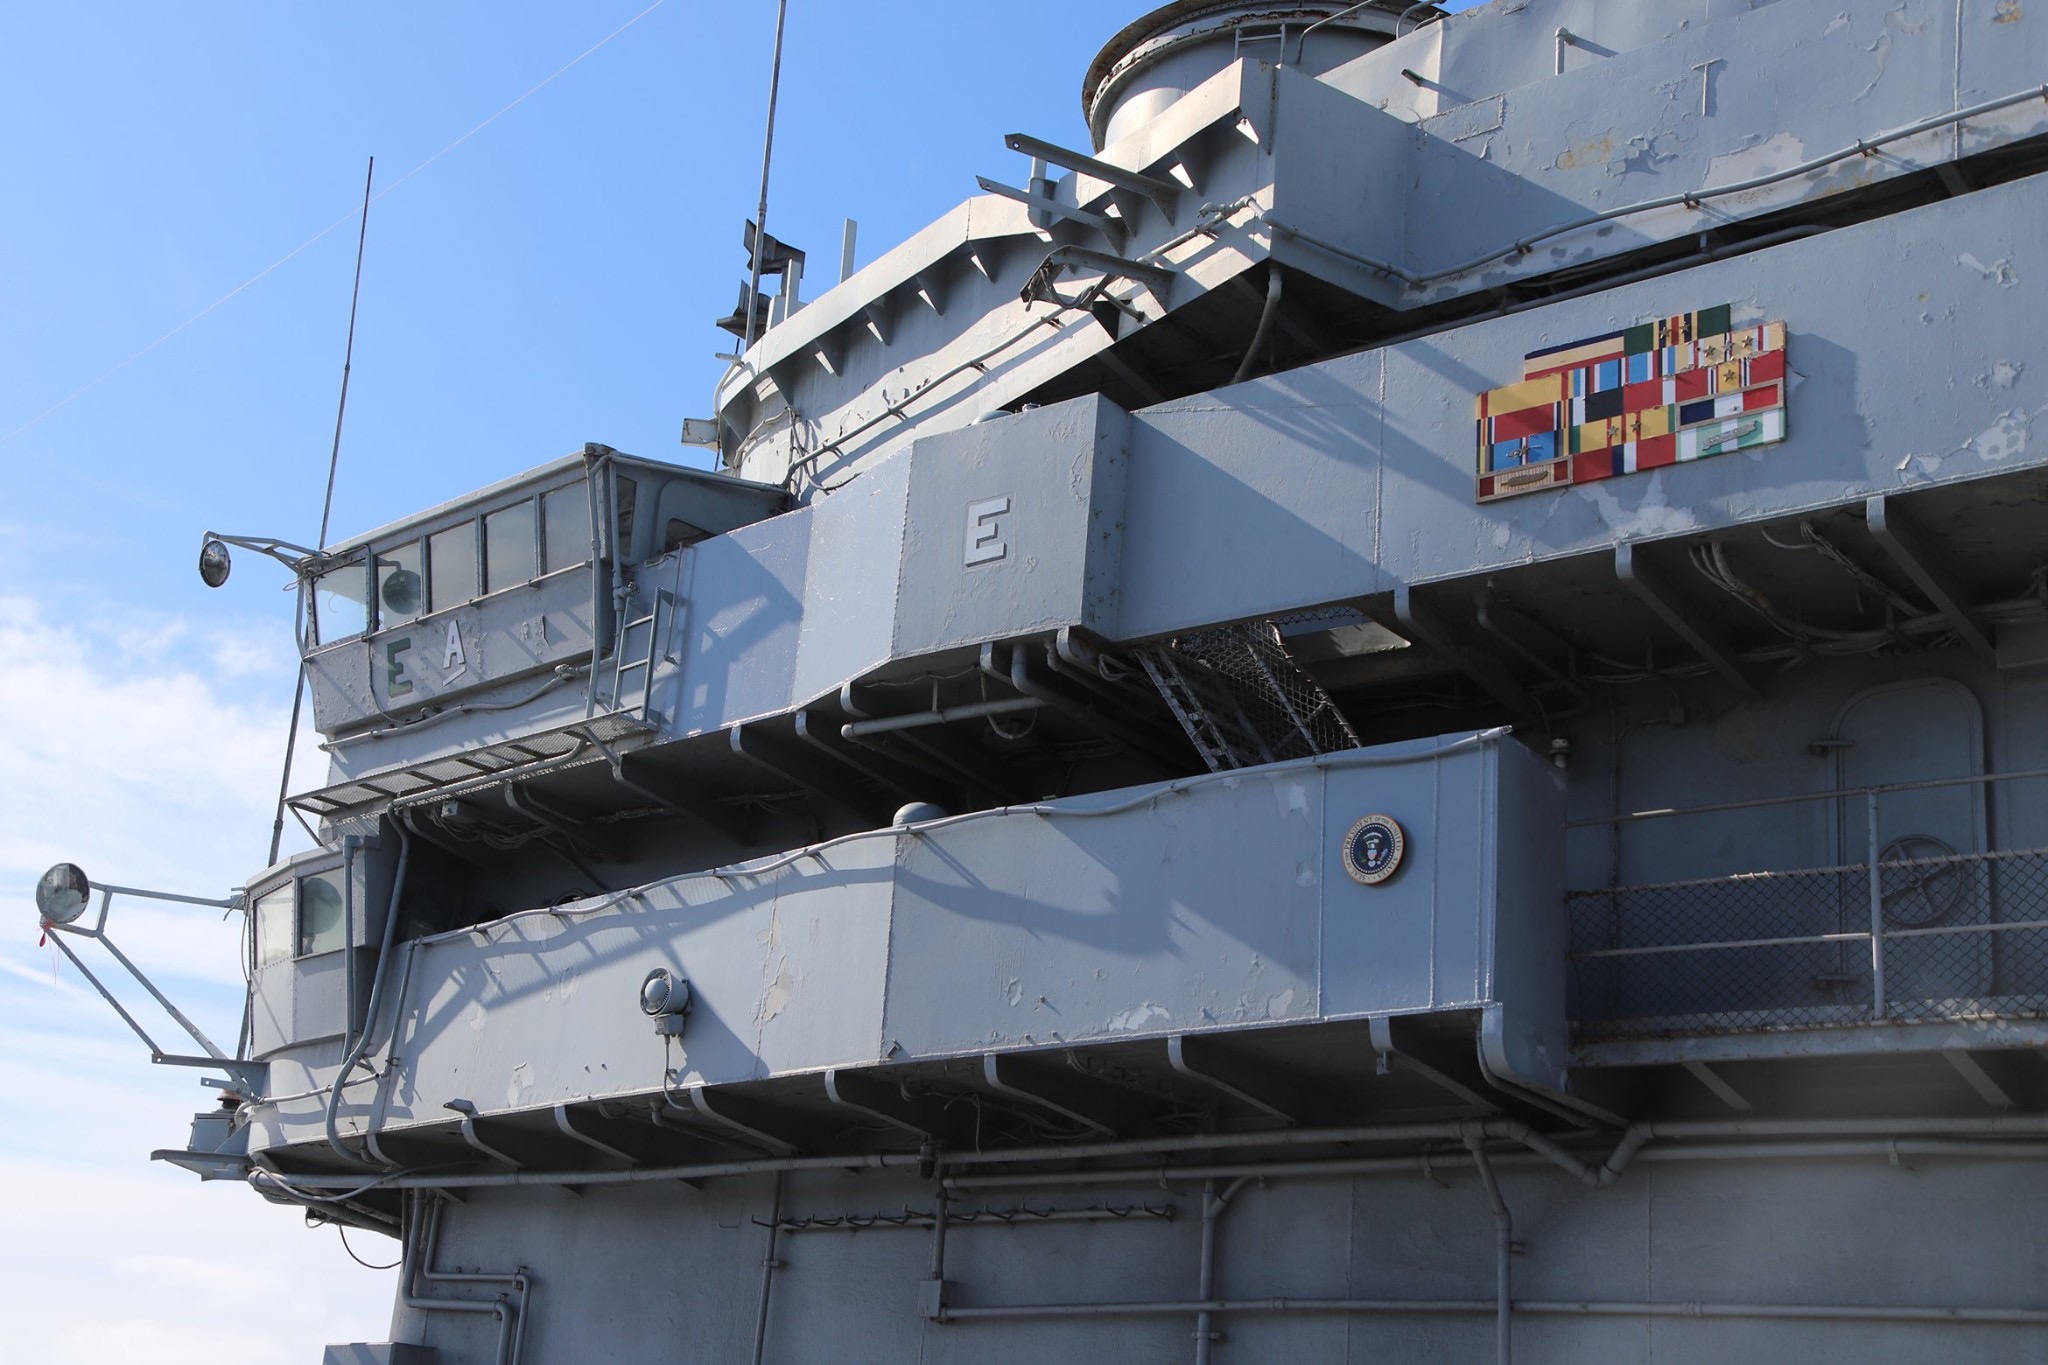
448k | To celebrate the 50th Anniversary of Apollo 11 and the recovery of the crew and command module by USS Hornet (CVS-12), a new Presidential Seal was placed on the railing where President Richard Nixon watched the recovery on 24 July 1969. |
USS Hornet Sea, Air & Space Museum, via Yu Chu | |
 NS-ha-047b |
316k | |||
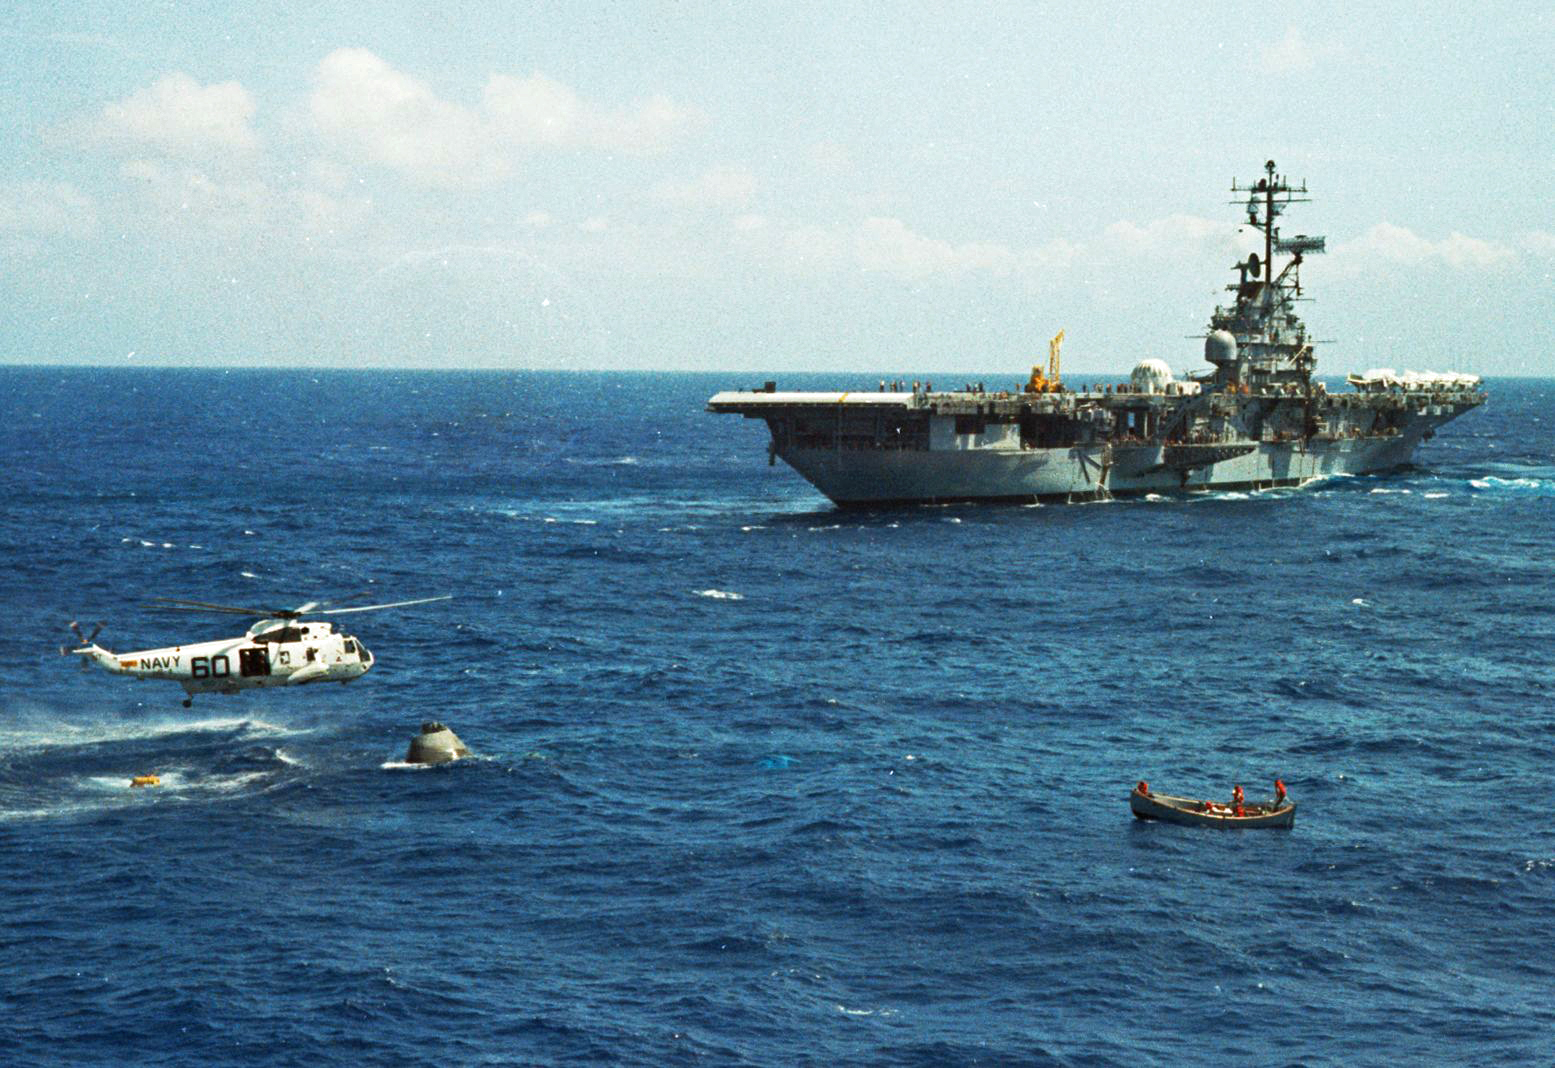
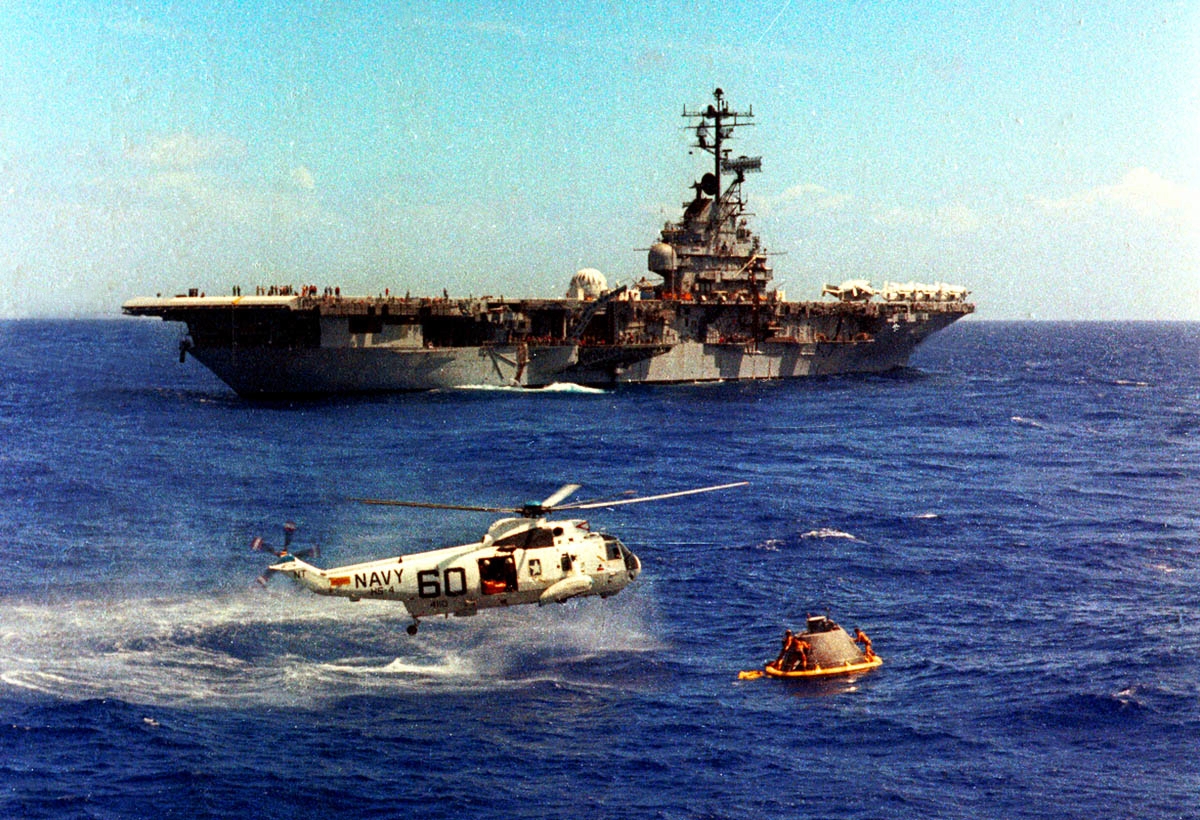
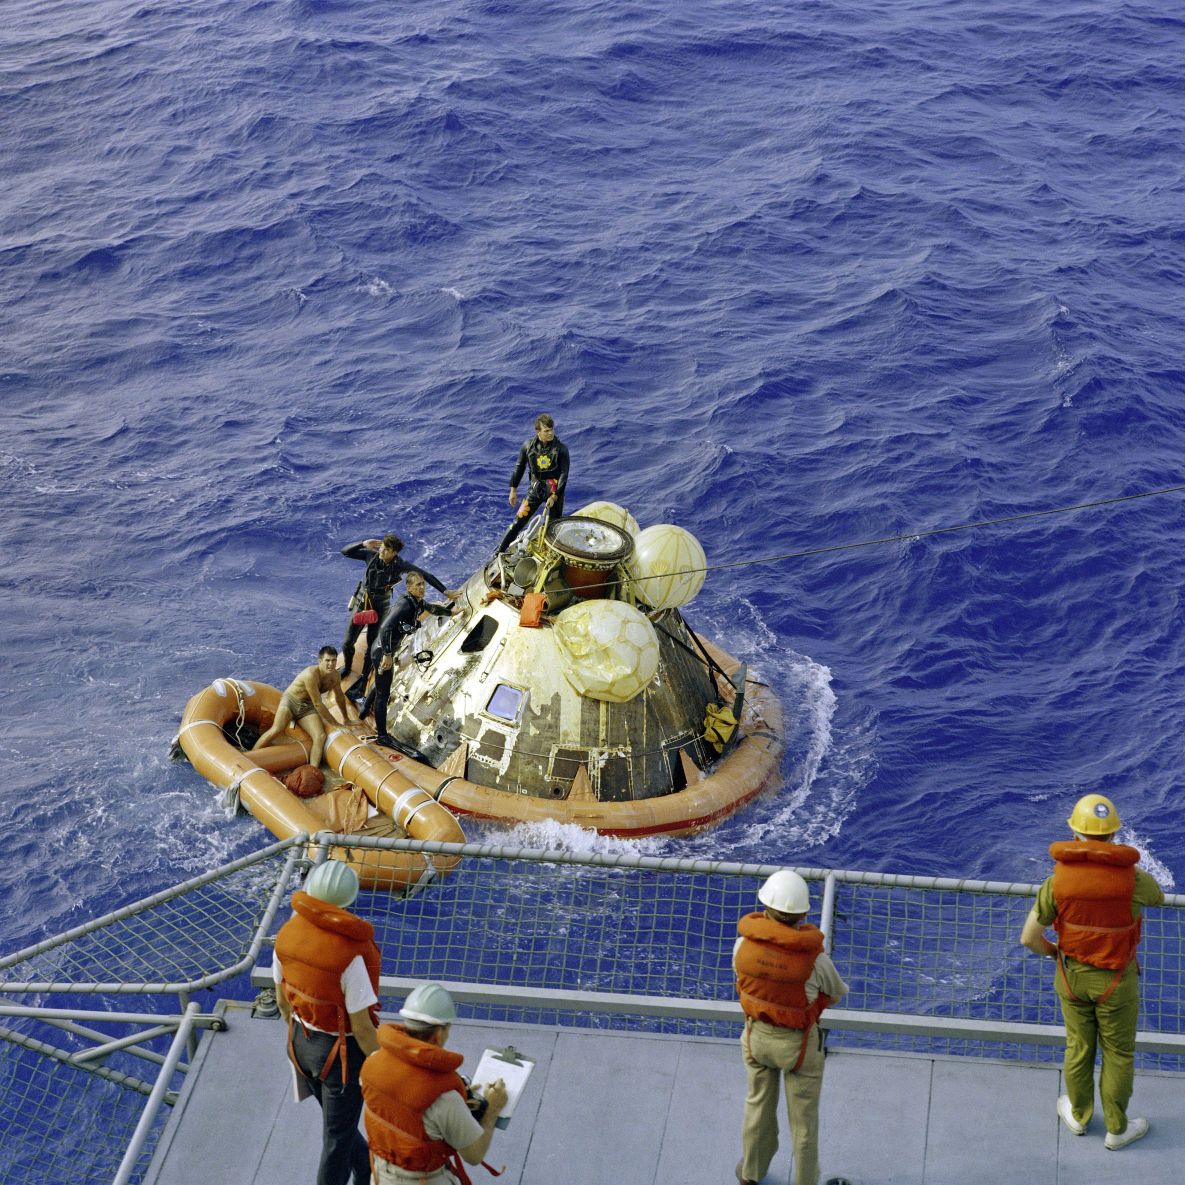
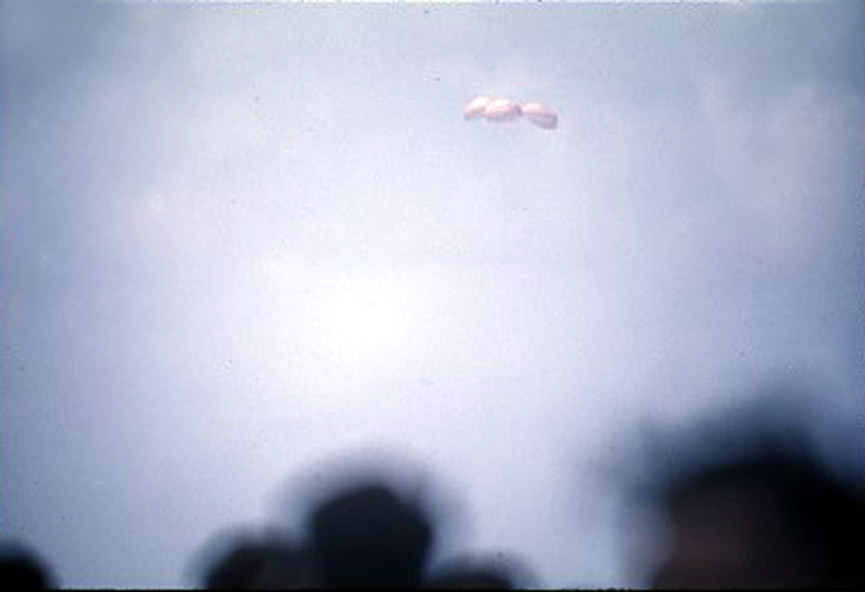
 NS-ha-050 |
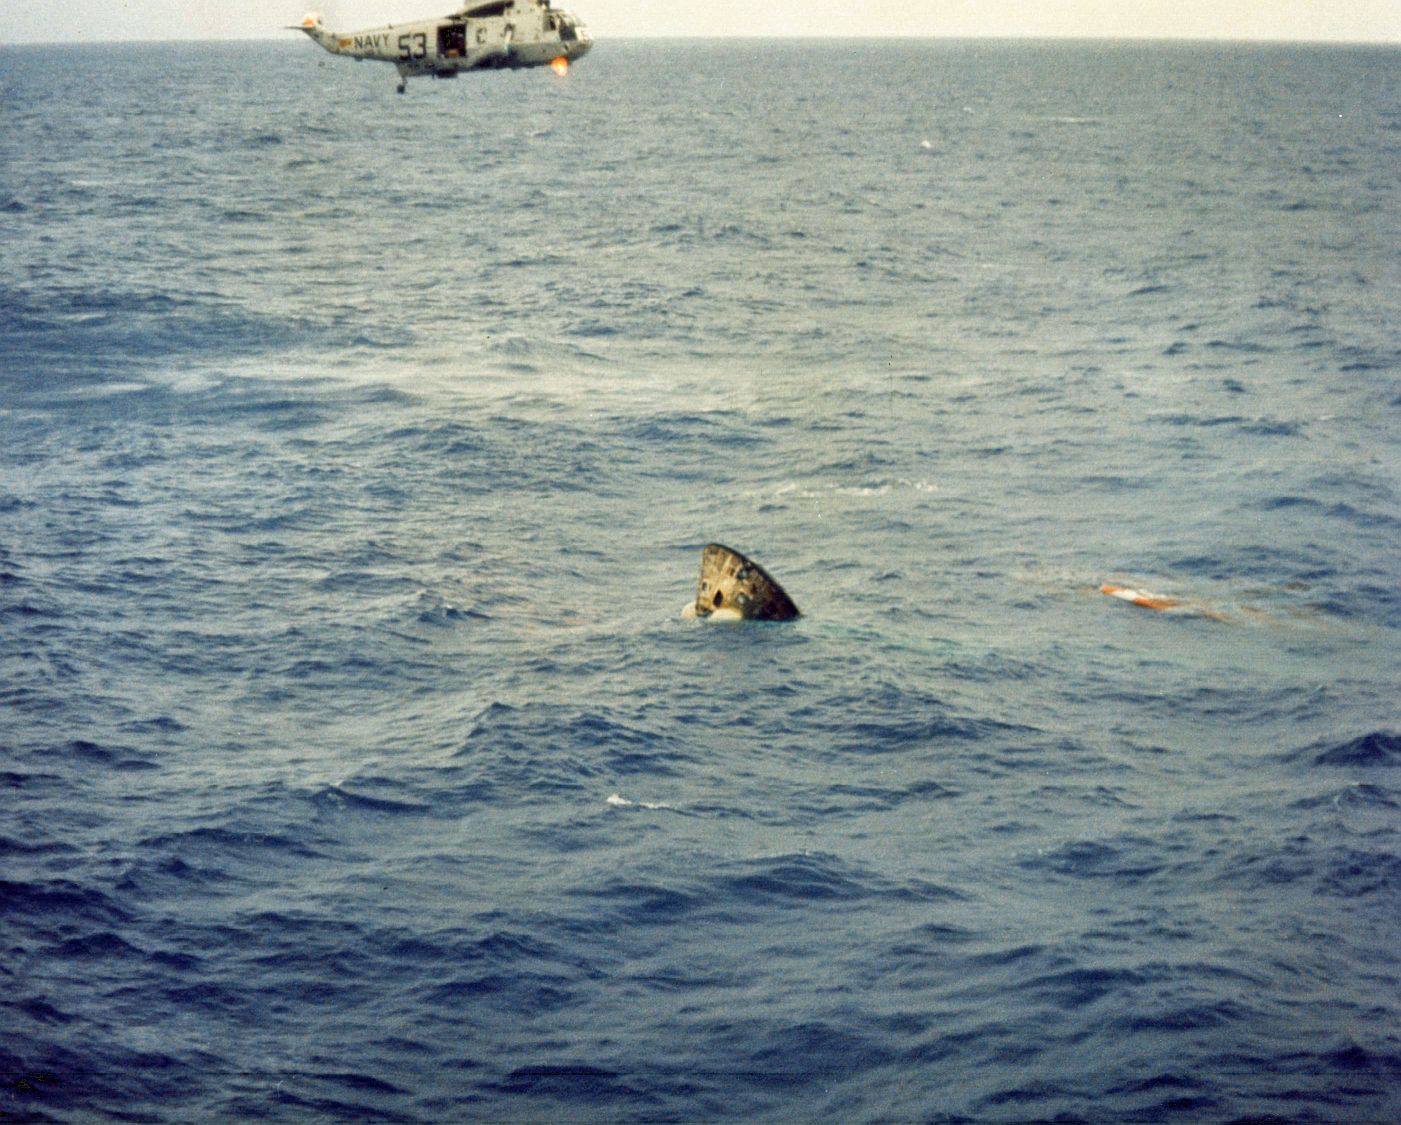
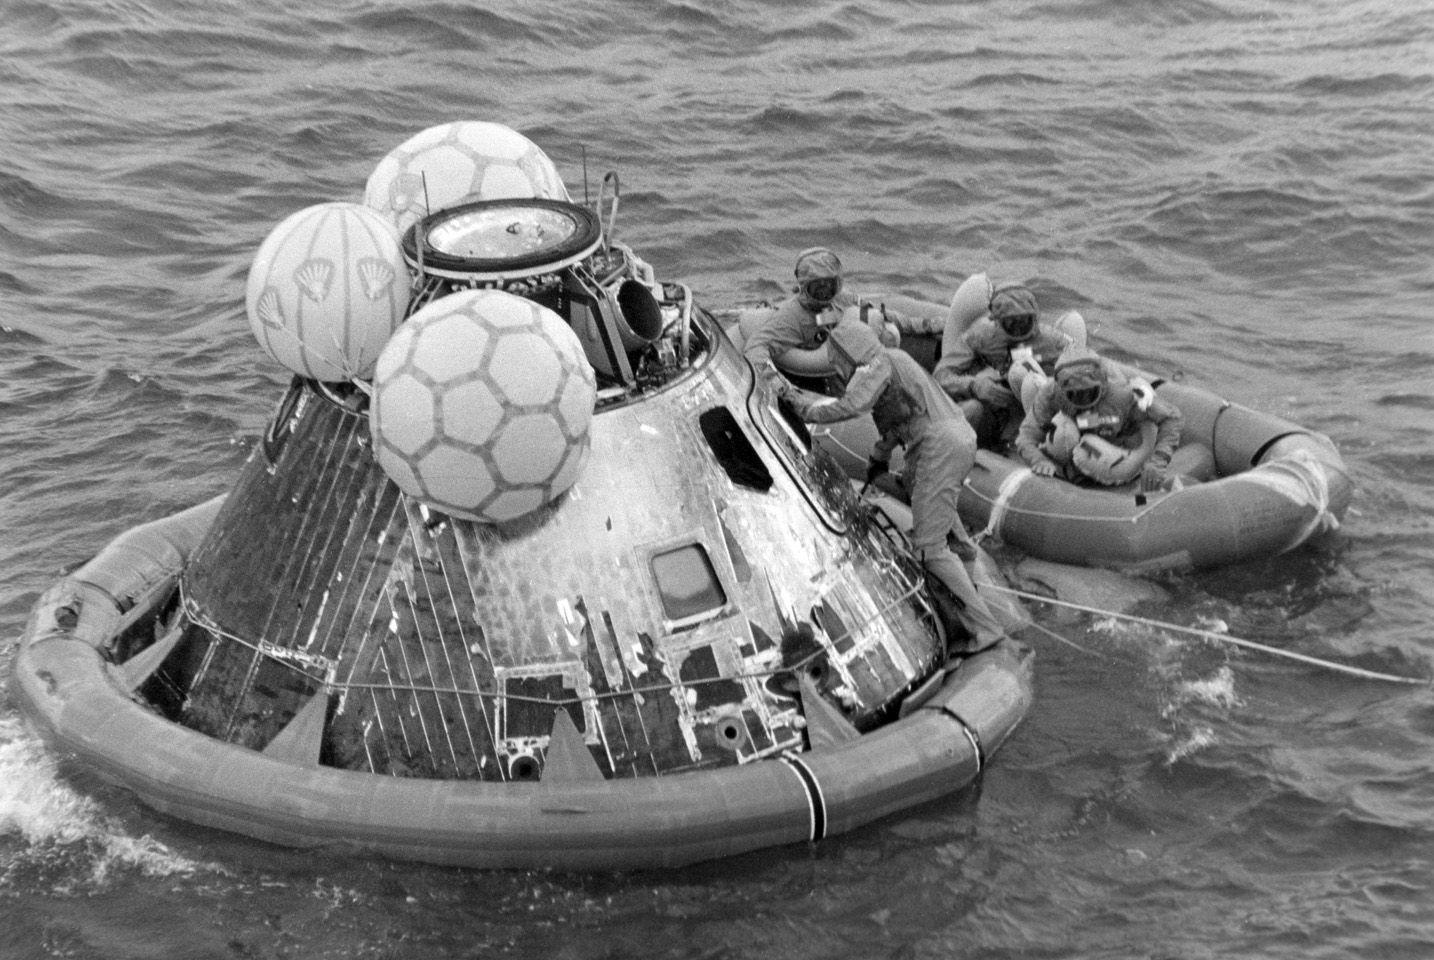
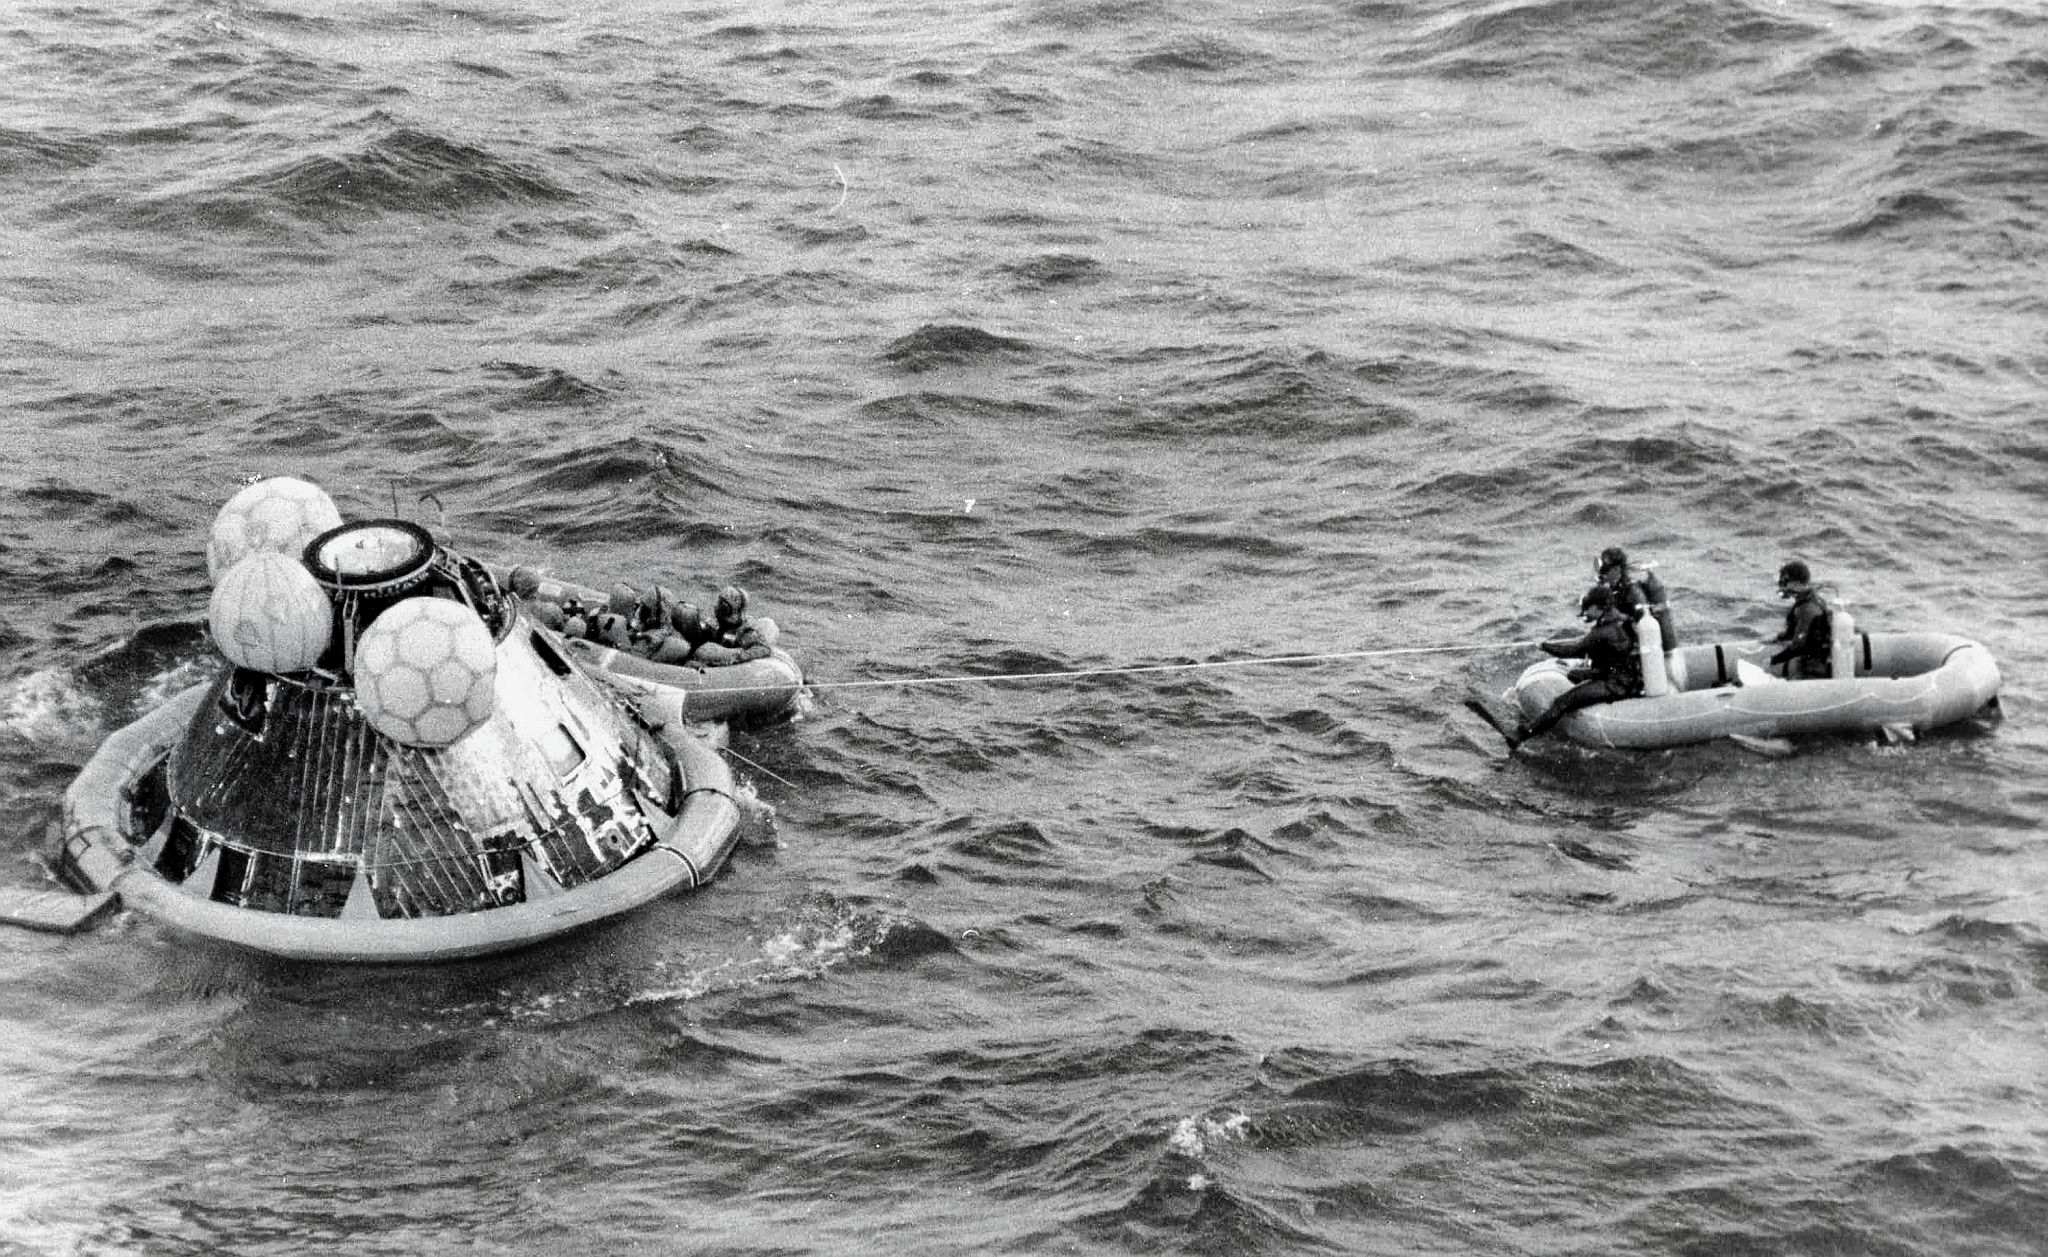
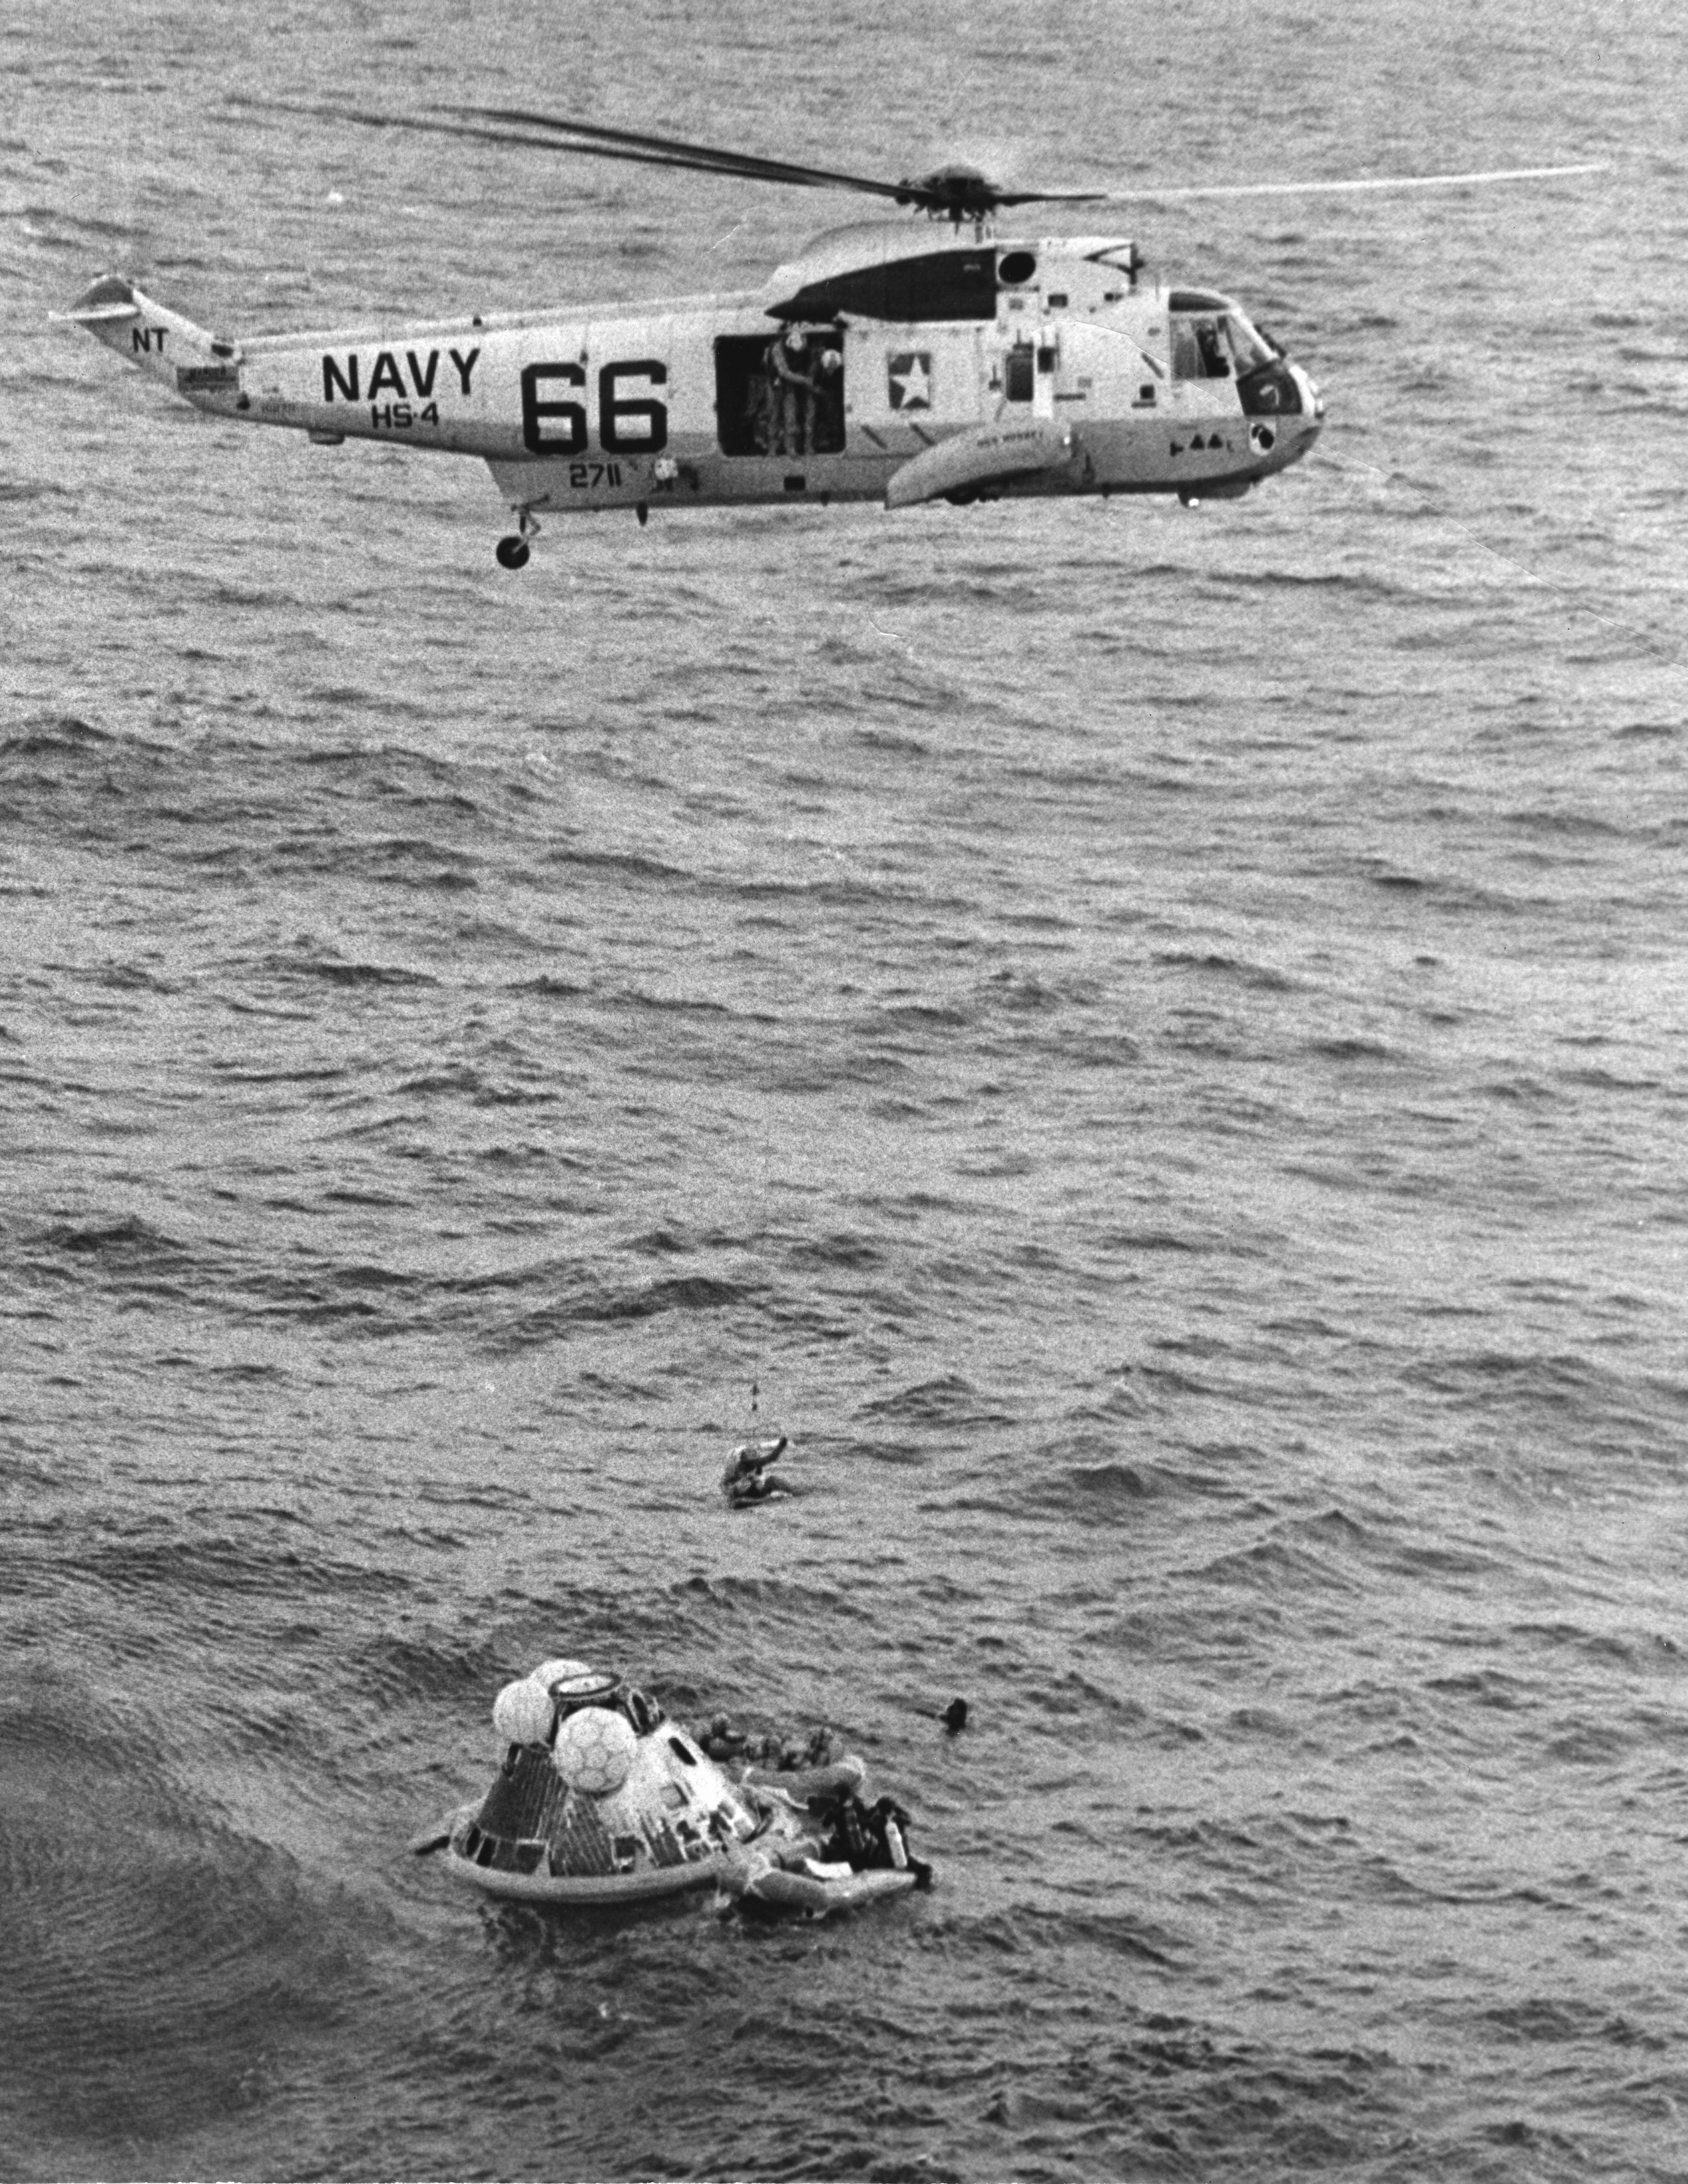
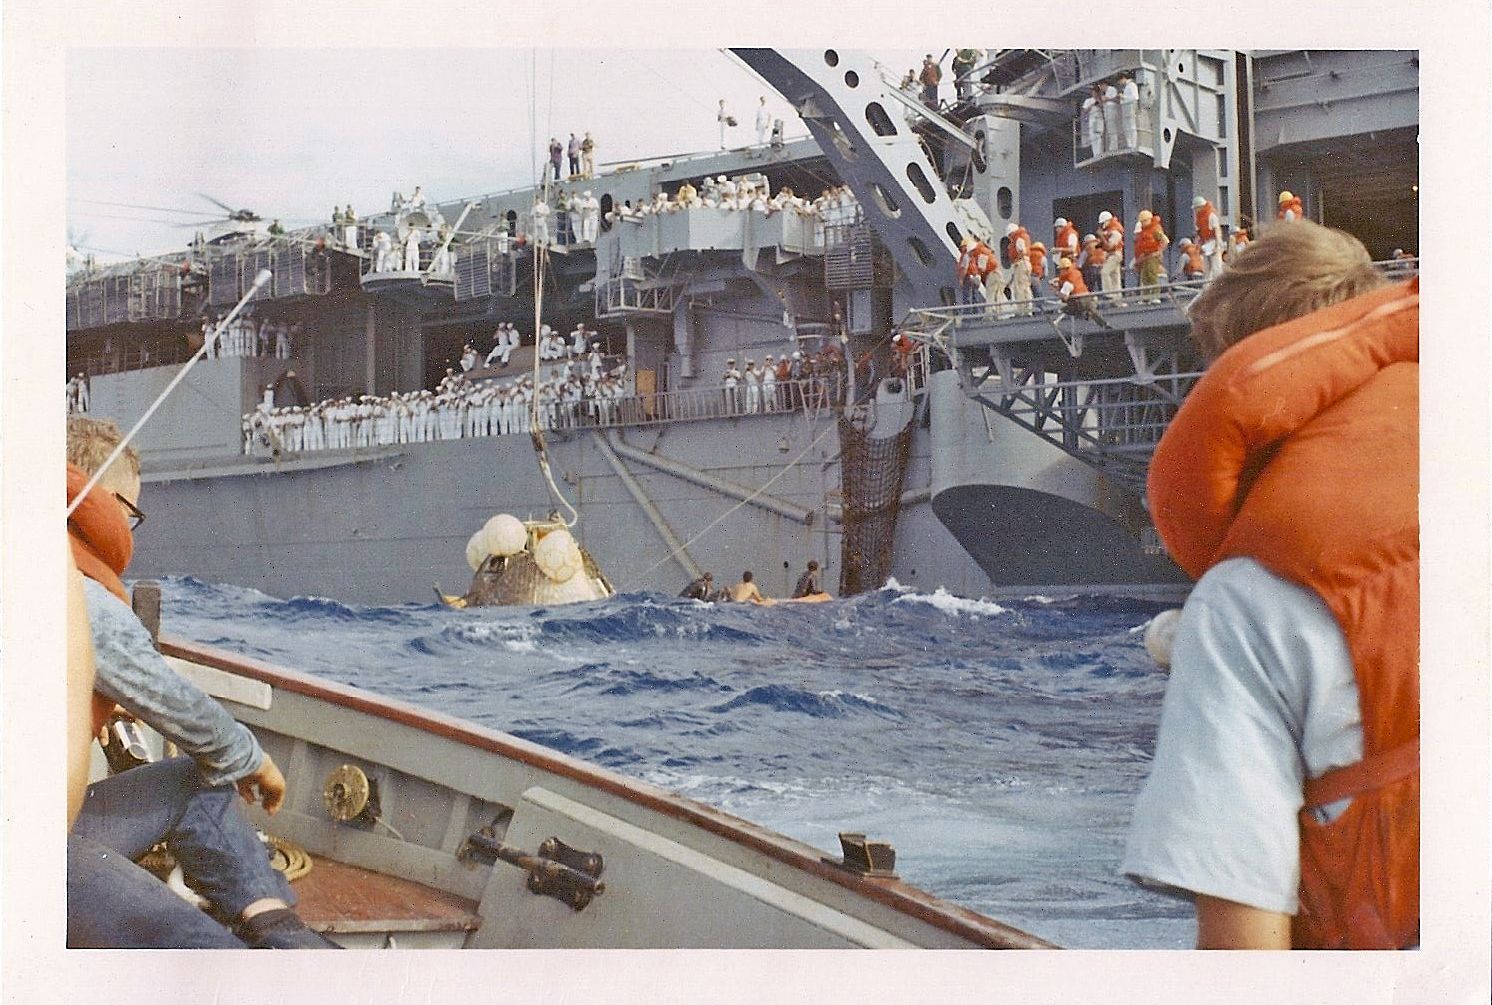
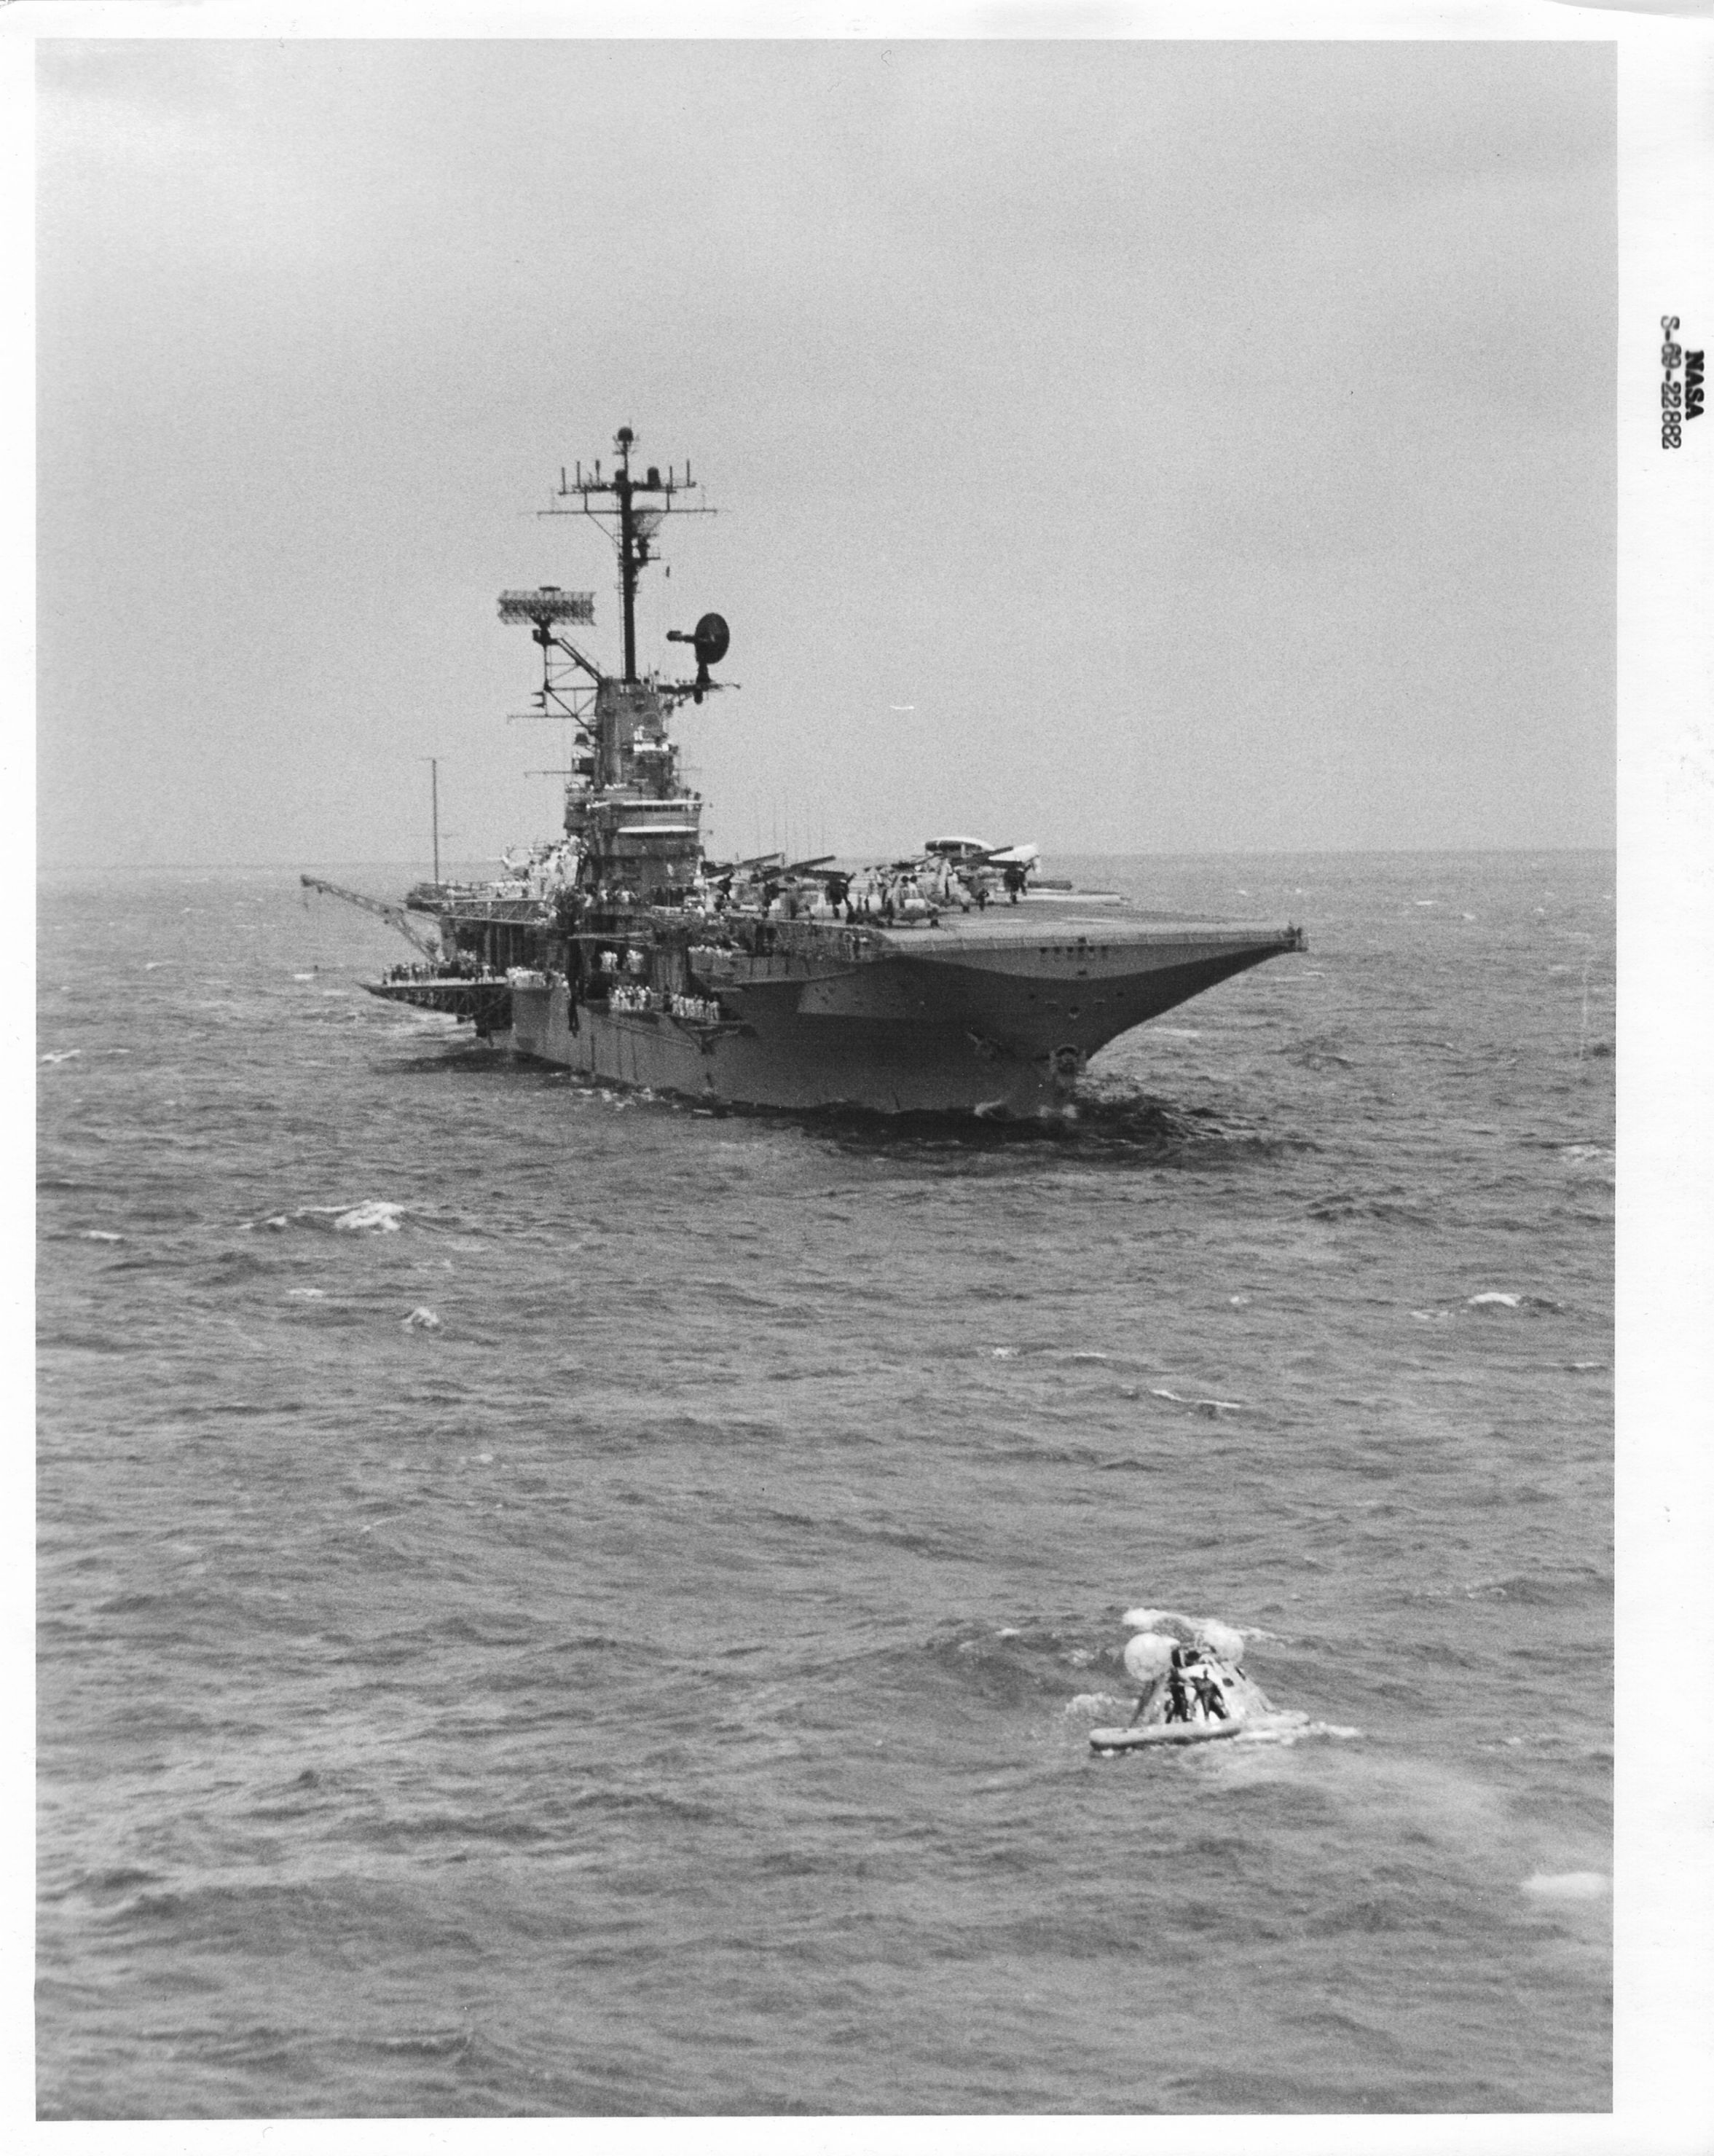
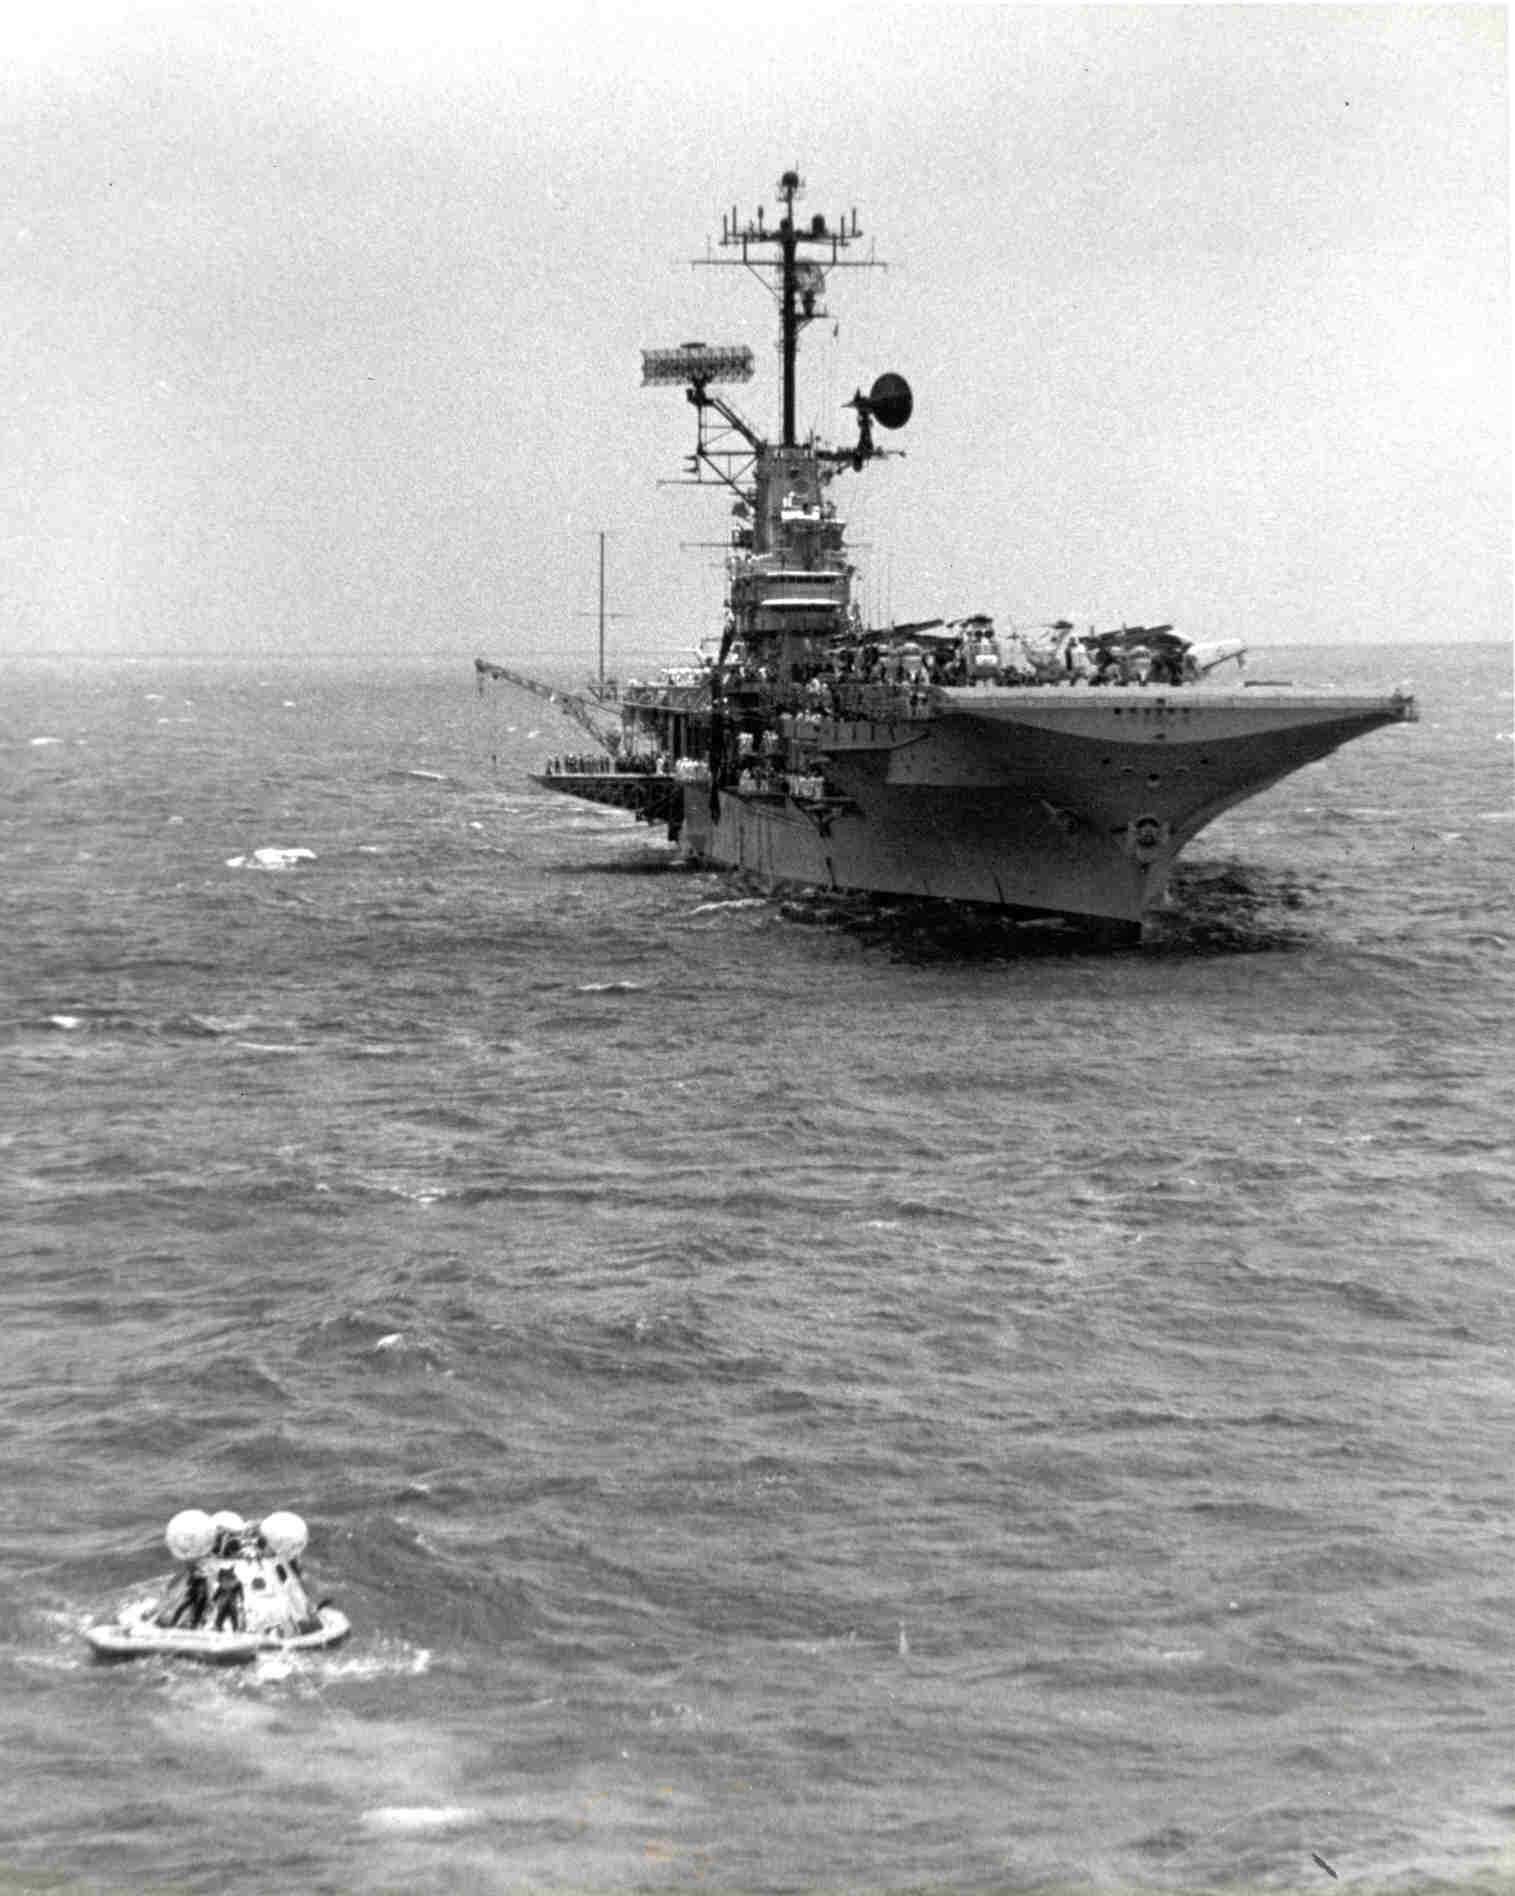
305k | At 0550 on 24 July, command module Columbia hit the Pacific waters. Before the giant parachutes could be detached, they caught the wind and tipped the CM over into a Stable II (upside down) position. While the astronauts hung from their straps and waited for the CM righting spheres to roll the craft upright (barely visible white bags in photo), an HS-4 Sea King helicopter with UDT Swim Team 1 hovered overhead. (Helicopter NT53 is an SH-3D Sea King, BuNo 154108.) National Aeronautics and Space Administration (NASA) photo, # KSC-69PC-466. |
Courtesy of NASA, via Bob Fish | |
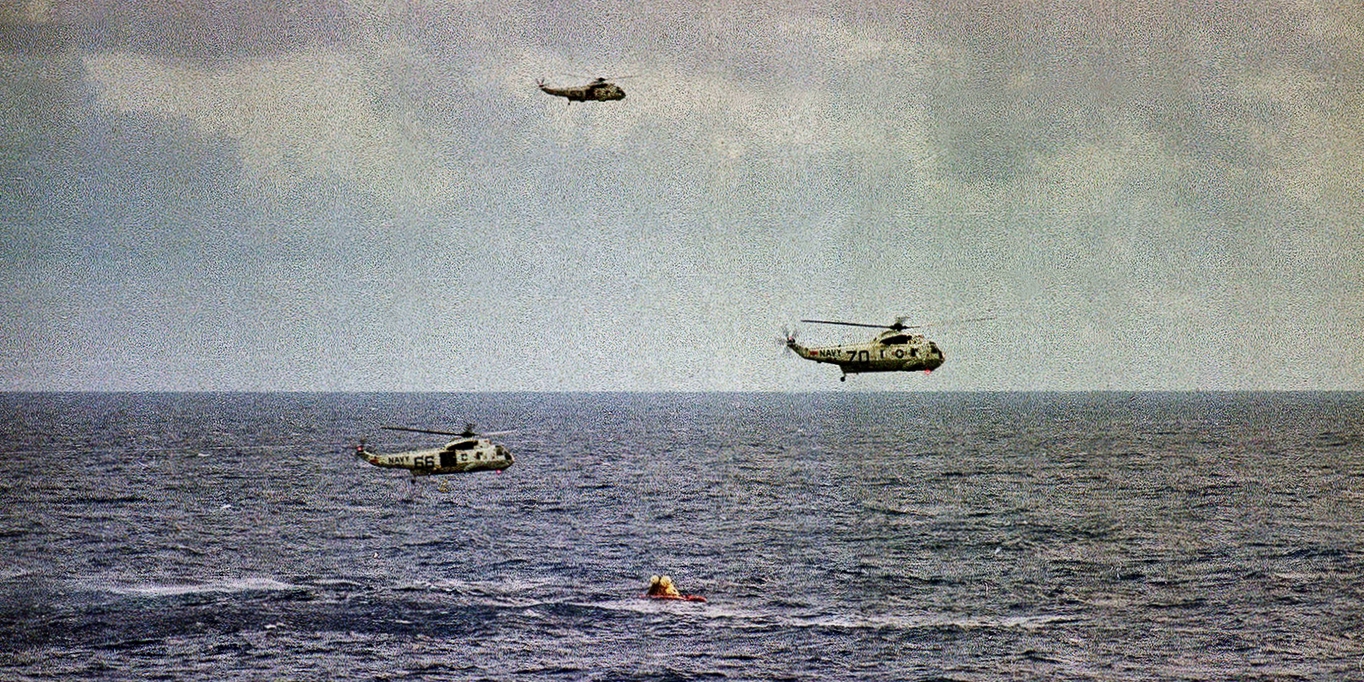 NS-ha-051 |
1.23M | Helicopters NT70 ("Photo ONE"), NT66 ("Recovery ONE"), and NT53 ("Swim ONE"). |
Bob Canchola, BT, USN (Ret.) | |
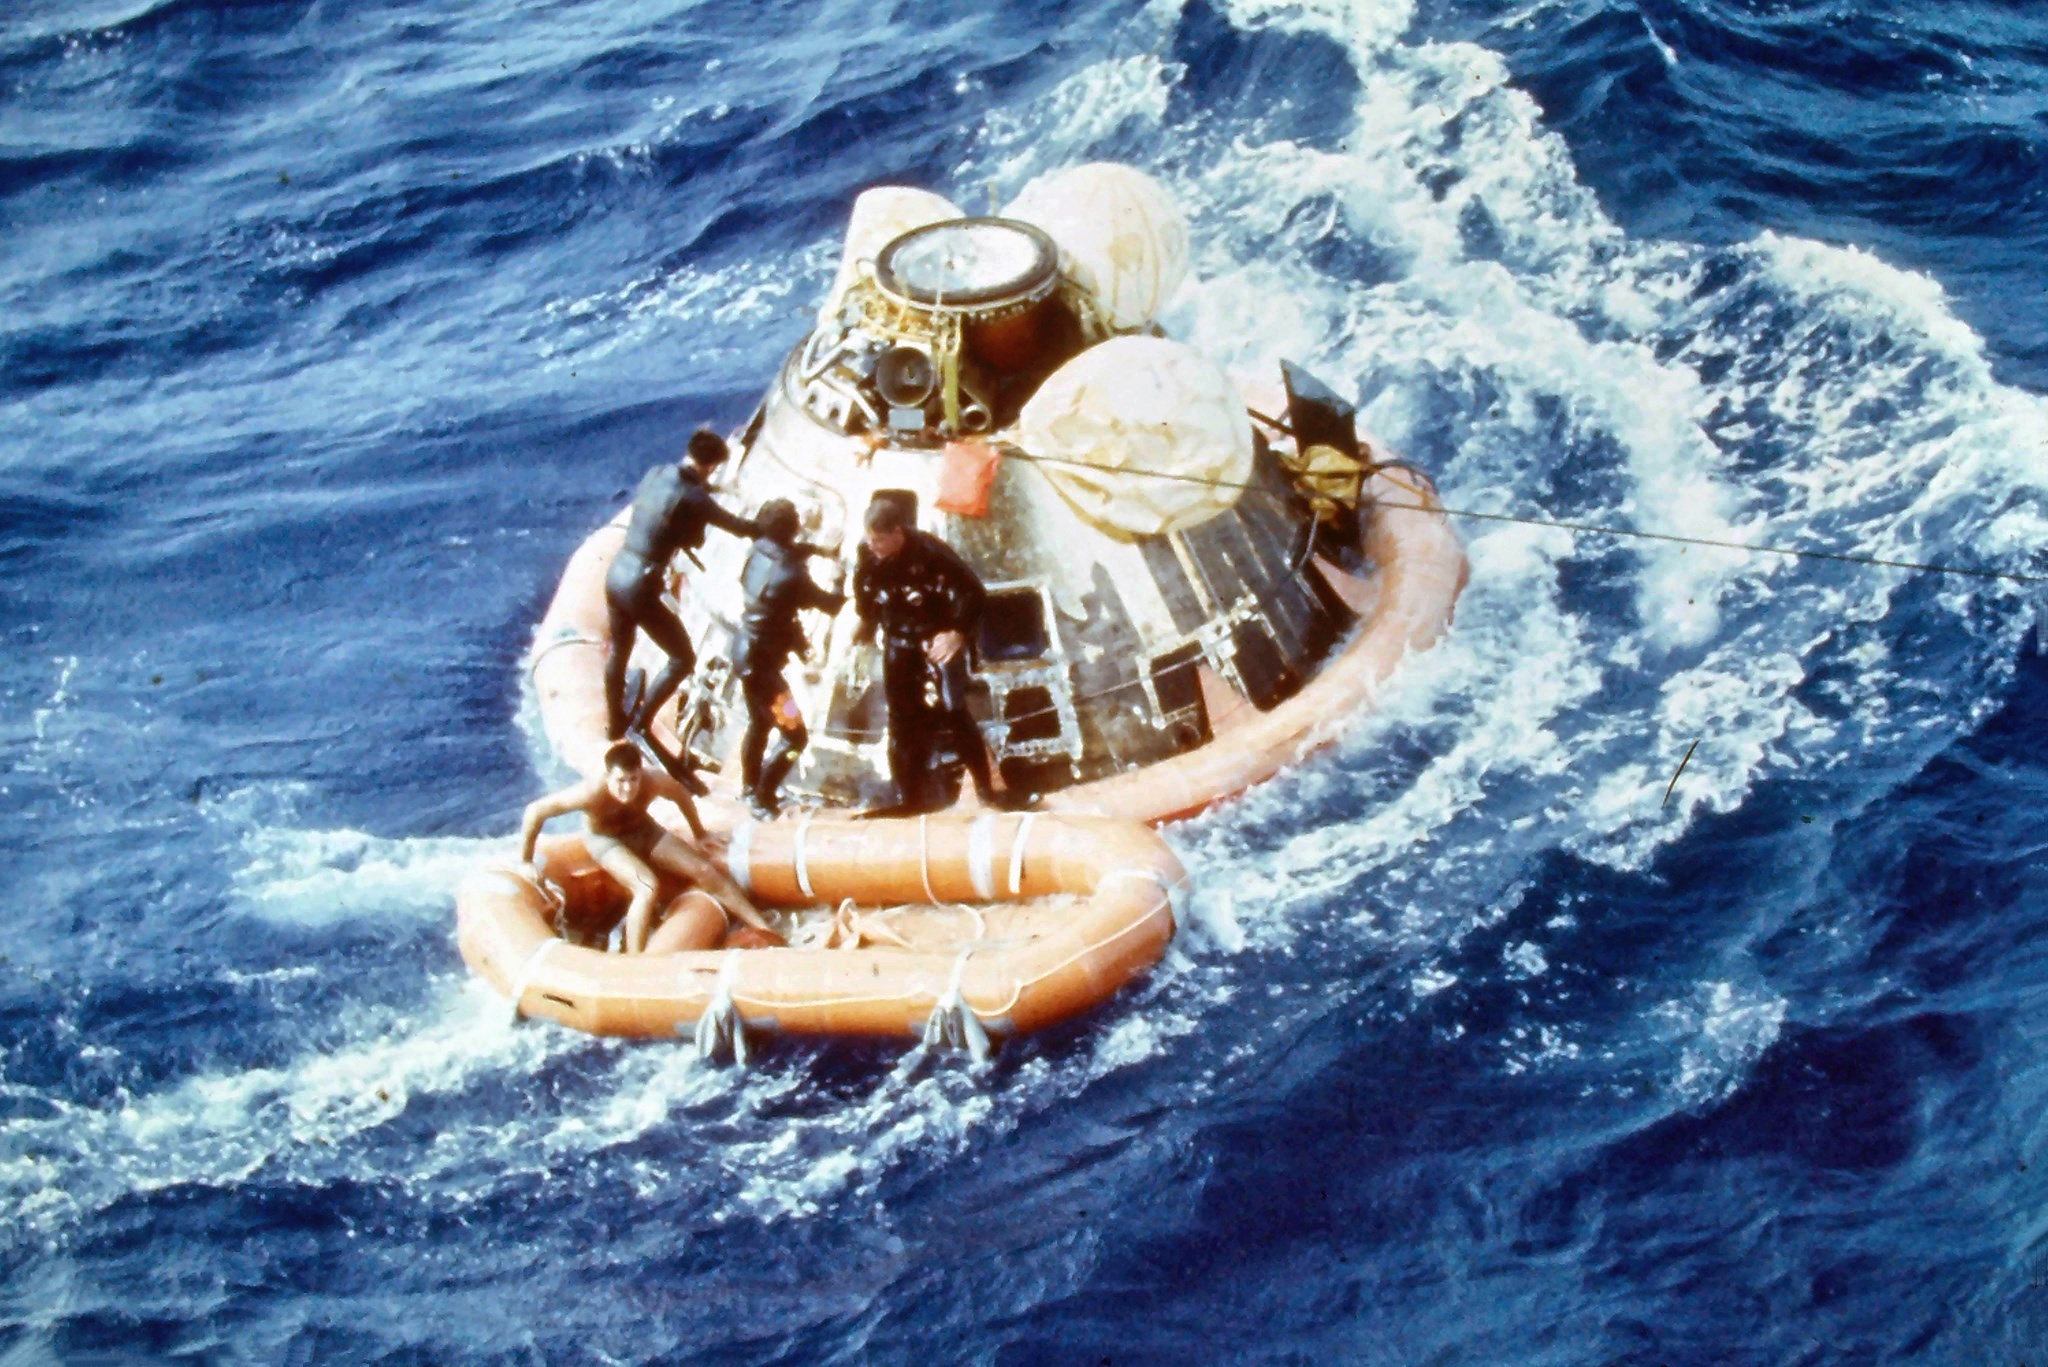
 NS-ha-052 |
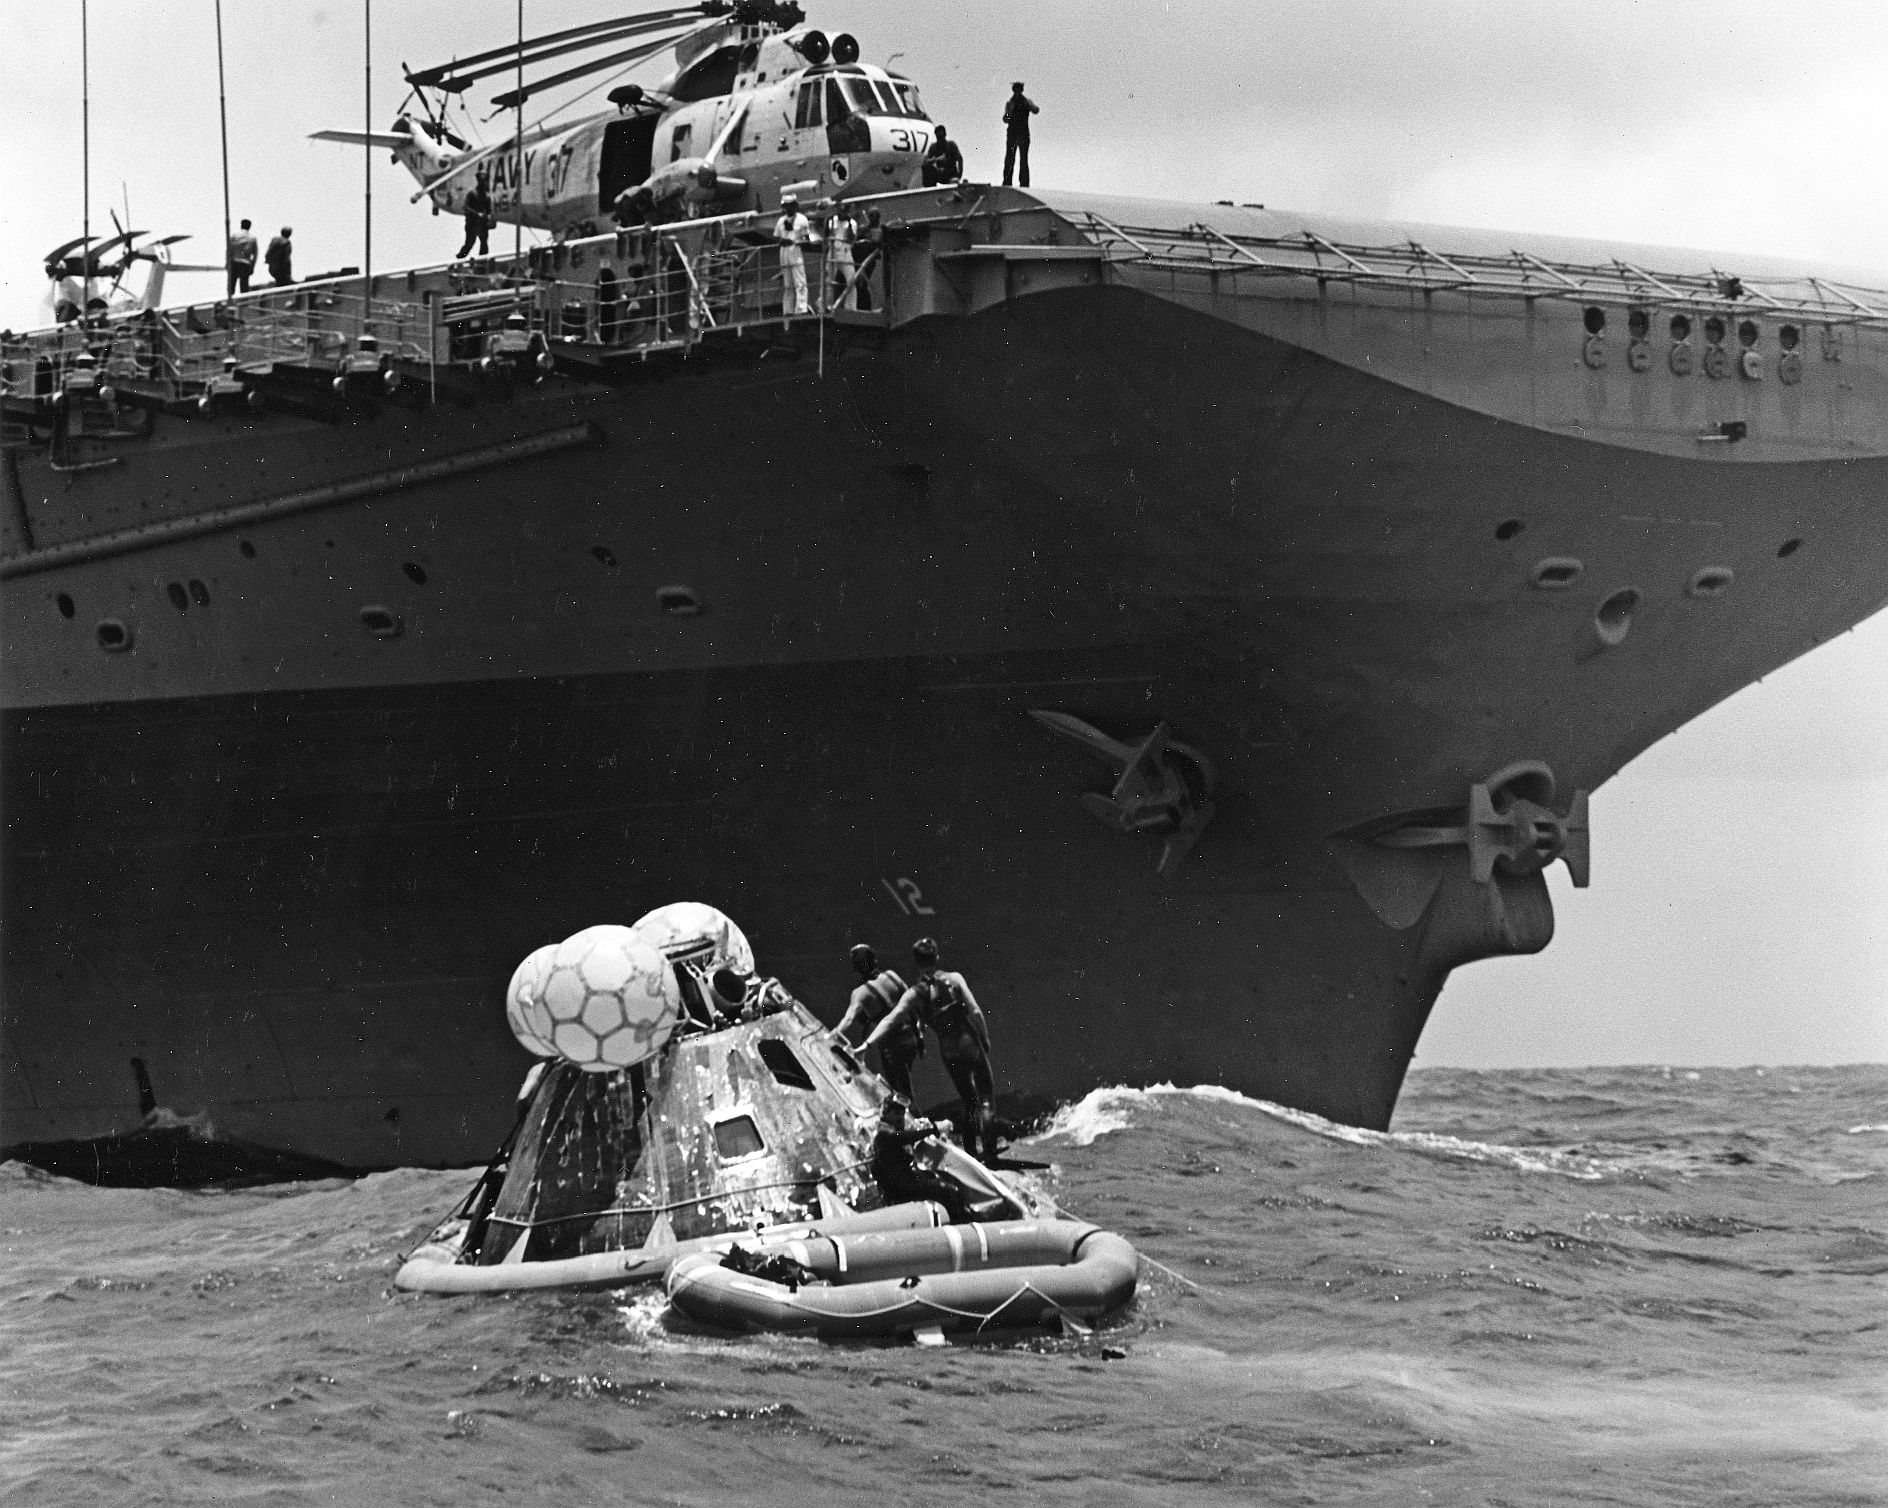
1.43M | Once Columbia was upright, UDT Swim Team 2 deployed from their Sea King helicopter. They attached a sea anchor to slow the drift rate of the CM, and a flotation collar to stabilize the rocking spacecraft and two rafts to be used as work places. The lead swimmer then signaled to start the decontamination process. Helicopter #66 (SH-3D Sea King, BuNo 152711) dipped low near the water to allow the decontamination swimmer LTJG Clancy Hatleberg to jump from the cargo hatch. On the next pass, the helicopter lowered the decontamination equipment to a work raft, including 4 biological isolation garments (BIGs) and two canisters of decontaminate solution. US Navy photo by PH2 Milt Putnam. |
Bob Fish | |
 NS-ha-053 |
507k | Once the UDT "decon" swimmer had his BIG suit on, Columbia's hatch was opened and he handed in 3 BIG suits to the astronauts, then closed the hatch. US Navy photo by PH2 Milt Putnam. |
Bob Fish | |
 NS-ha-054 |
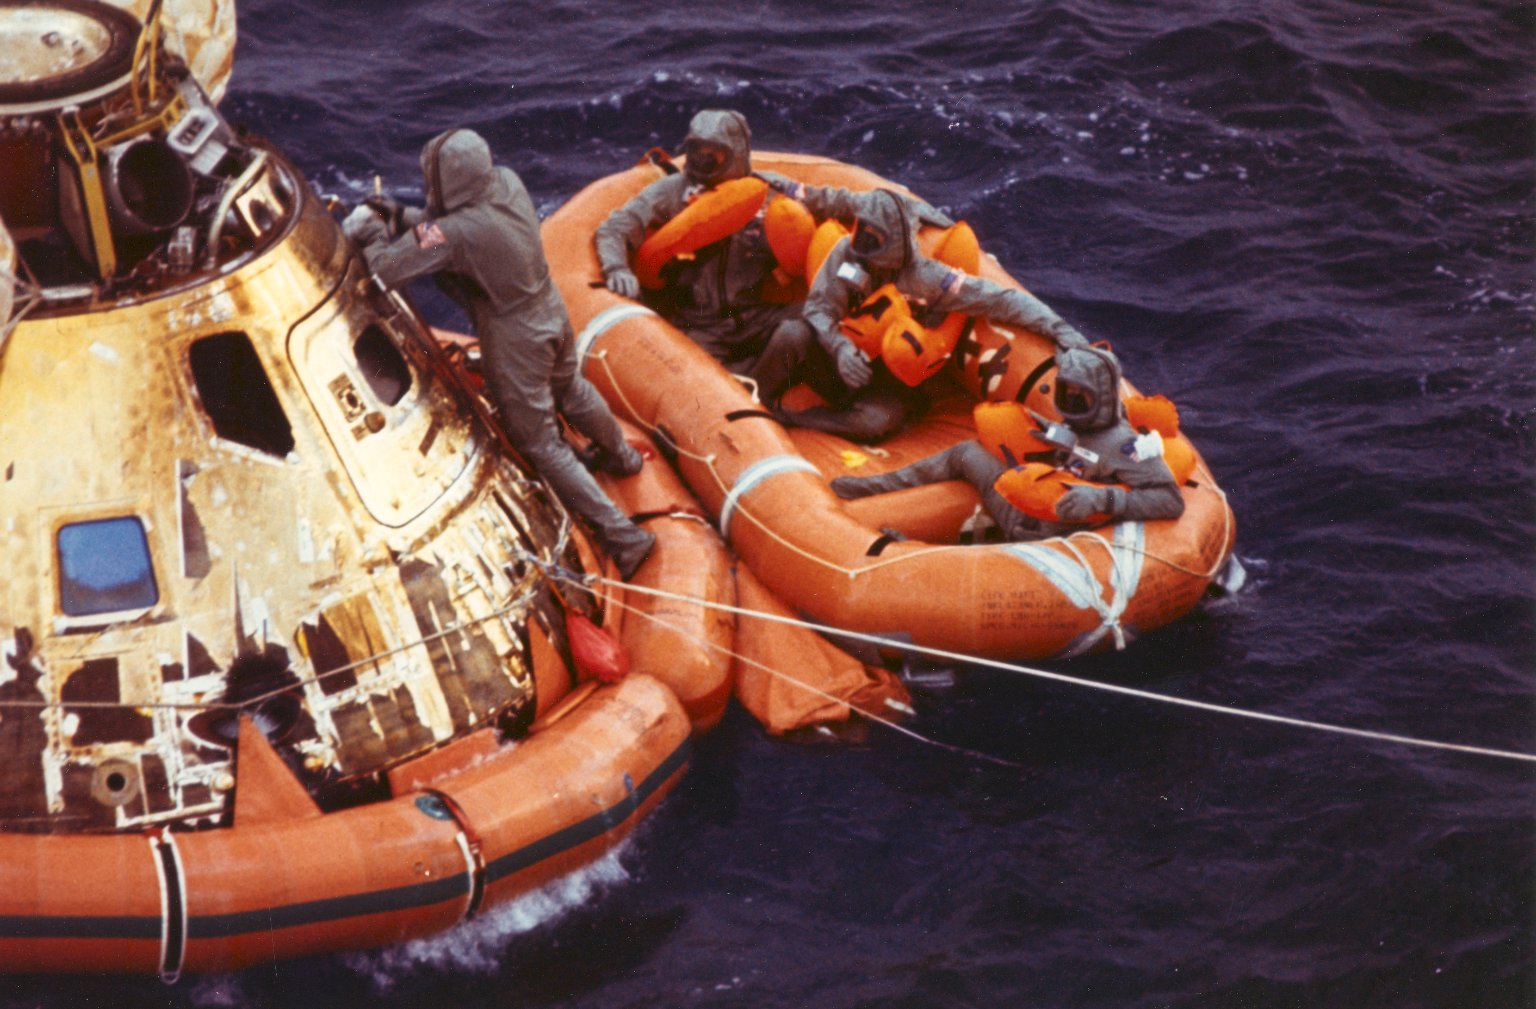
480k | After donning their BIG suits, the astronauts opened the hatch and exited the CM with the help of the UDT decon swimmer. As seen in the photo, Neil Armstrong came out first and half slid into the raft. The BIG suits did not have a grippy sole for the foot and the flotation collar was slick with salt water. Michael Collins came out next and then "Buzz" Aldrin. Two other issues that slowed the process were the BIG face visors fogging over in the tropic humidity and having to wear bulky "water wing" life vests. US Navy photo by PH2 Milt Putnam. |
Bob Fish | |
 NS-ha-055 |
255k | Initially, the UDT decon swimmer, wearing his own BIG suit, had difficulty closing and locking the CM hatch. Armstrong got up to help but quickly gave way to Command Module Pilot Collins, who was able to get it closed. National Aeronautics and Space Administration (NASA) photo AS11-0997-69H-1199. |
Courtesy of NASA, via Bob Fish | |
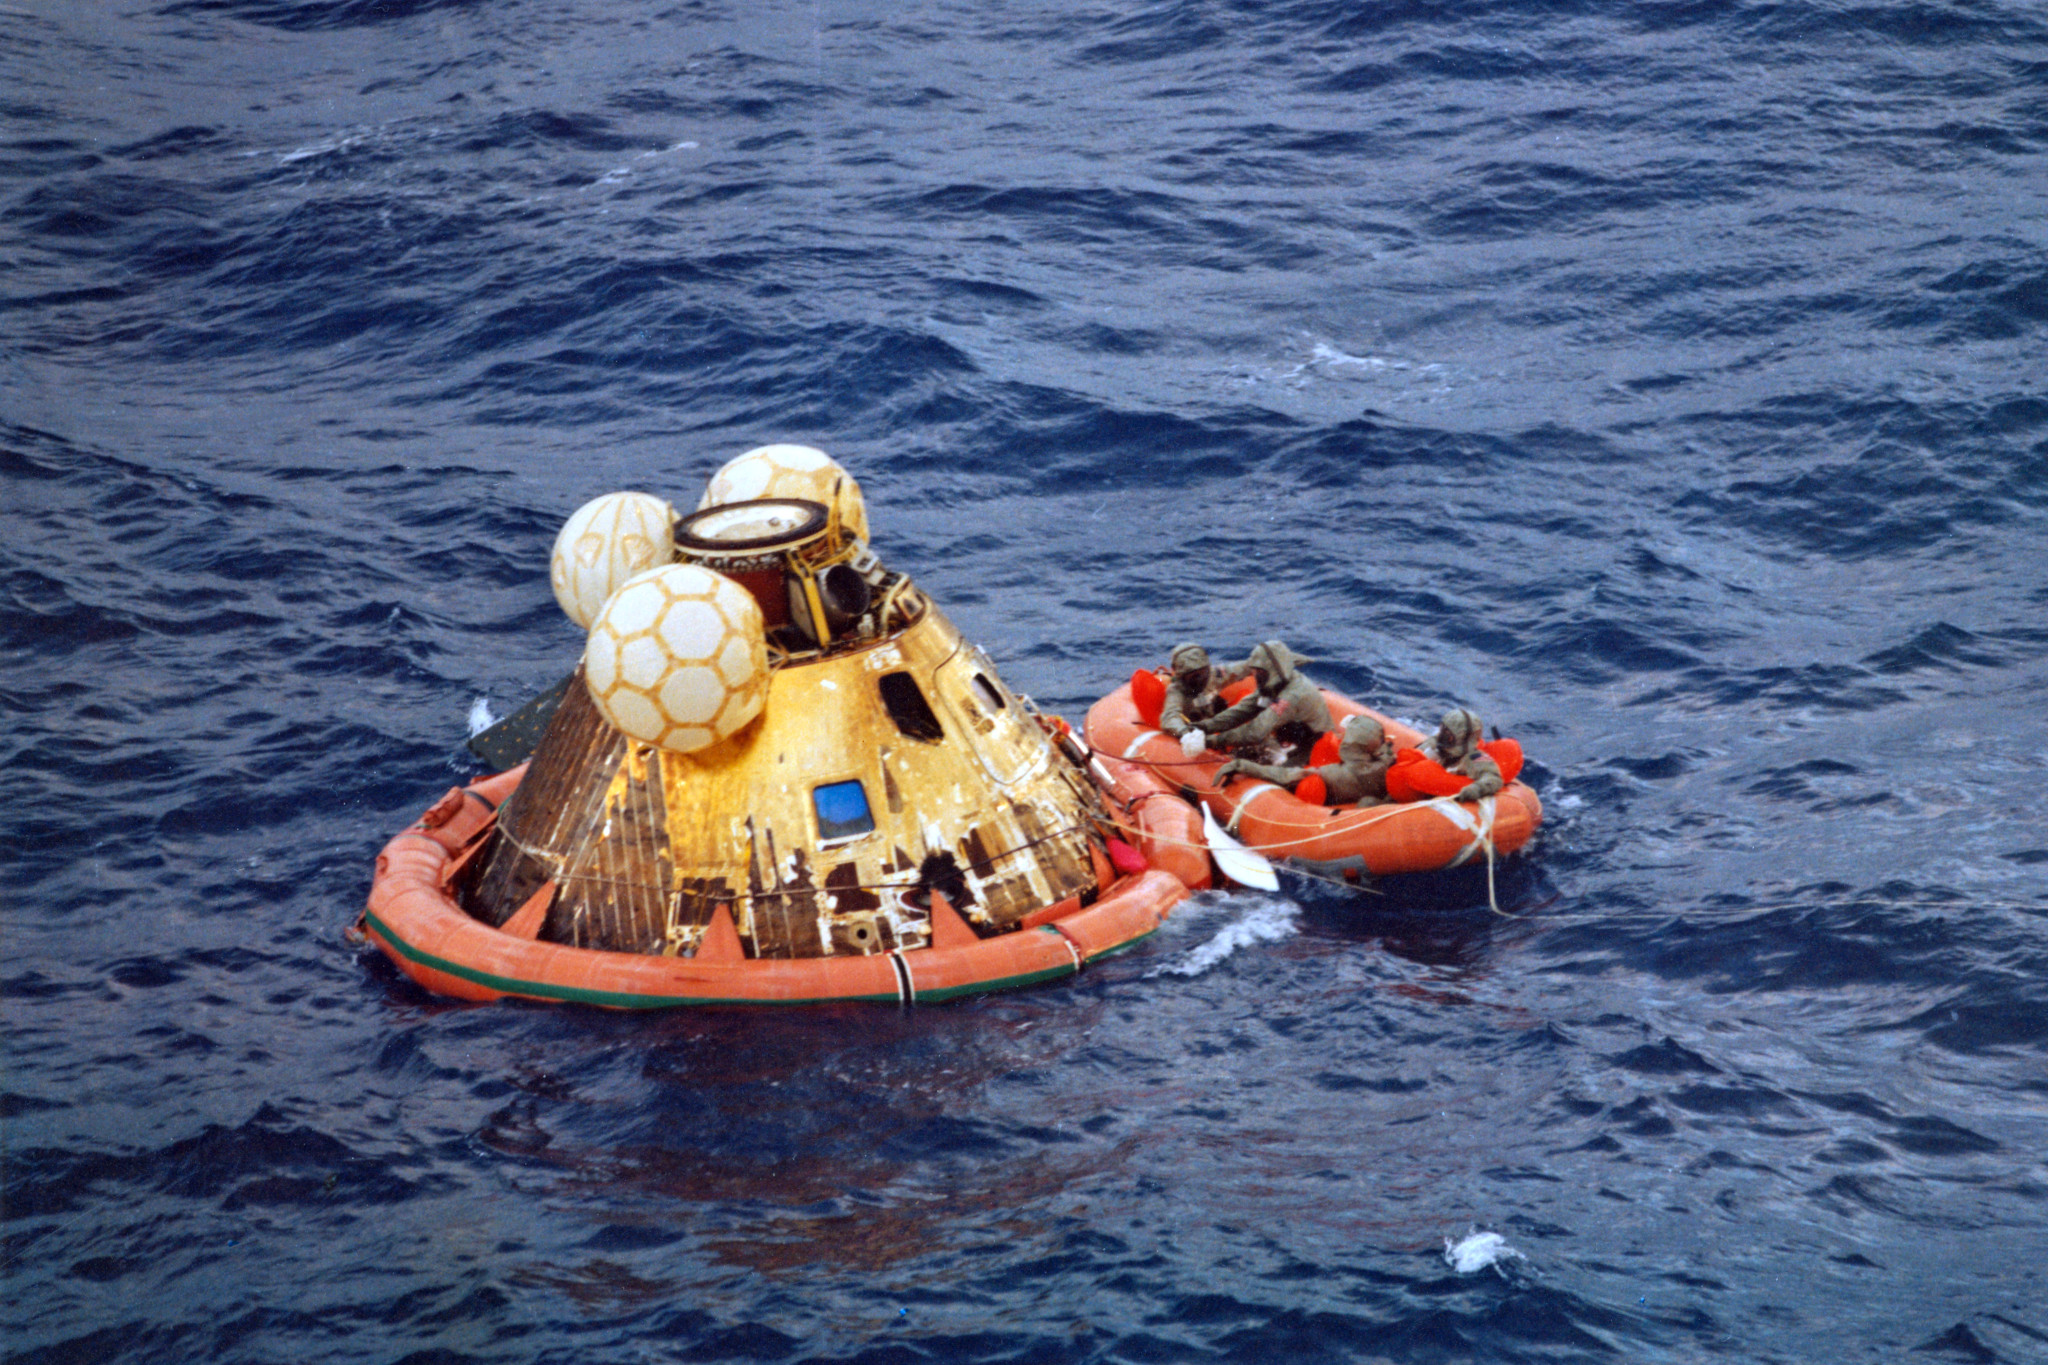
 NS-ha-056 |
255k | The UDT decon swimmer then proceeded to decontaminate key parts of Columbia that may have come into contact with any potential moon germs, such as the hatch frame and handle, which had been touched by the astronauts during their exit. For this, NASA used a betadine solution. From left to right in the raft, astronauts Armstrong, Collins and Aldrin watched this activity. National Aeronautics and Space Administration (NASA) photo GPN-2002-000051. |
Courtesy of NASA, via Bob Fish | |
 NS-ha-057 |
952k | Since the astronauts had donned their BIG suits in the confines of the moon-dust laden command module, they had to be decontaminated prior to being hoisted into the Recovery helicopter. The UDT decon swimmer wiped each one with a white "car wash" mitt that was sprayed with a sodium hypochlorite (aka bleach). In this photo, he is wiping Neil Armstrong's right arm. Looking closely, one can see the spray hose that is connected to the silver canister (with red top) on the flotation collar that contained the bleach. National Aeronautics and Space Administration (NASA) photo GPN-2000-001212. |
Courtesy of NASA, via Bob Fish | |
 NS-ha-058 |
295k | This photo provides a unique perspective photo of the astronaut decontamination process and was taken around the same time as the previous one. The UDT decon swimmer is currently wiping down the right side of Michael Collins BIG suit in the middle of the raft. US Navy photo by QM3 Mike Mallory. |
Bob Fish | |
 NS-ha-058a |
640k | Apollo 11 crew waits to be picked up by U.S. Navy personnel. (AP Photo.) |
Bob Canchola, BT, USN (Ret.) | |
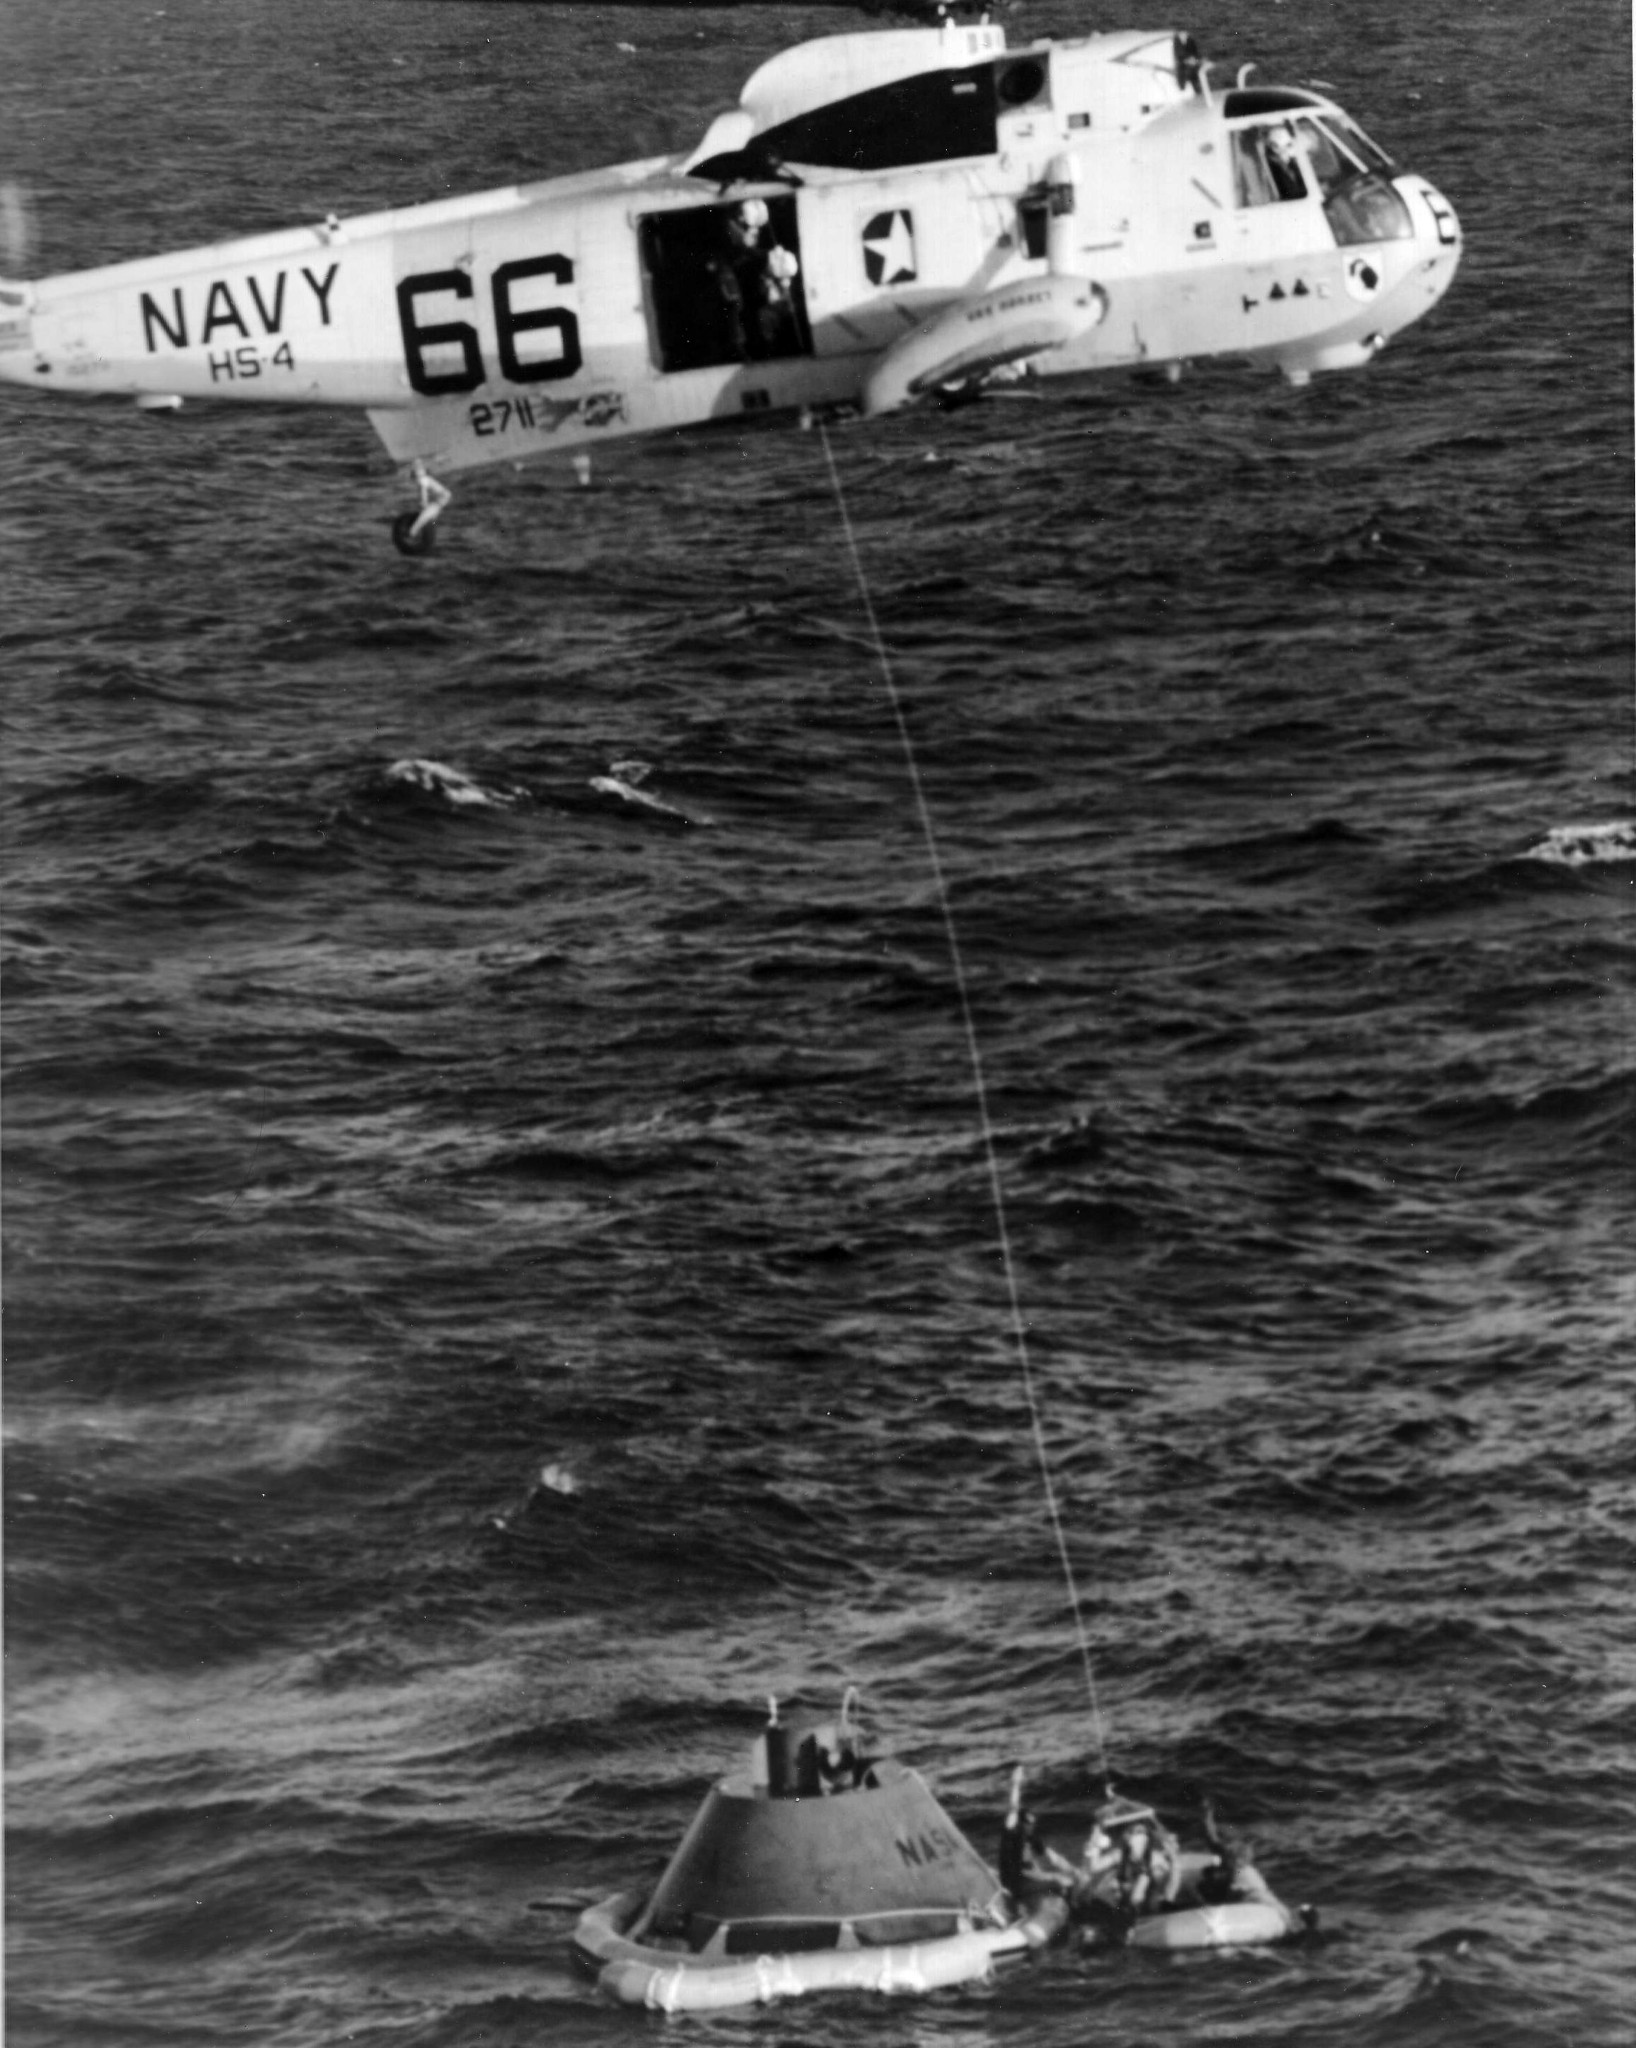
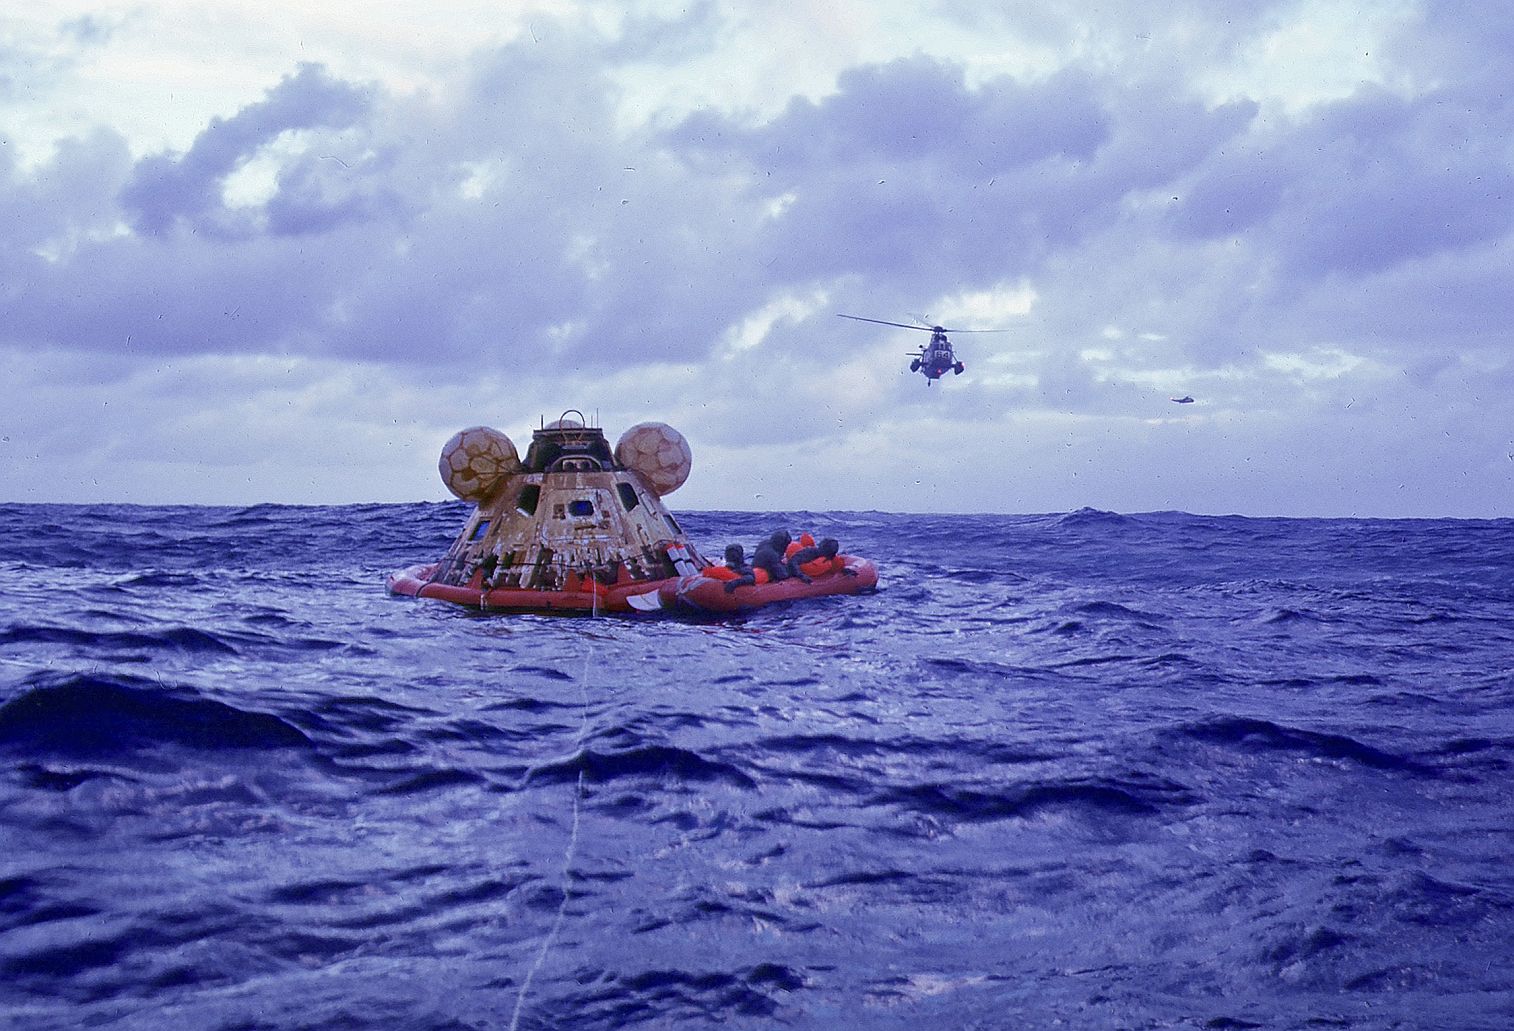
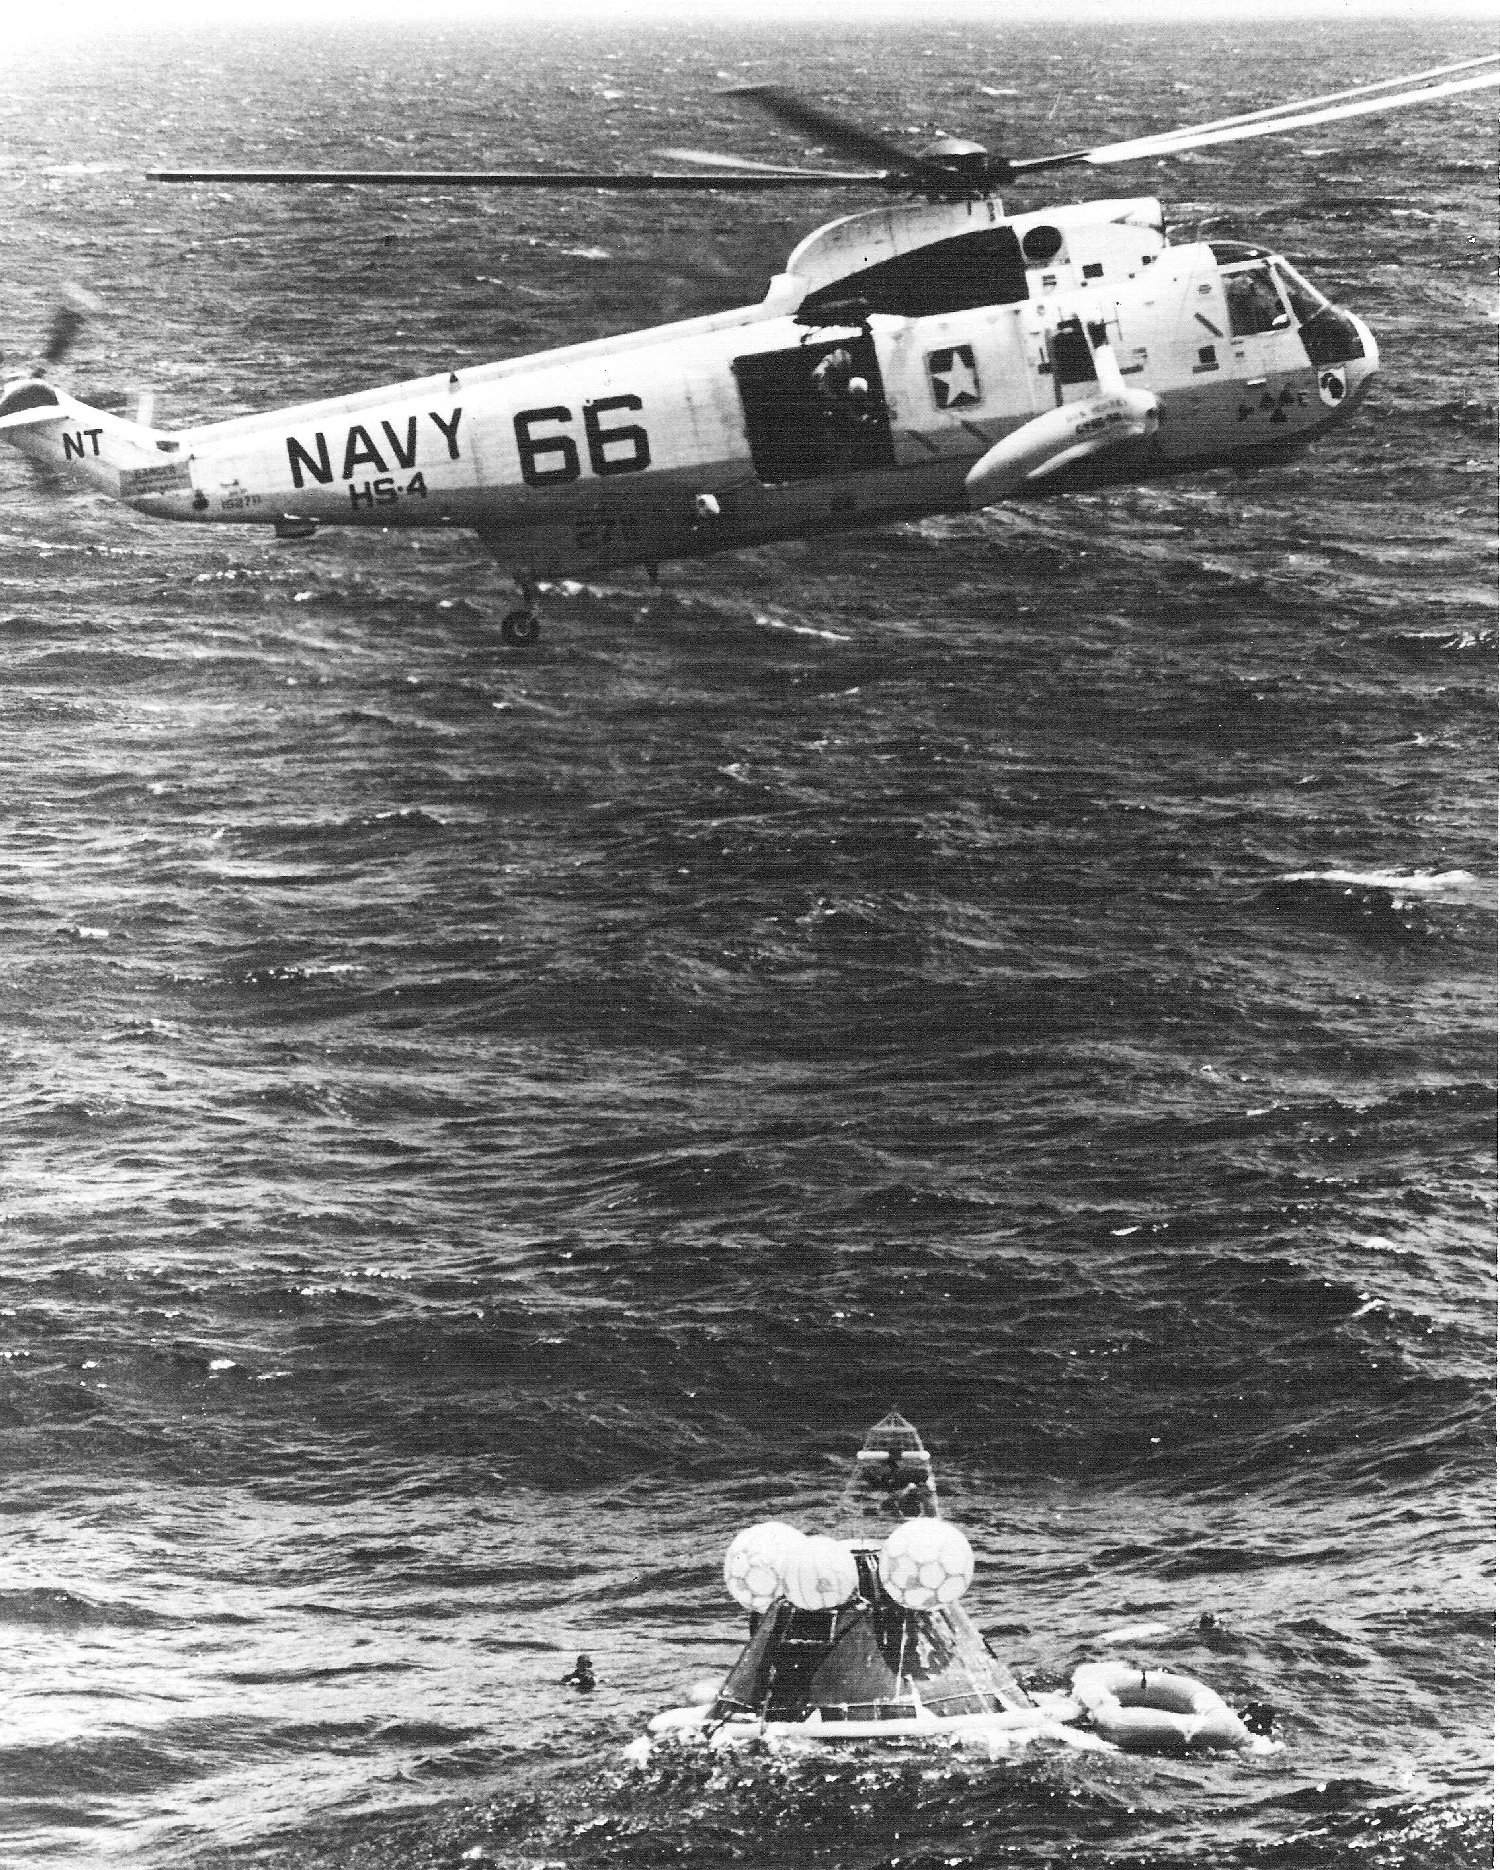
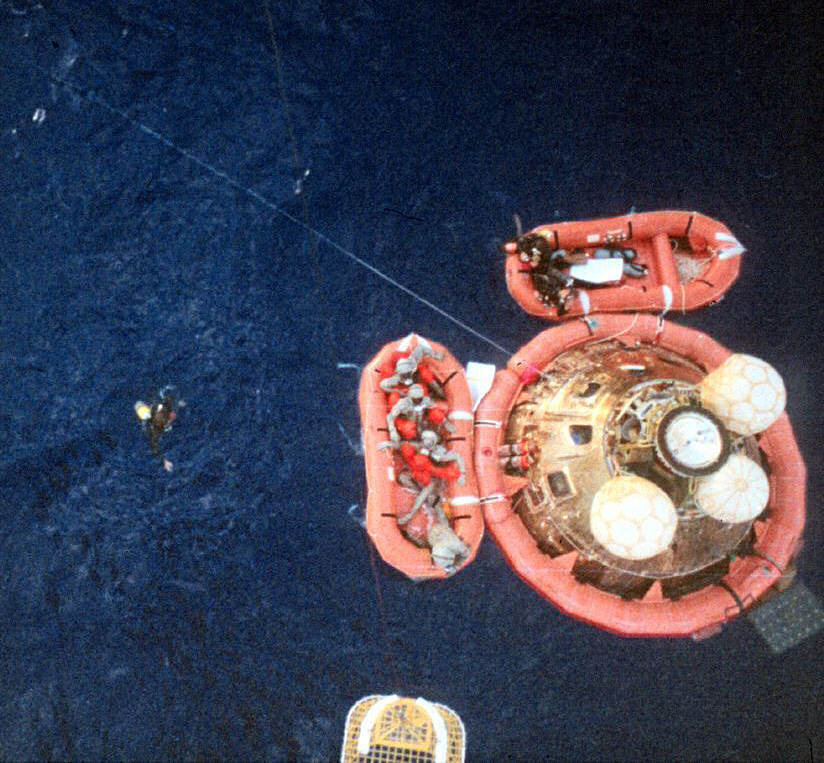 NS-ha-059 |
582k | Once the astronaut decontamination process was completed, the other UDT personnel moved in to support the helicopter hoist operation. In this overhead view from the Recovery helicopter #66, the three astronauts are lined up in their raft while the UDT decon swimmer leans out to grab the yellow Billy Pugh rescue net being lowered. US Navy photo by AWHC Norvell Wood. |
Bob Fish | |
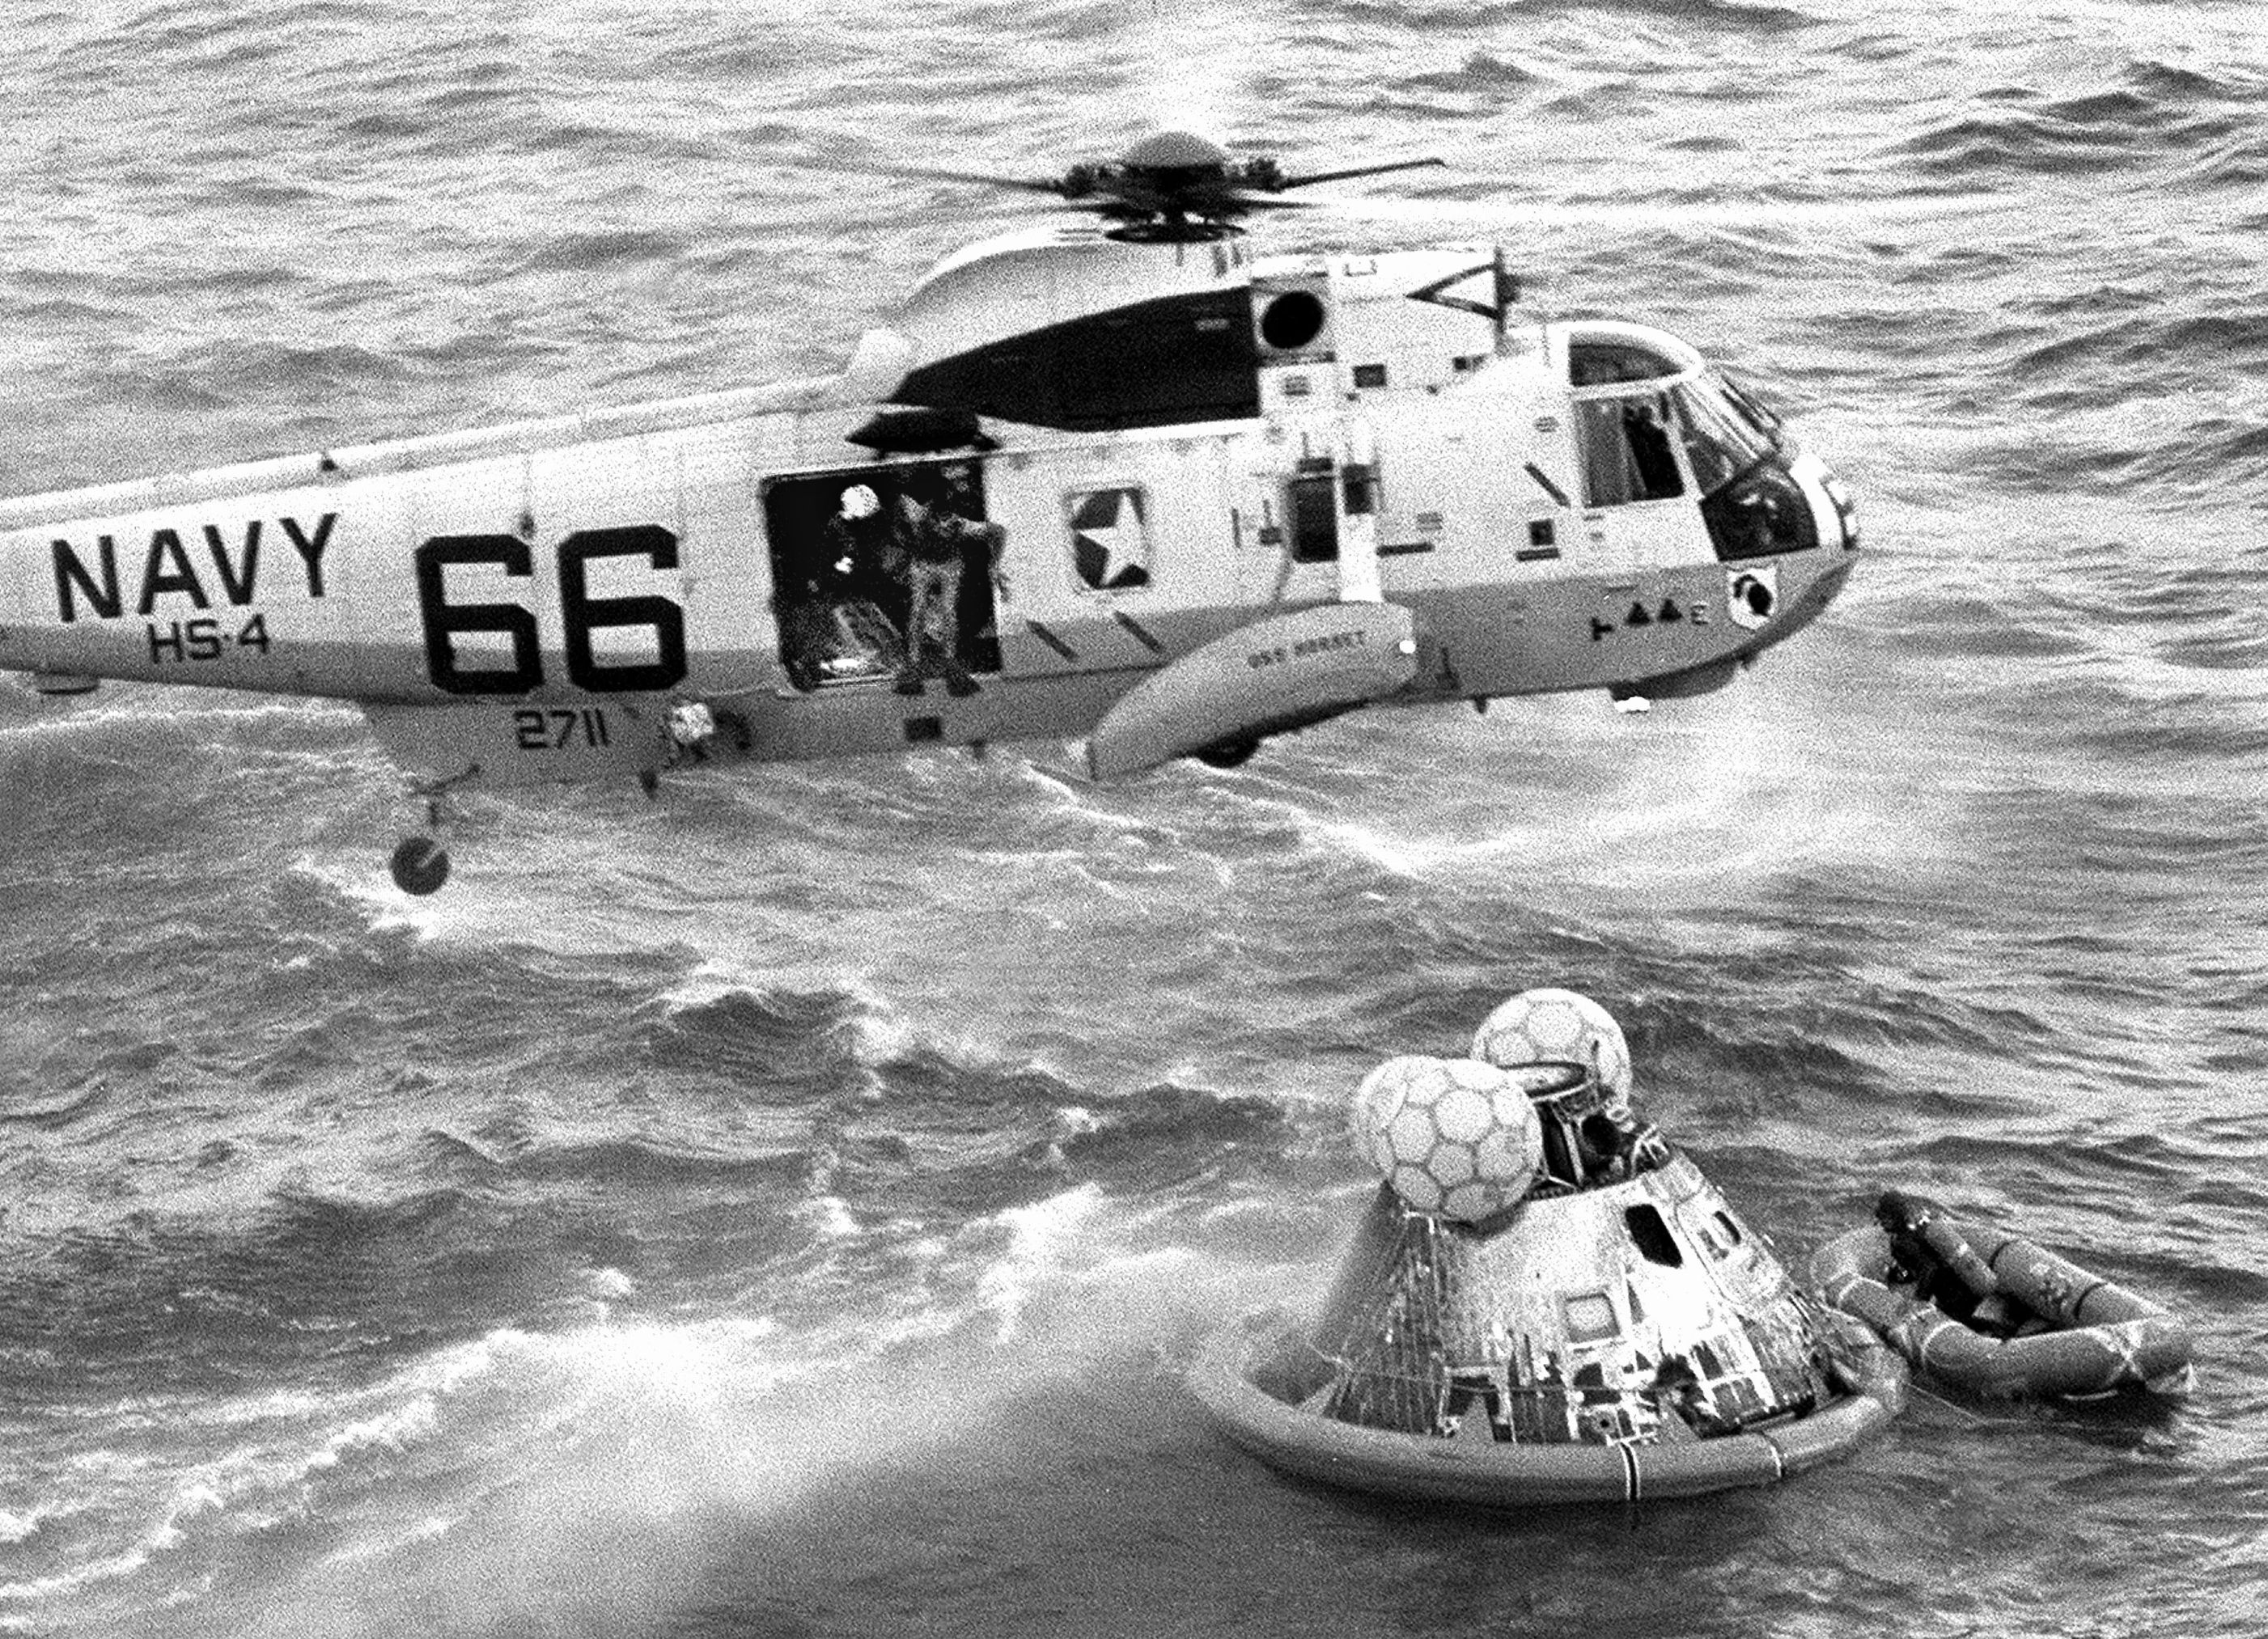
 NS-ha-060 |
688k | A nice view of the HS-4 Sea King helicopter #66 (BuNo 152711), piloted by CDR Don Jones, and the Billy Pugh rescue net reaching the recovery raft and being grabbed by the UDT decon swimmer. The hoist operators can be clearly seen in the open hatch of the helicopter, guiding the net to the recovery raft.
National Aeronautics and Space Administration (NASA) photo S69-21723. |
Courtesy of NASA, via Bob Fish | |
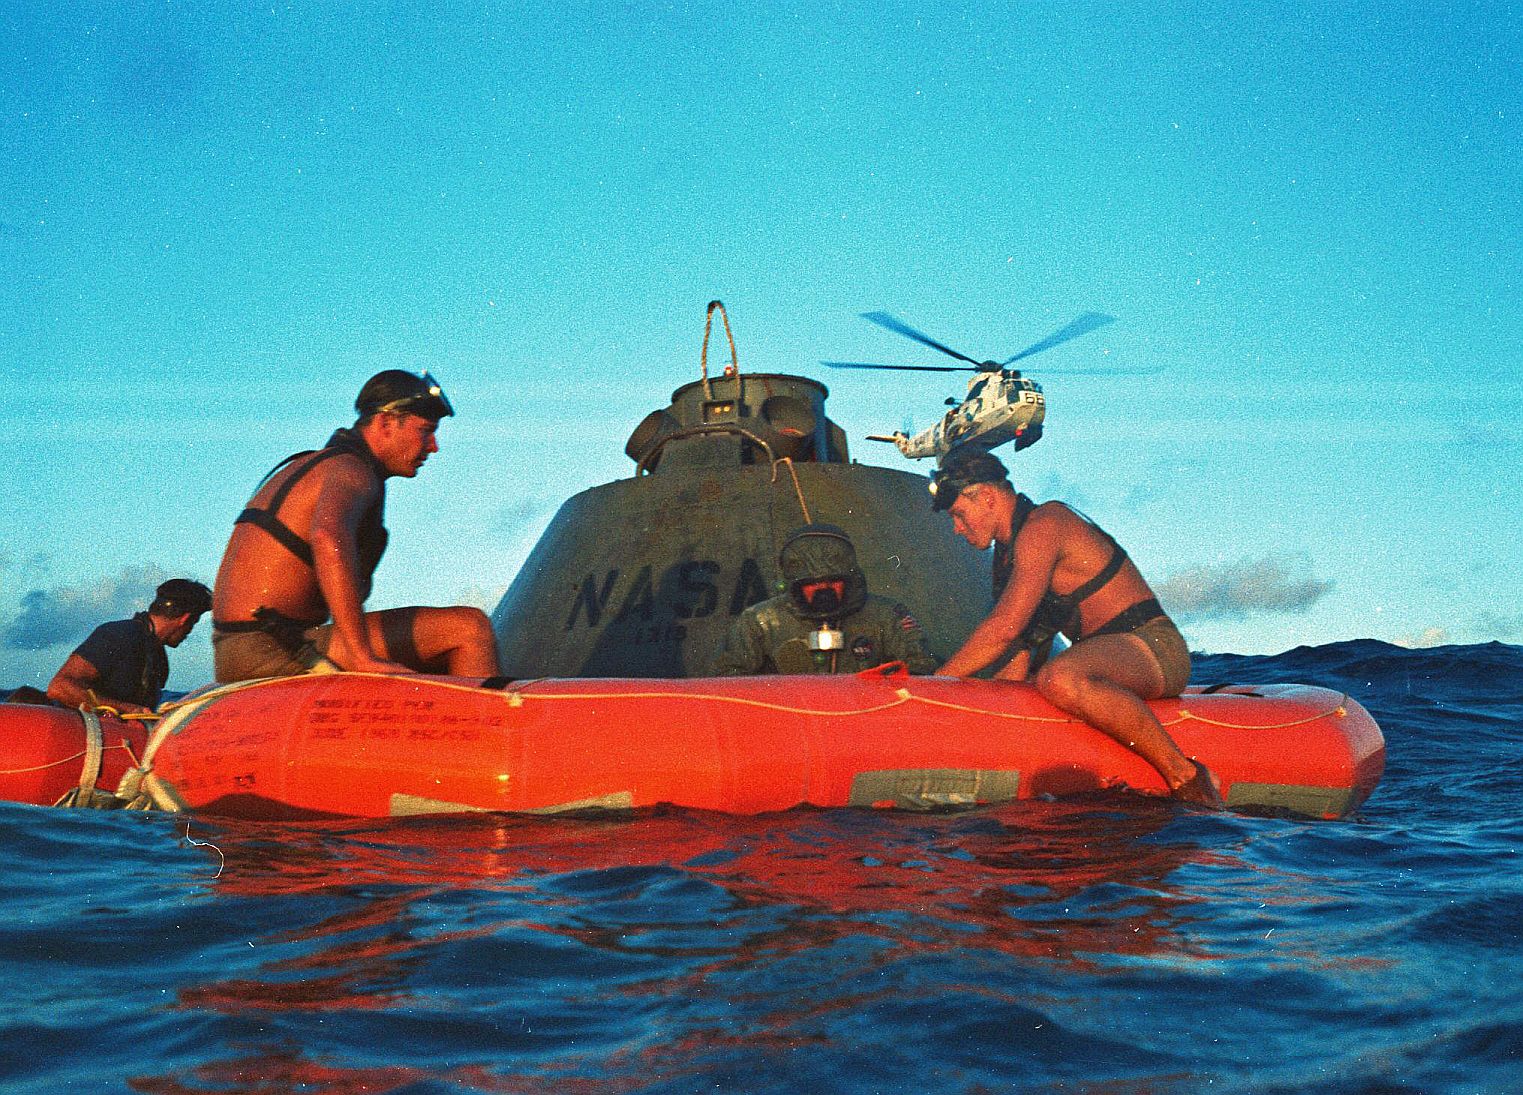
 NS-ha-061 |
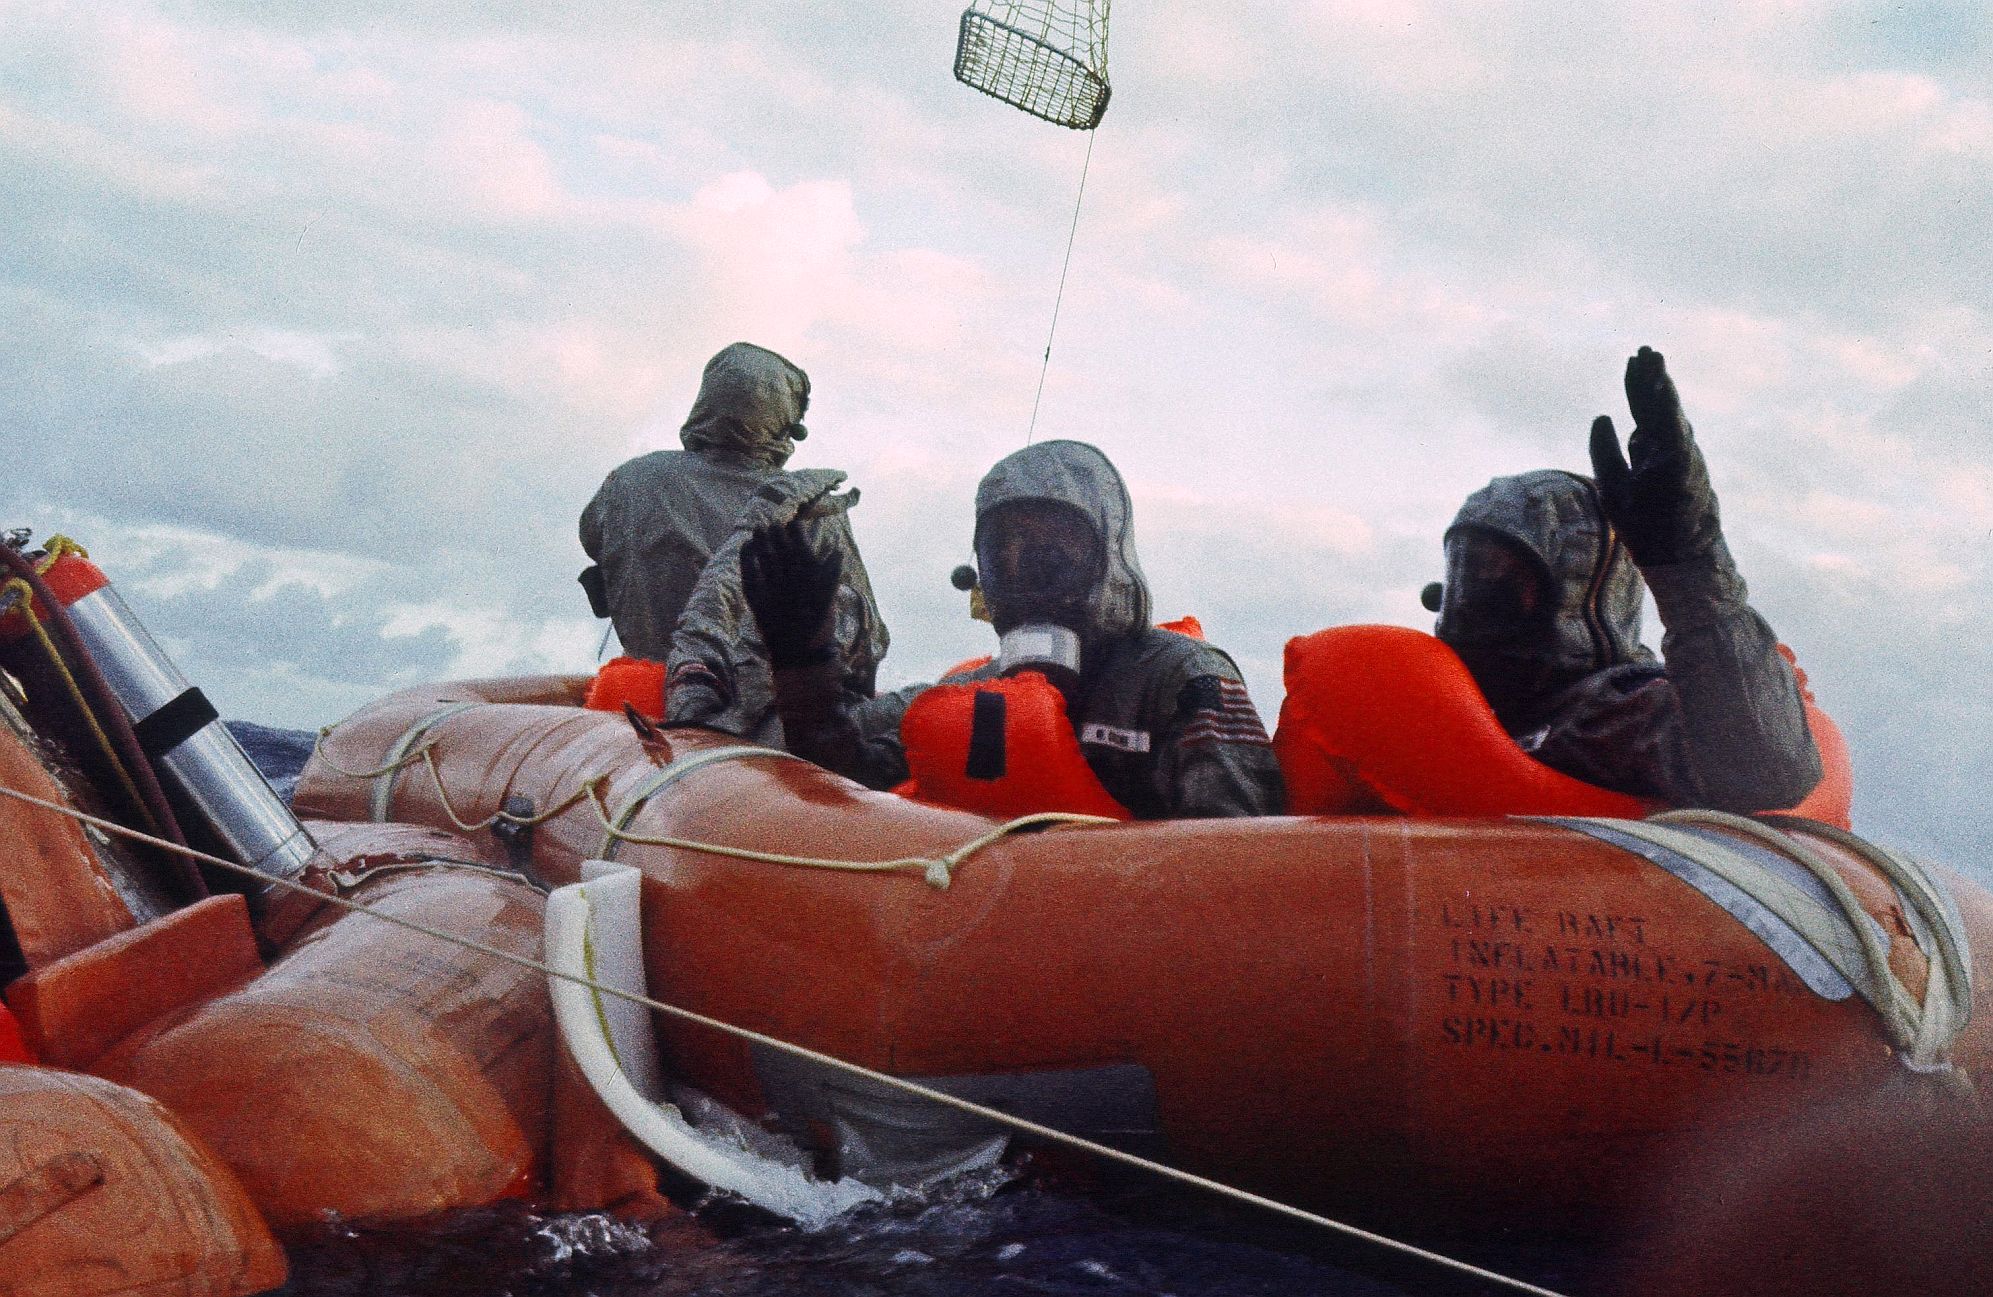
542k | Another sea level view of the three astronauts wearing their BIG suits in the decontamination raft as they await the Billy Pugh rescue net. Michael Collins and "Buzz" Aldrin wave at UDT swimmer John Wolfram, indicating they are doing fine. US Navy photo by SN John Wolfram. |
Bob Fish | |
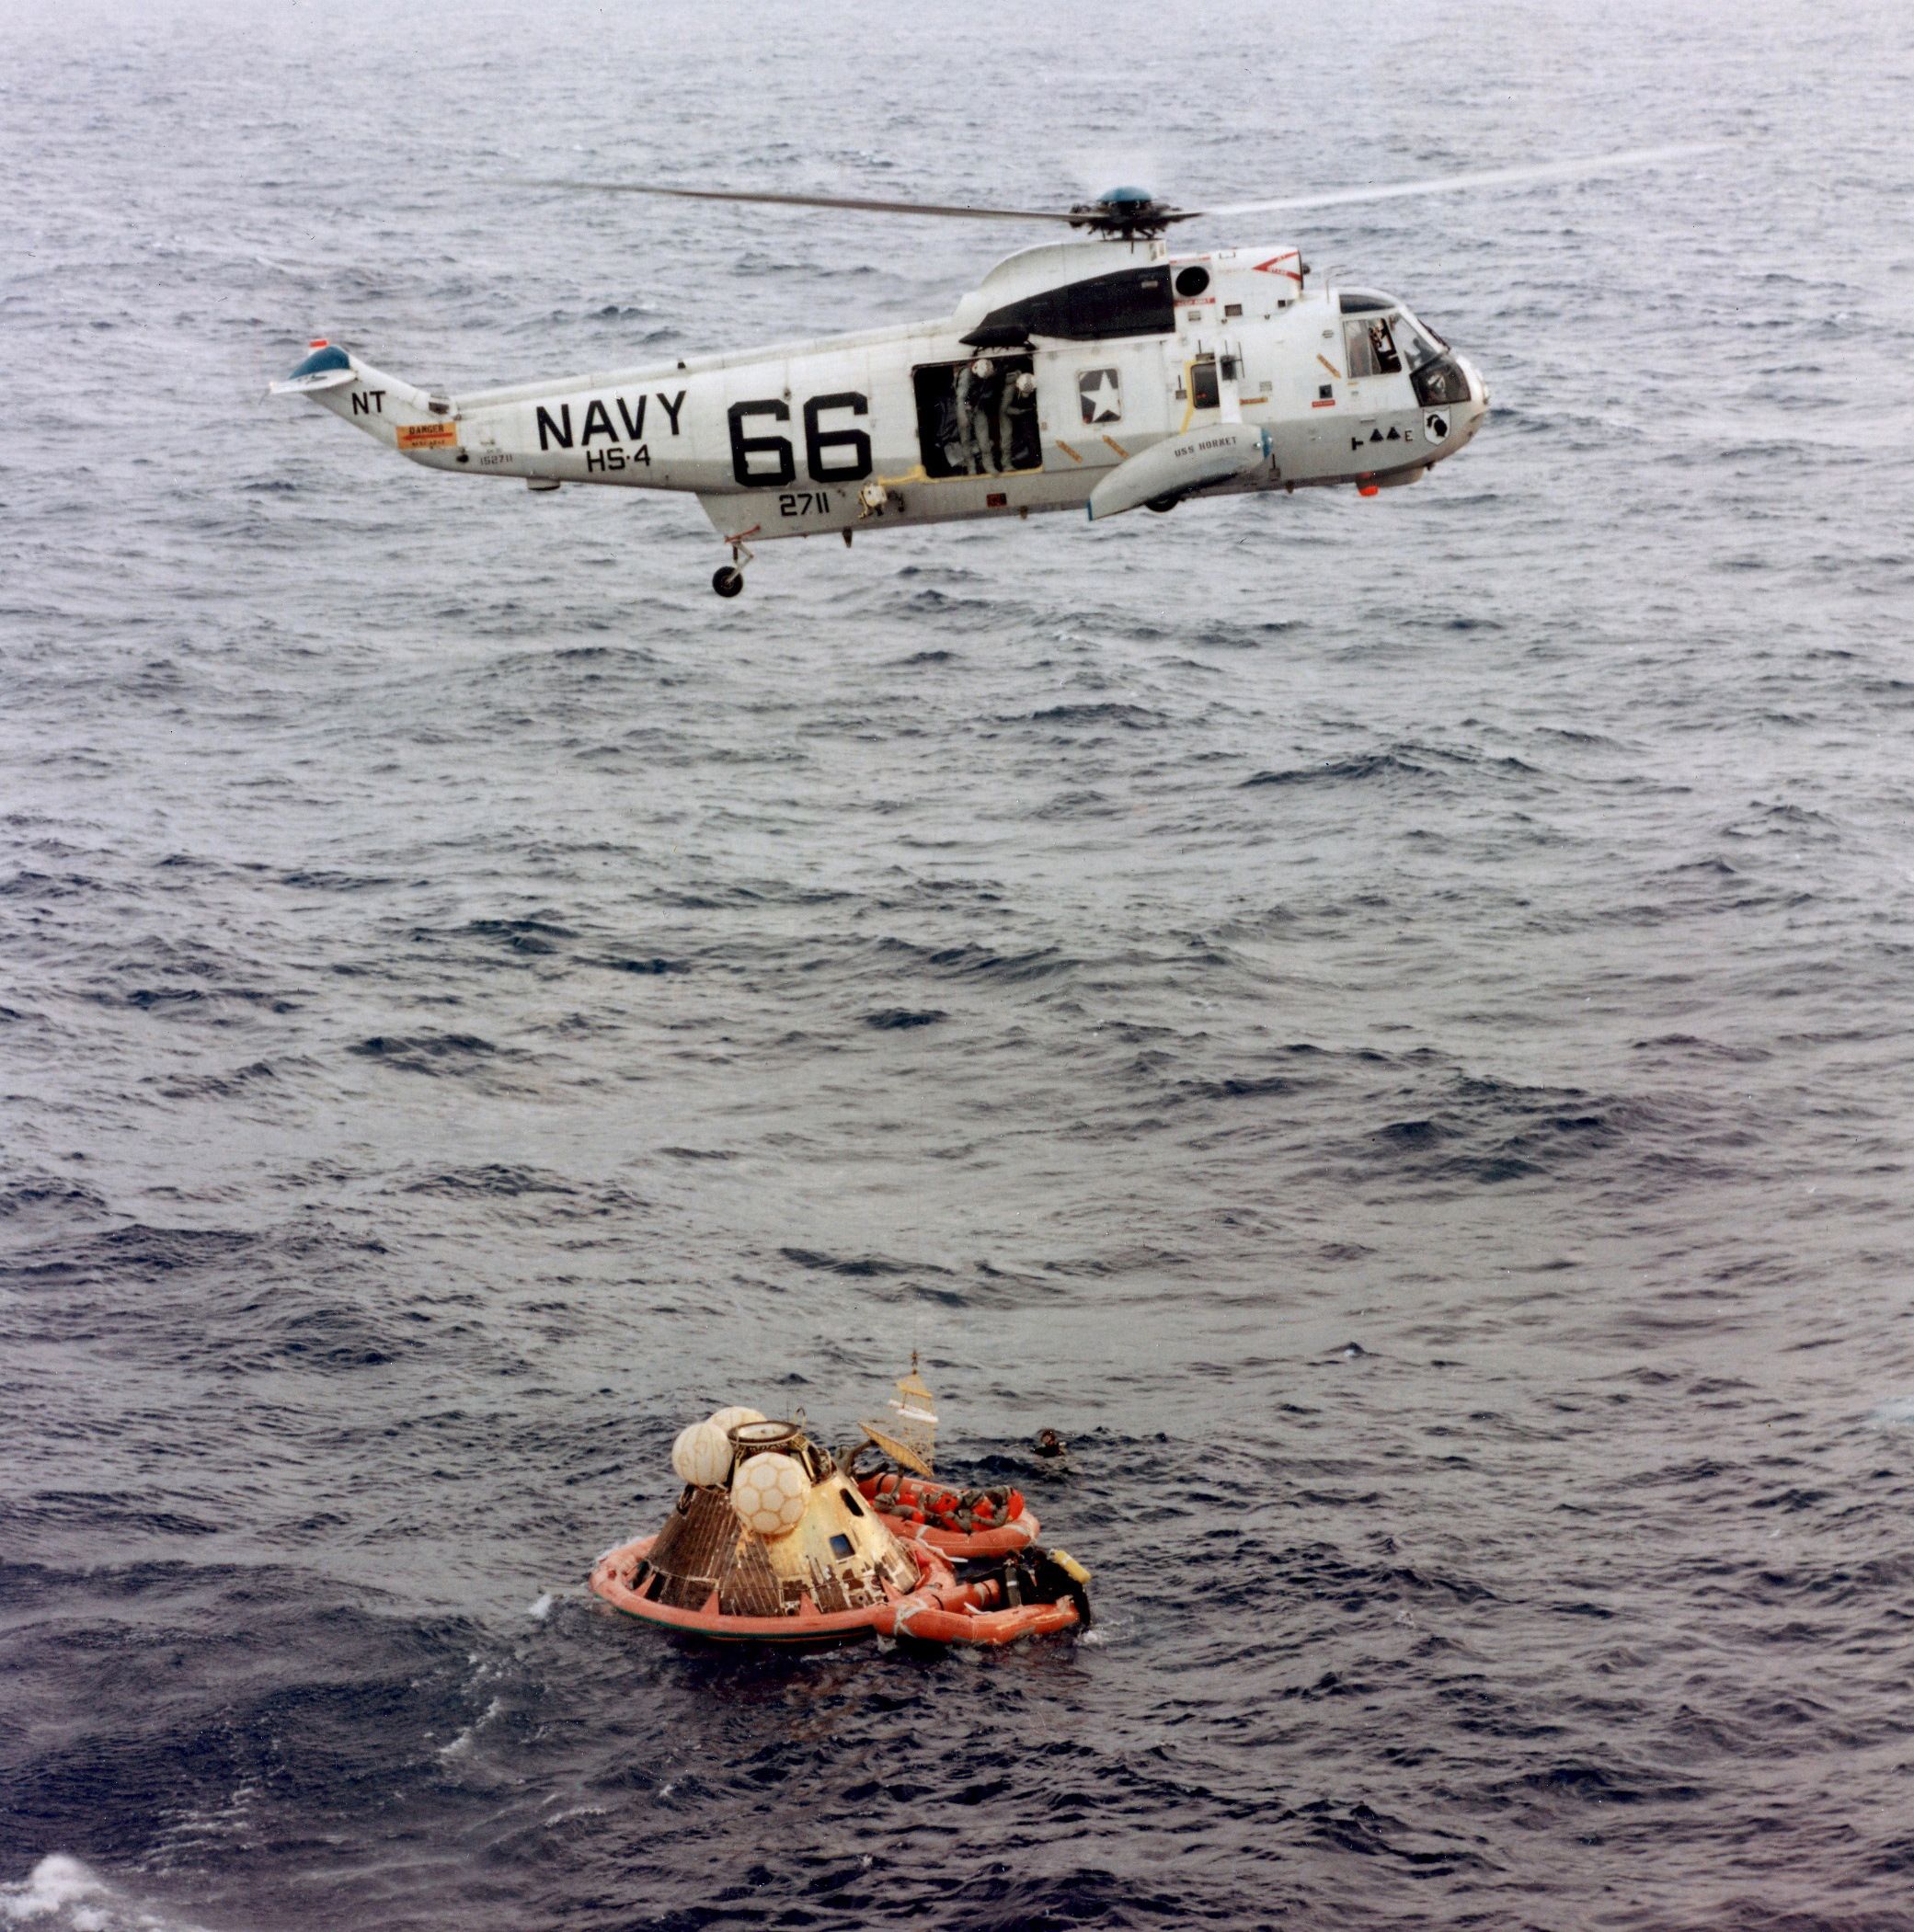
 NS-ha-062 |
1.45M | Once the UDT swimmer finished decontaminating the three astronauts, the pilot of recovery helicopter #66, CDR Donald Jones, hovered over the decontamination raft and lowered down a standard Navy Billy Pugh rescue net. The astronauts were hoisted up one at a time, then NASA flight surgeon Dr. William Carpentier gave them a quick health check to ensure the quarantine process had not been compromised. |
Bob Fish | |
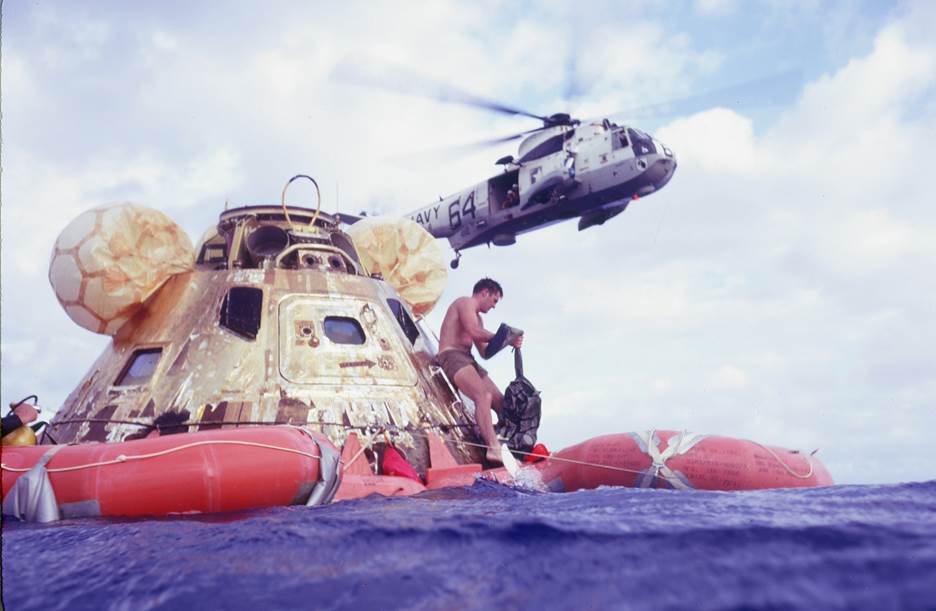
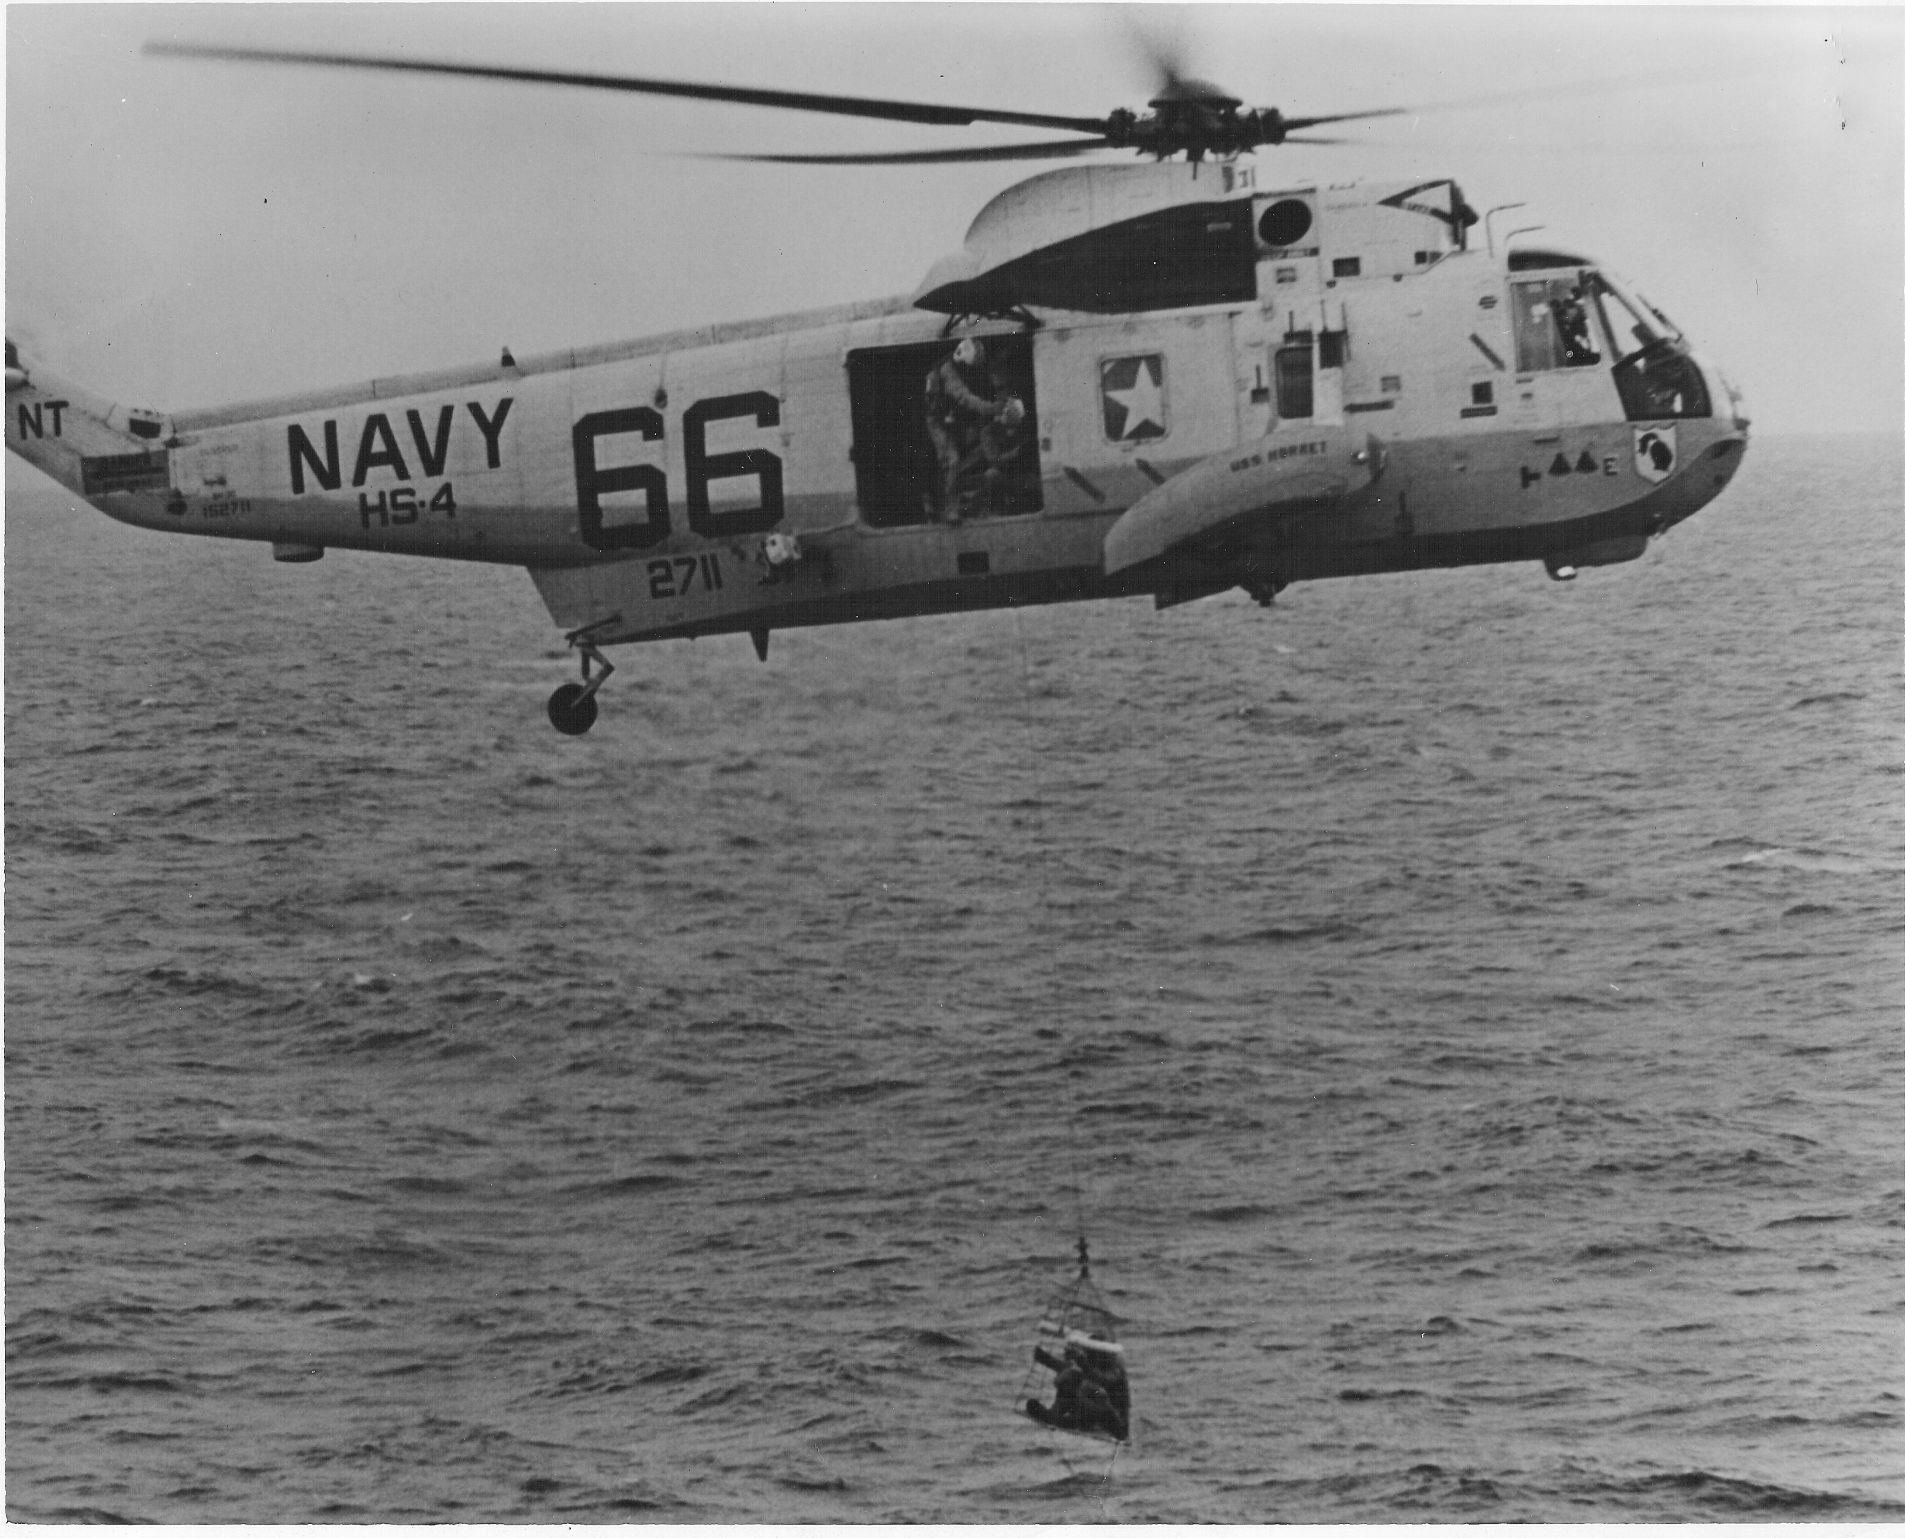 NS-ha-570 |
352k | An astronaut is now in the Billy Pugh rescue net and is being hoisted into the recovery helicopter, the world-famous "Helicopter 66."
USN photo by PHCS Milt Putnam, HS-4. |
Bob Fish | |
 NS-ha-063 |
922k | This excellent close-up shows astronaut Neil Armstrong wearing his BIG suit in the Billy Pugh net, just below the cargo hatch of Sea King #66. The net is about to be pulled into the open hatch so the astronaut can get out and sit on a canvas bench seat inside. A stand-by helicopter with another UDT team aboard is seen in the background. US Navy photo by AWHC Norvell Wood, in the collections of the Naval Historical Foundation. |
Bob Fish | |
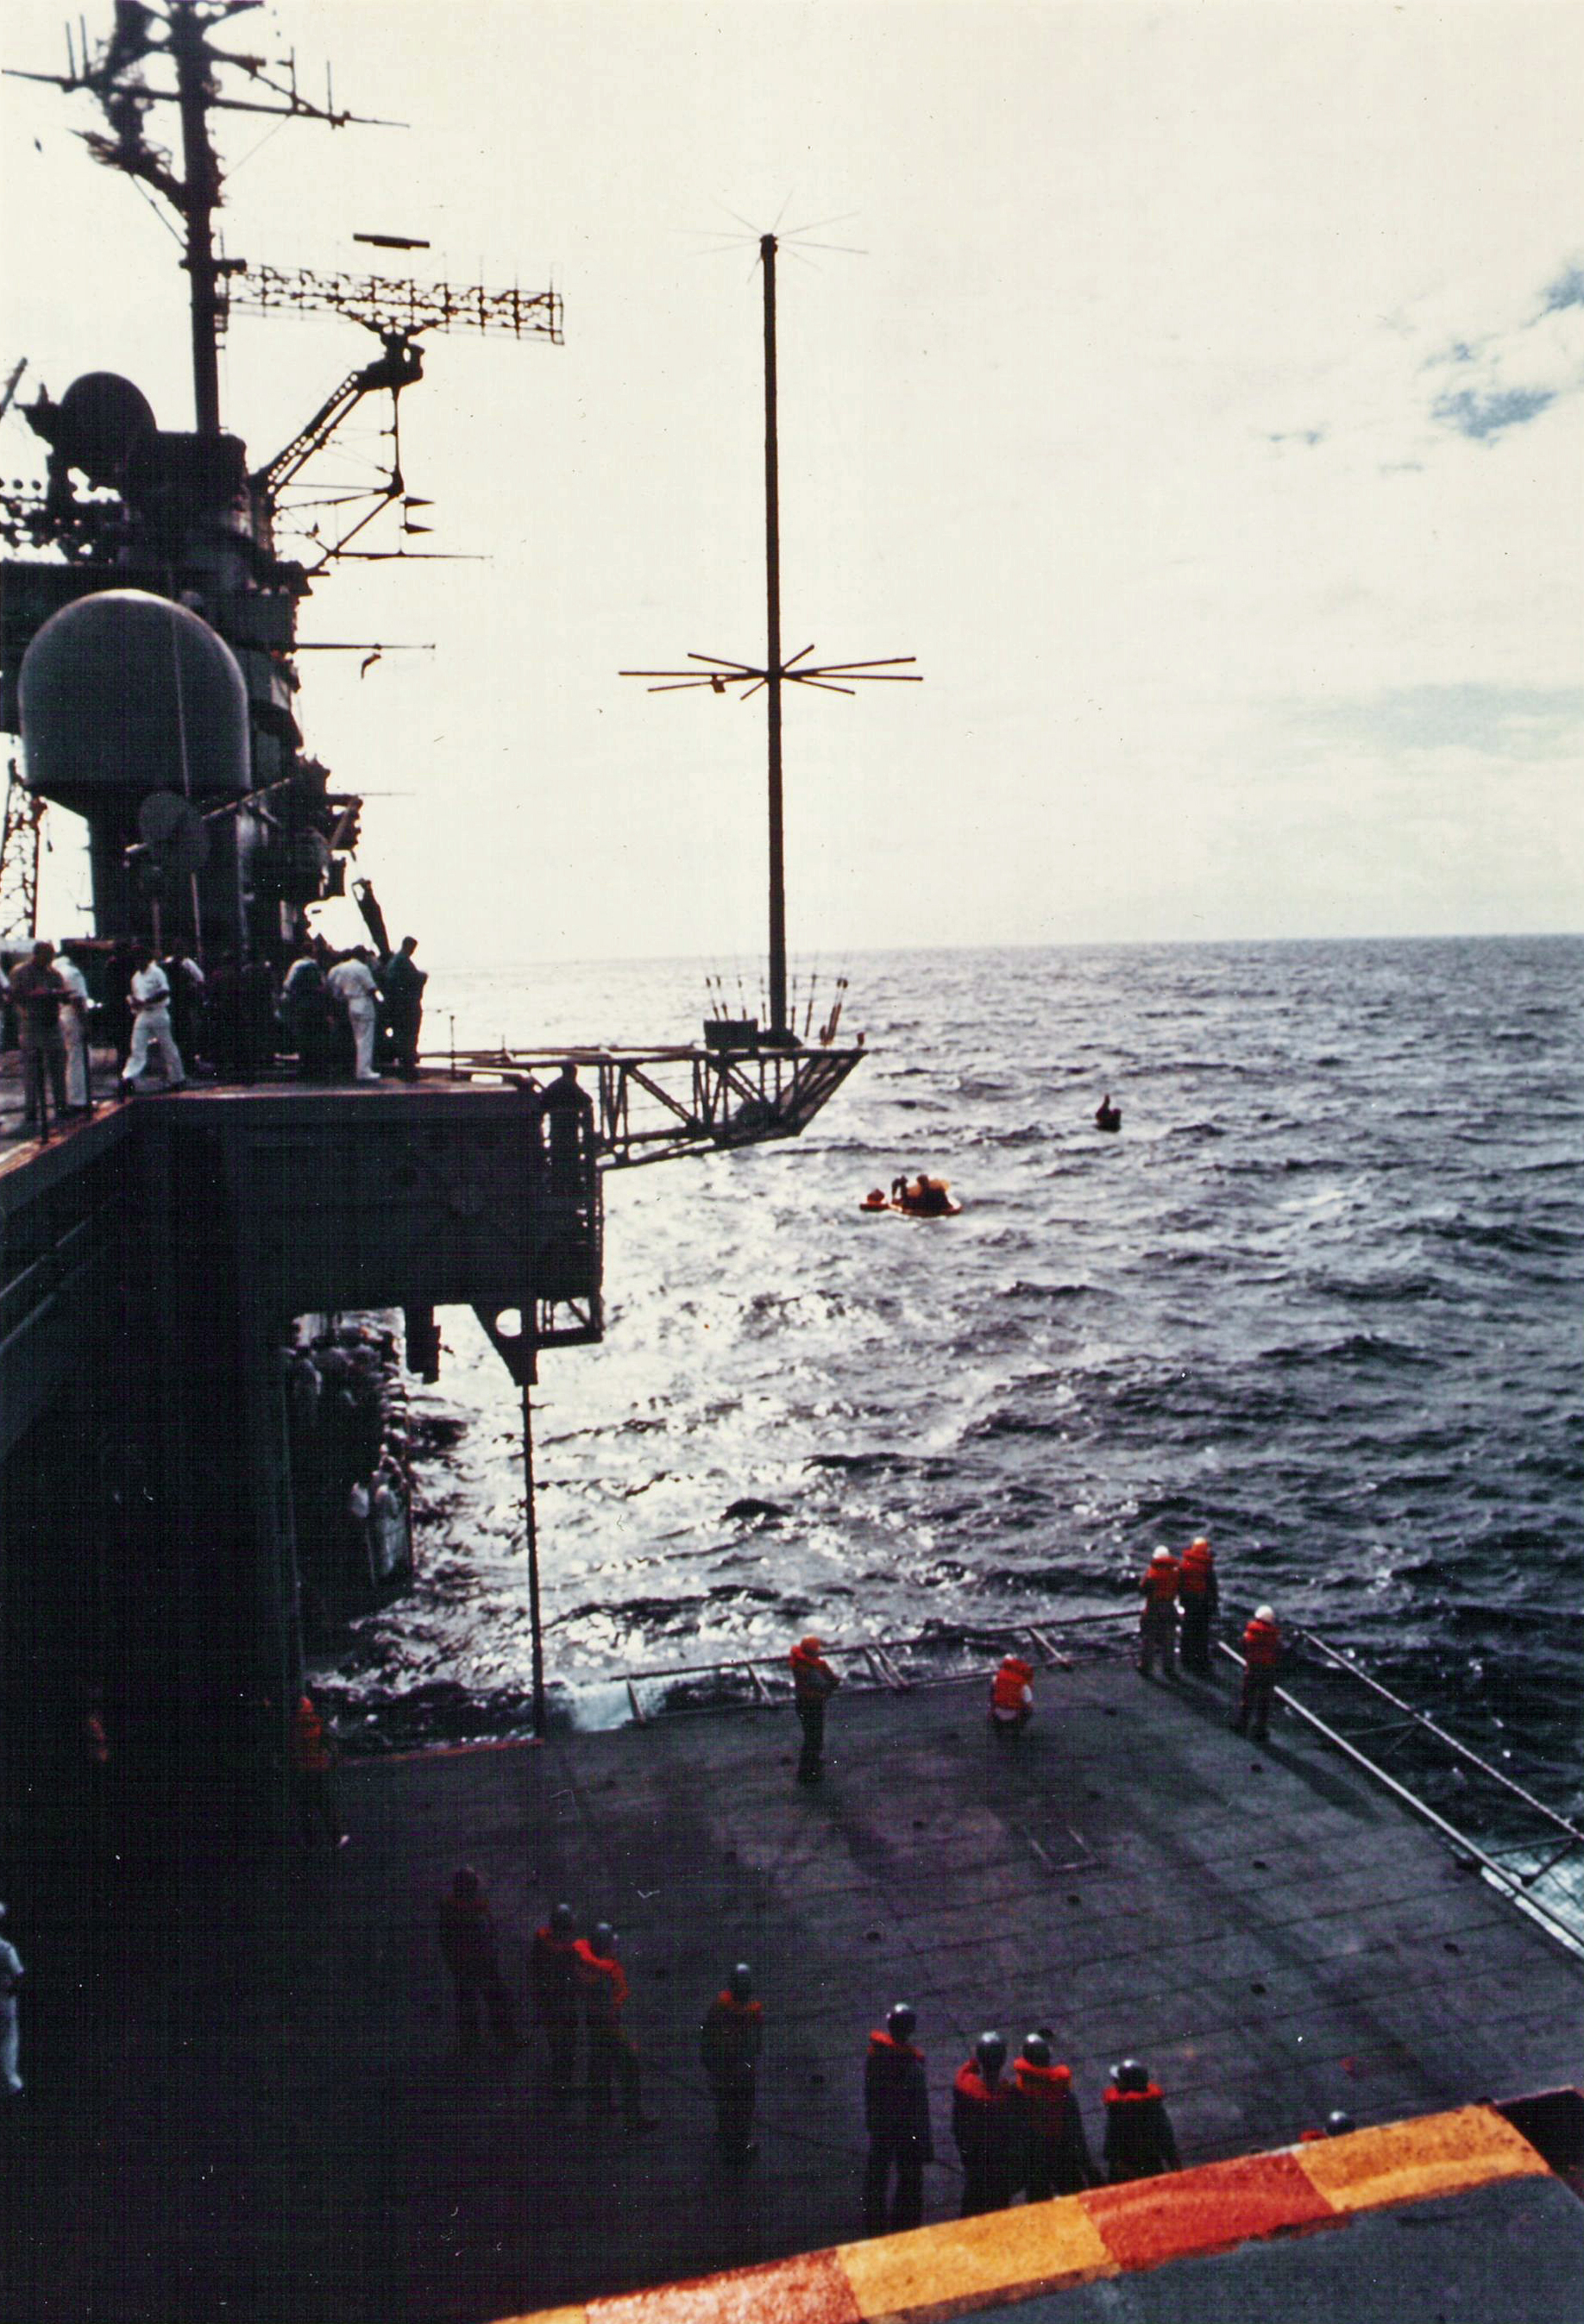
 NS-ha-066 |
109k | Waiting for the arrival of the Apollo 11 crew, aboard USS Hornet. Left to right: William P. Rogers, Secretary of State; Henry A. Kissinger, Assistant to the President for National Security Affairs; Admiral John S. McCain, Jr., Commander-in-Chief, US Pacific Command; and RADM Donald C. Davis, Commander, Task Force 130.
US Navy photo. |
Courtesy of the National Naval
Aviation Museum (NNAM), via Mat Garretson and Bob Canchola, BT, USN (Ret.) |
|
 NS-ha-064 |
849k | A well timed photo of the HS-4 Recovery helicopter #66 landing on USS Hornet (CVS-12) flight deck after recovering the three Apollo 11 astronauts. It has just flown by Marine One, President Nixon's helicopter, which was kept in a "high alert status" in case the quarantine protocol had been broken and the President had to be quickly evacuated. Since the Photo helicopter #70 has already landed on the front of the flight deck, this photo was taken by a UDT or HS-4 person on the Swim 1 helo team.
US Navy photo. |
Bob Fish | |
 NS-ha-065 |
2.24M | NS-ha-065: Photo taken moments after HS-4 Recovery helicopter #66 had landed on the Hornet flight deck in spot #5, just aft of the portside elevator with the three Apollo 11 astronauts inside. Pilot CDR Don Jones is shutting down the Sea King engines and preparing the helo for towing onto the elevator. The two "command module" decals on the side of the cockpit denotes the successful recoveries of Apollo 8 (December 1968) and Apollo 10 (May 1969). US Navy photo by PHCS Robert Lawson.
NS-ha-065a: Showing the third "command module" decal, for Apollo 11 (July 1969). |
Bob Fish | |
 NS-ha-065a |
388k | Mat Garretson | ||
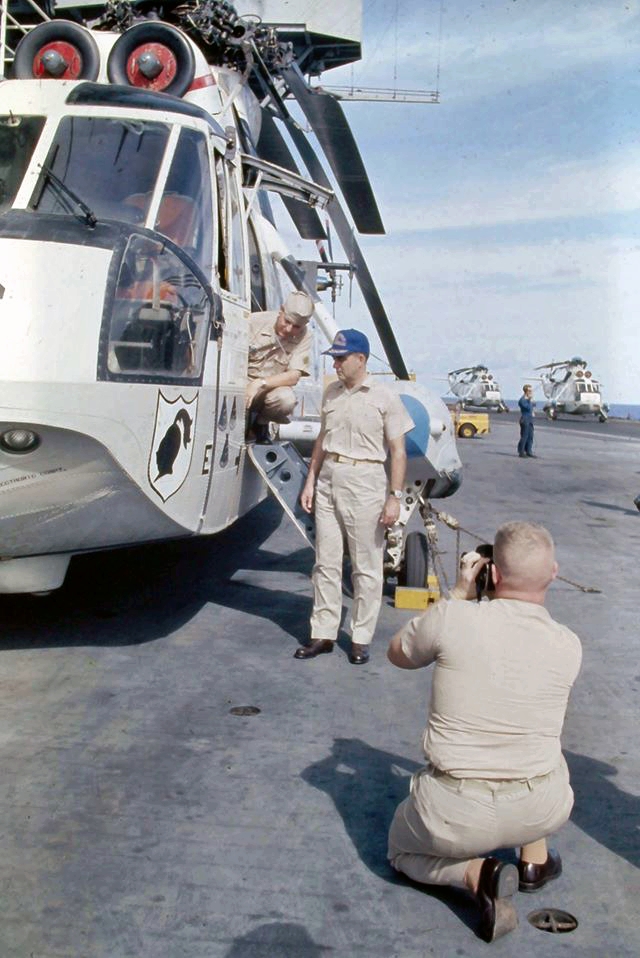
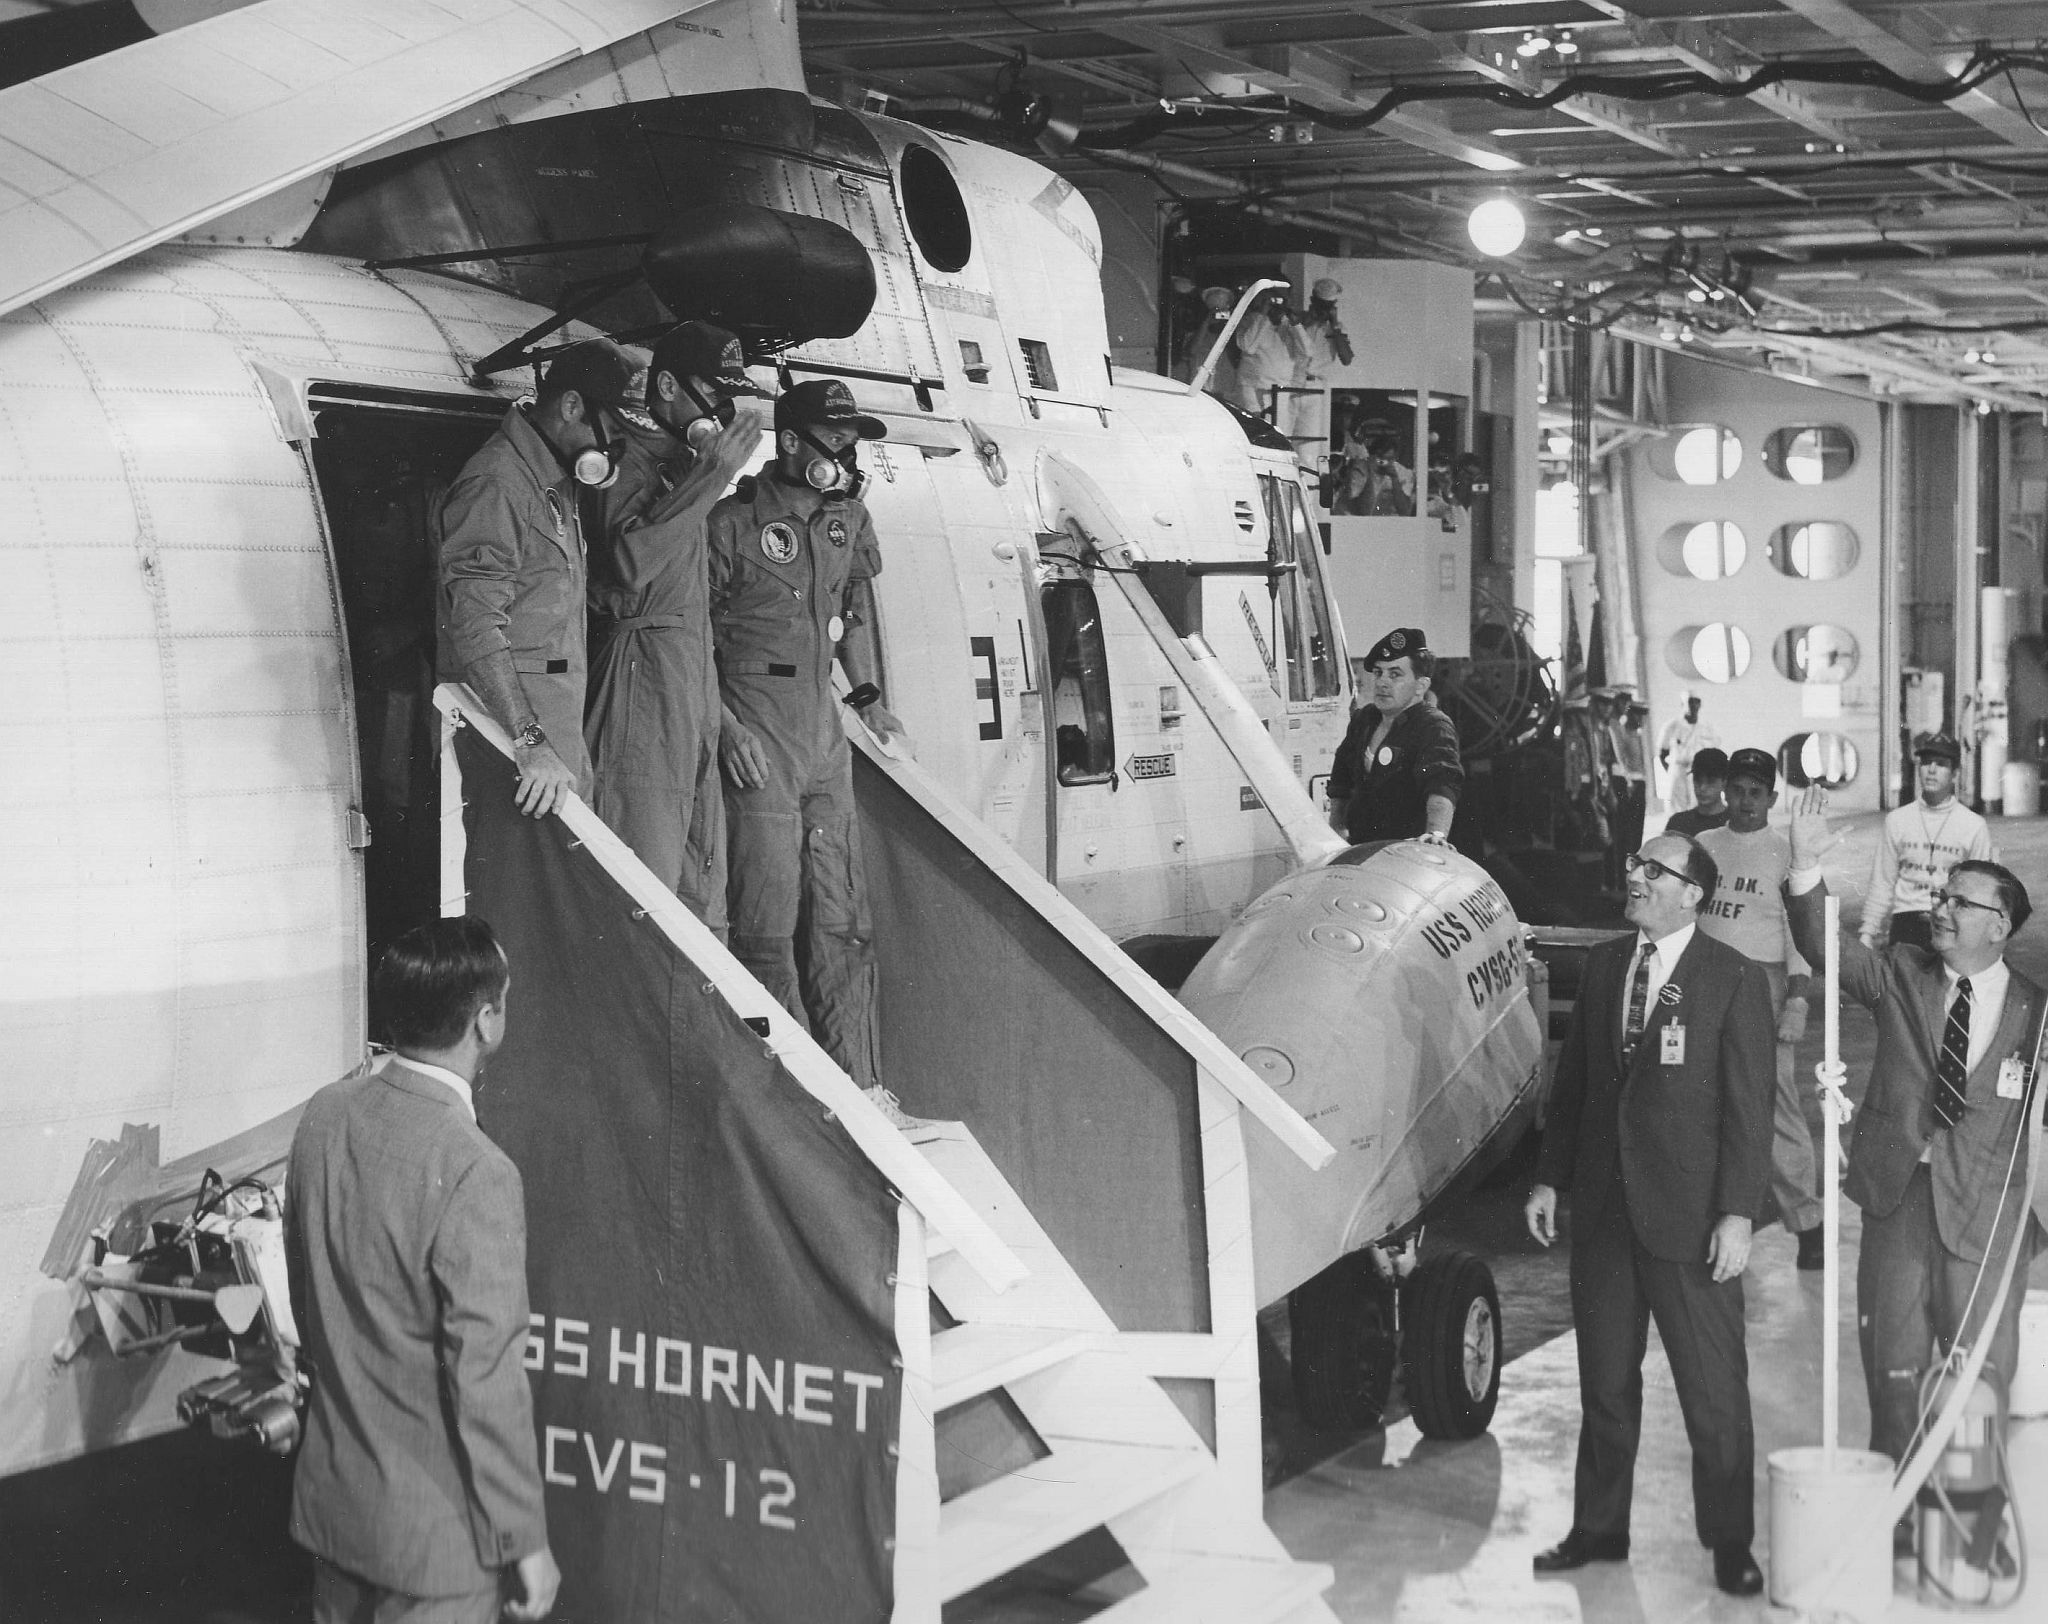
 NS-ha-067 |
668k | Once lowered to Hangar Bay 2 of the Hornet, Sea King #66 was towed to a spot adjacent to the NASA Mobile Quarantine Facility (MQF). The astronauts are still wearing BIG suits, and happy their next ten steps will be on more solid ground. The first to exit is Michael Collins, second is Neil Armstrong, and third is "Buzz" Aldrin. Still in the helo behind Aldrin is NASA flight surgeon Bill Carpentier. On the near side of the steps, in the dark suit, is Dr. Don Stullken, NASA Recovery Team Leader. On the forward part of the helicopter is AWHC Stanley Robnett, preparing to quickly close the cargo hatch door. National Aeronautics and Space Administration (NASA) photo 6901225. |
Bill Gonyo Larger copy courtesy of NASA, via Bob Fish |
|
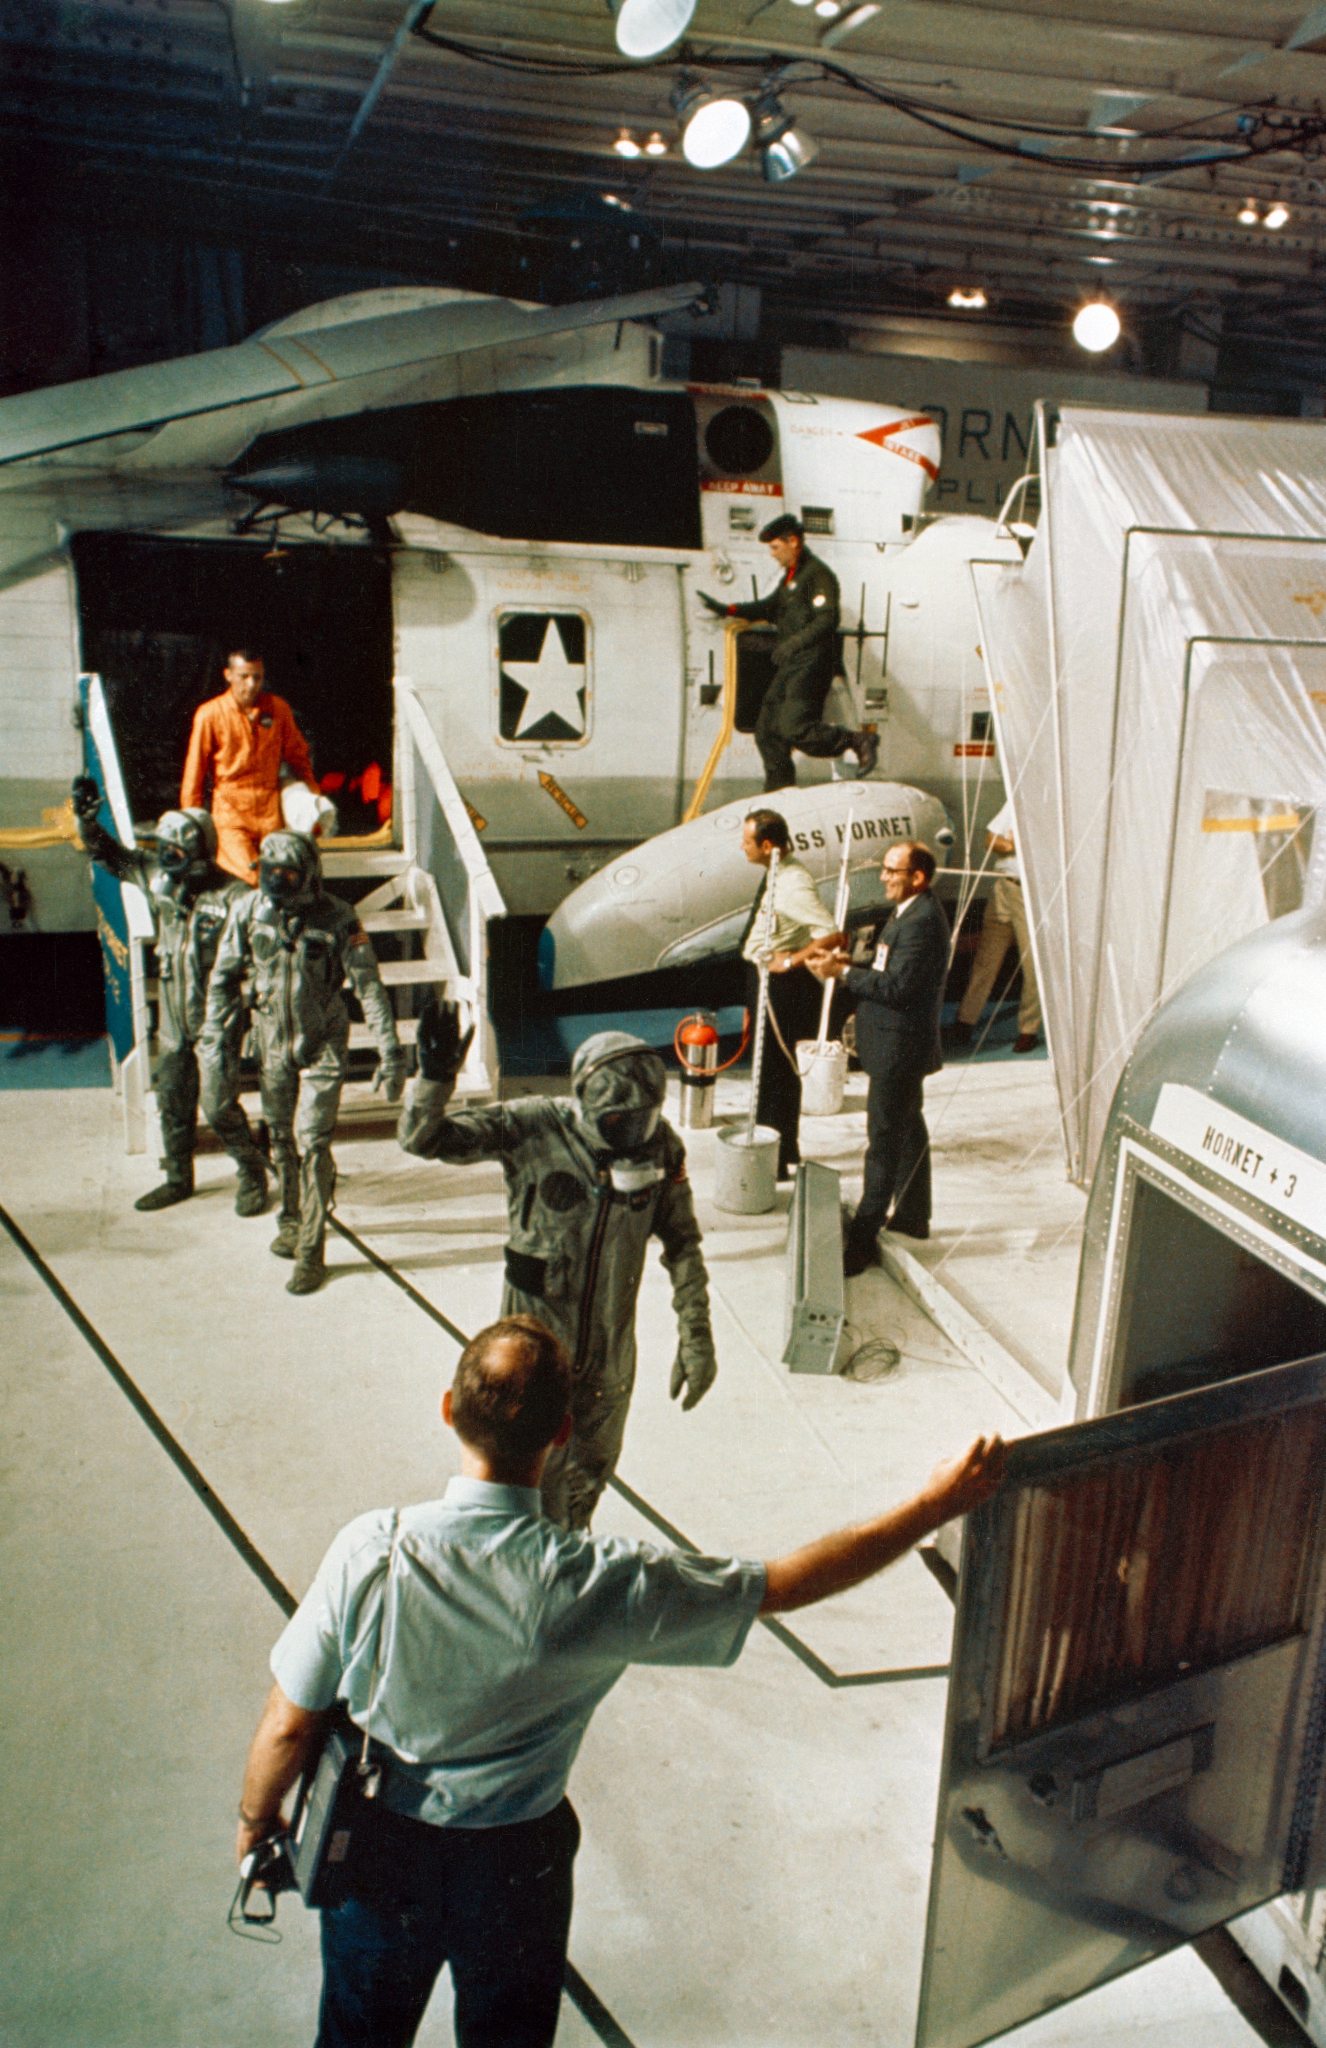 NS-ha-068 |
3.31M | Apollo 11 astronauts wave to the sailors and media as they walk across Hangar Bay 2 towards the MQF wearing BIG suits. Michael Collins is in the lead, followed by Neil Armstrong and then "Buzz" Aldrin. NASA flight surgeon Bill Carpentier is in the orange flight suit. HS-4 crewman AWHC Stanley Robnett is closing the cargo hatch door on helo #66, preparing it for decontamination on the flight deck. Standing next to the helo is a NASA person with a red-topped silver container who will spray glutaraldehyde on the stairs and floor touched by the astronauts to protect President Nixon when he arrives. Holding the MQF door is Dr. Clarence Jernigan, the flight surgeon assigned to Apollo 12. The plastic tunnel on the right will be used to connect the Command Module with the MQF to preserve the biological isolation of moon rocks as they are retrieved. National Aeronautics and Space Administration (NASA) photo 6901201. |
Courtesy of NASA, via Bob Fish | |
 NS-ha-068a |
362k | Howard Eitsen decontaminates the stairs. |
Mat Garretson | |
 NS-ha-069 |
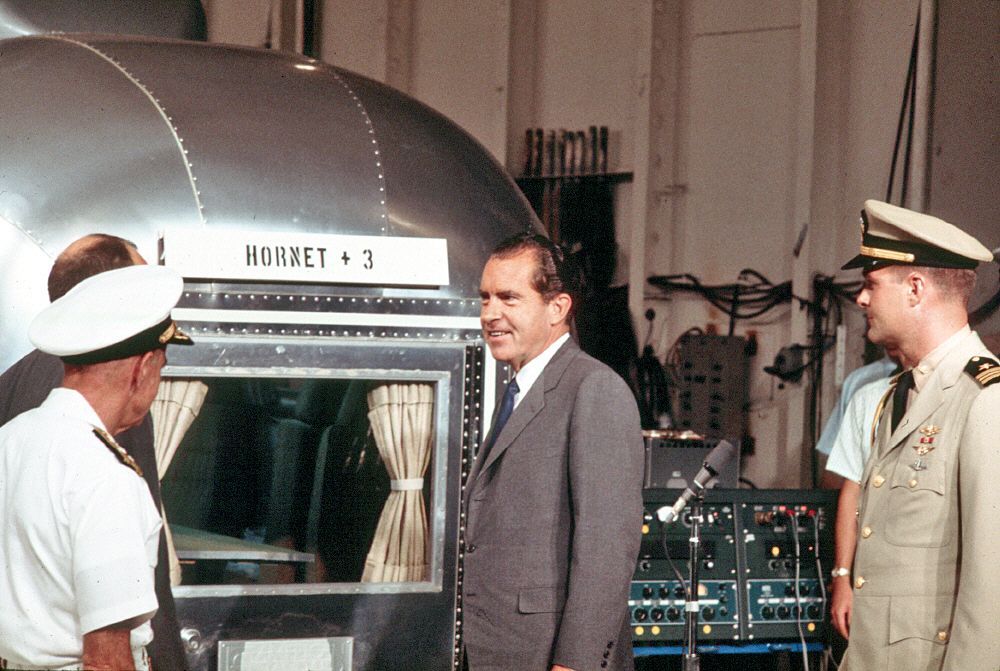
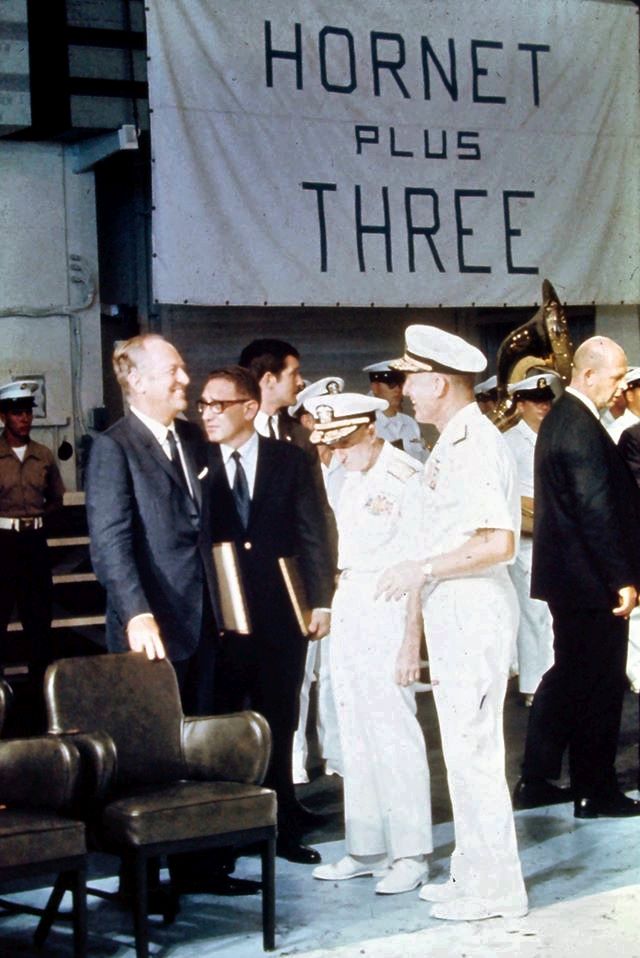
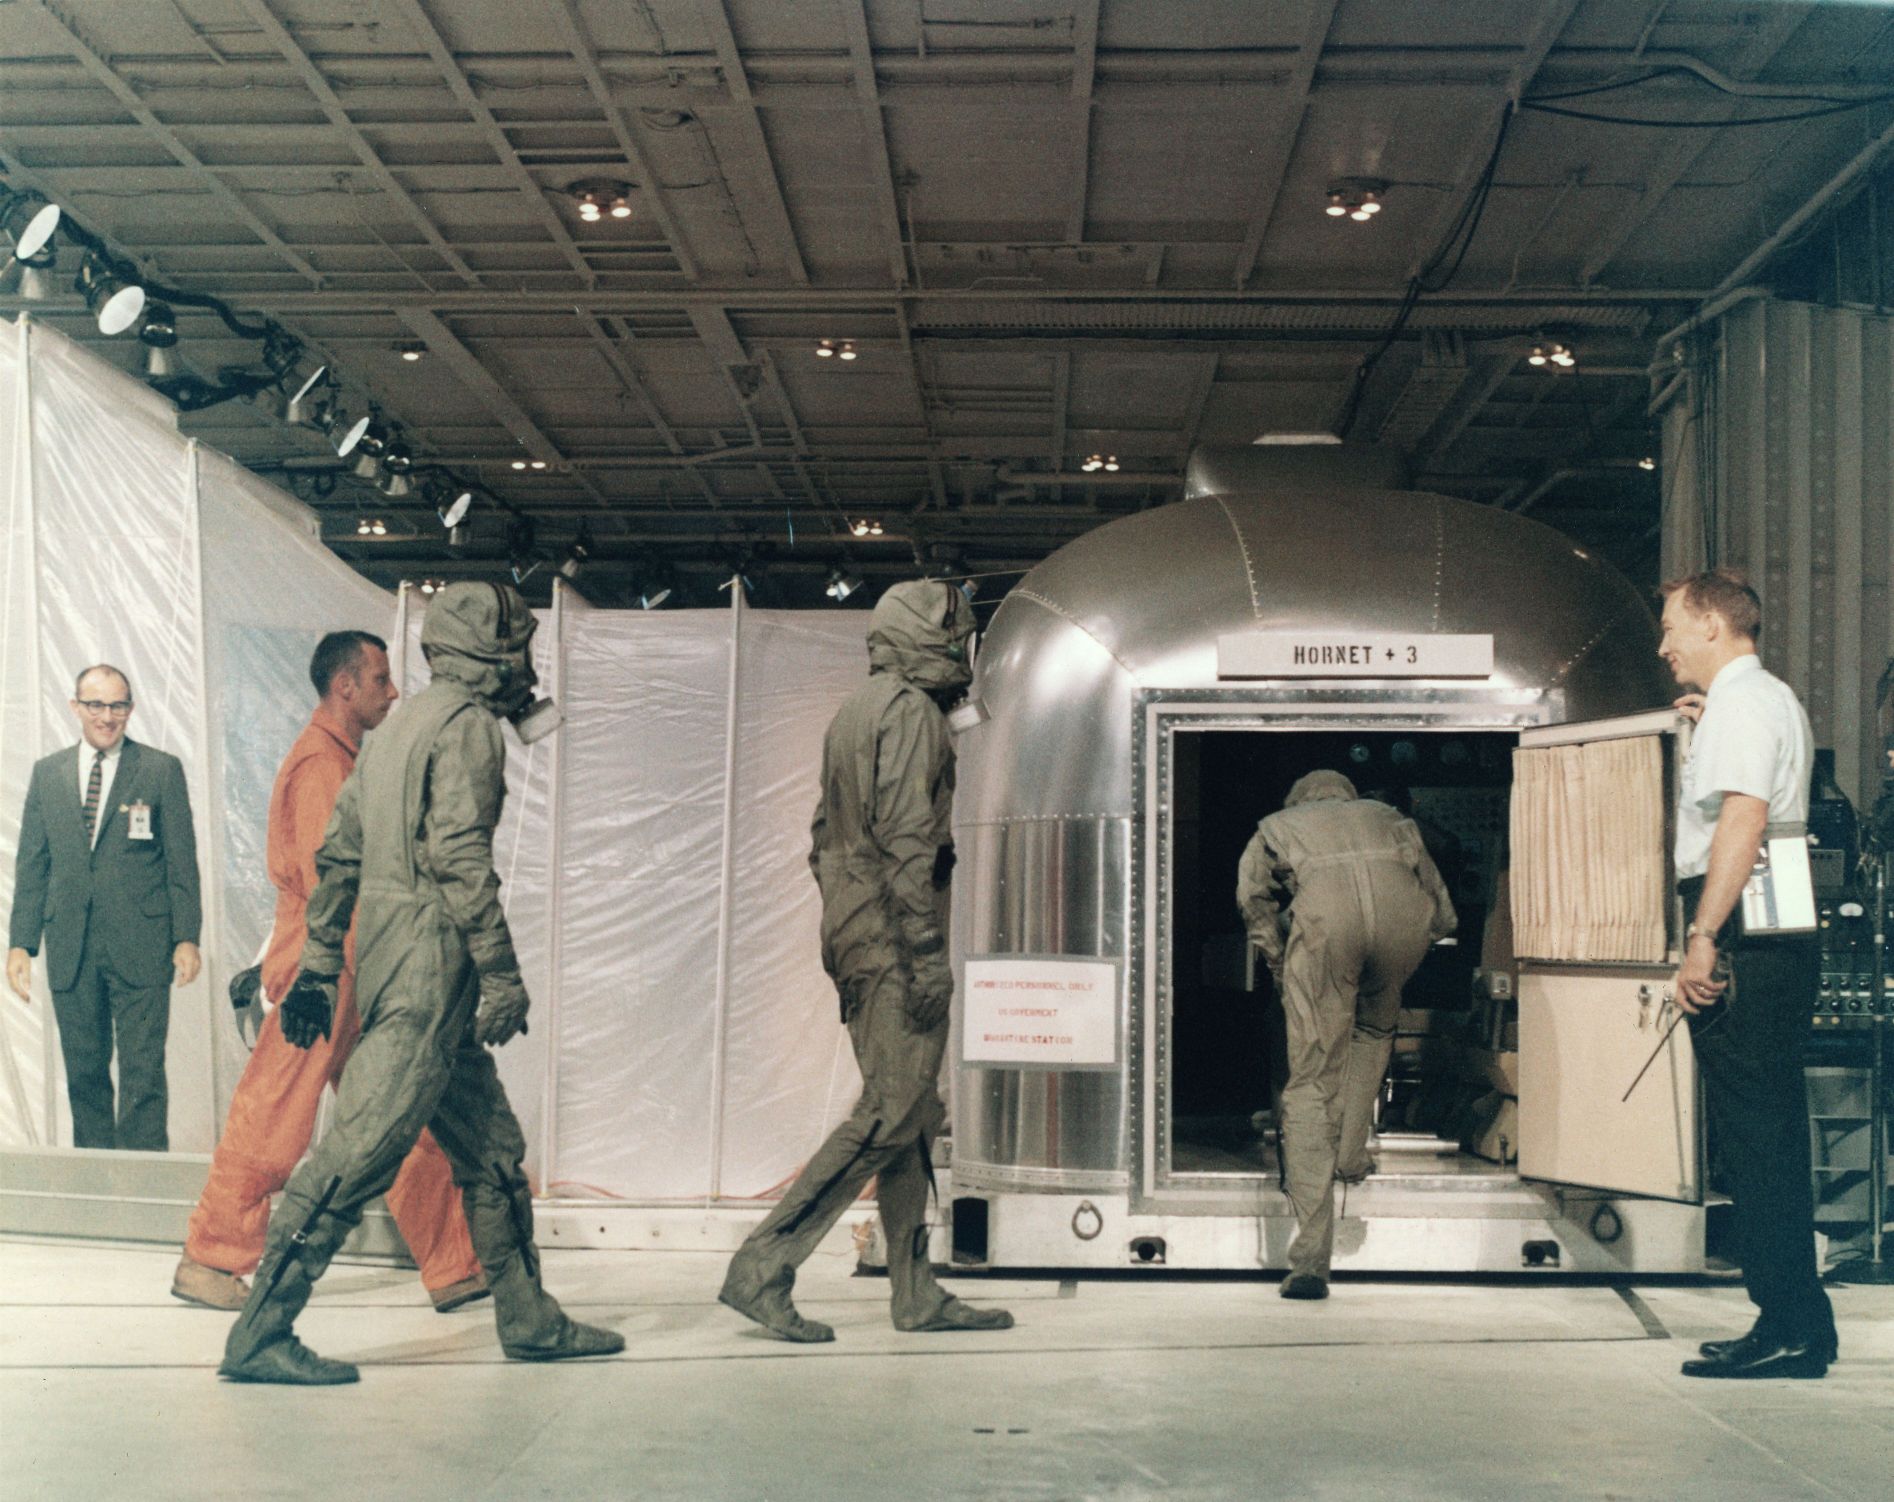
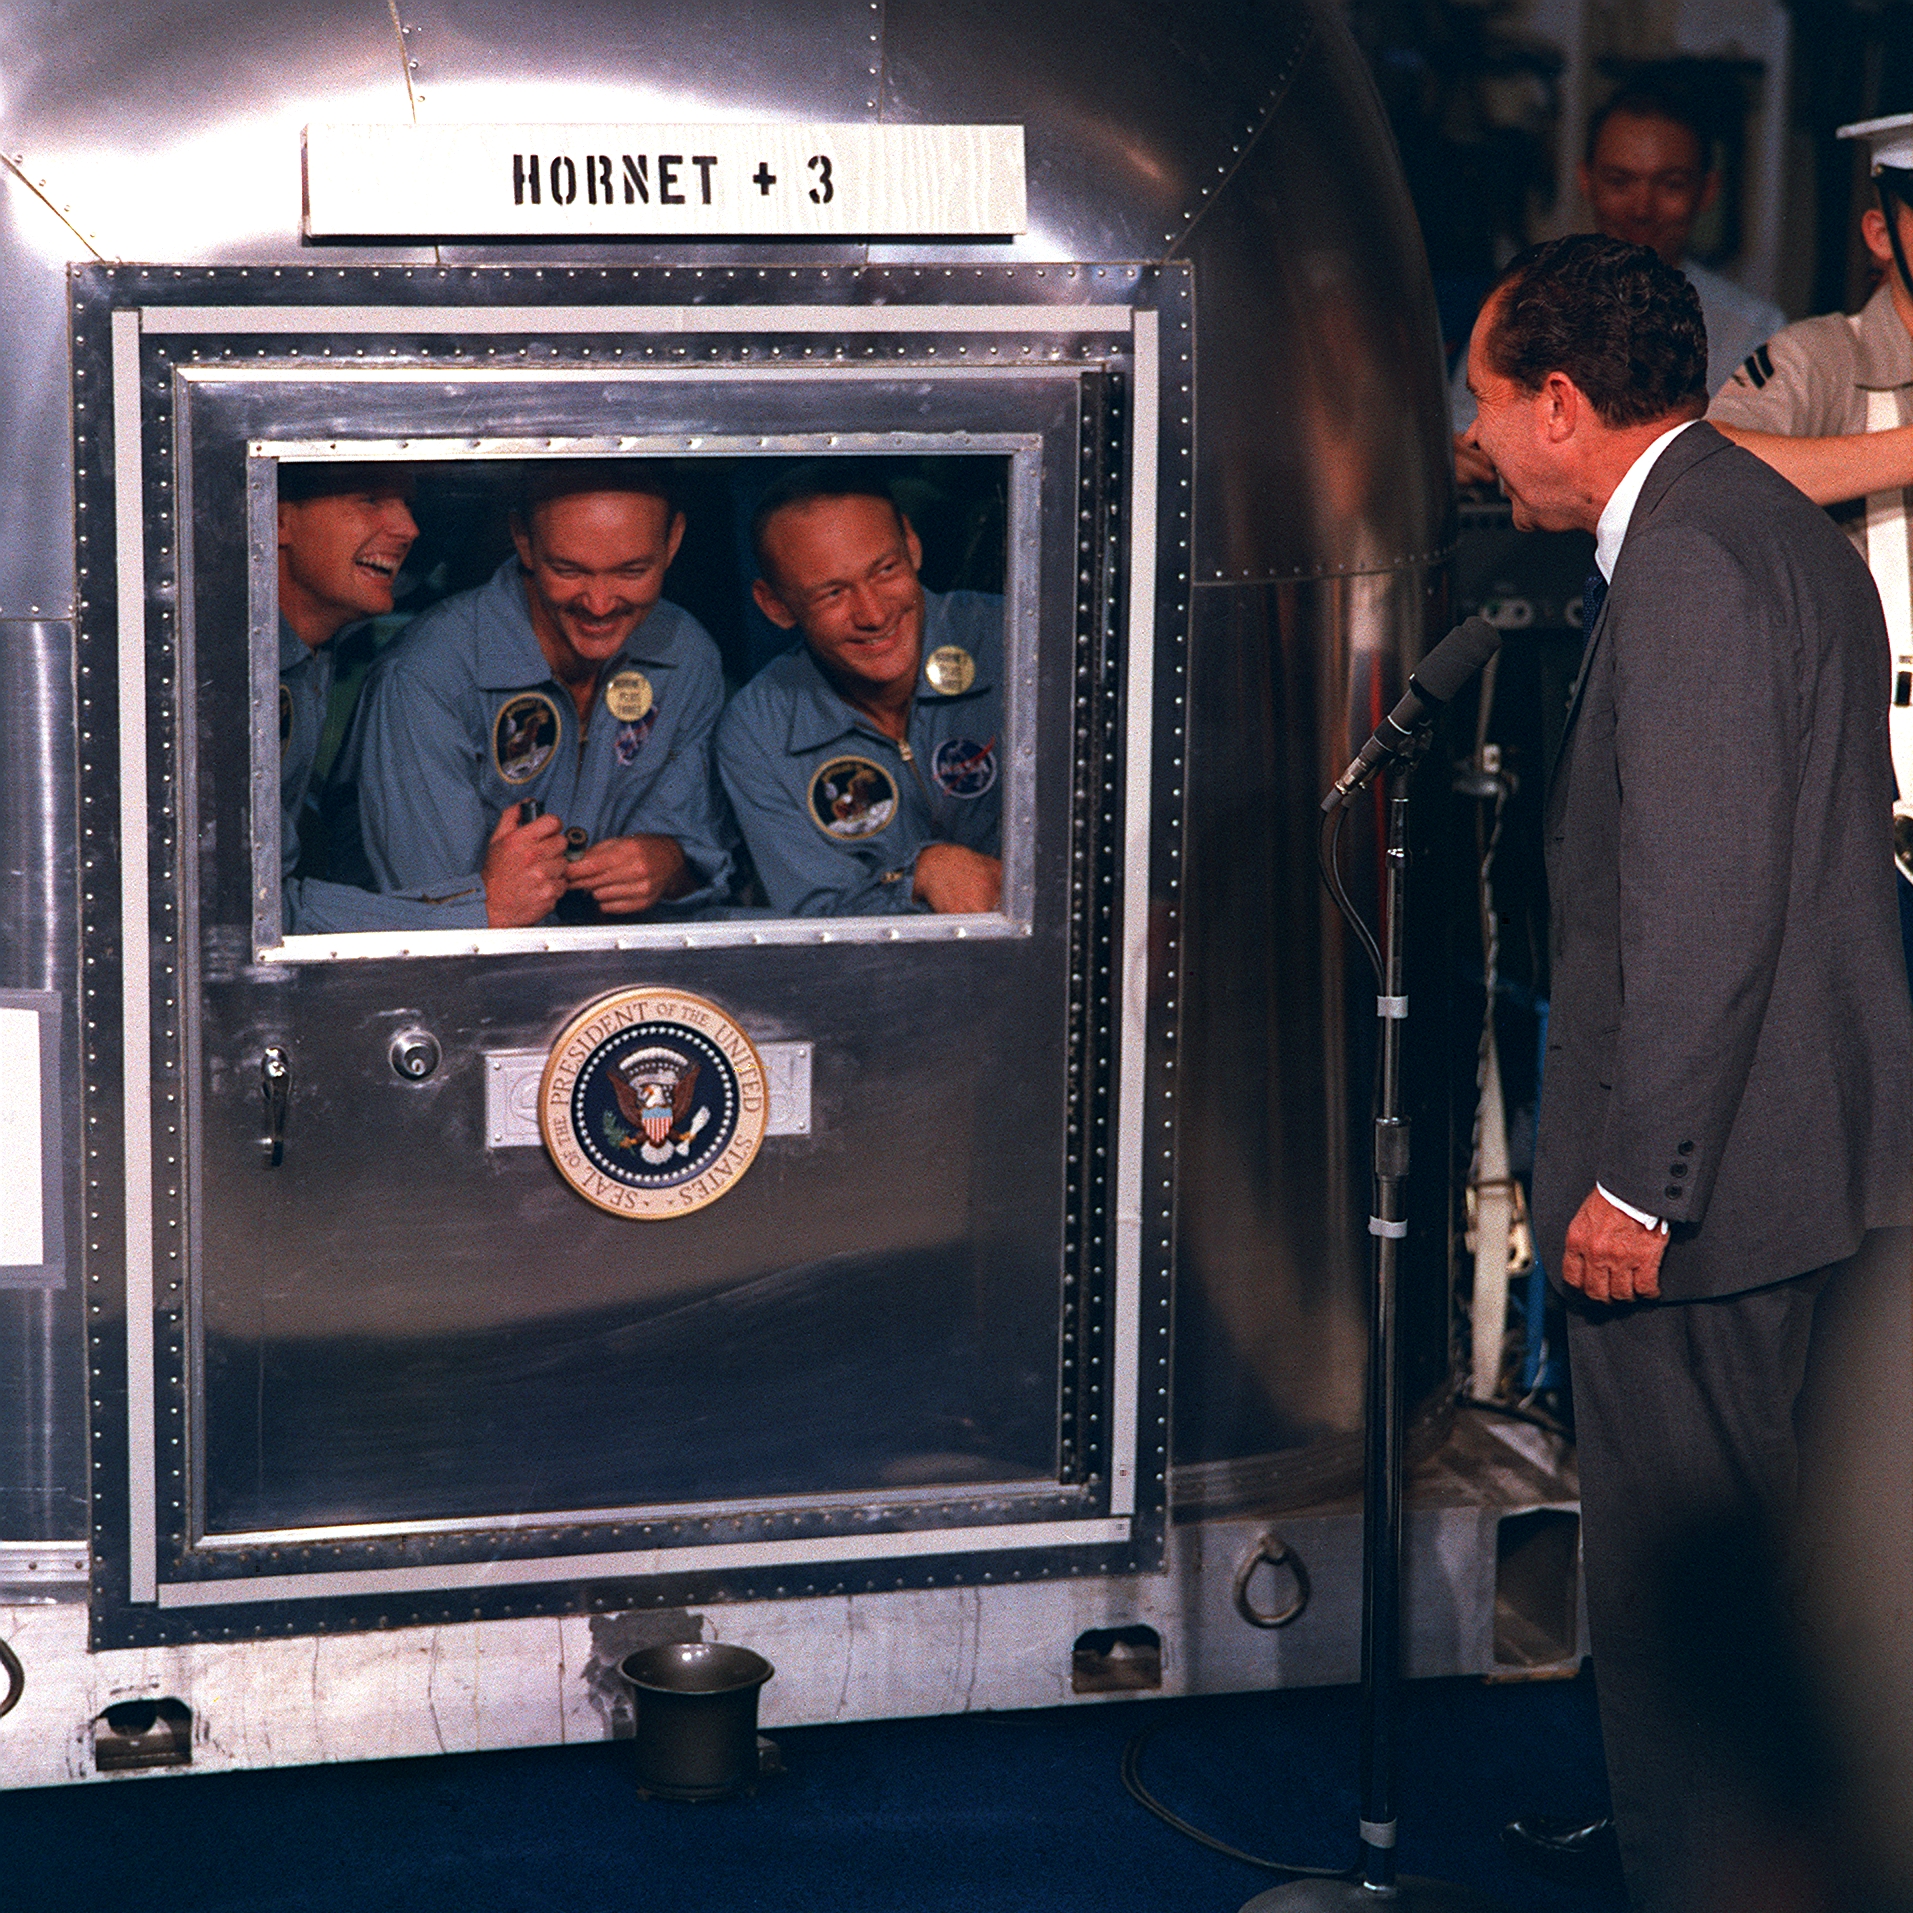
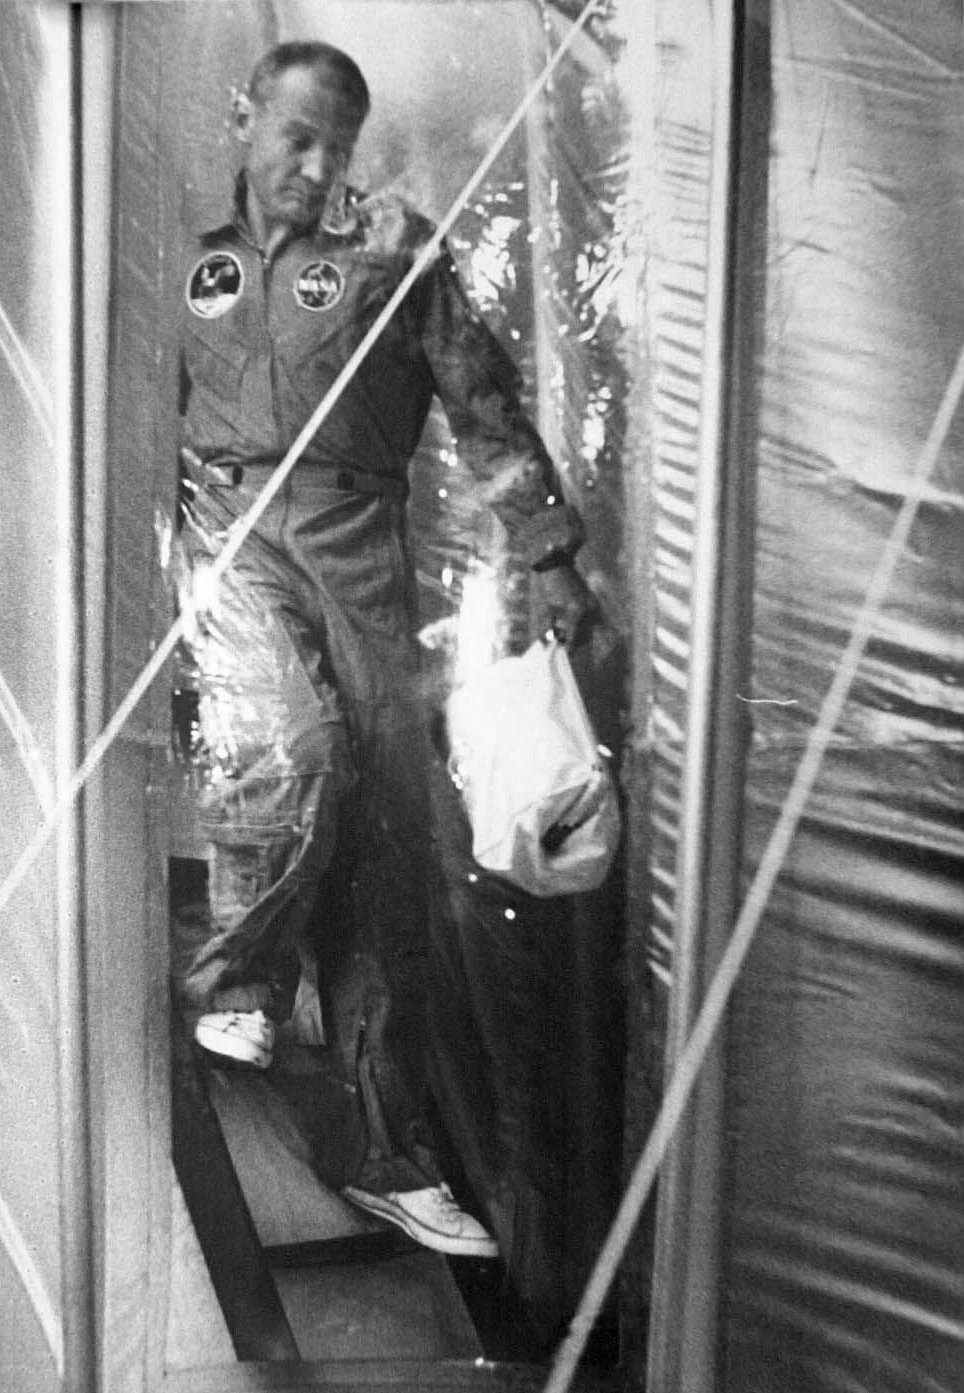
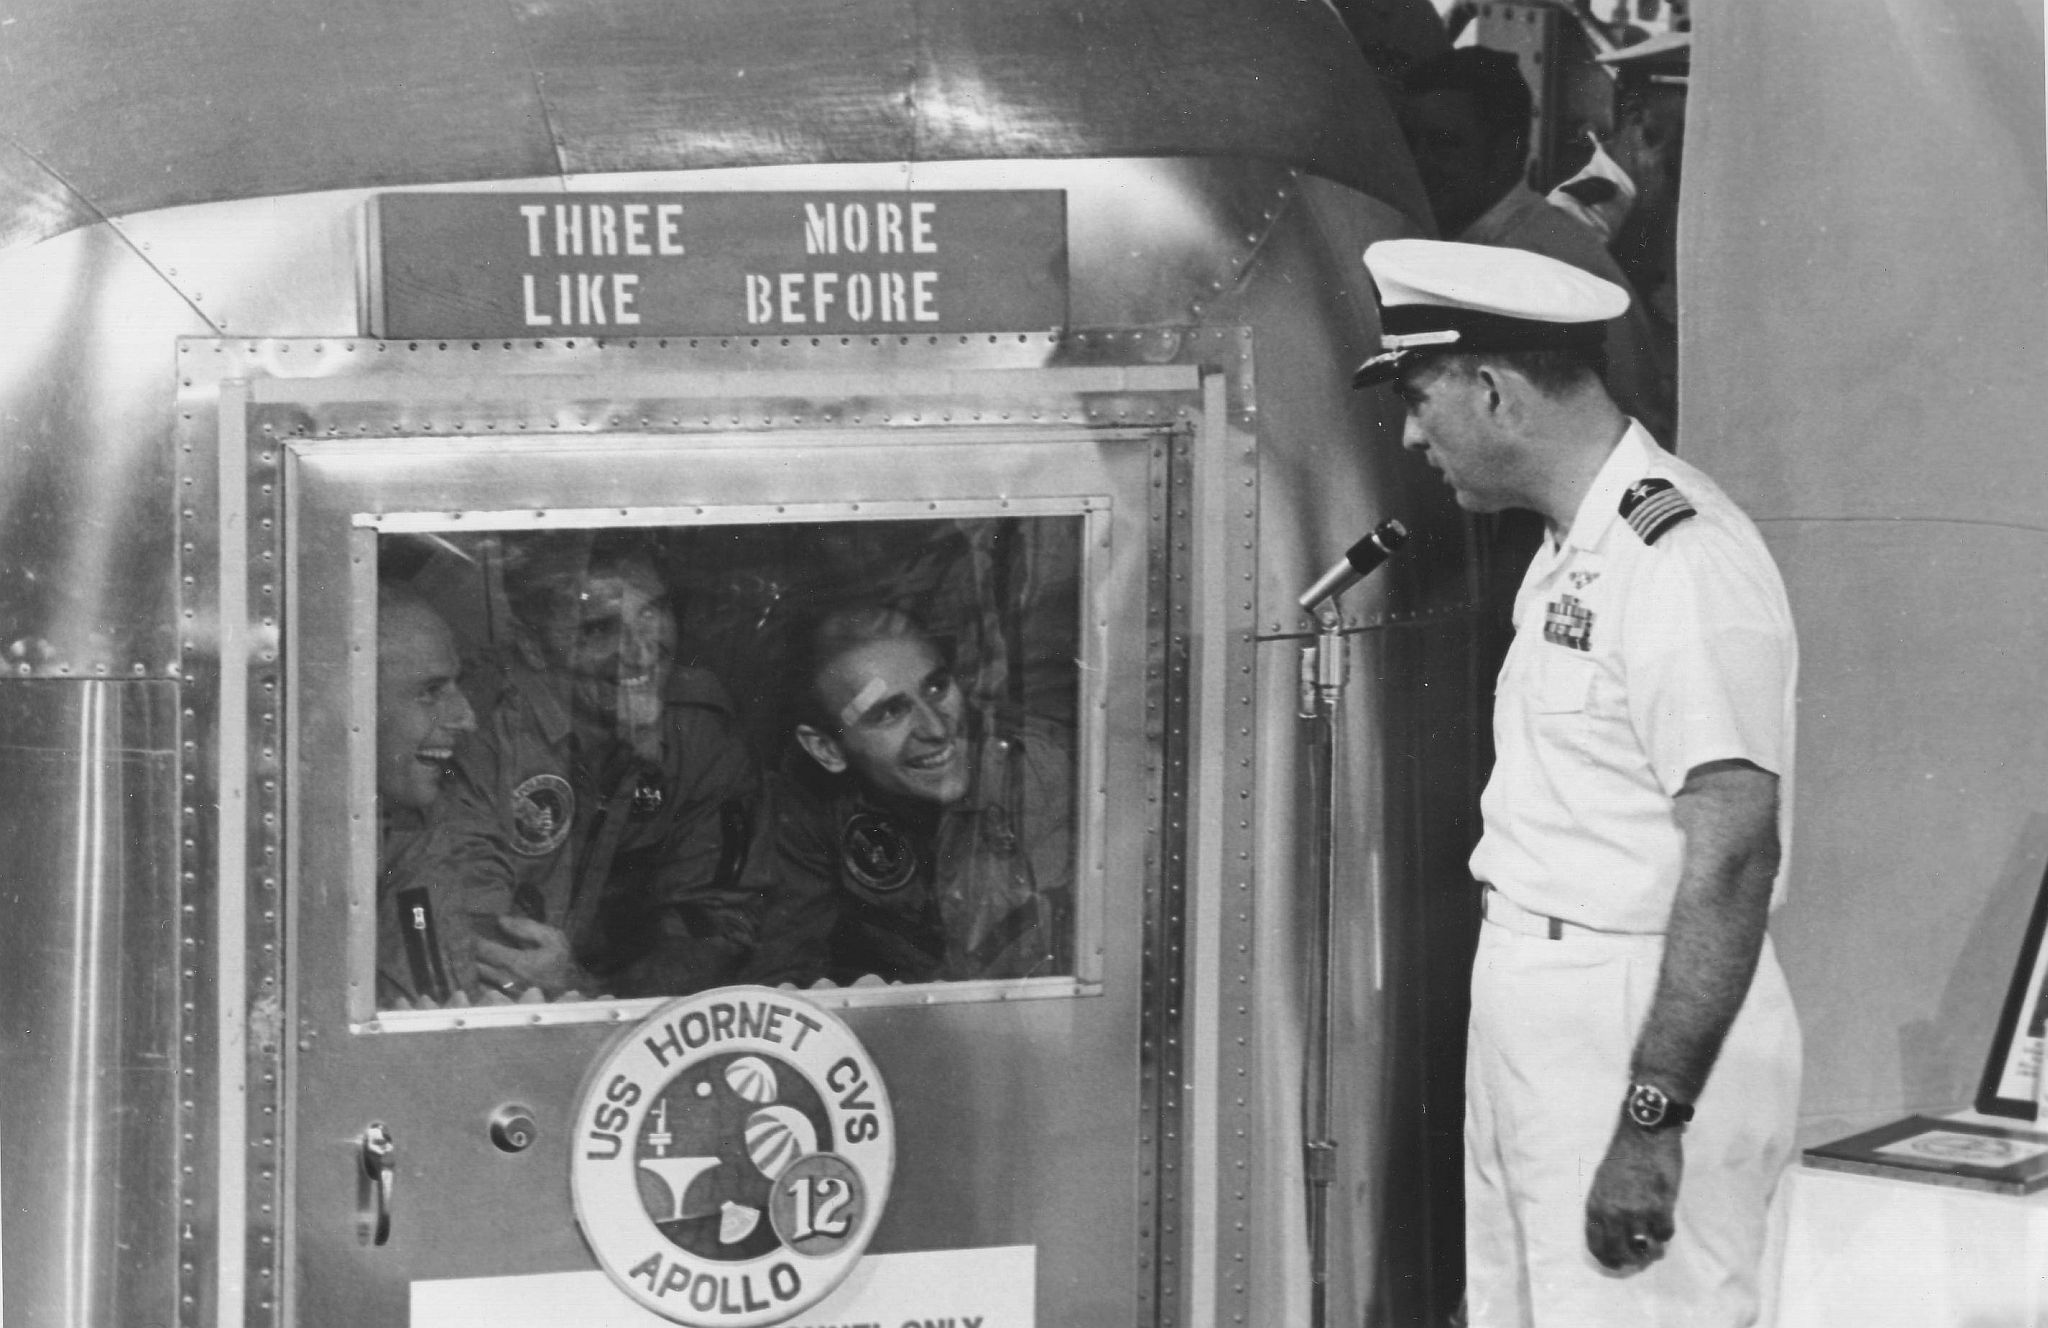
392k | Astronaut Michael Collins enters the NASA MQF followed by Neil Armstrong and then "Buzz Aldrin." Behind Aldrin, in the orange flight suit, is NASA flight surgeon Bill Carpentier. To the left is the NASA Manager for the Apollo 11 quarantine program John Stonesifer, while holding the MQF door is Dr. Clarence Jernigan, who would become the NASA flight surgeon for Apollo 12. The sign over the door reads "Hornet + 3." This motto was selected by the Hornet CO, CAPT Carl Seiberlich, to establish a "safety first" mentality. The Hornet would return to Pearl Harbor with the full ship's complement, members of the media and other guests, plus 3 astronauts. US Navy photo. |
Bob Fish | |
 NS-ha-069a |
26k | Same scene, from a different angle. US Navy photo by Milt Putnam. Milt commented: "Using a remote control, I take this photo with a camera I mounted yesterday on the ship's bulkhead near the quarantine trailer. I mounted the camera 12 feet high so it will capture a different angle from the ordinary." "Newspaper and magazine editors—the target of our photos—appreciate being given more than one photo angle." |
Bob Canchola, BT, USN (Ret.) | |
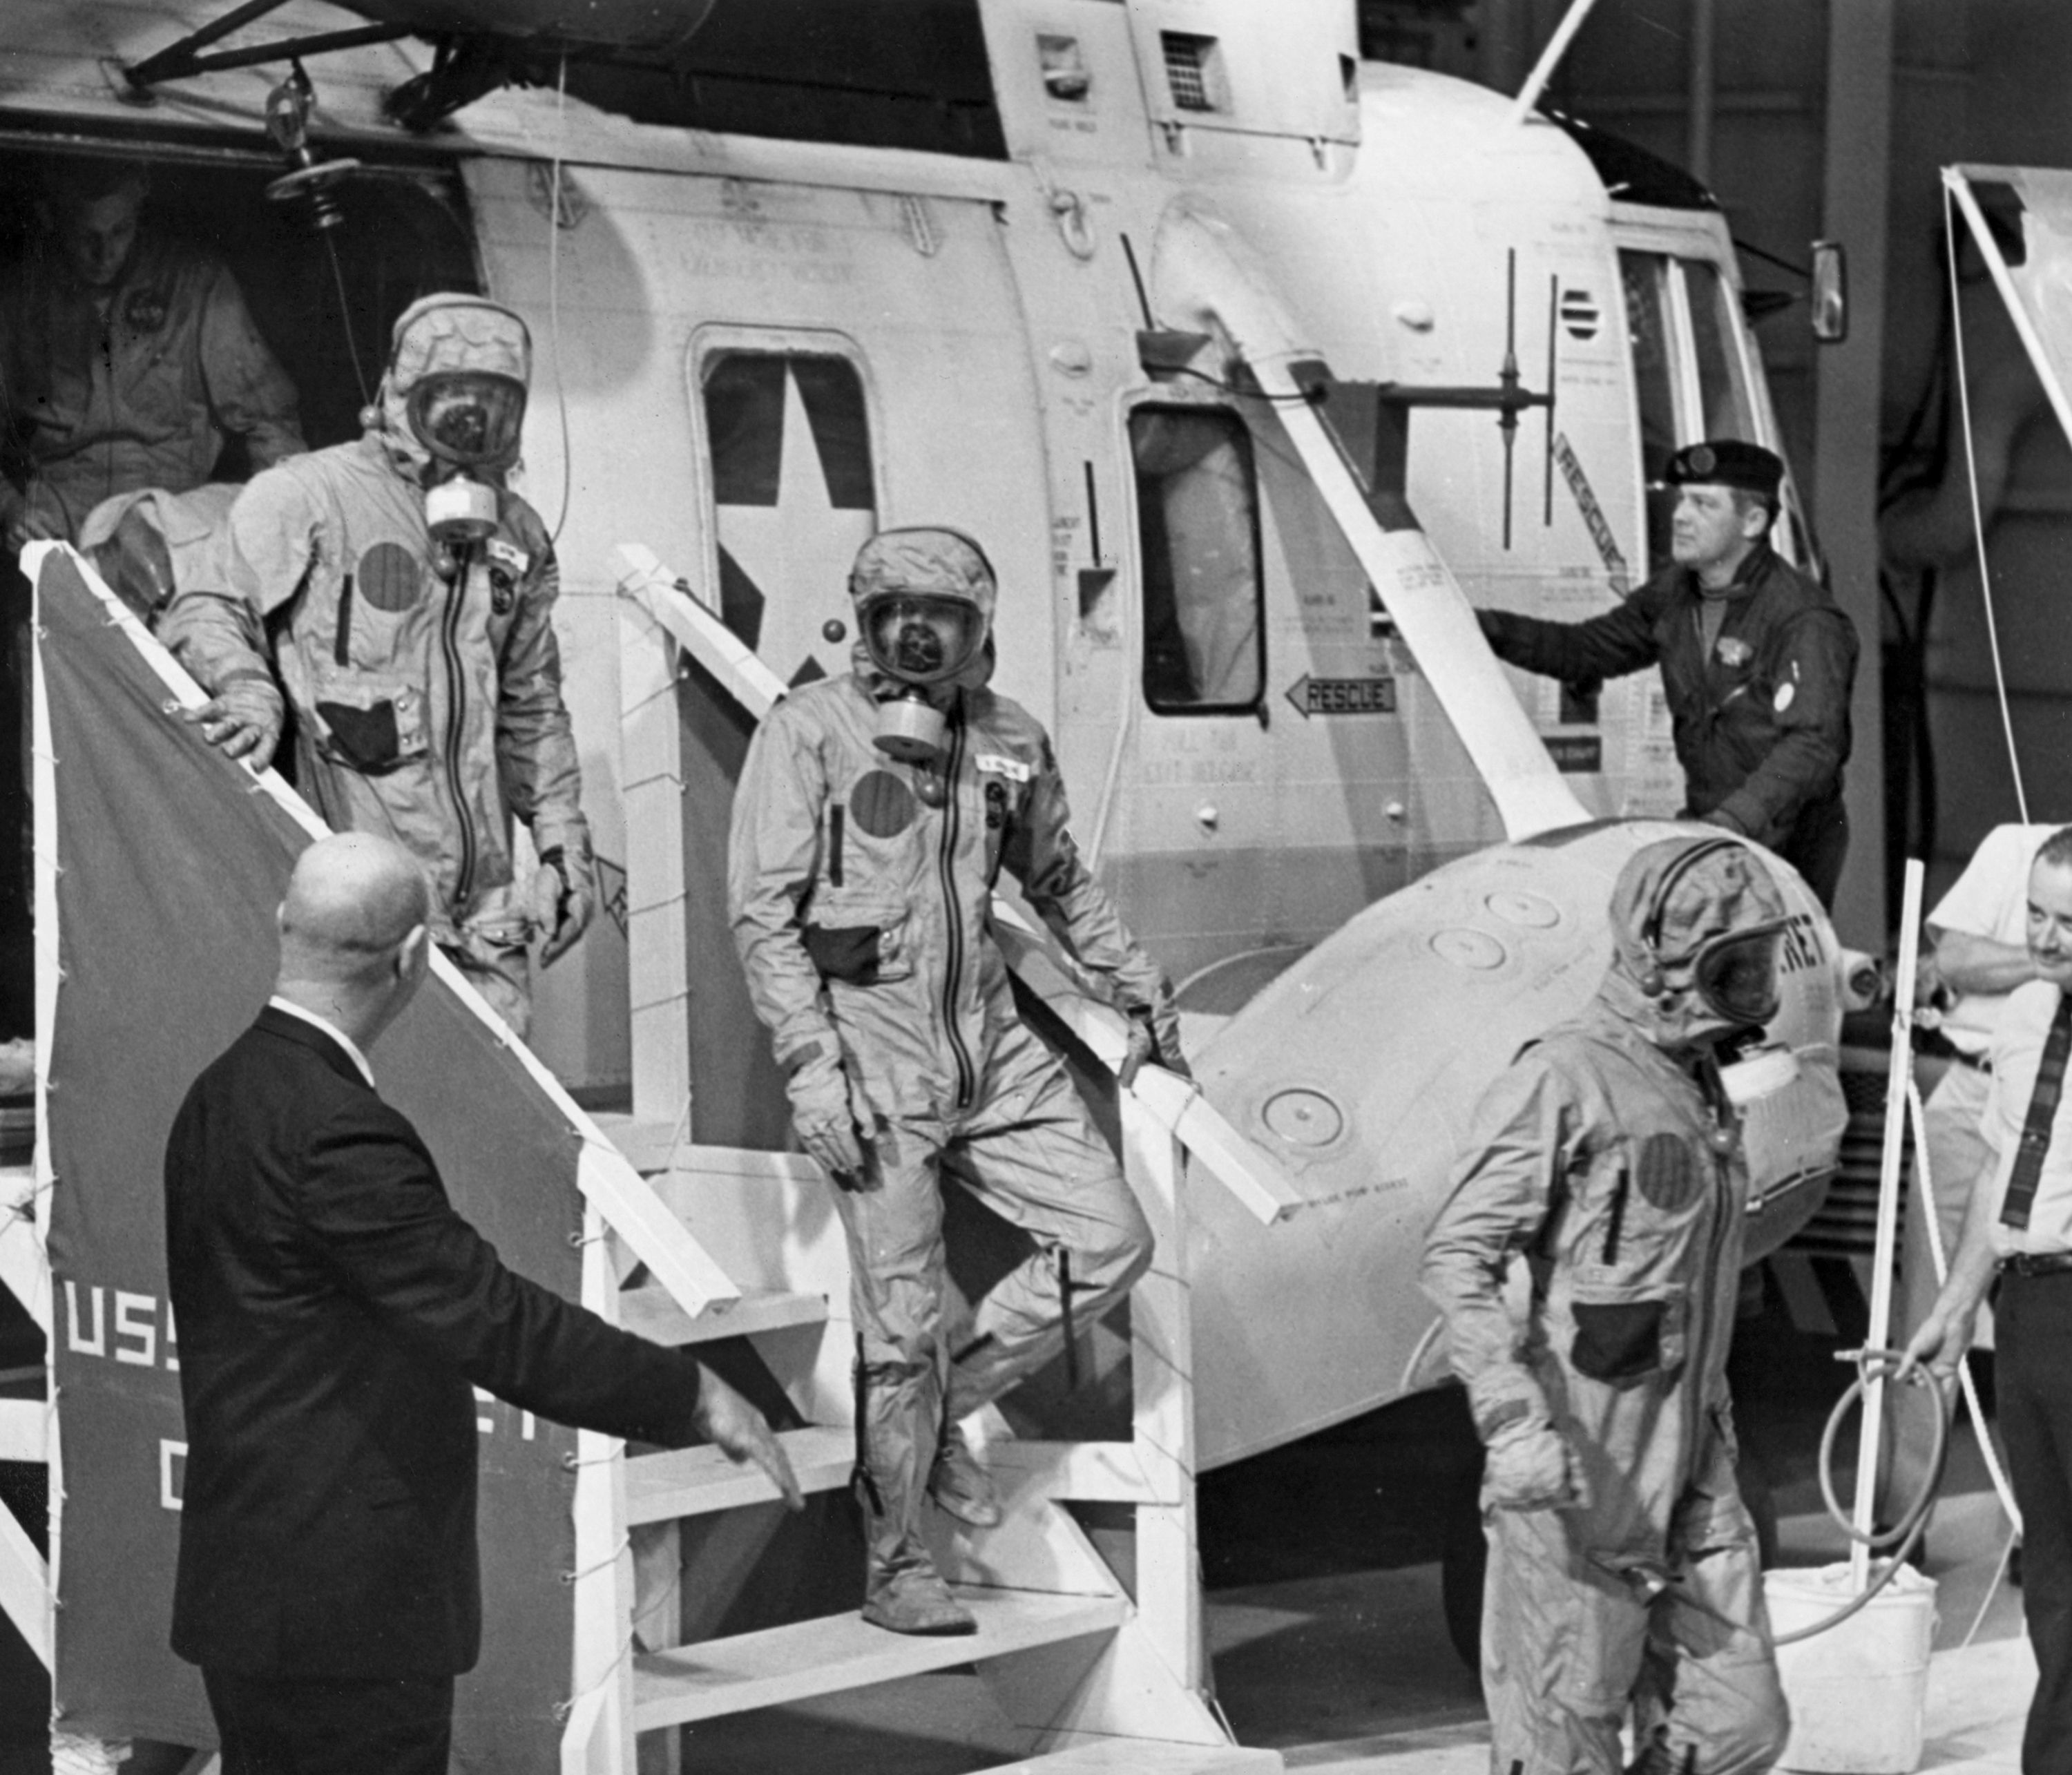
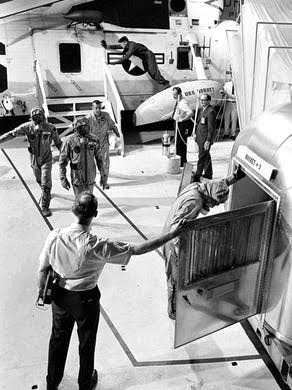
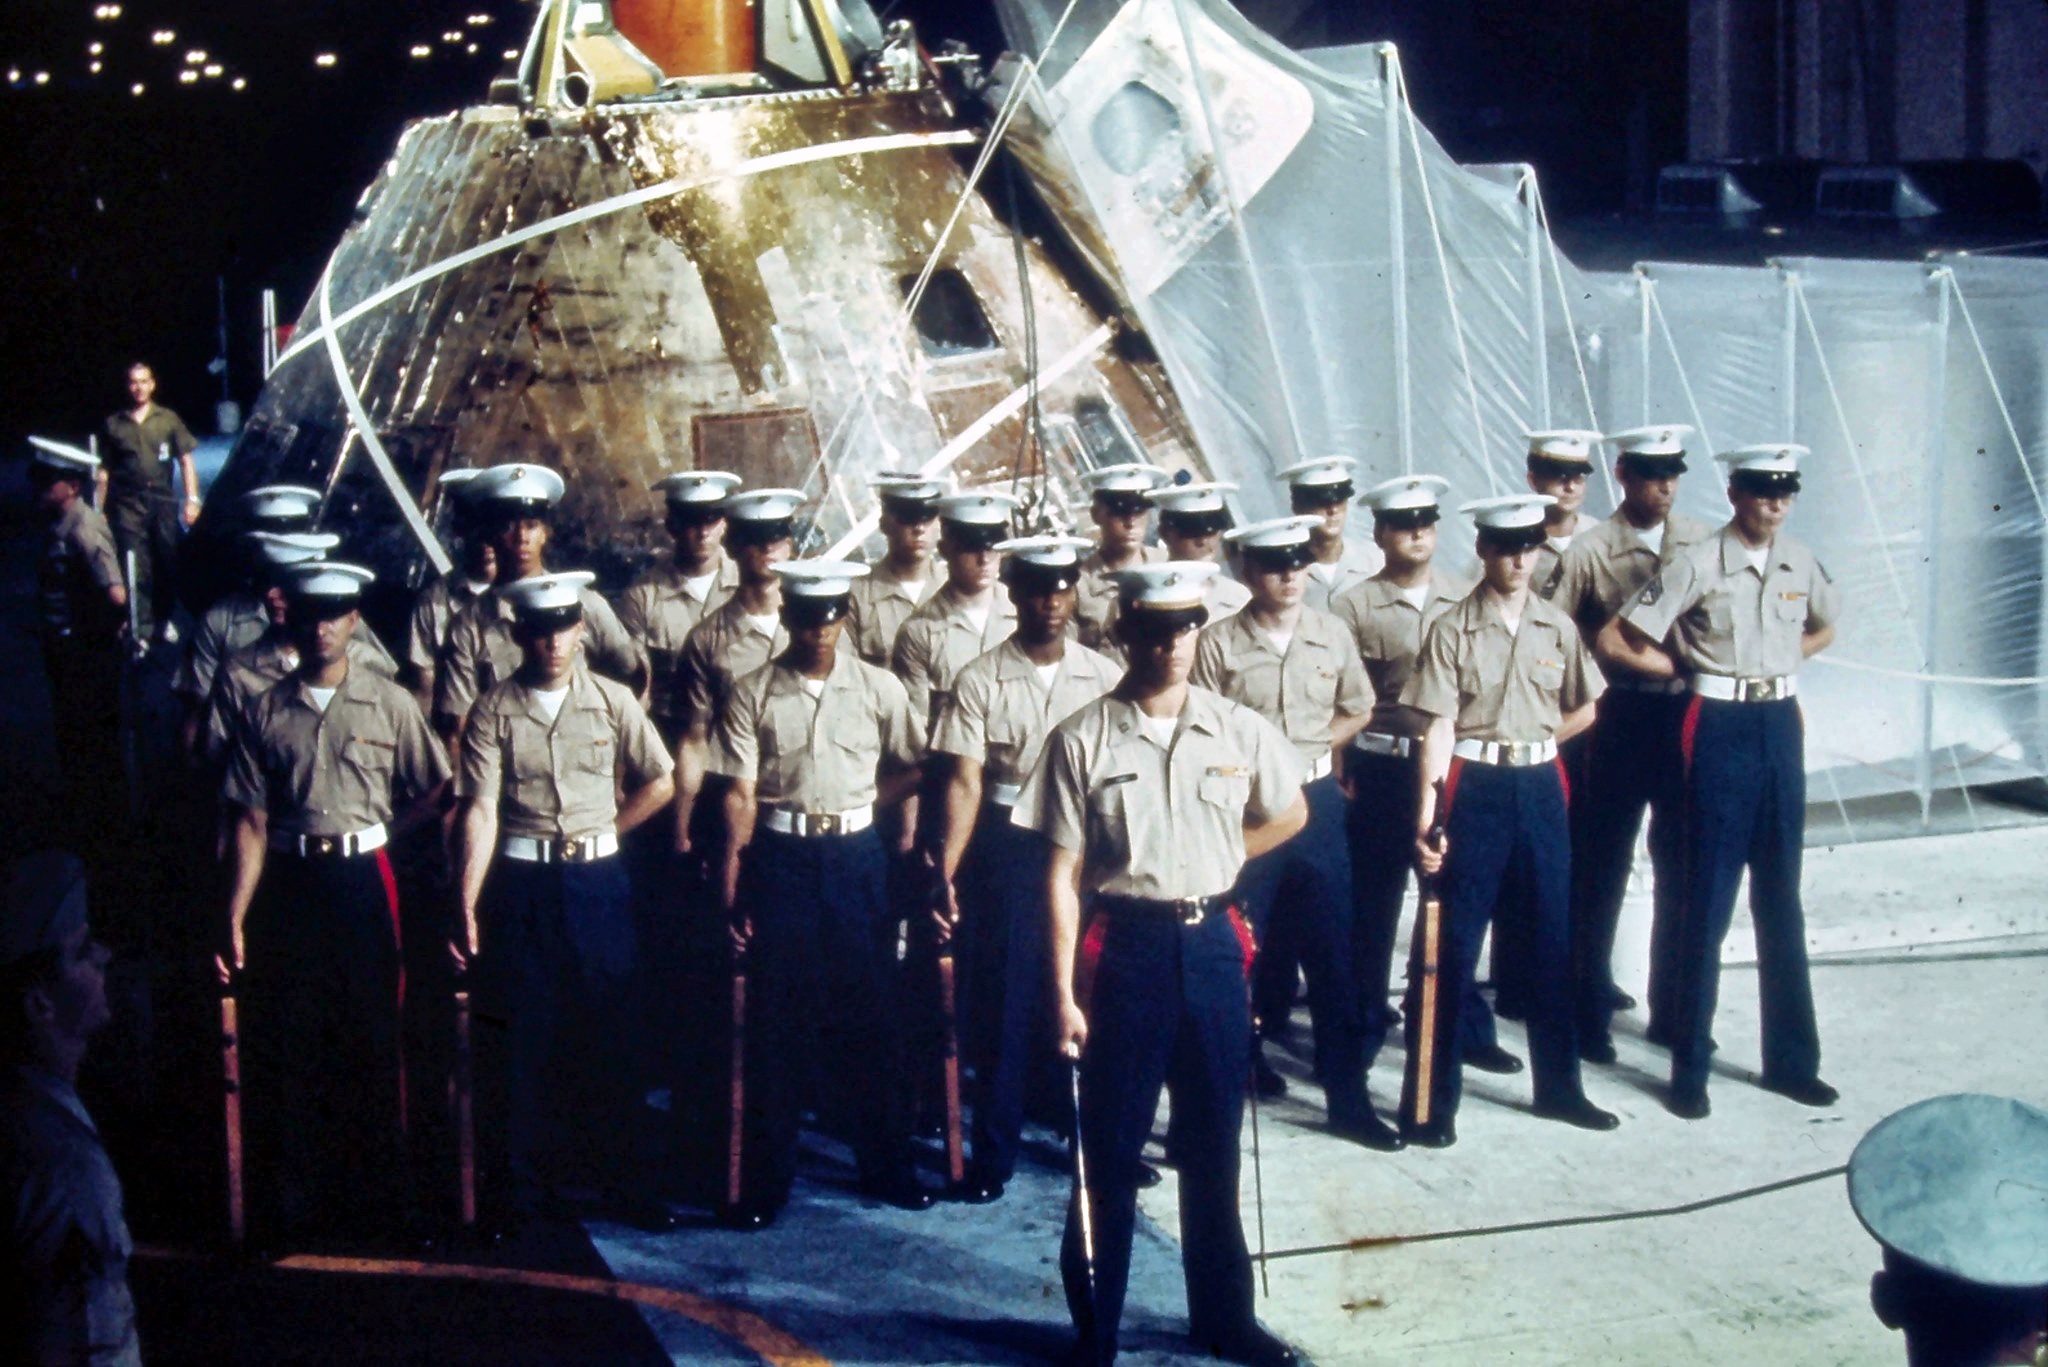 NS-ha-077 |
1.61M | The Marine Detachment. |
Mat Garretson | |
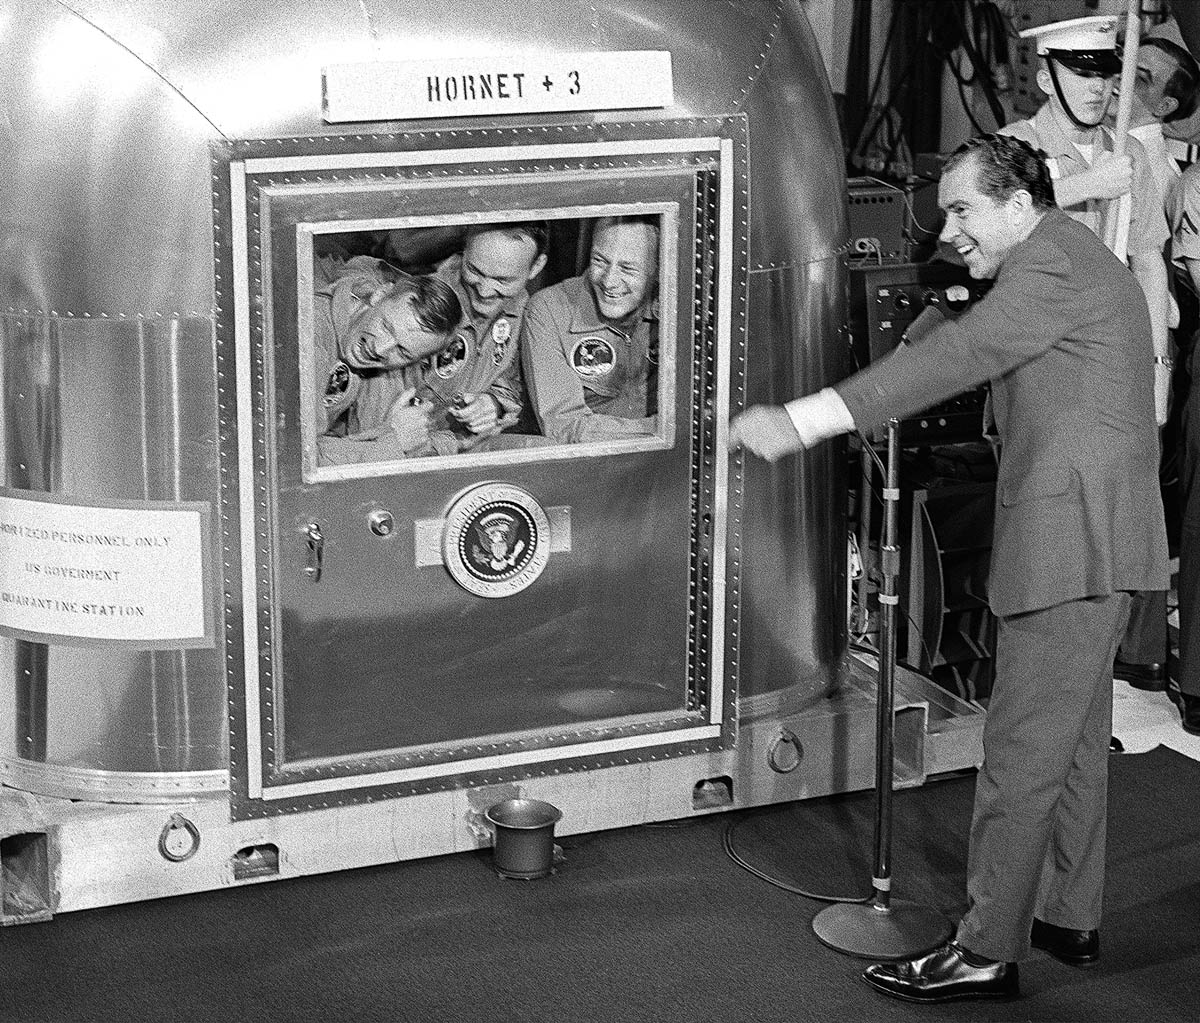
 NS-ha-071 |
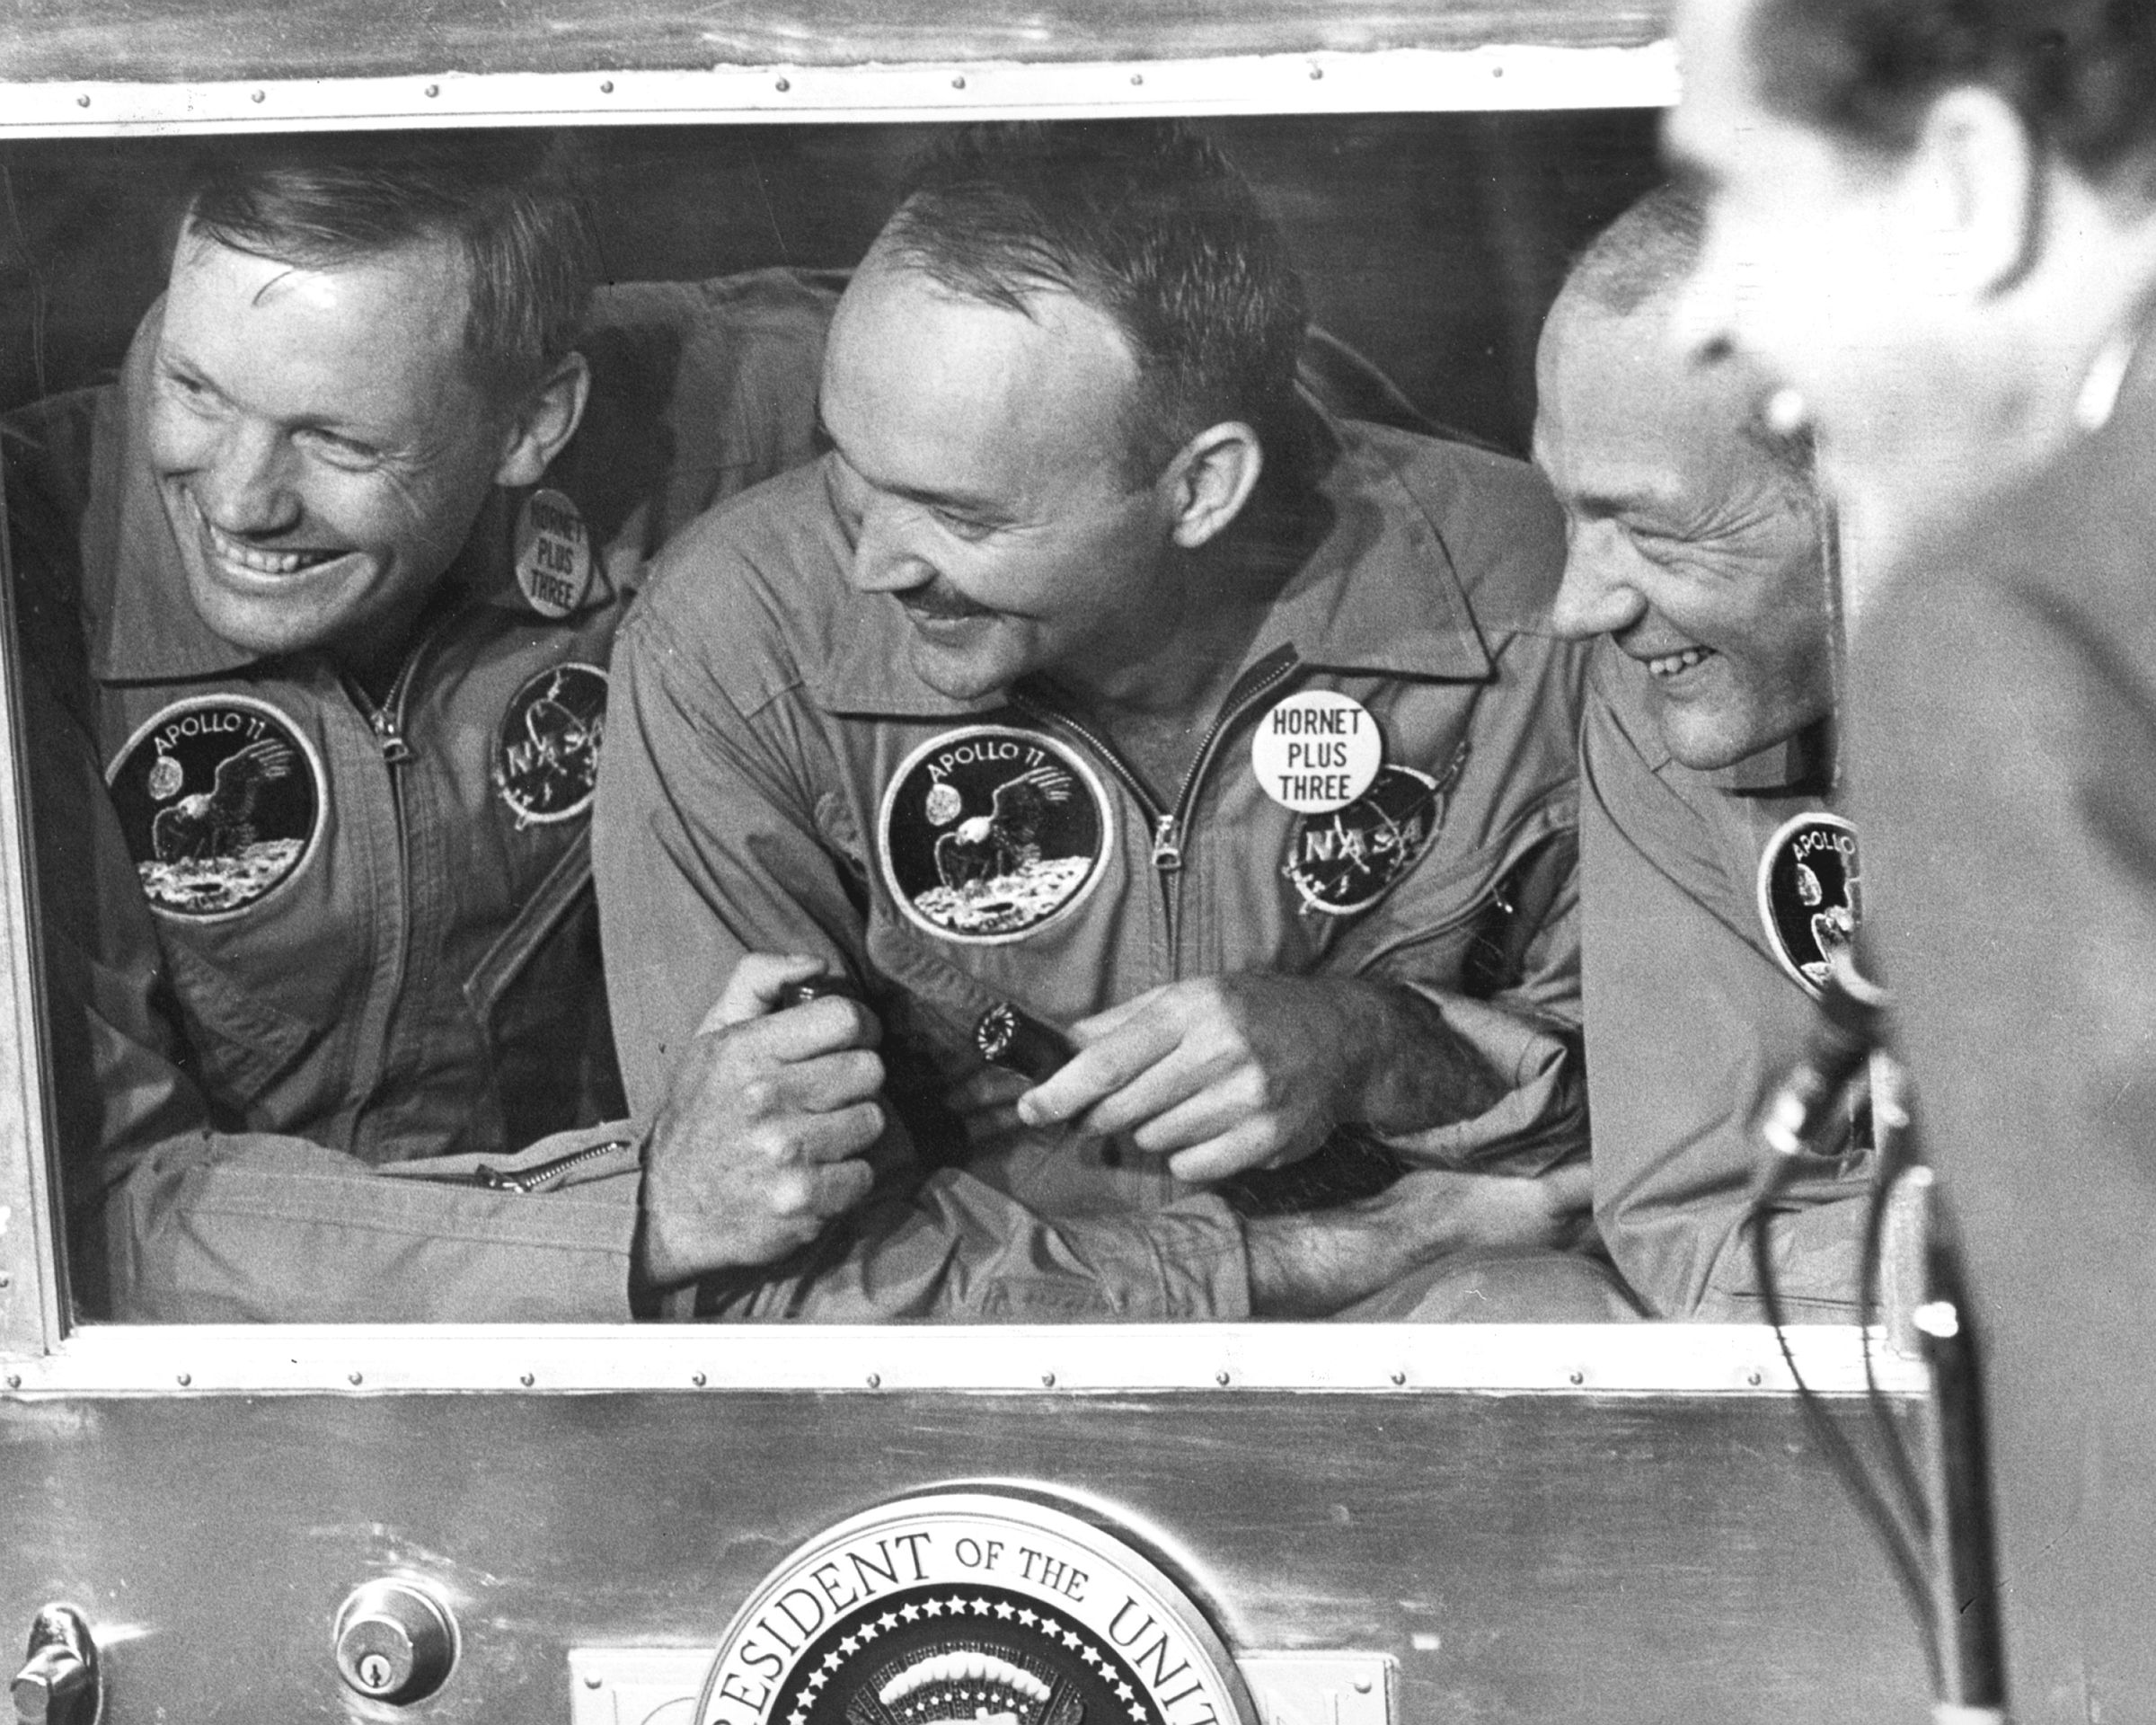
342k | Perhaps the most famous photo sequence from Apollo 11; at 0755 President Richard Nixon welcomes the three astronauts back to earth. Visible in the MQF window, from left to right, are Neil Armstrong, Michael Collins and "Buzz" Aldrin. This event was broadcast around the world on live TV and it's estimated that 500 million people watched as it happened. There are many variations on this photo, but this particular one was captured by PHCS Robert Lawson, the Chief of the USS Hornet Photo Lab. |
Bob Fish | |
 NS-ha-071a |
492k | The man in white shirt and tie to the right of the Marine is Roderick ("Rod") Bass, who was involved in Mercury, Gemini, and Apollo, training both the crews and the recovery crews. Courtesy of National Aeronautics and Space Administration (NASA), photo # KSC-69P-658. |
NASA, via Bob Canchola, BT, USN (Ret.) |
|
 NS-021246 |
3.05M | President Richard M. Nixon was in the central Pacific recovery area to welcome the Apollo 11 astronauts aboard USS Hornet, prime recovery ship for the historic lunar landing mission. Already confined to the Mobile Quarantine Facility (MQF) are (left to right) Neil A. Armstrong, commander; Michael Collins, command module pilot; and Edwin E. Aldrin Jr., lunar module pilot. Apollo 11 splashed down at 1149 (CDT), Thursday, 24 July 1969, about 812 nautical miles southwest of Hawaii and only 12 nautical miles from Hornet. The three crew men would remain in the MQF until they arrived at the Manned Spacecraft Center's (MSC) Lunar Receiving Laboratory (LRL). While astronauts Armstrong and Aldrin descended in the Lunar Module (LM) Eagle to explore the Sea of Tranquility region of the Moon, astronaut Collins remained with the Command and Service Modules (CSM) Columbia in lunar-orbit. National Aeronautics and Space Administration (NASA) photo S69-21365. |
NASA | |
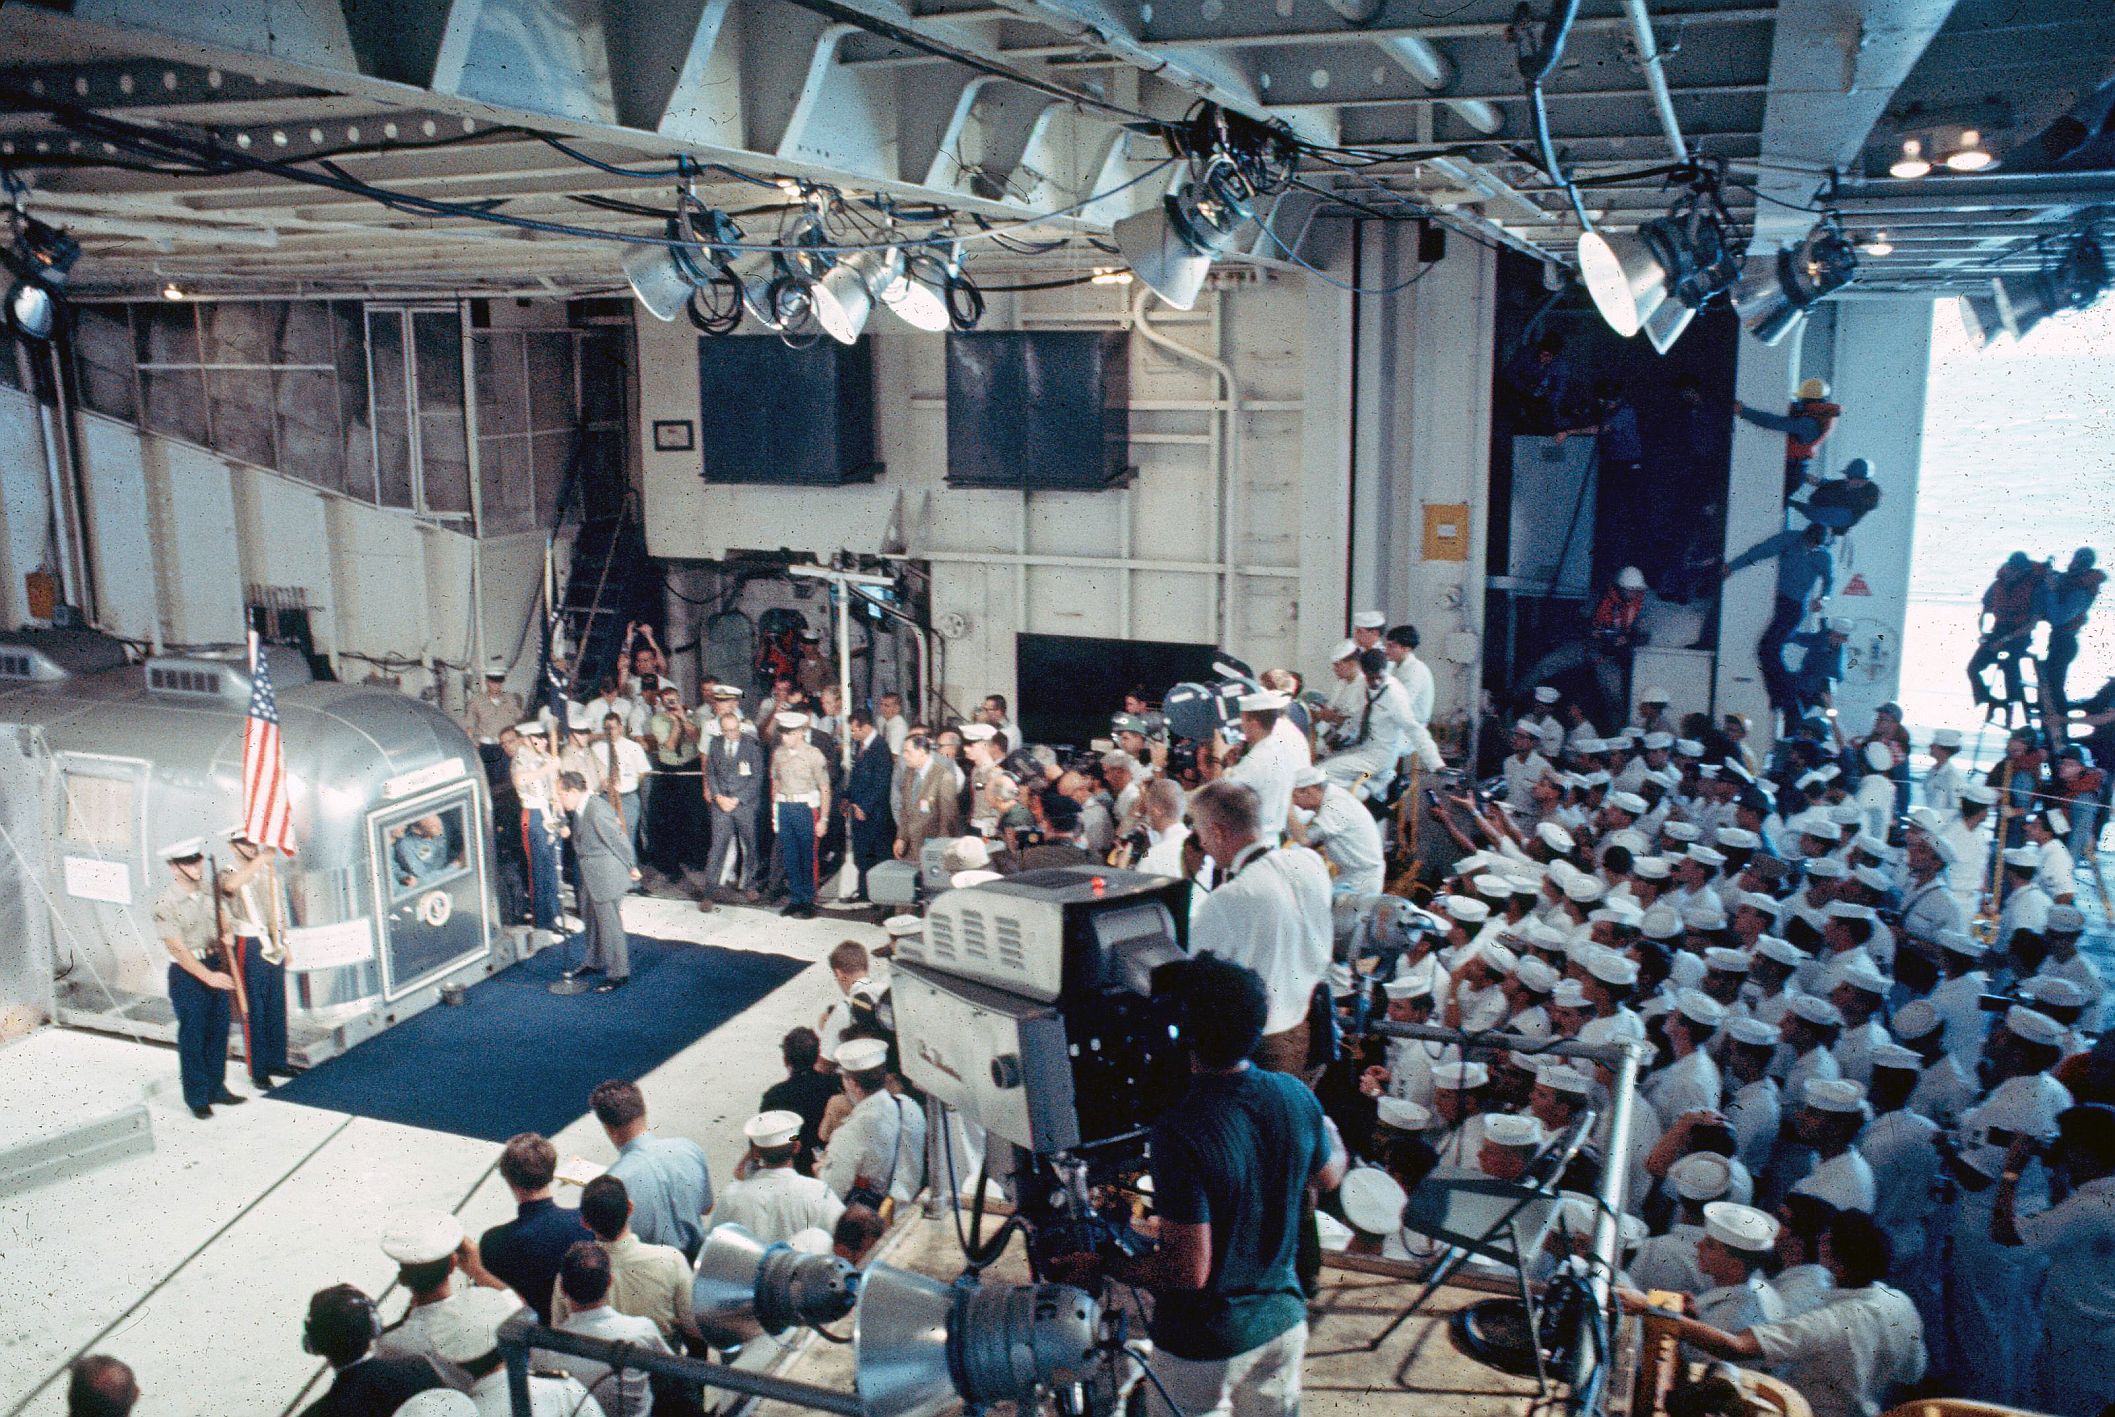 NS-ha-072 |
723k | This photo, taken at about the same time as the ones above, provides a broader perspective of the Hornet Hangar Bay 2 environment during President Nixon's welcoming remarks. The MQF, with the astronauts in the window, is on the left while the President chats with them. At the bottom center is the TV camera capturing this live image. To the right is the throng of media and sailor's experiencing this momentous occasion in world history. US Navy photo. |
Bob Fish | |
 NS-ha-073 |
712k | The quarantined Apollo 11 crew members (l to r) Armstrong, Collins, and Aldrin, and U.S. President Richard M. Nixon, share laughs over a comment made by fellow astronaut Frank Borman, Apollo 8 commander. The president was aboard Hornet to welcome the astronauts back to the Earth. National Aeronautics and Space Administration (NASA) photo 6900601. |
Courtesy of NASA, via Bob Fish |
|
 NS-ha-073a |
380k | "President Nixon welcomes the astronauts home. He jokes about astronaut Frank Borman, Commander of Apollo 8, who flew aboard Hornet this morning with the President." "The President laughingly points toward Borman, who's standing to the side of the quarantine trailer's single window. Astronauts Aldrin (right) and Collins (center) laugh while Armstrong (left) leans forward, trying to see Borman." "The astronauts are scheduled to stay in quarantine for three weeks." US Navy Photo by Milt Putnam. |
Bob Canchola, BT, USN (Ret.) | |
 NS-ha-074 |
332k | The Apollo 11 crew inside the Mobile Quarantine Facility, as prayer is offered by LCDR John A. Piirto, USS Hornet Chaplain, accompanied by U.S. President Richard M. Nixon (front right). National Aeronautics and Space Administration (NASA) photo 6901203. |
Courtesy of NASA, via Bob Fish |
|
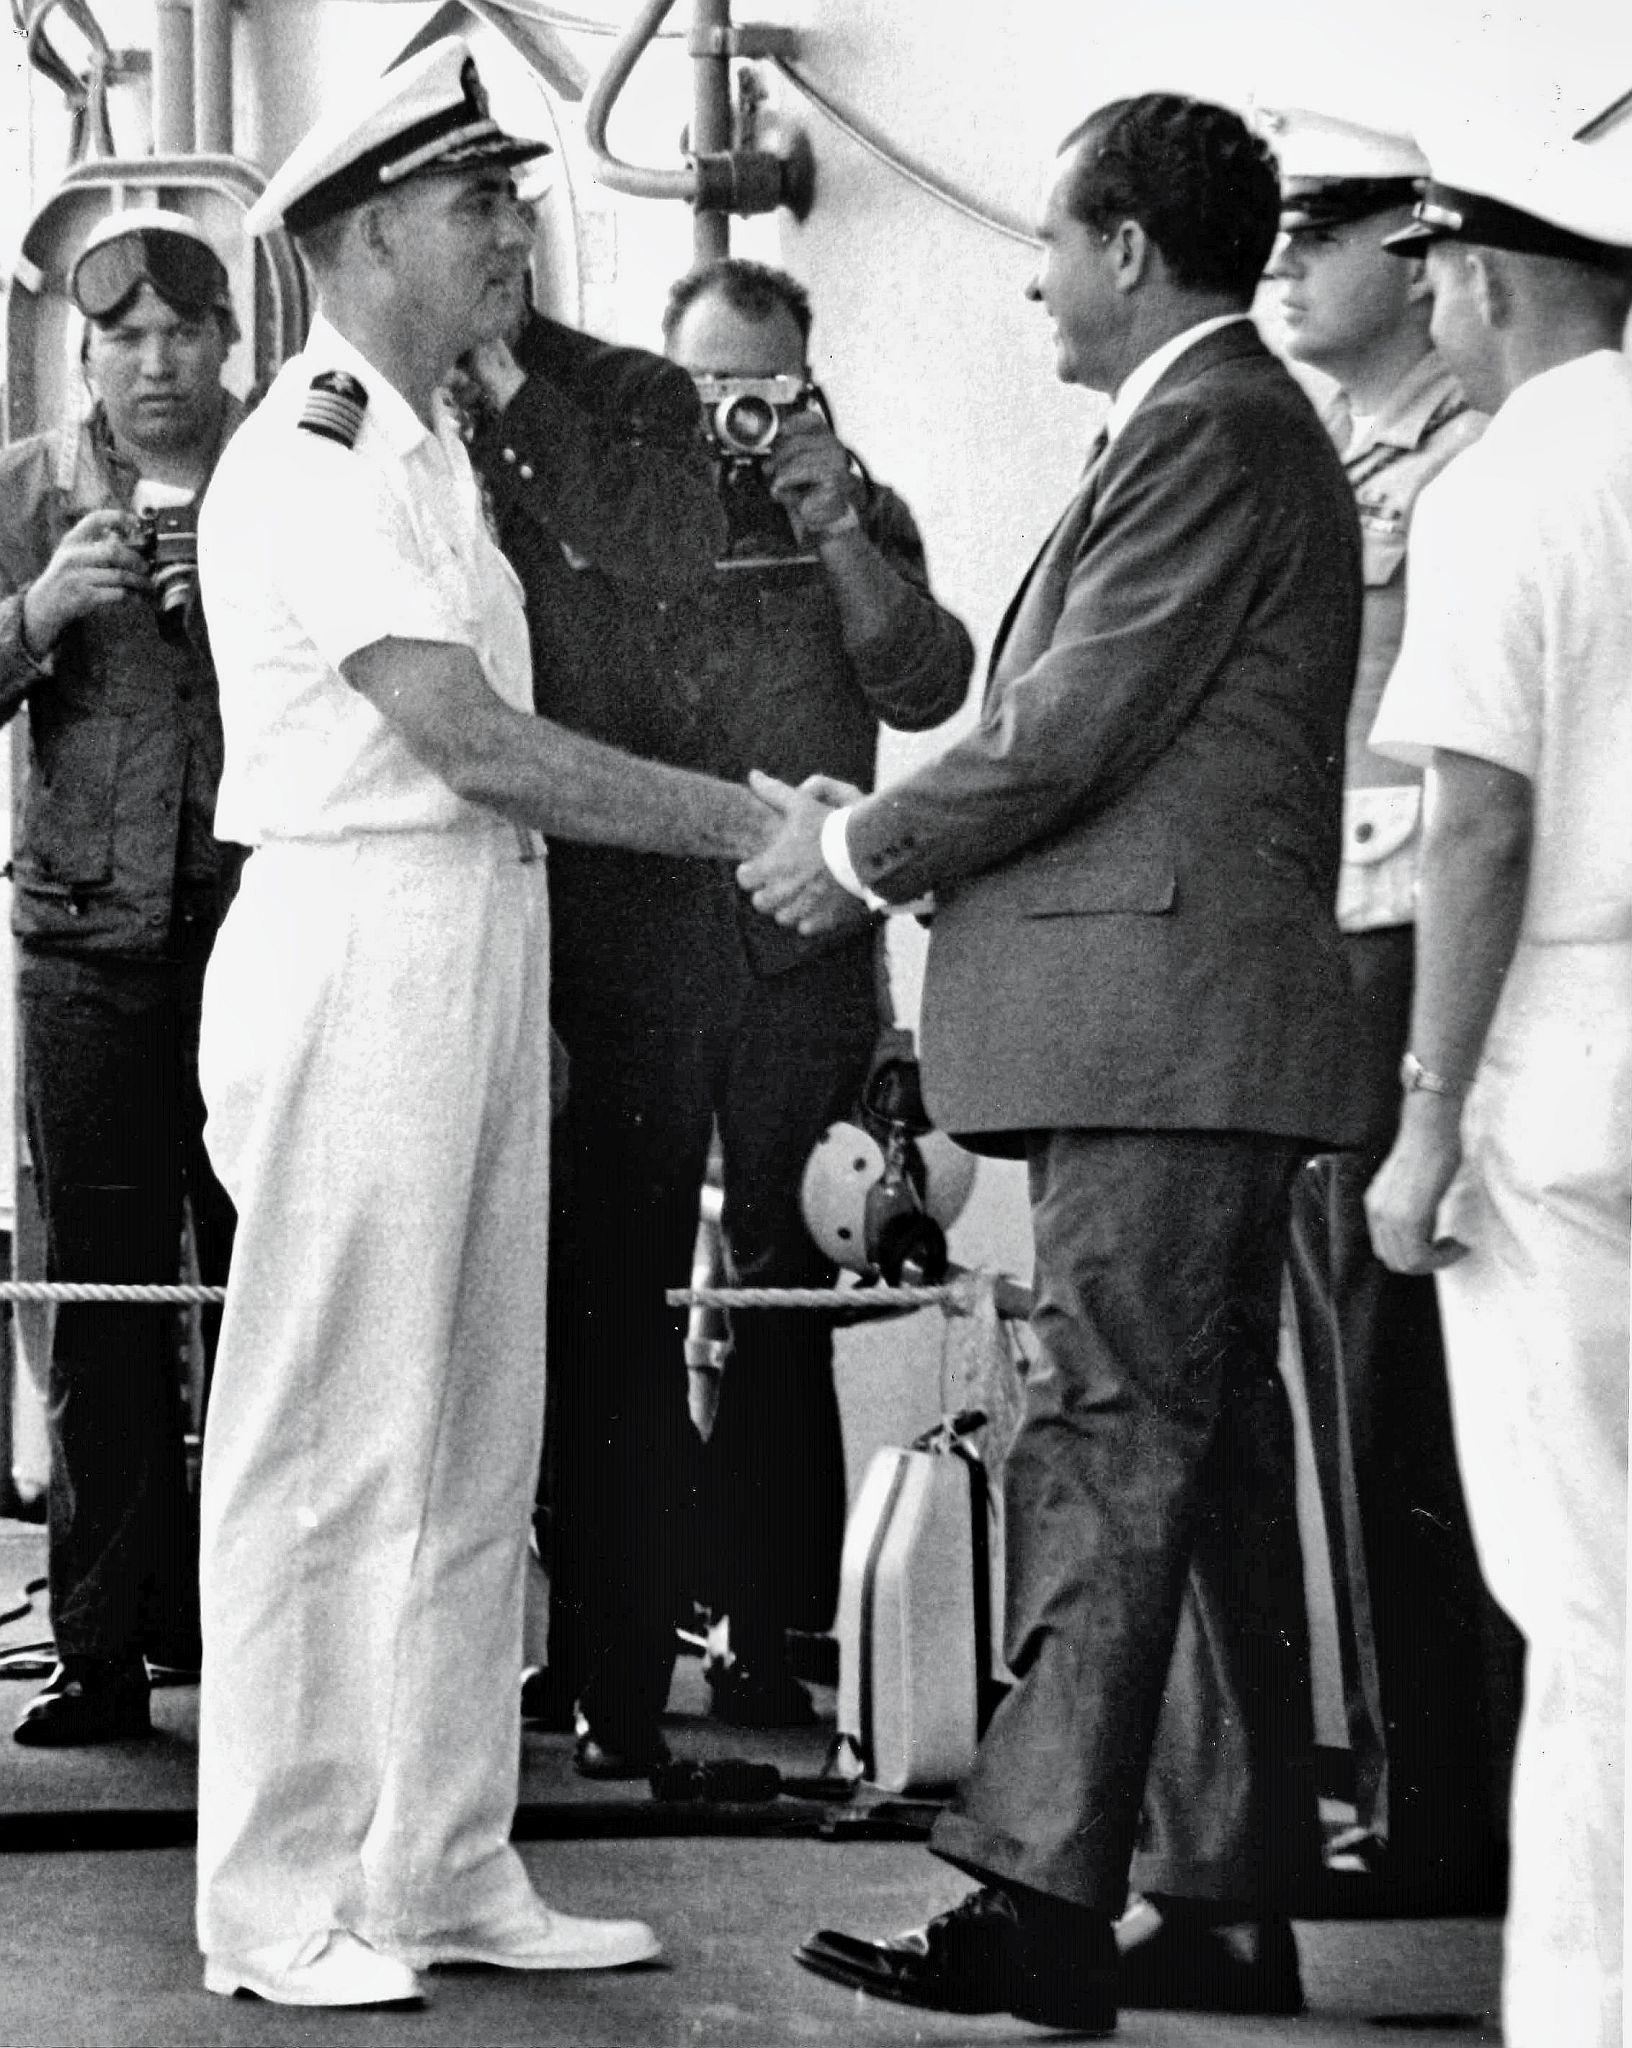 NS-ha-075a |
461k | Captain Carl J. Seiberlich shakes hands with President Richard M. Nixon. Naval History and Heritage Command (NH&HC) photo. |
Bob Canchola, BT, USN (Ret.) | |
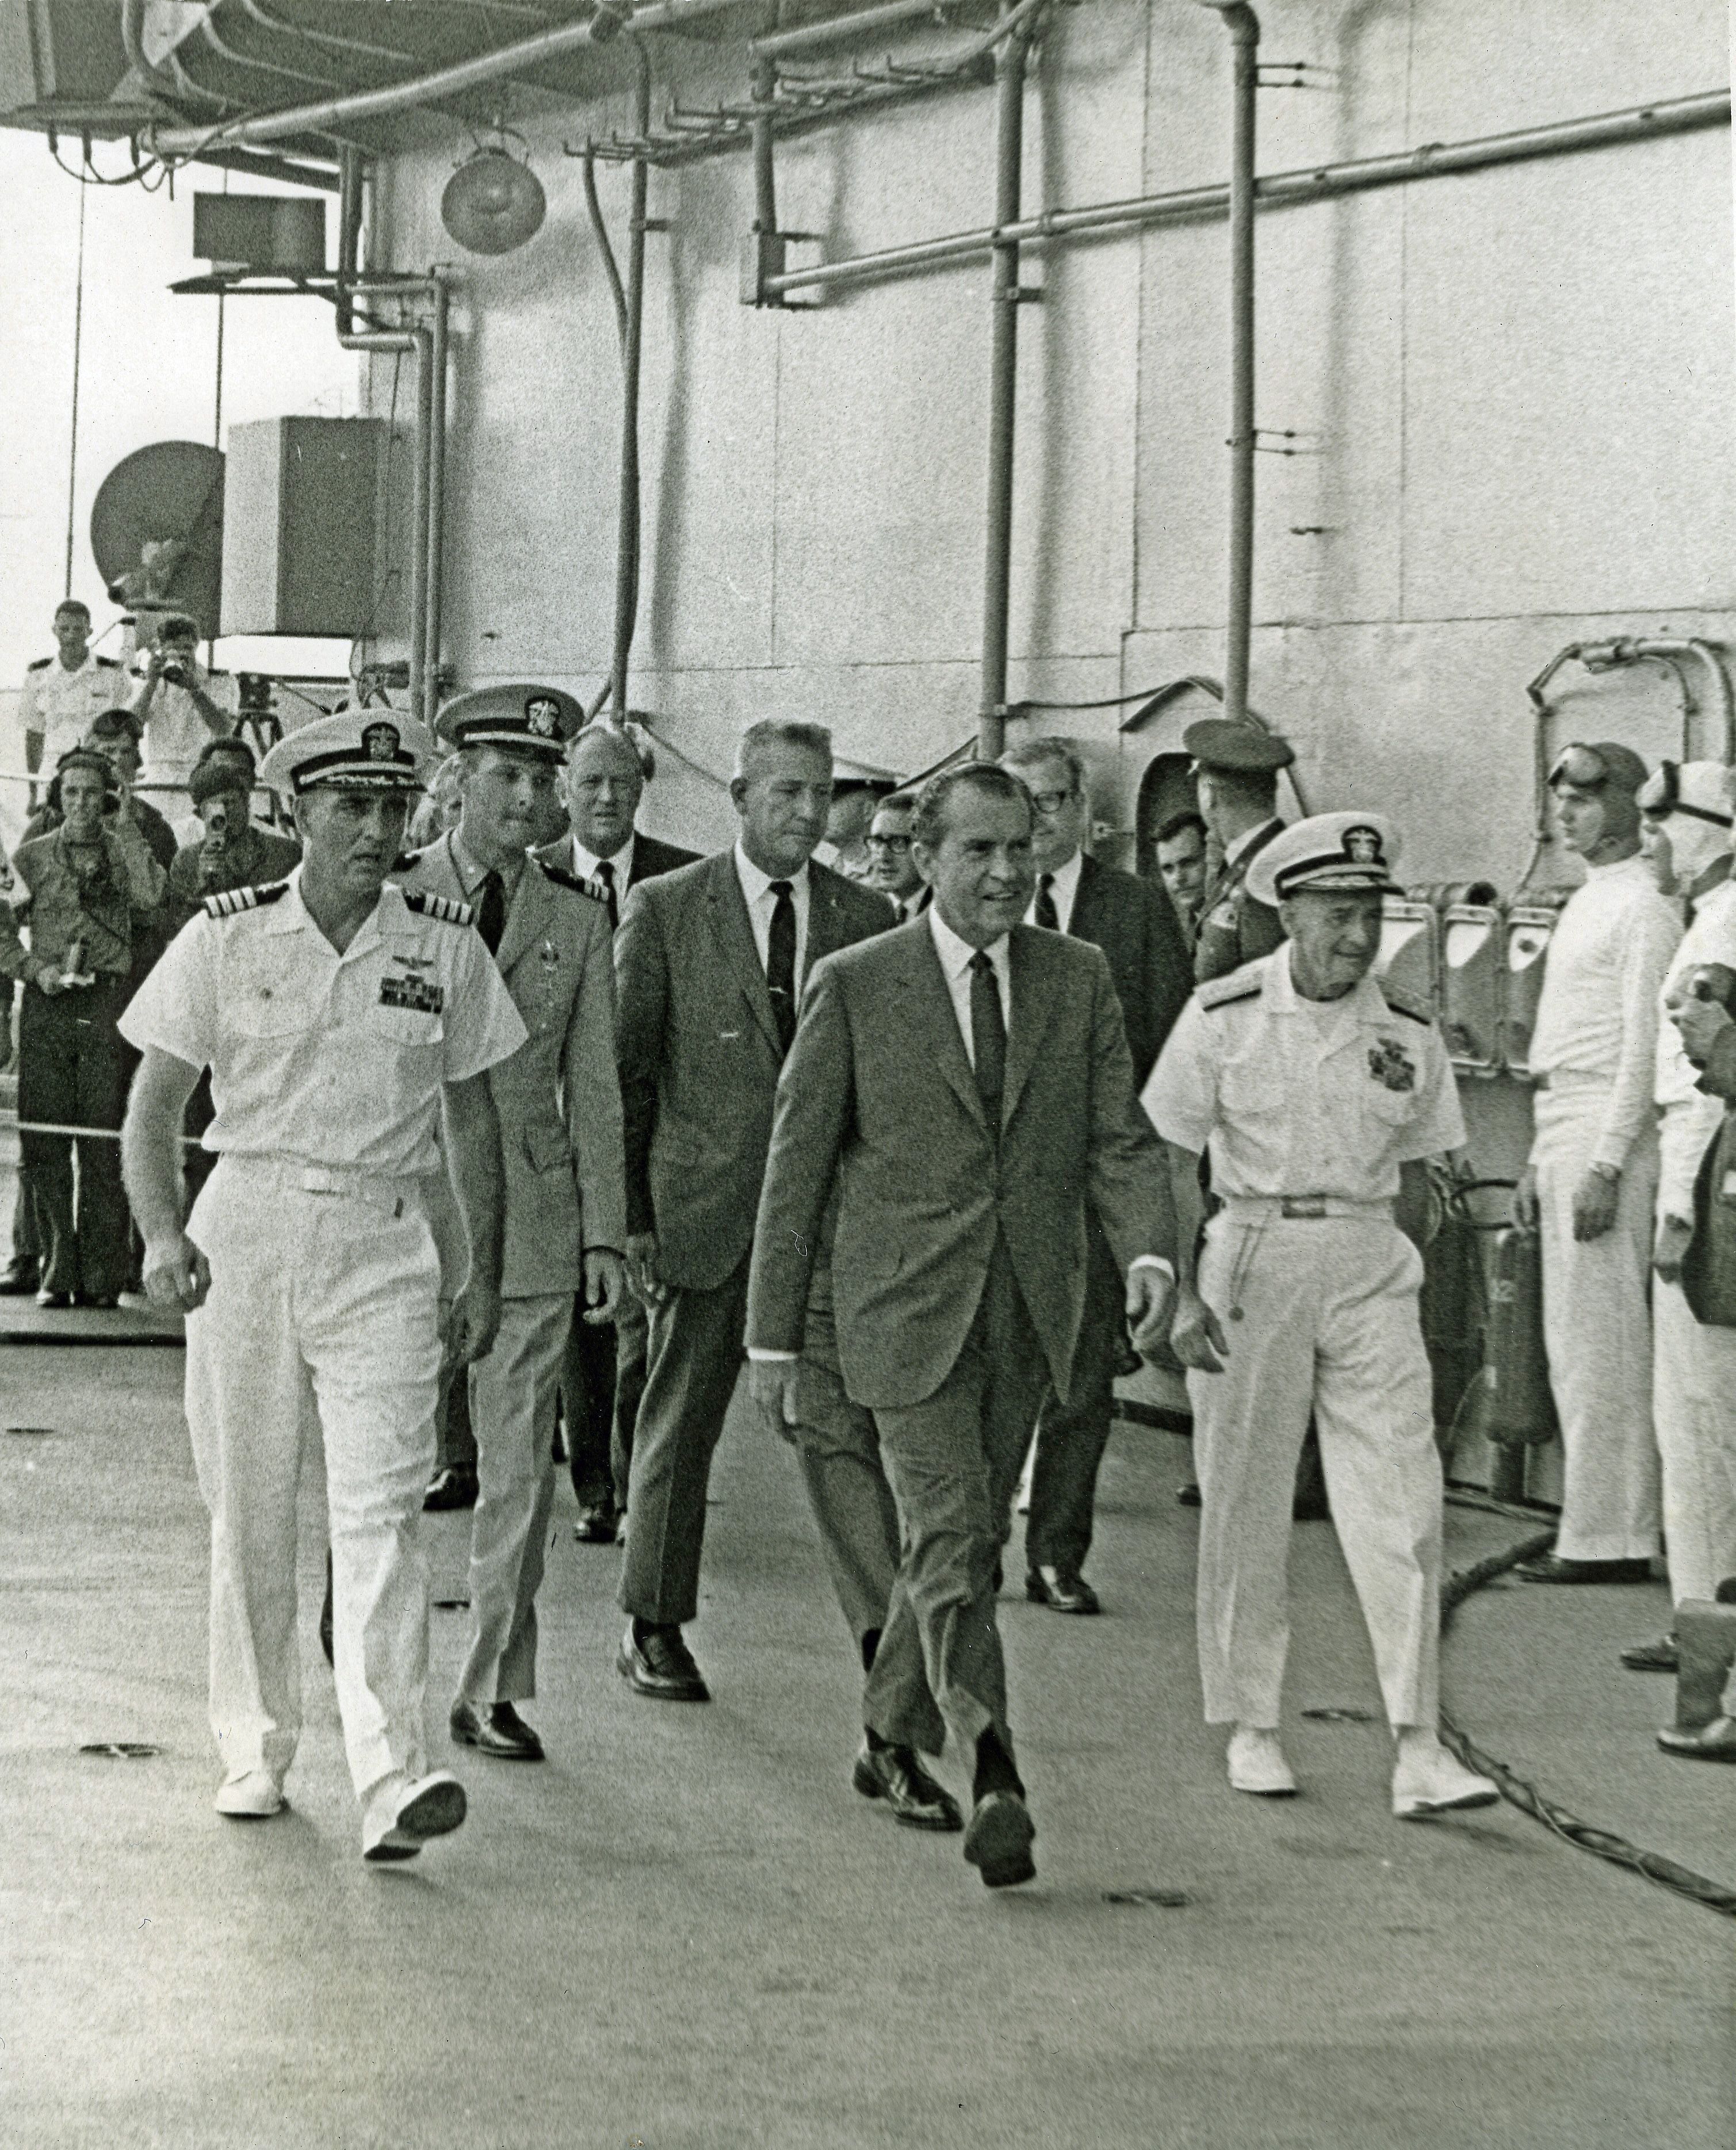 NS-ha-075 |
2.02M | President Richard M. Nixon walks toward helicopter Marine One to depart USS Hornet, escorted by the ship's commanding officer, CAPT Carl J. Seiberlich (left), and Commander In Chief, Pacific (CINCPAC), ADM John S. McCain, Jr. |
Bob Fish | |
 NS-ha-075b |
350k | Captain Carl J. Seiberlich, Commanding Officer, USS Hornet (CVS-12), Apollo 11. |
Mat Garretson | |
 NS-ha-702 |
506k | "President Richard Nixon asks Photographer Milt Putnam to send him photos of the recovery." |
Bob Canchola, BT, USN (Ret.) | |
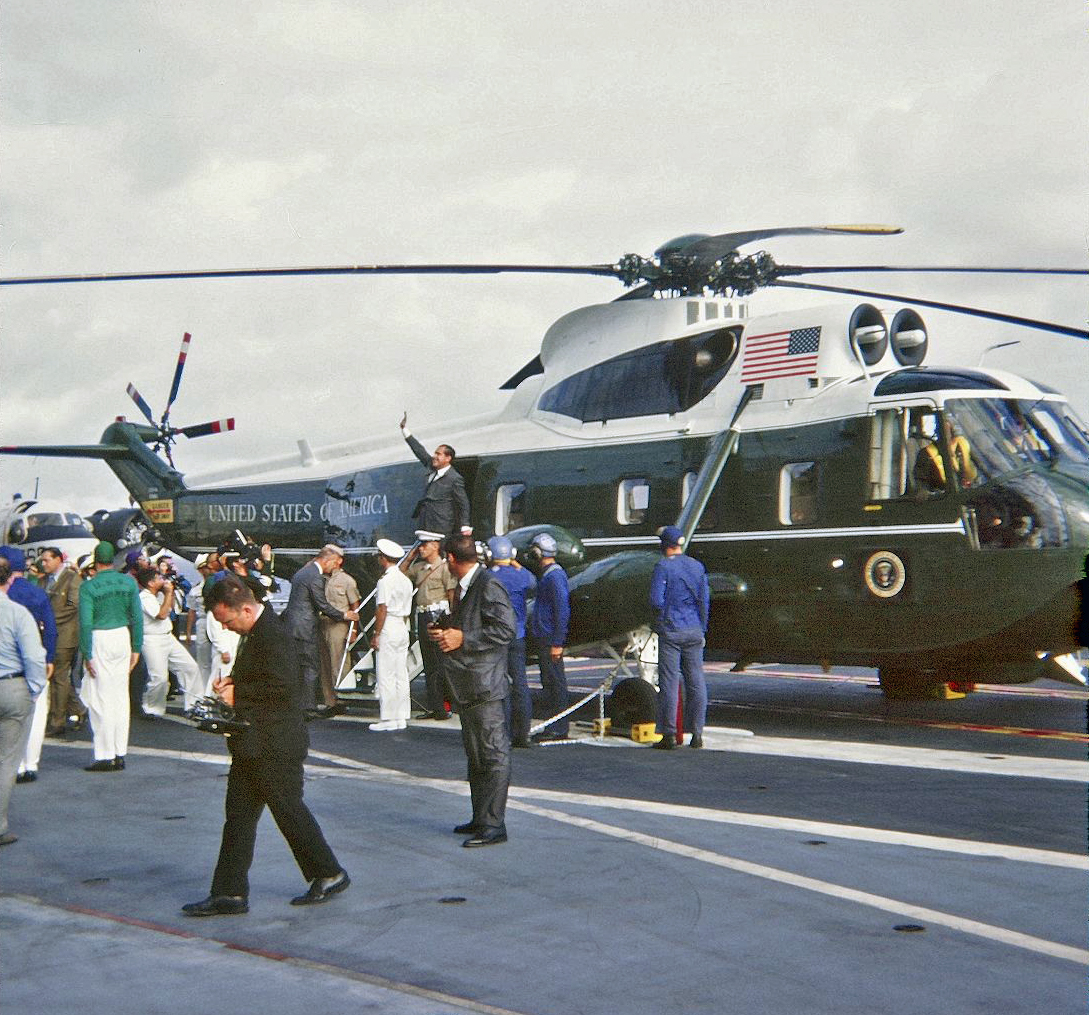 NS-ha-076 |
949k | After his welcoming remarks with the Apollo 11 astronauts, President Nixon went up to the flight deck where his HMX-1 Sea King helicopter awaited. After shaking hands with many ship's crewmembers, he climbed the steps to Marine One and waved at the crowd. At 0810—roughly three hours after arriving—pilot LtCol Ed Sample fired up the Sea King's twin turboshaft engines and departed USS Hornet for Johnston Island. US Navy photo. |
Bob Fish | |
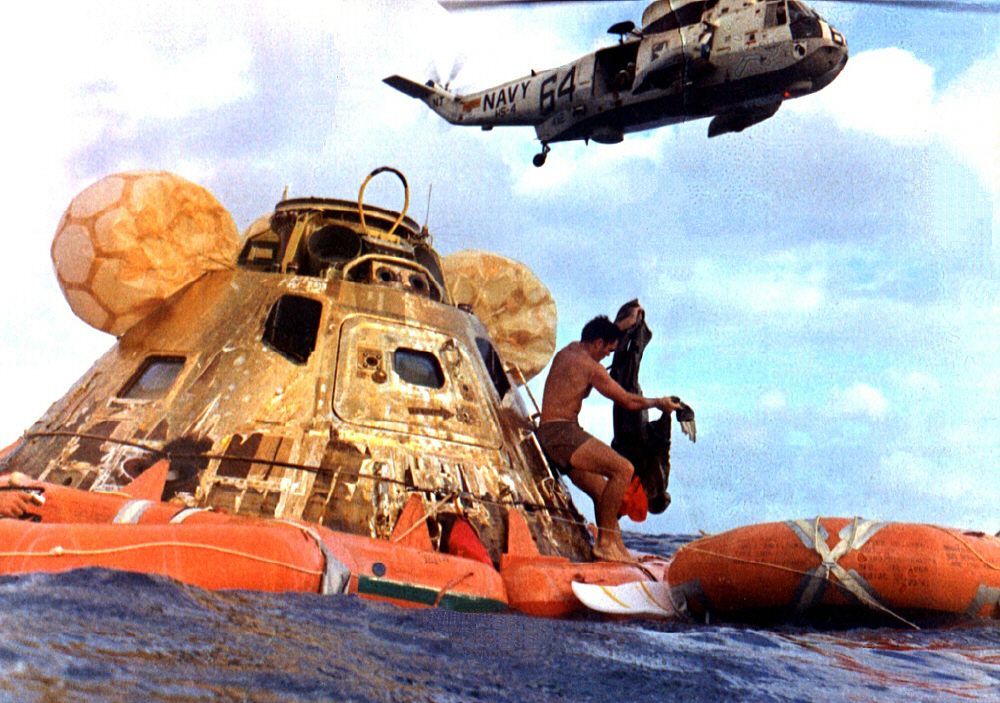 NS-ha-081 |
136k | To prepare the spacecraft for recovery, UDT decon swimmer LTJG Clancy Hatleberg decontaminated designated parts of it while still wearing his BIG suit. When finished, he placed all the decontamination canisters of betadine and sodium hypochlorite into the decontamination raft. He then placed his own BIG suit in the raft and sank it. US Navy photos by Mike Mallory. |
Bob Fish | |
 NS-ha-081a |
53k | |||
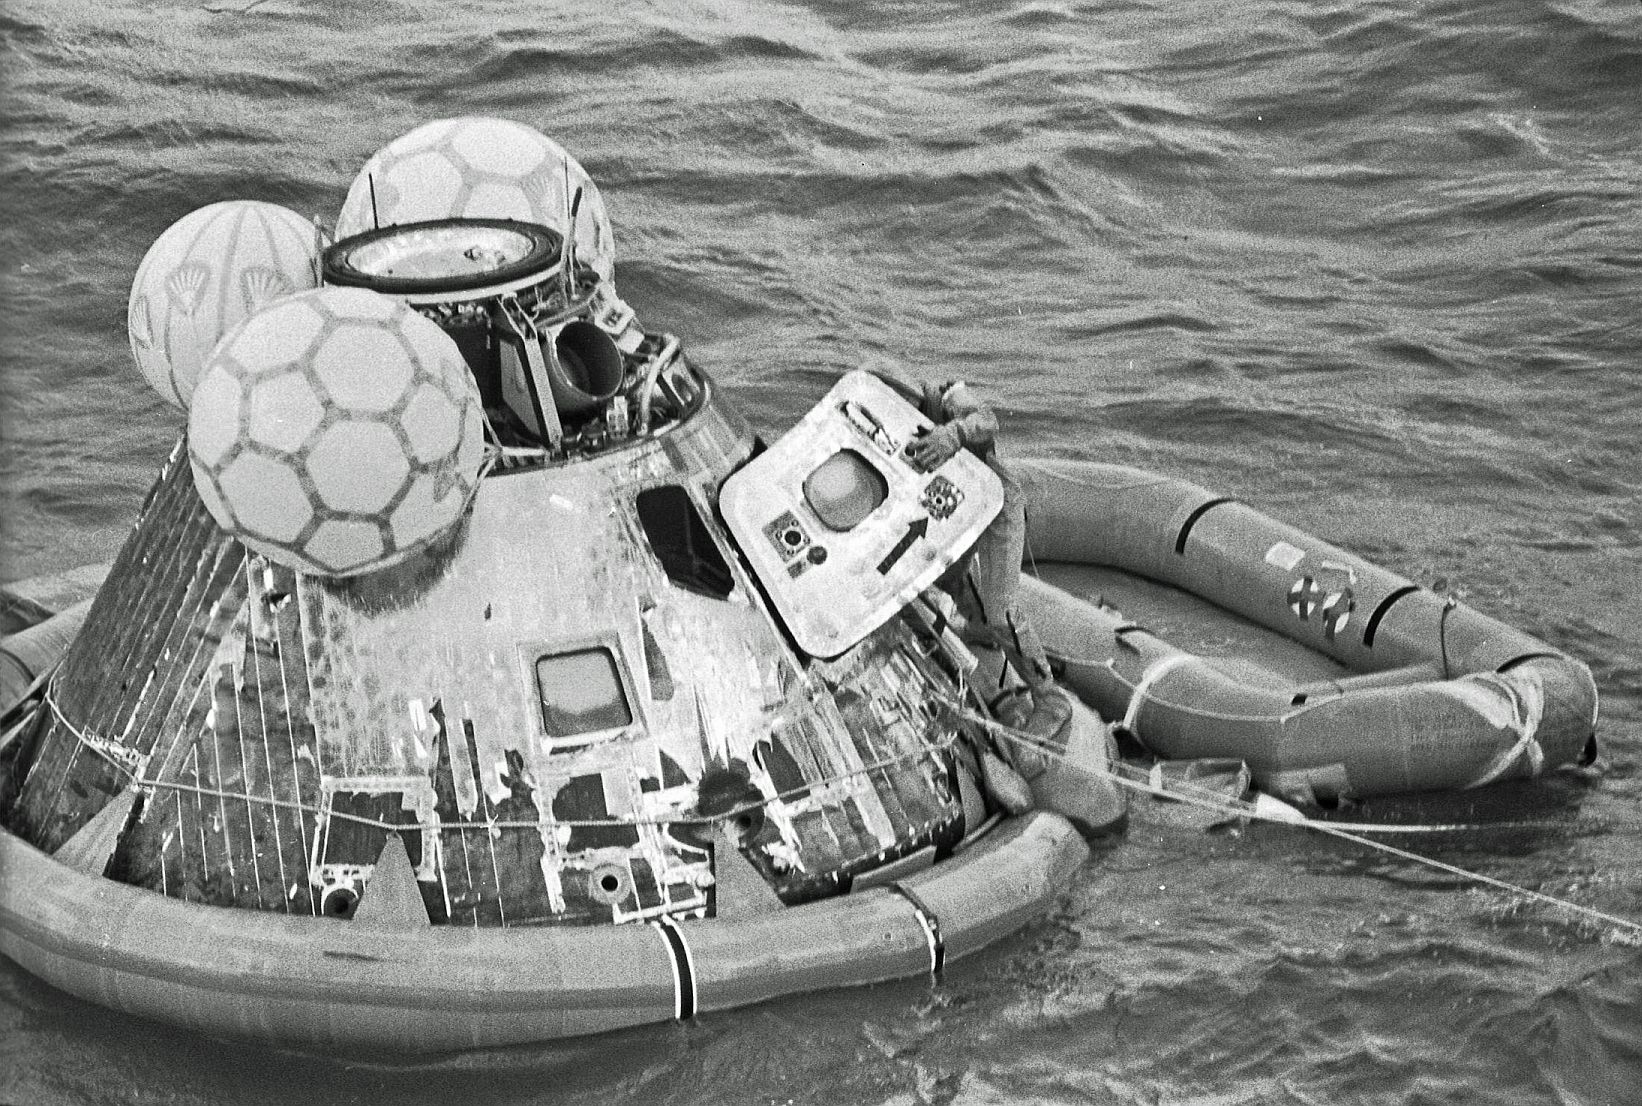
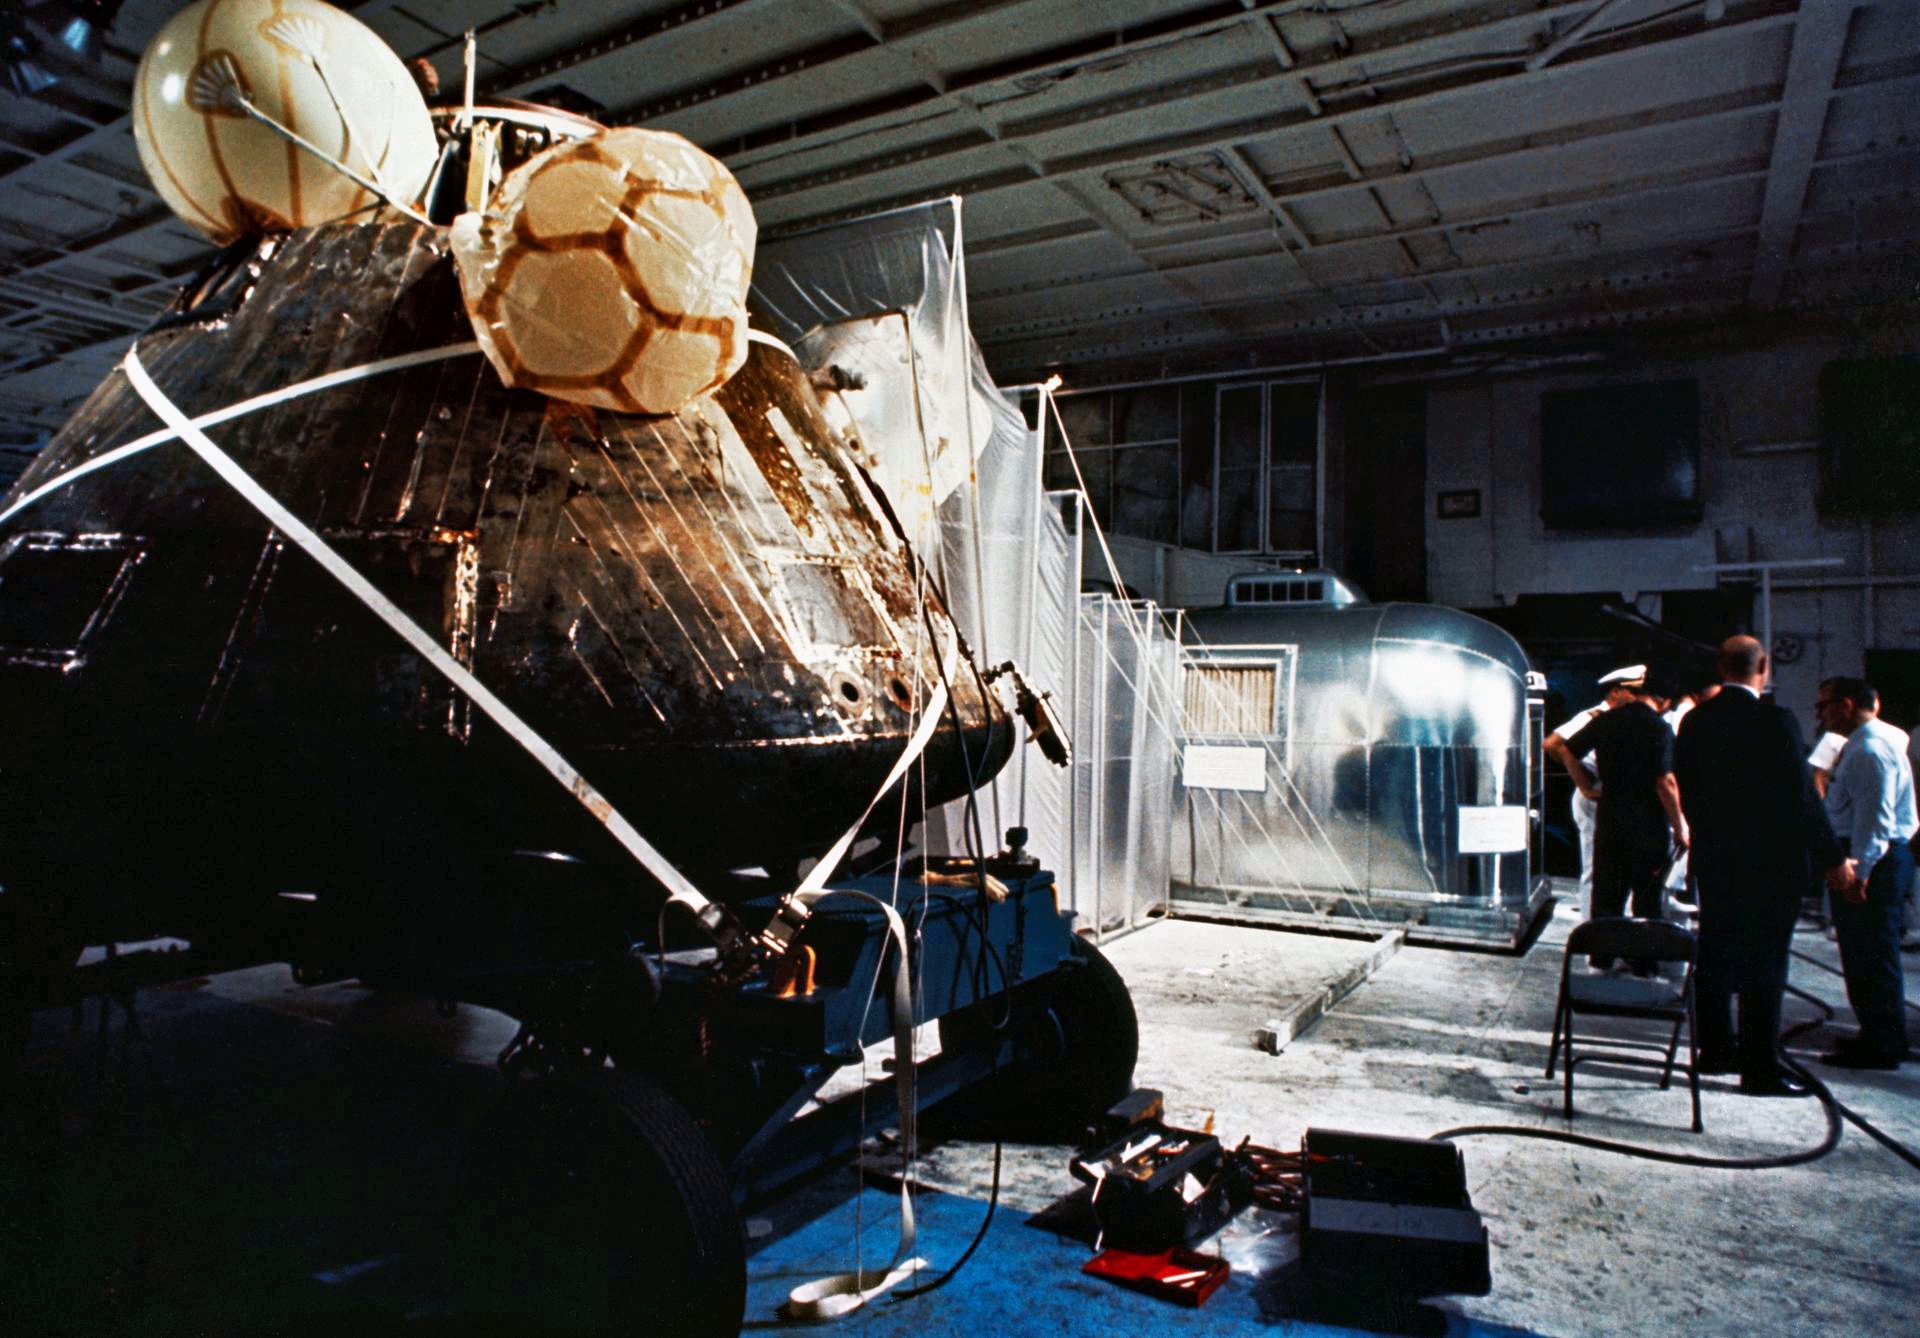
 NS-ha-572 |
2.63M | The Command Module (CM), Columbia, as seen from USS Hornet (CVS-12). From Chris Lamb, Executive Officer (XO), batch. |
Bob Fish | |
 NS-ha-083 |
371k | When Hornet had moved close enough to Columbia, an inhaul line attached to the ship's B&A crane was thrown to the UDT swimmers. Its hook was attached to the spacecraft recovery loop (at the top). A special NASA tensioning winch, along with the ship's crew, slowly pulled the spacecraft closer to the B&A crane for lifting. UDT swimmer John Wolfram (with sunflower appliqué) stands atop the CM holding the actual lifting sling, ready to snap the crane's hook into it when appropriate. From left to right, the UDT-11 recovery team is LTJG Clancy Hatleberg, LTJG Wes Chesser, QM3 Michael Mallory and SN John Wolfram. National Aeronautics and Space Administration (NASA) photo S69-21282. |
Courtesy of NASA, via Bob Fish | |
 NS-ha-082 |
1.85M | In this view, the initial shot line had been thrown to the the UDT swimmers and they were waiting for the B&A crane to lower the lifting cable. Sunflower apliqués can be seen clearly on John Wolfram's wetsuit. Decon swimmer Hatleberg has removed, and sunk, his BIG suit and is now in swim trunks.
US Navy photo.
(Text adapted from Hornet Plus Three, by Bob Fish.) |
Courtesy of the National Naval
Aviation Museum (NNAM), via Mat Garretson and Bob Canchola, BT, USN (Ret.) |
|
 NS-ha-084 |
310k | An unusual view taken from the Hornet's motor lifeboat showing the spacecraft hooked to the B&A crane via a special NASA strap and ready for hoisting. At this time, the UDT team is evacuating the area around the spacecraft in case it swings wildly after being plucked from the top of a swell. US Navy photo by Allen Swanson. |
Bob Fish | |
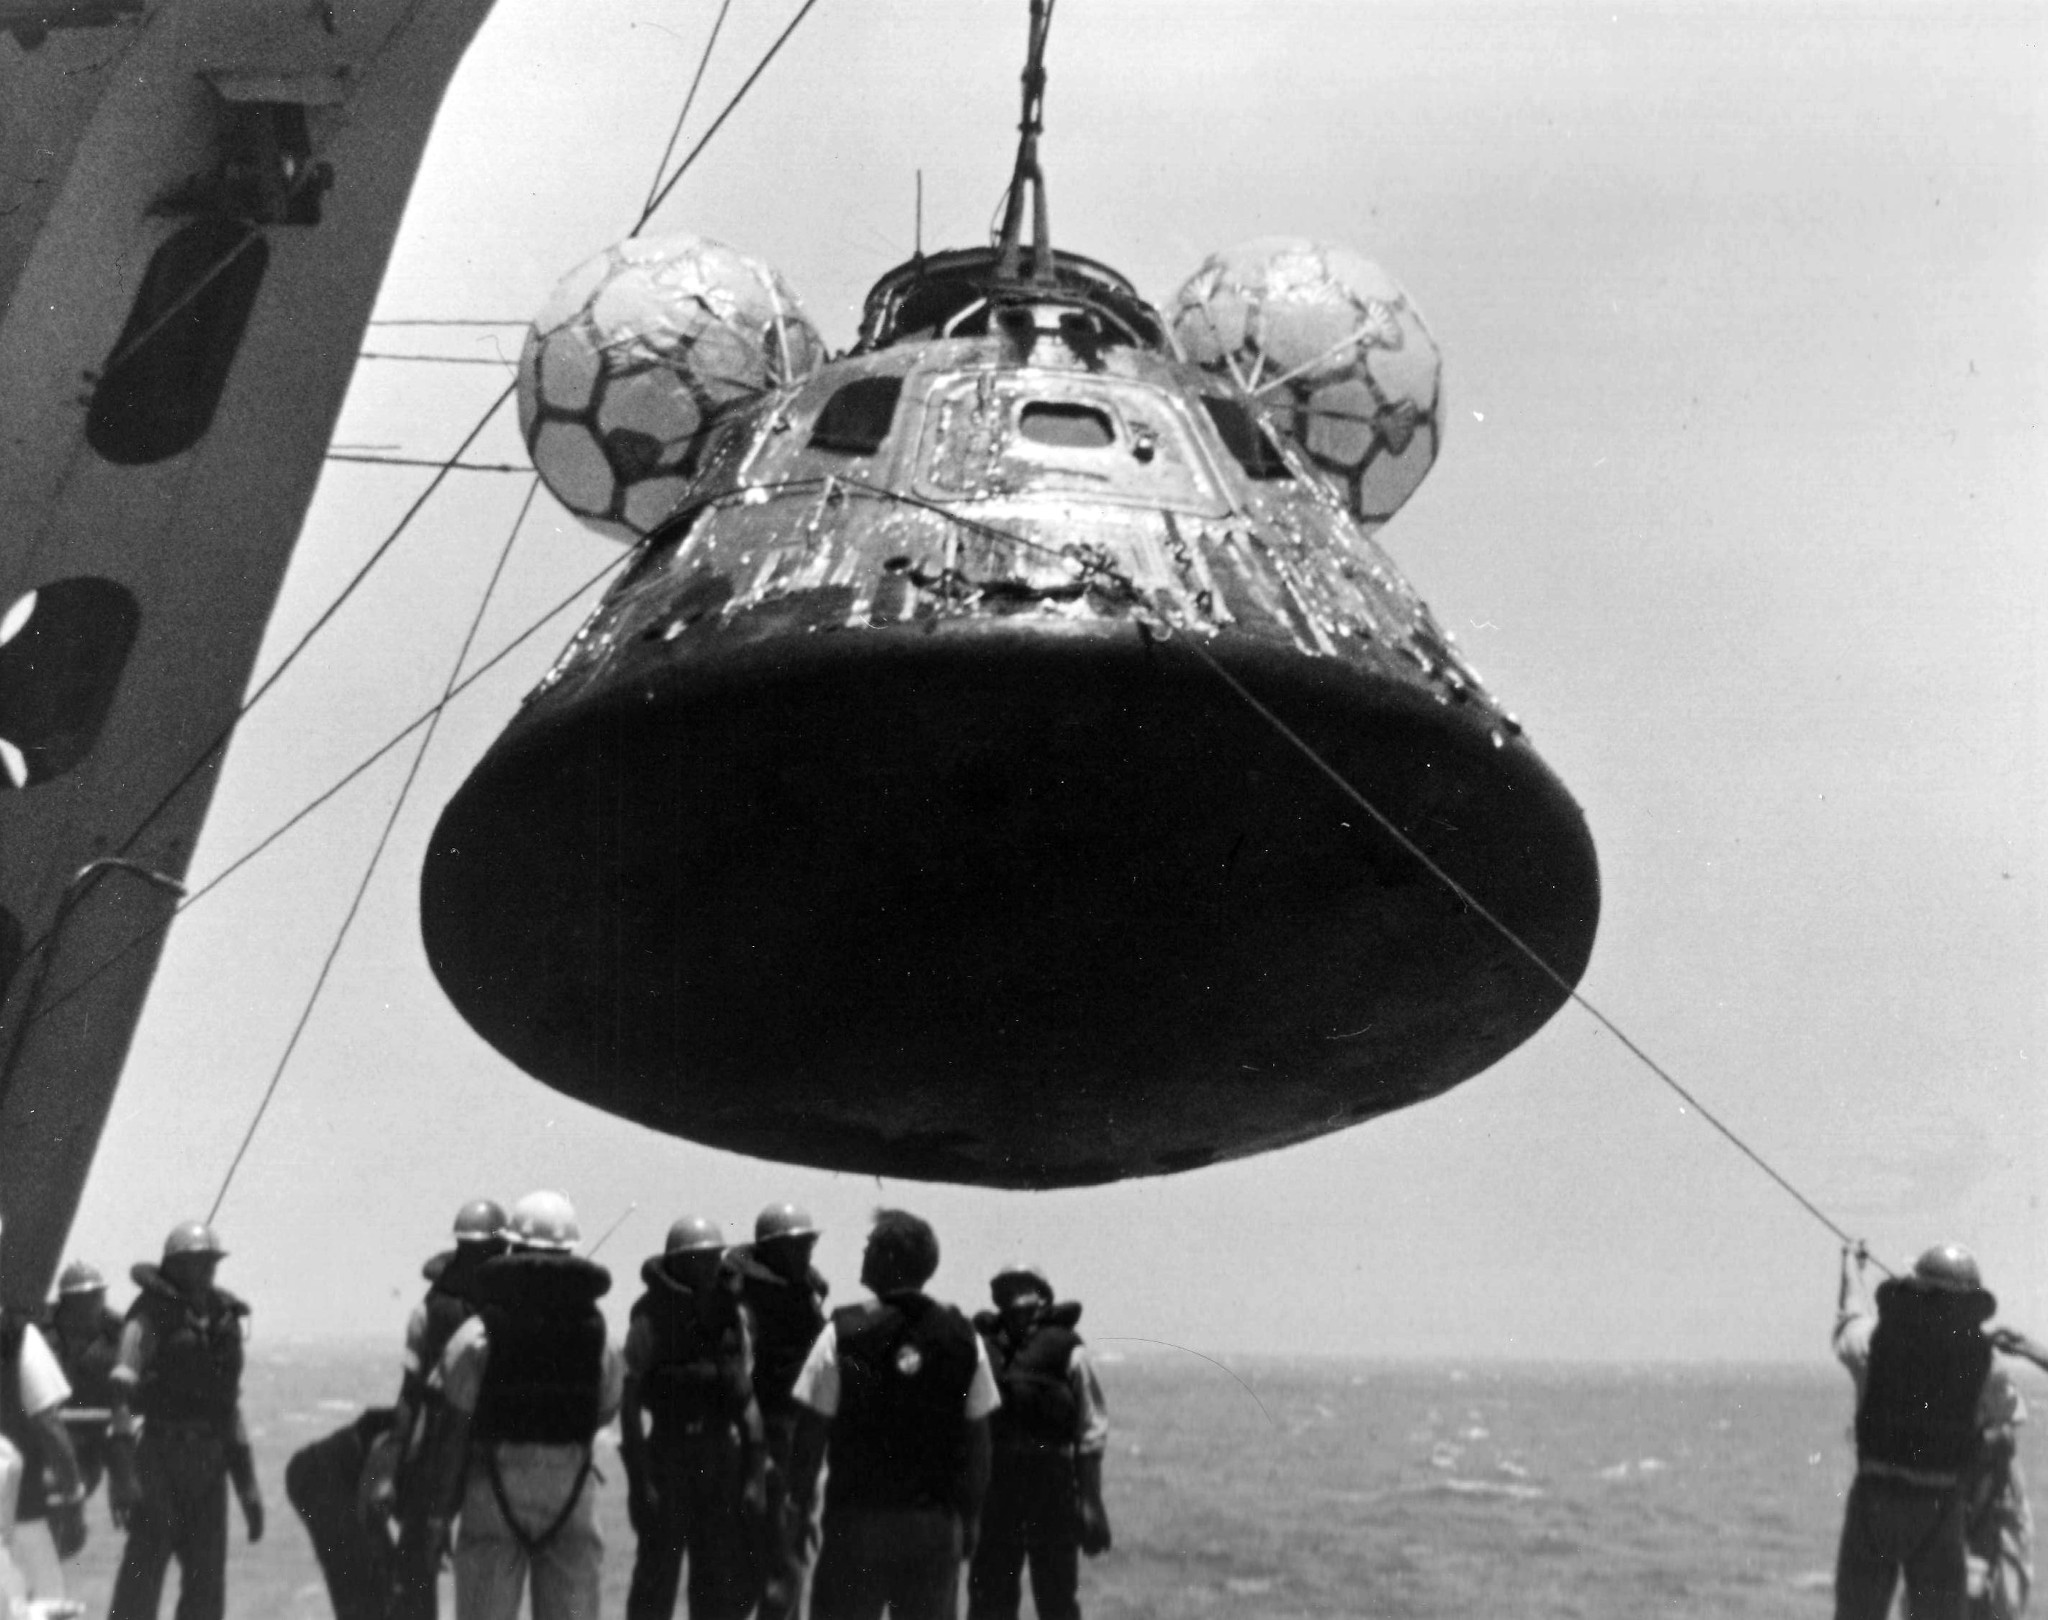
 NS-ha-085 |
641k | The Apollo 11 Command Module (CM) photographed as it is hoisted aboard USS Hornet (CVS-12). National Aeronautics and Space Administration (NASA) photo S69-21783. |
Courtesy of NASA, via Bob Canchola, BT, USN (Ret.) |
|
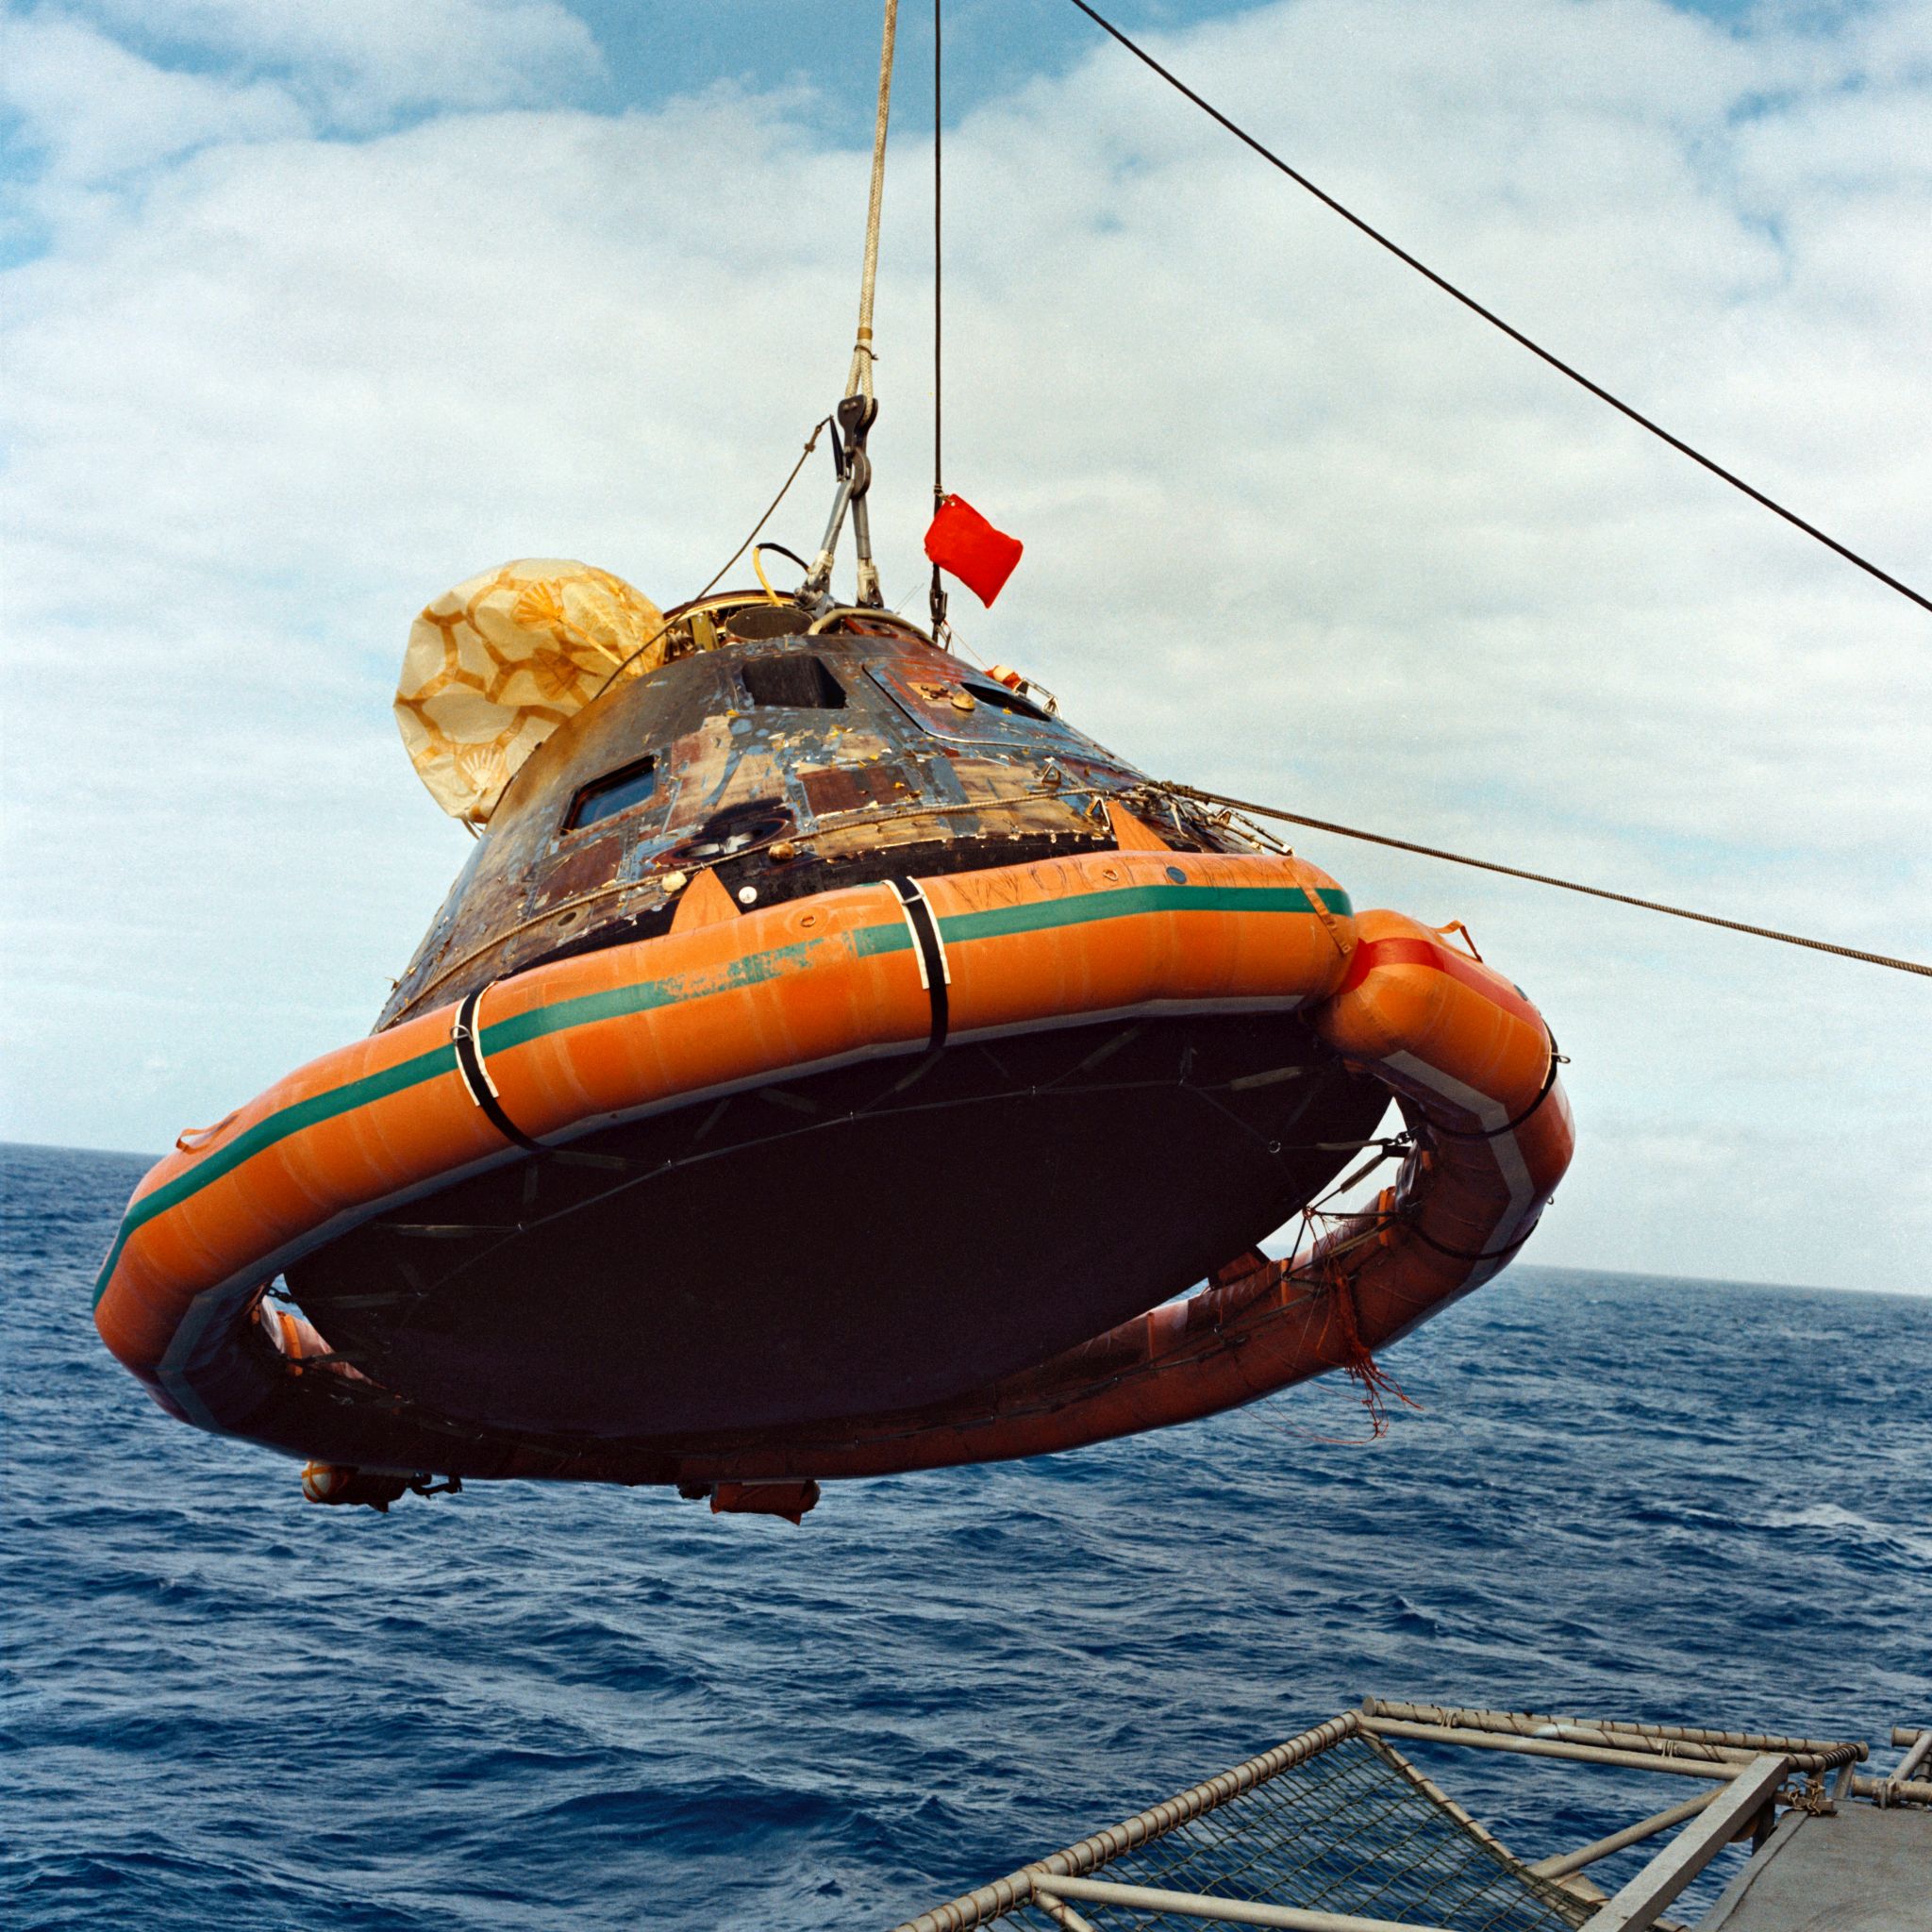
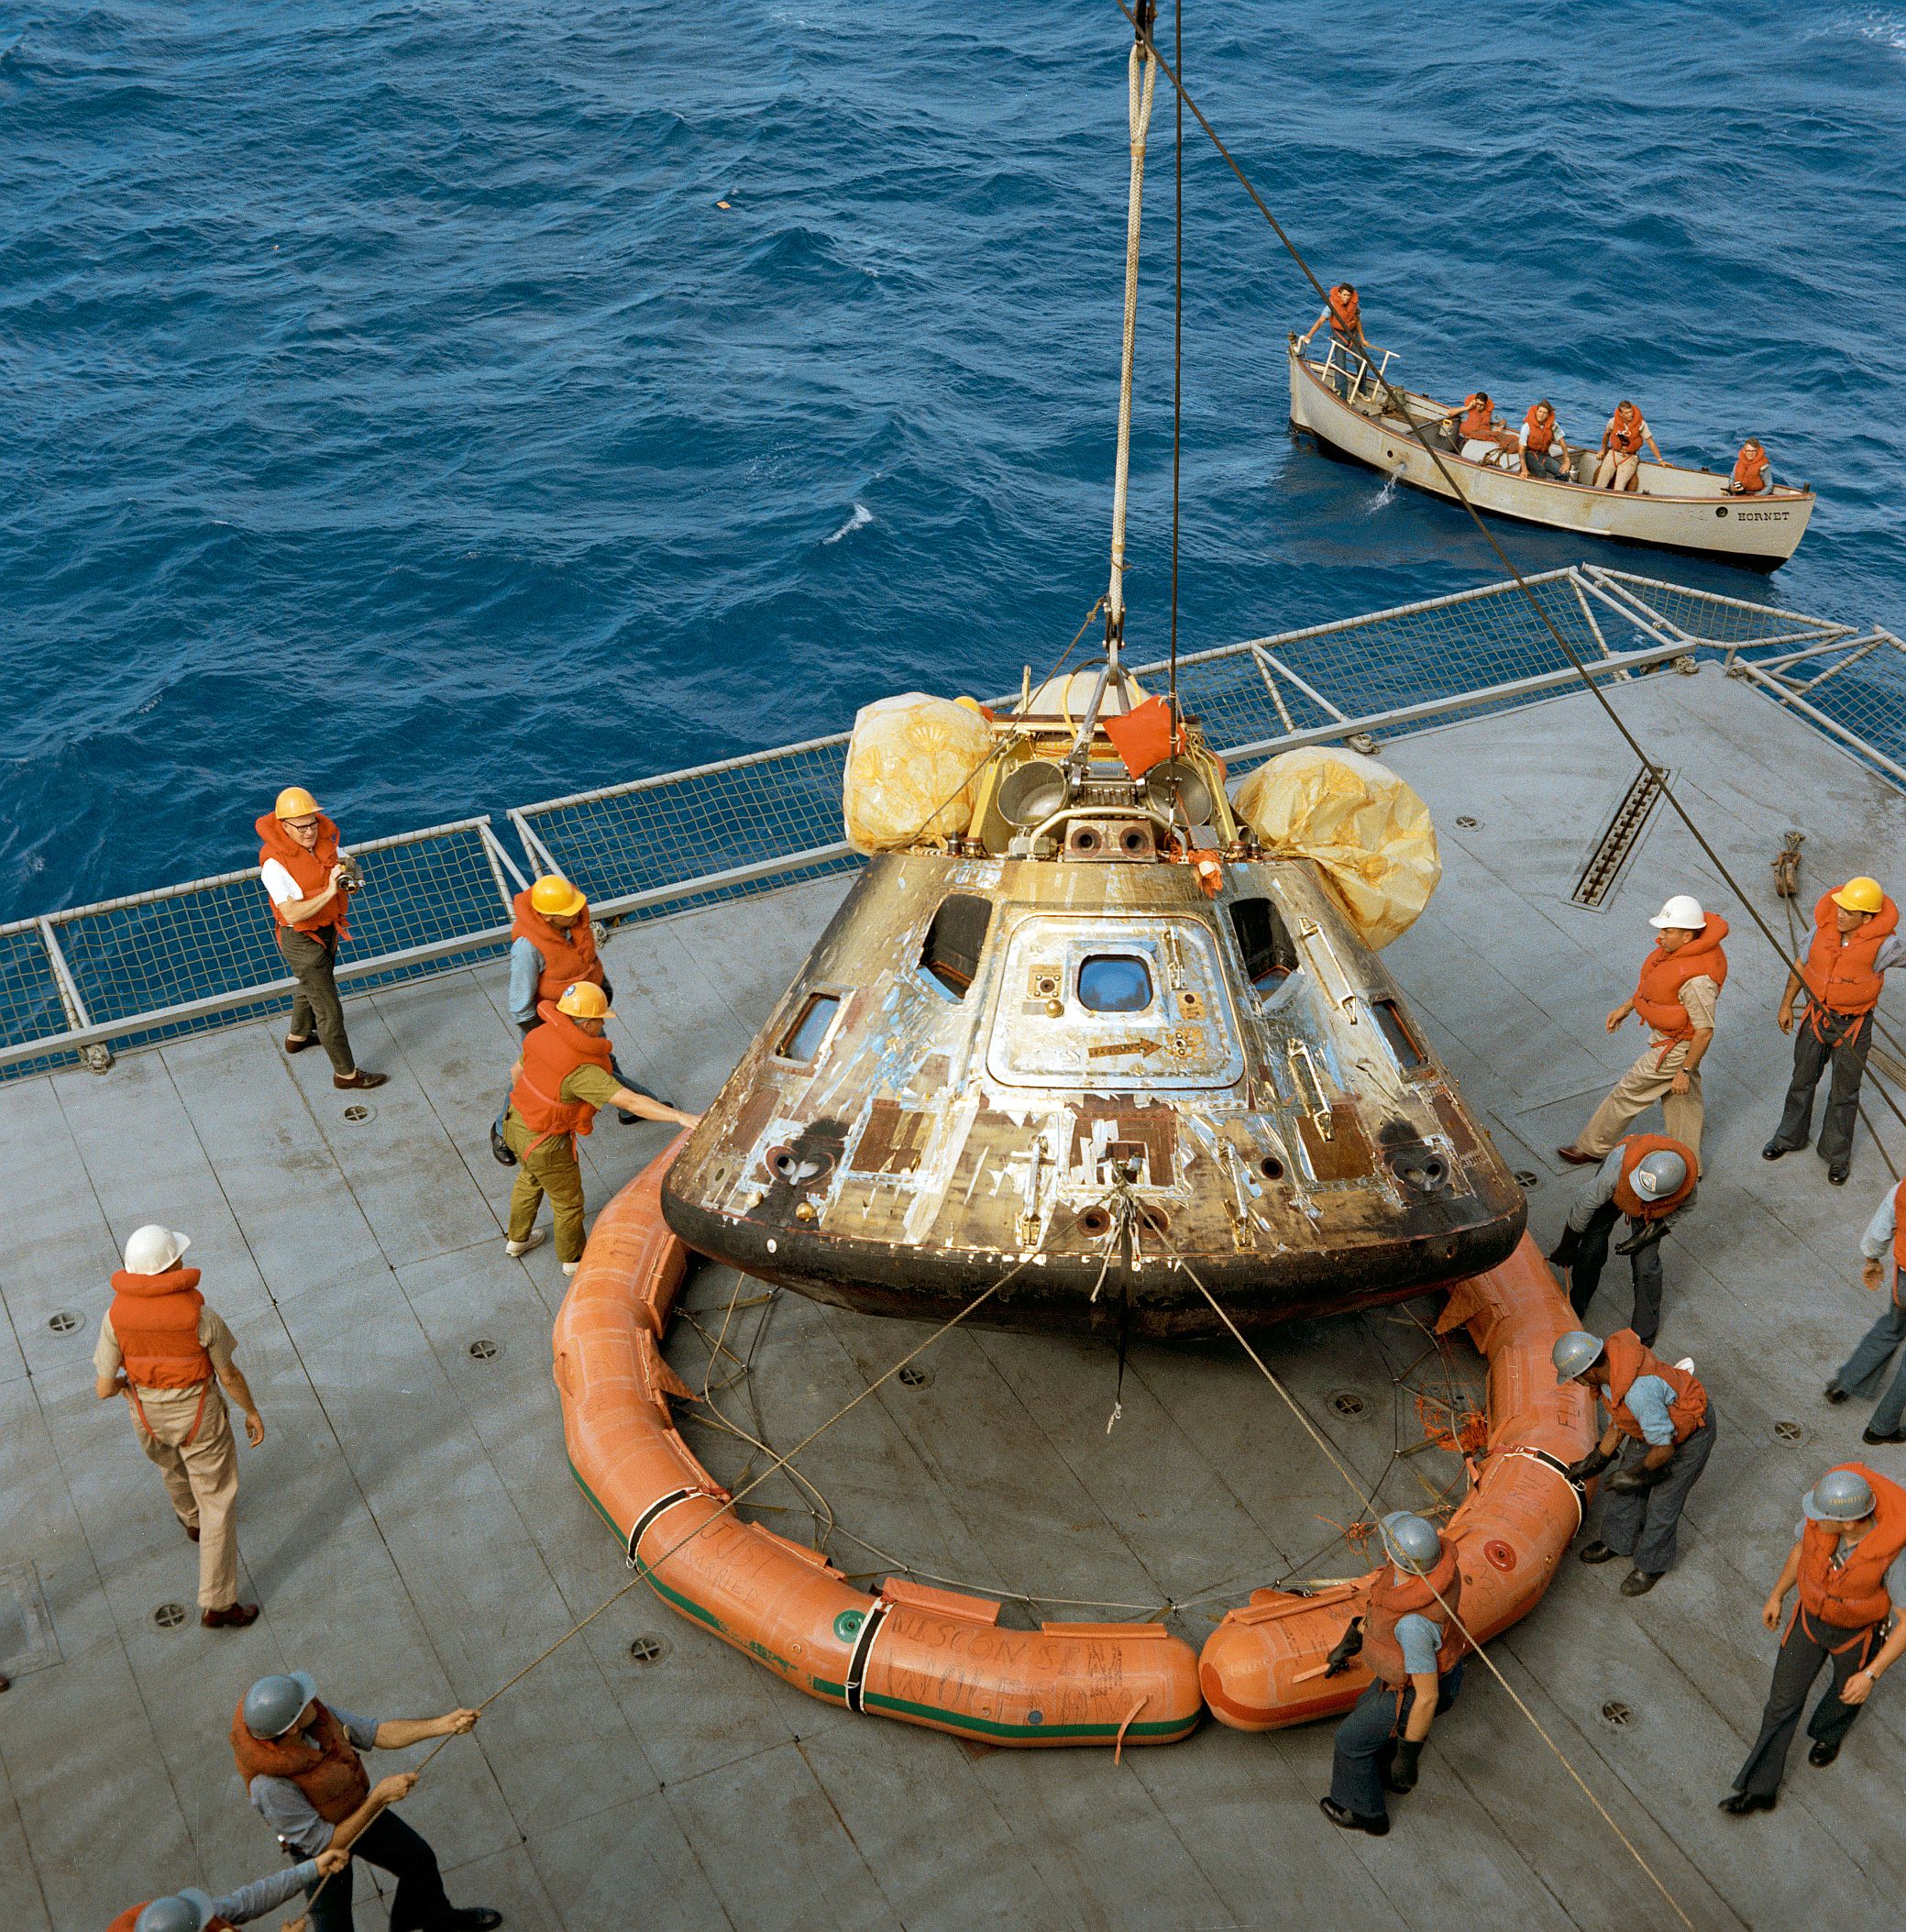 NS-ha-086 |
1.11M | Three hours after splashdown in the Pacific Ocean on 24 July, Columbia is lifted onto Hornet's elevator 3 by the ship's B&A crane. At this point, its flotation collar is being removed carefully by ship's crew. The CM still harbored dangerous chemicals that could catch fire or, if inhaled, cause serious respiratory problems. The ship's motor lifeboat is clearly visible in the background. National Aeronautics and Space Administration (NASA) photo S69-21294. |
Courtesy of NASA, via Bob Fish | |
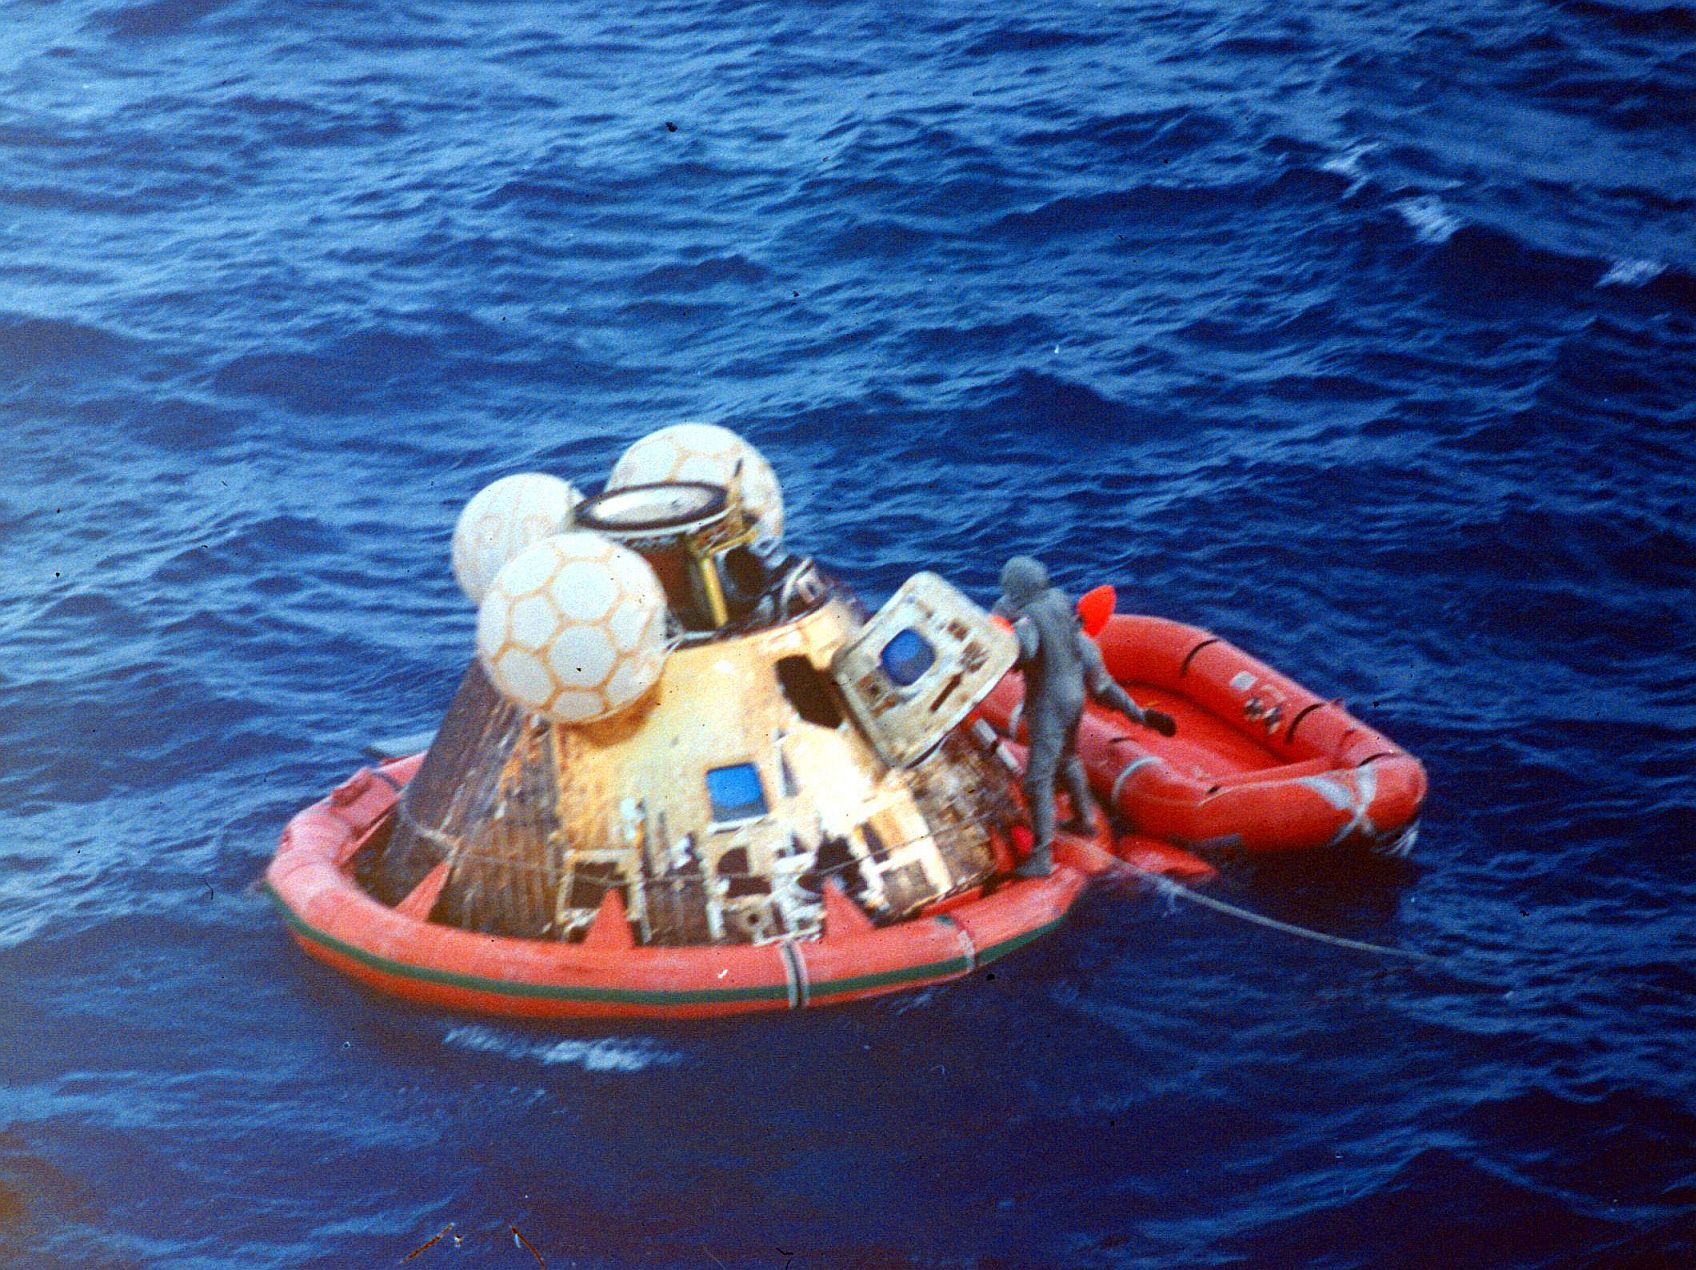
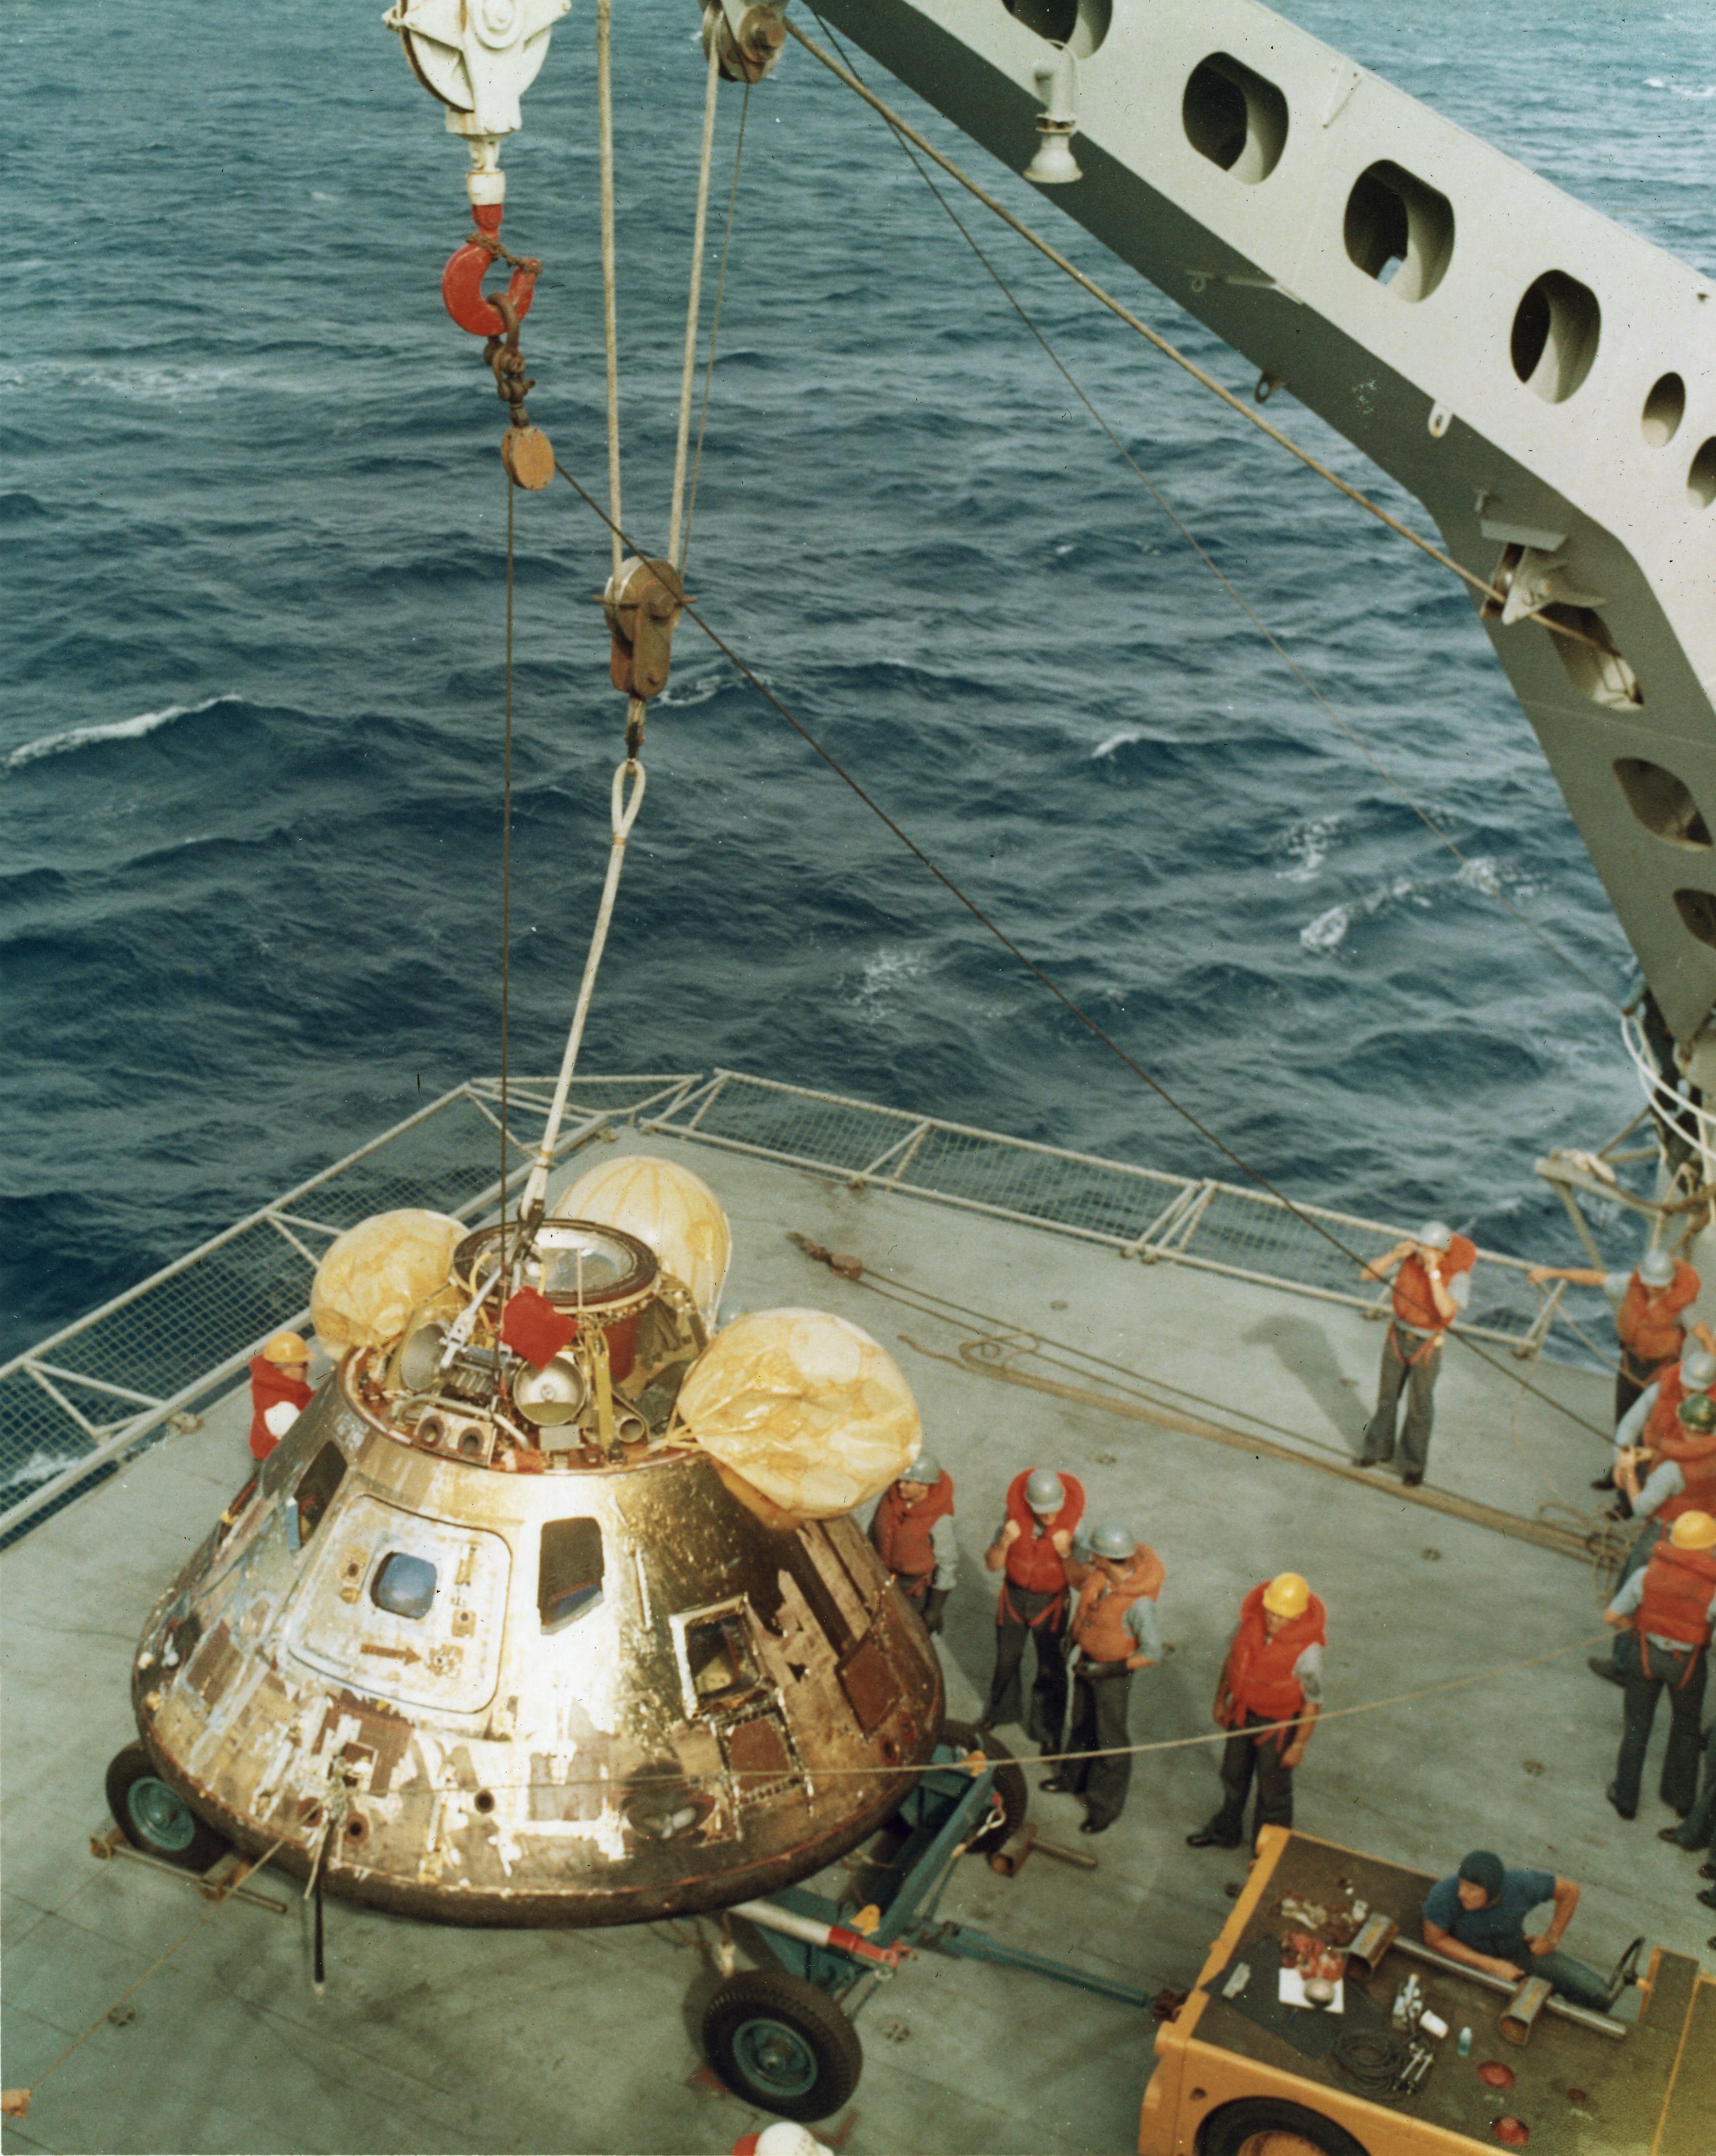 NS-ha-087 |
1.40M | With its flotation collar removed, but retaining three semi-inflated uprighting bags, Columbia is placed on the blue NASA dolly. It was then towed into Hangar Bay 2 by a standard Navy aircraft tractor. US Navy photo by PHCS Robert Lawson. |
Bob Fish | |
 NS-ha-090 |
145k | After the dolly with Columbia was pulled into Hornet's Hangar Bay 2, it was connected to the Mobile Quarantine Facility (MQF) via a plastic transfer tunnel. This allowed the biological quarantine to remain in place while the astronauts and MQF technicians safely retrieved items from the spacecraft, such as the moon rocks and personal effects. Top photo by Don Blair. Bottom photo courtesy of National Aeronautics and Space Administration (NASA) photo s69-40758. |
Bob Fish | |
 NS-ha-090a |
1.45M | Bob Canchola, BT, USN (Ret.) | ||
 NS-ha-091 |
627k | "Buzz" Aldrin is shown descending from the open hatch of Columbia into the plastic tunnel that connects the CM to the MQF. This "temporary biosphere" maintains the quarantine while allowing the moon rocks and personal effects of the astronauts to be removed from the CM before it is closed for further end-of-mission processing in Hawaii. |
Bob Fish | |
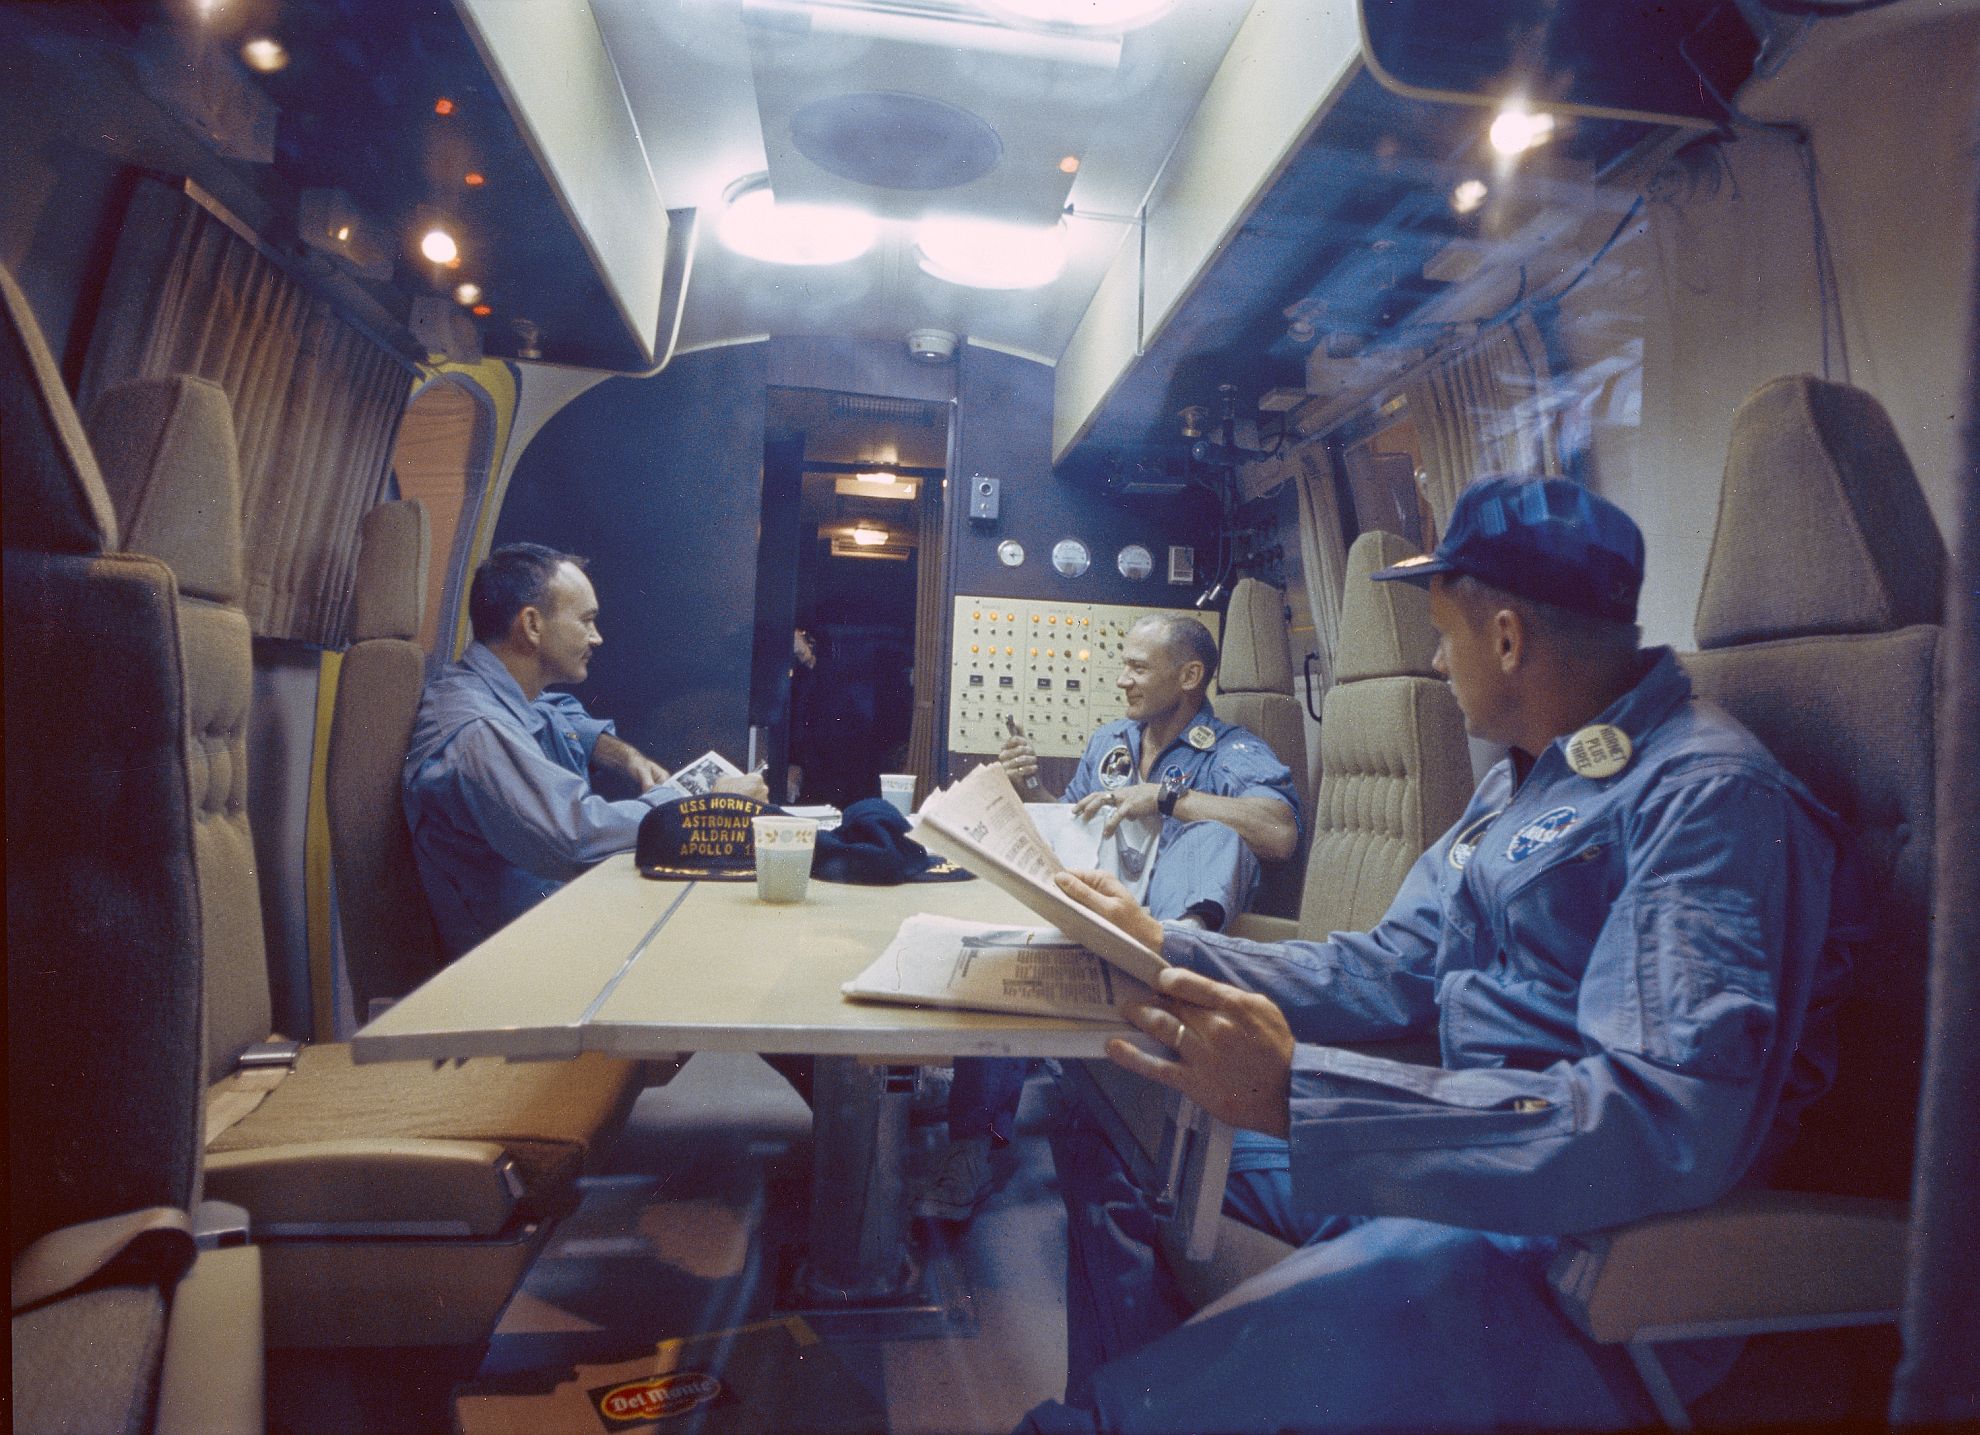 NS-ha-092 |
454k | During their 52-hour journey to Pearl Harbor, the astronauts took time to relax in between undergoing medical examinations and recording their post-flight recollections. Michael Collins is on the left with "Buzz" Aldrin in the center and Neil Armstrong on the right. The photo was taken looking through the main MQF door window into the lounge area. The white lapel buttons display the ship's "Hornet Plus Three" motto. National Aeronautics and Space Administration (NASA) photo, #6901208. |
Courtesy of NASA, via Bob Fish | |
 NS-ha-565 |
2.45M | USS Hornet (CVS-12) Deck Log, 23 & 24 July 1969. |
Bob Fish | |
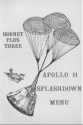 NS-ha-567 |
915K | "Hornet Plus Three. Apollo 11 Splashdown Menu." 24 July 1969. |
Bob Fish | |
 NS-ha-573 |
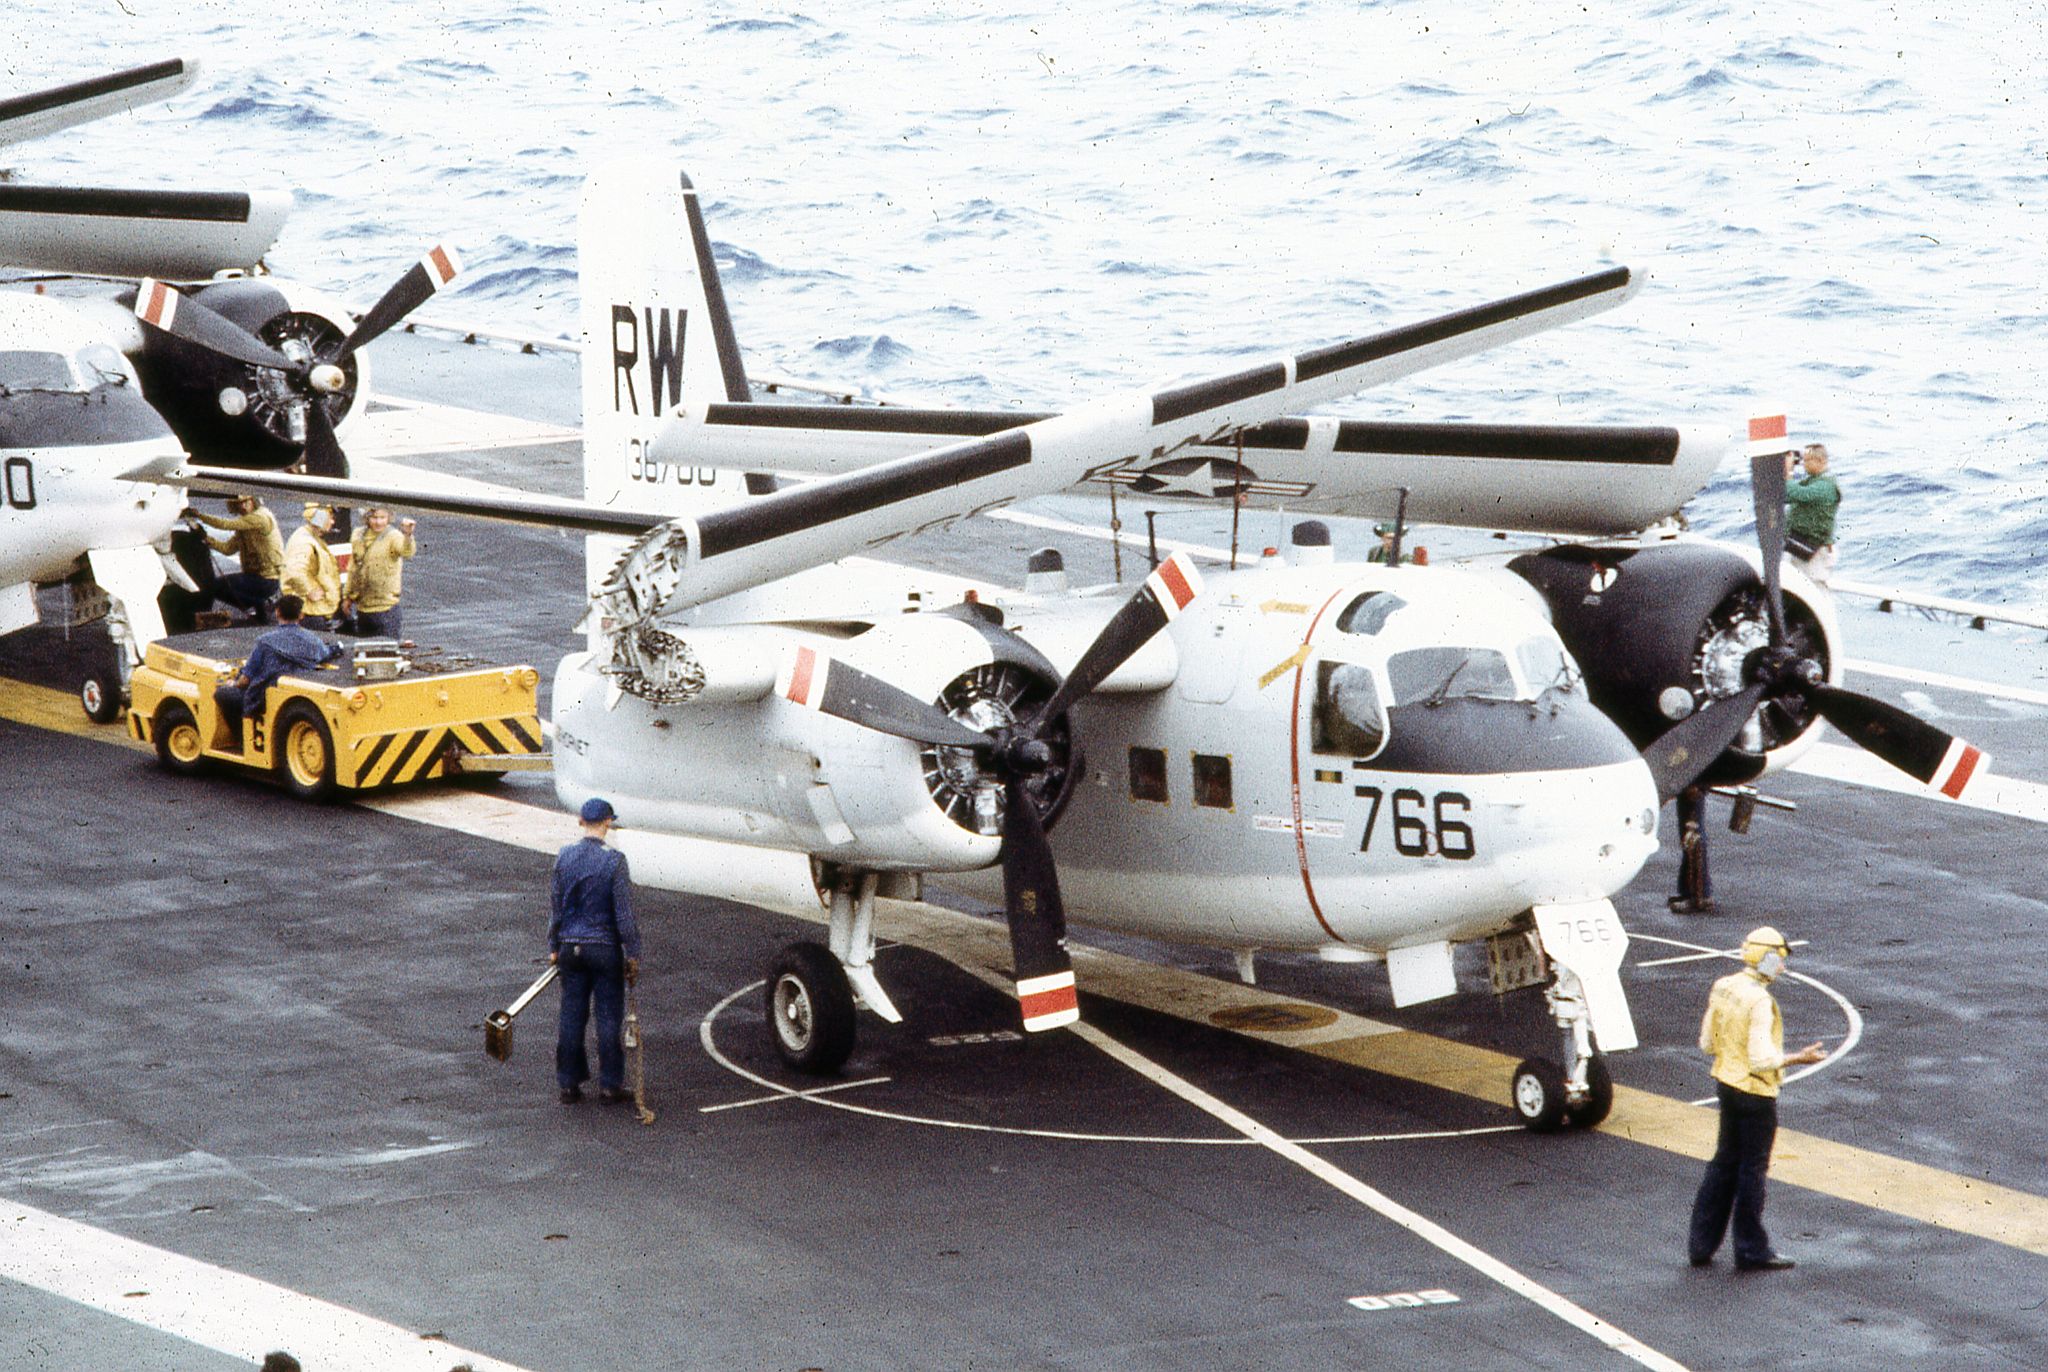
538K | From Fleet Tactical Support Squadron (VR) 30 "Providers" Command History for 1969: "27 June 1969 to 1 August 1969 — a two plane detachment was assigned onboard the USS Hornet (CVS-12) for the Apollo Eleven recovery. The detachment consisted of four aviators and six enlisted mechanics/crewmen. The mission of the Apollo Eleven detachment was to transport moon samples and astronaut biological samples from the Hornet to Johnstone [sic] Island and Hawaii after the recovery. A secondary mission was to transport VIP White House personnel and ADM John S. McCain, CINCPAC, who were present for the recovery." This is one of the C-1A Traders, BuNo 136766, modex RW766. |
Bob Fish | |
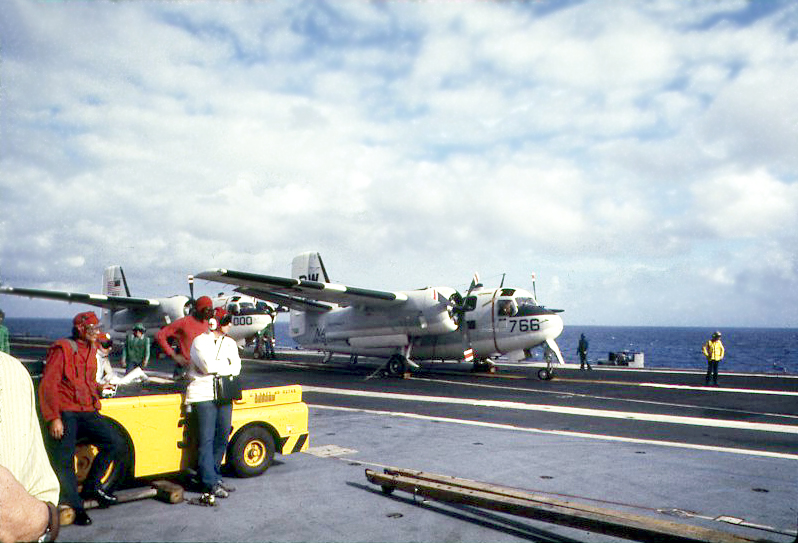 NS-ha-573a |
350K | ADM John S. McCain, CINCPAC, arrived and departed aboard C-1A Trader BuNo 136776, side number 000 (in the left background), Hornet's COD aircraft. |
||
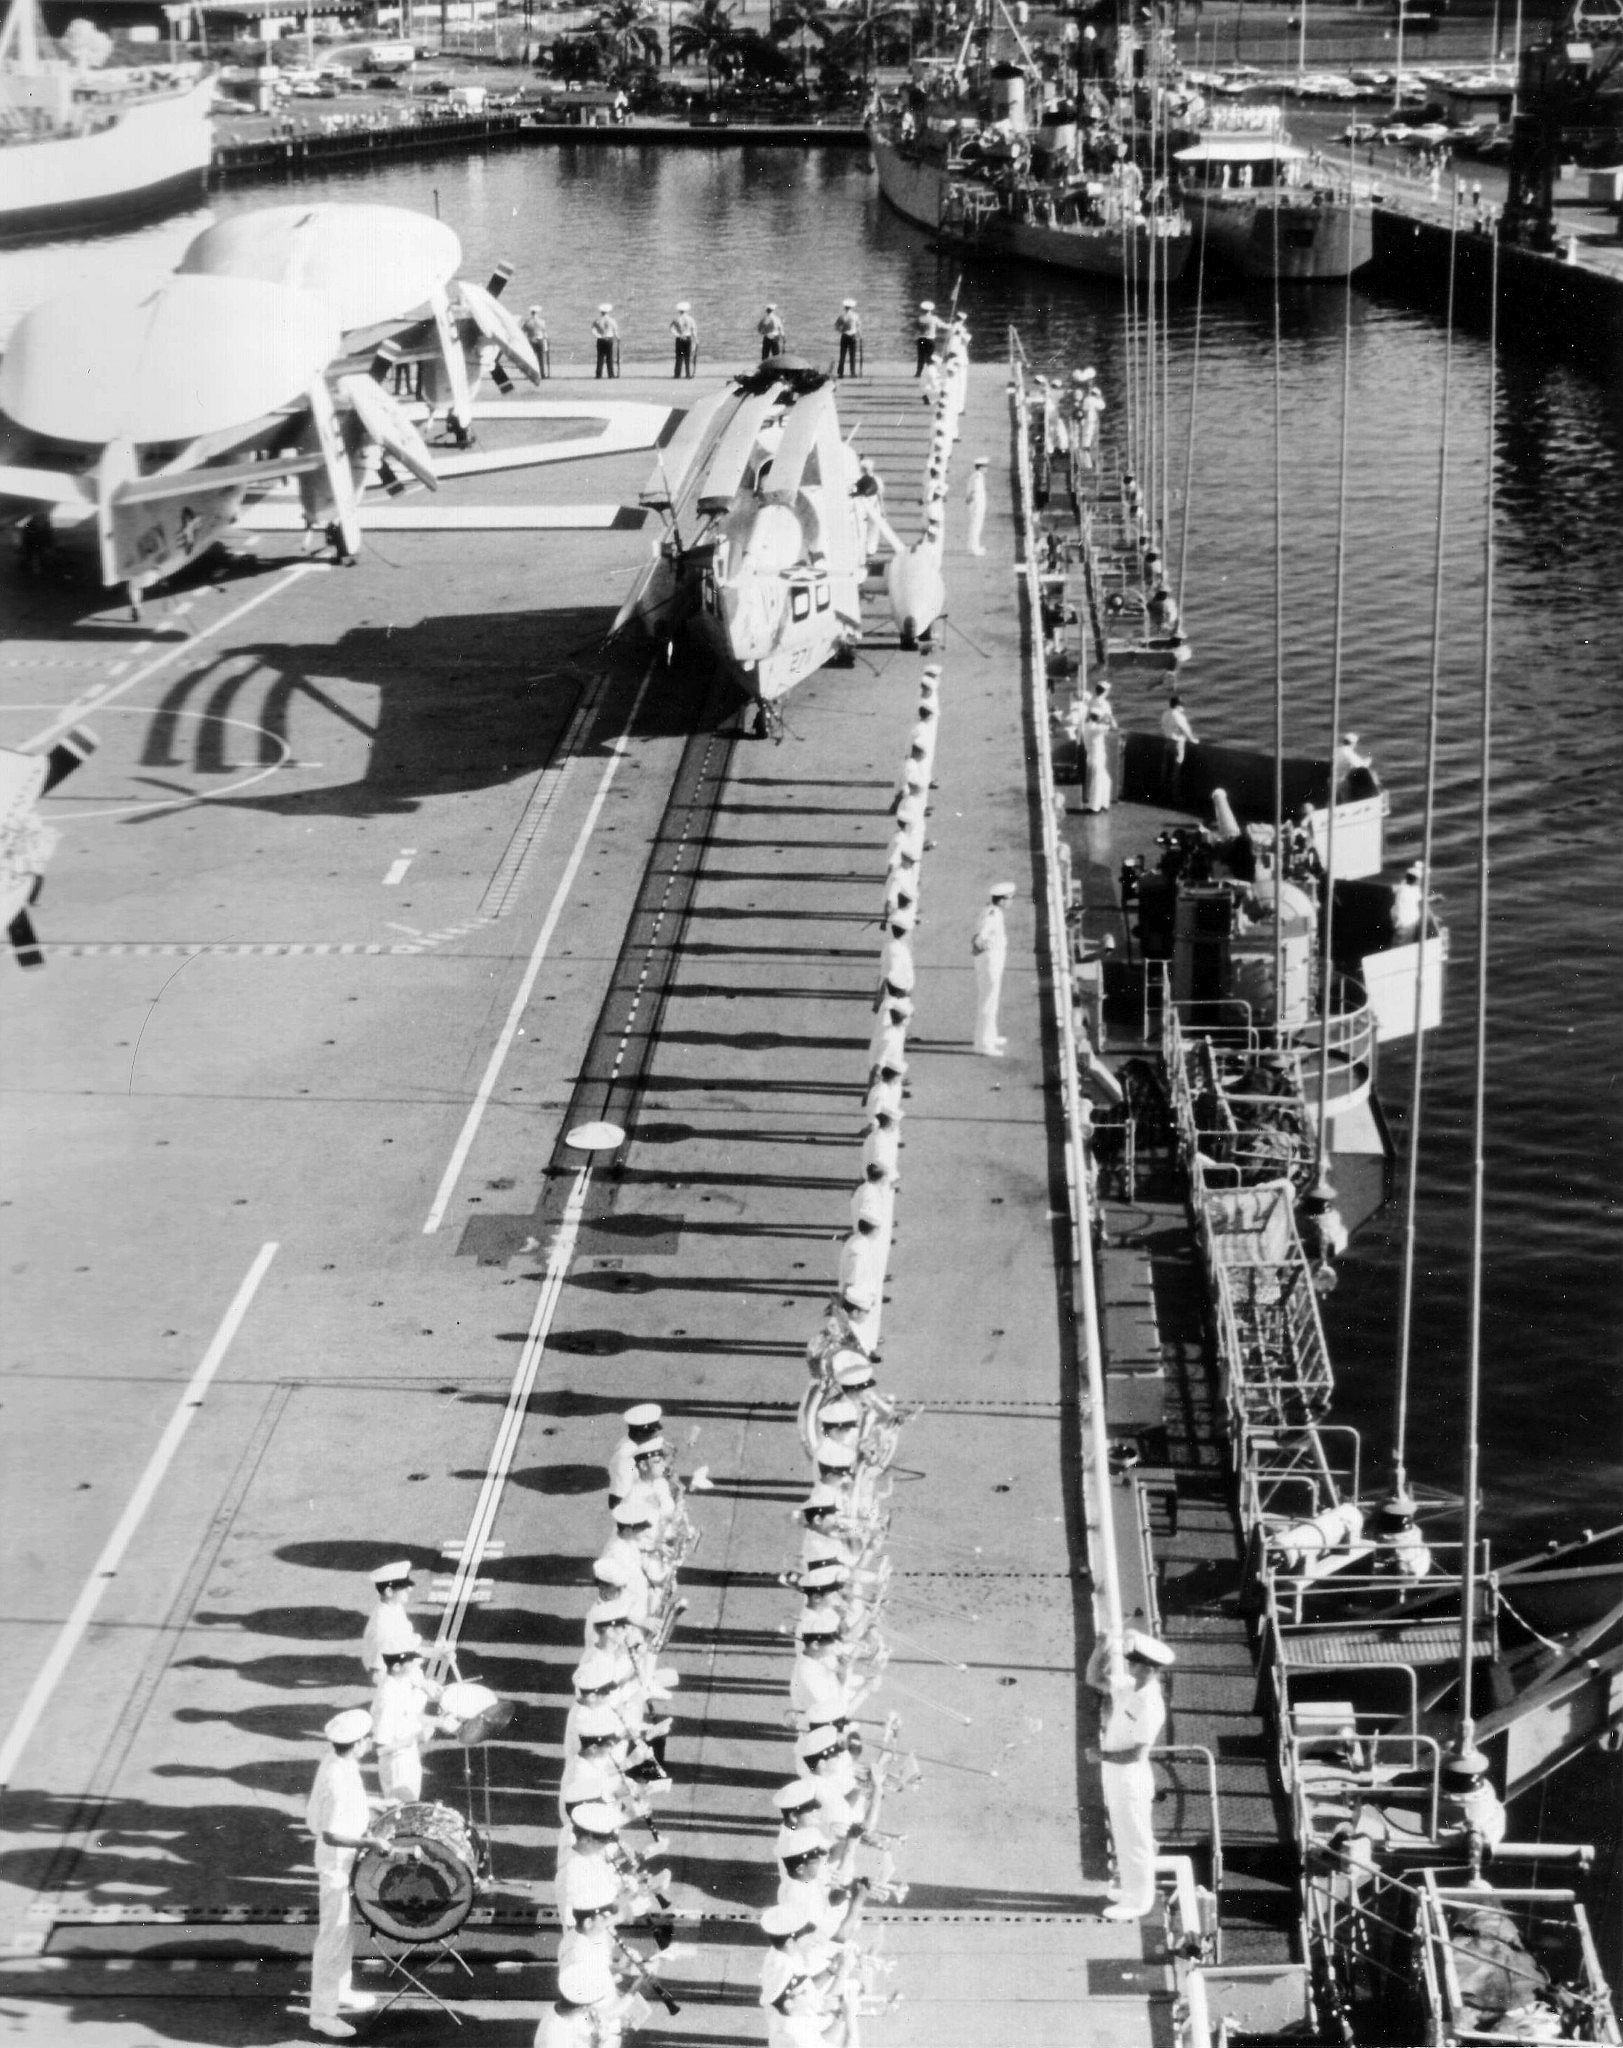
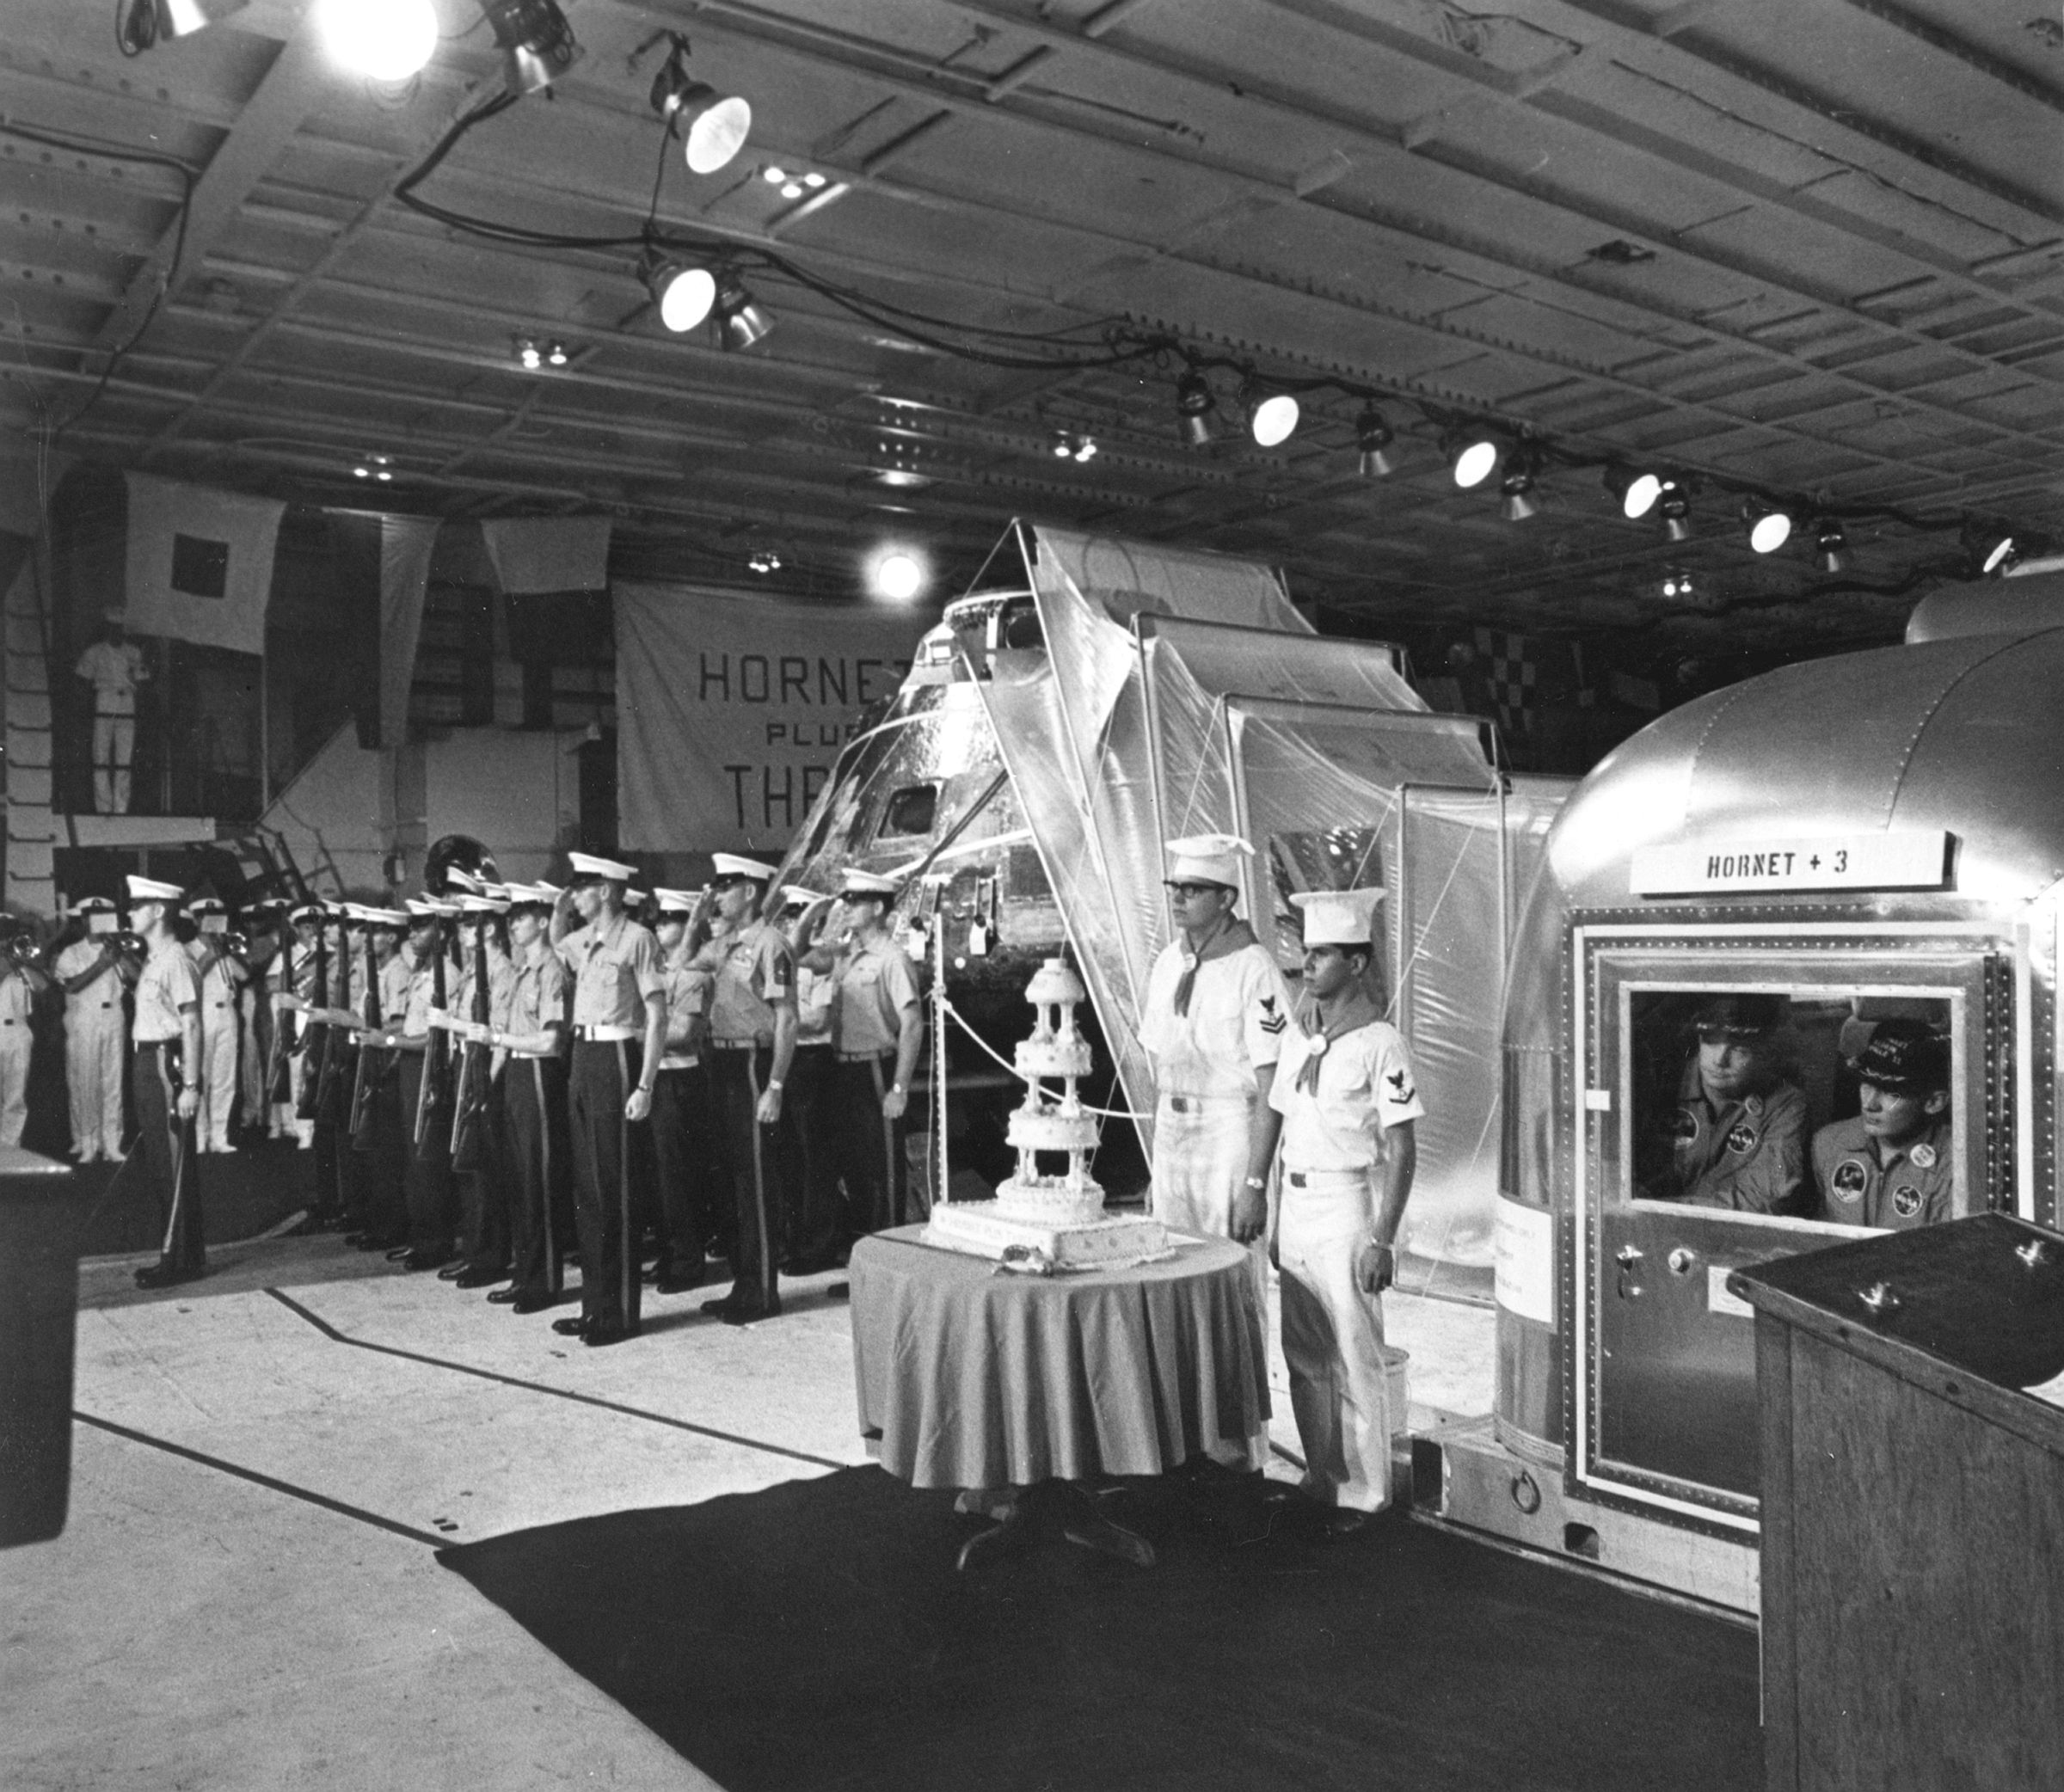 NS-ha-093 |
660k | At noon, on 25 July, a day after the recovery, Hornet held her own "welcome home" ceremony in Hangar Bay 2. Accompanied by music from the band, this included a special cake, some memorabilia for the astronauts, and the reenlistment of several sailors, with "Buzz" Aldrin presiding from inside the MQF. National Aeronautics and Space Administration (NASA) photo, #6901218. |
Courtesy of NASA, via Bob Fish | |
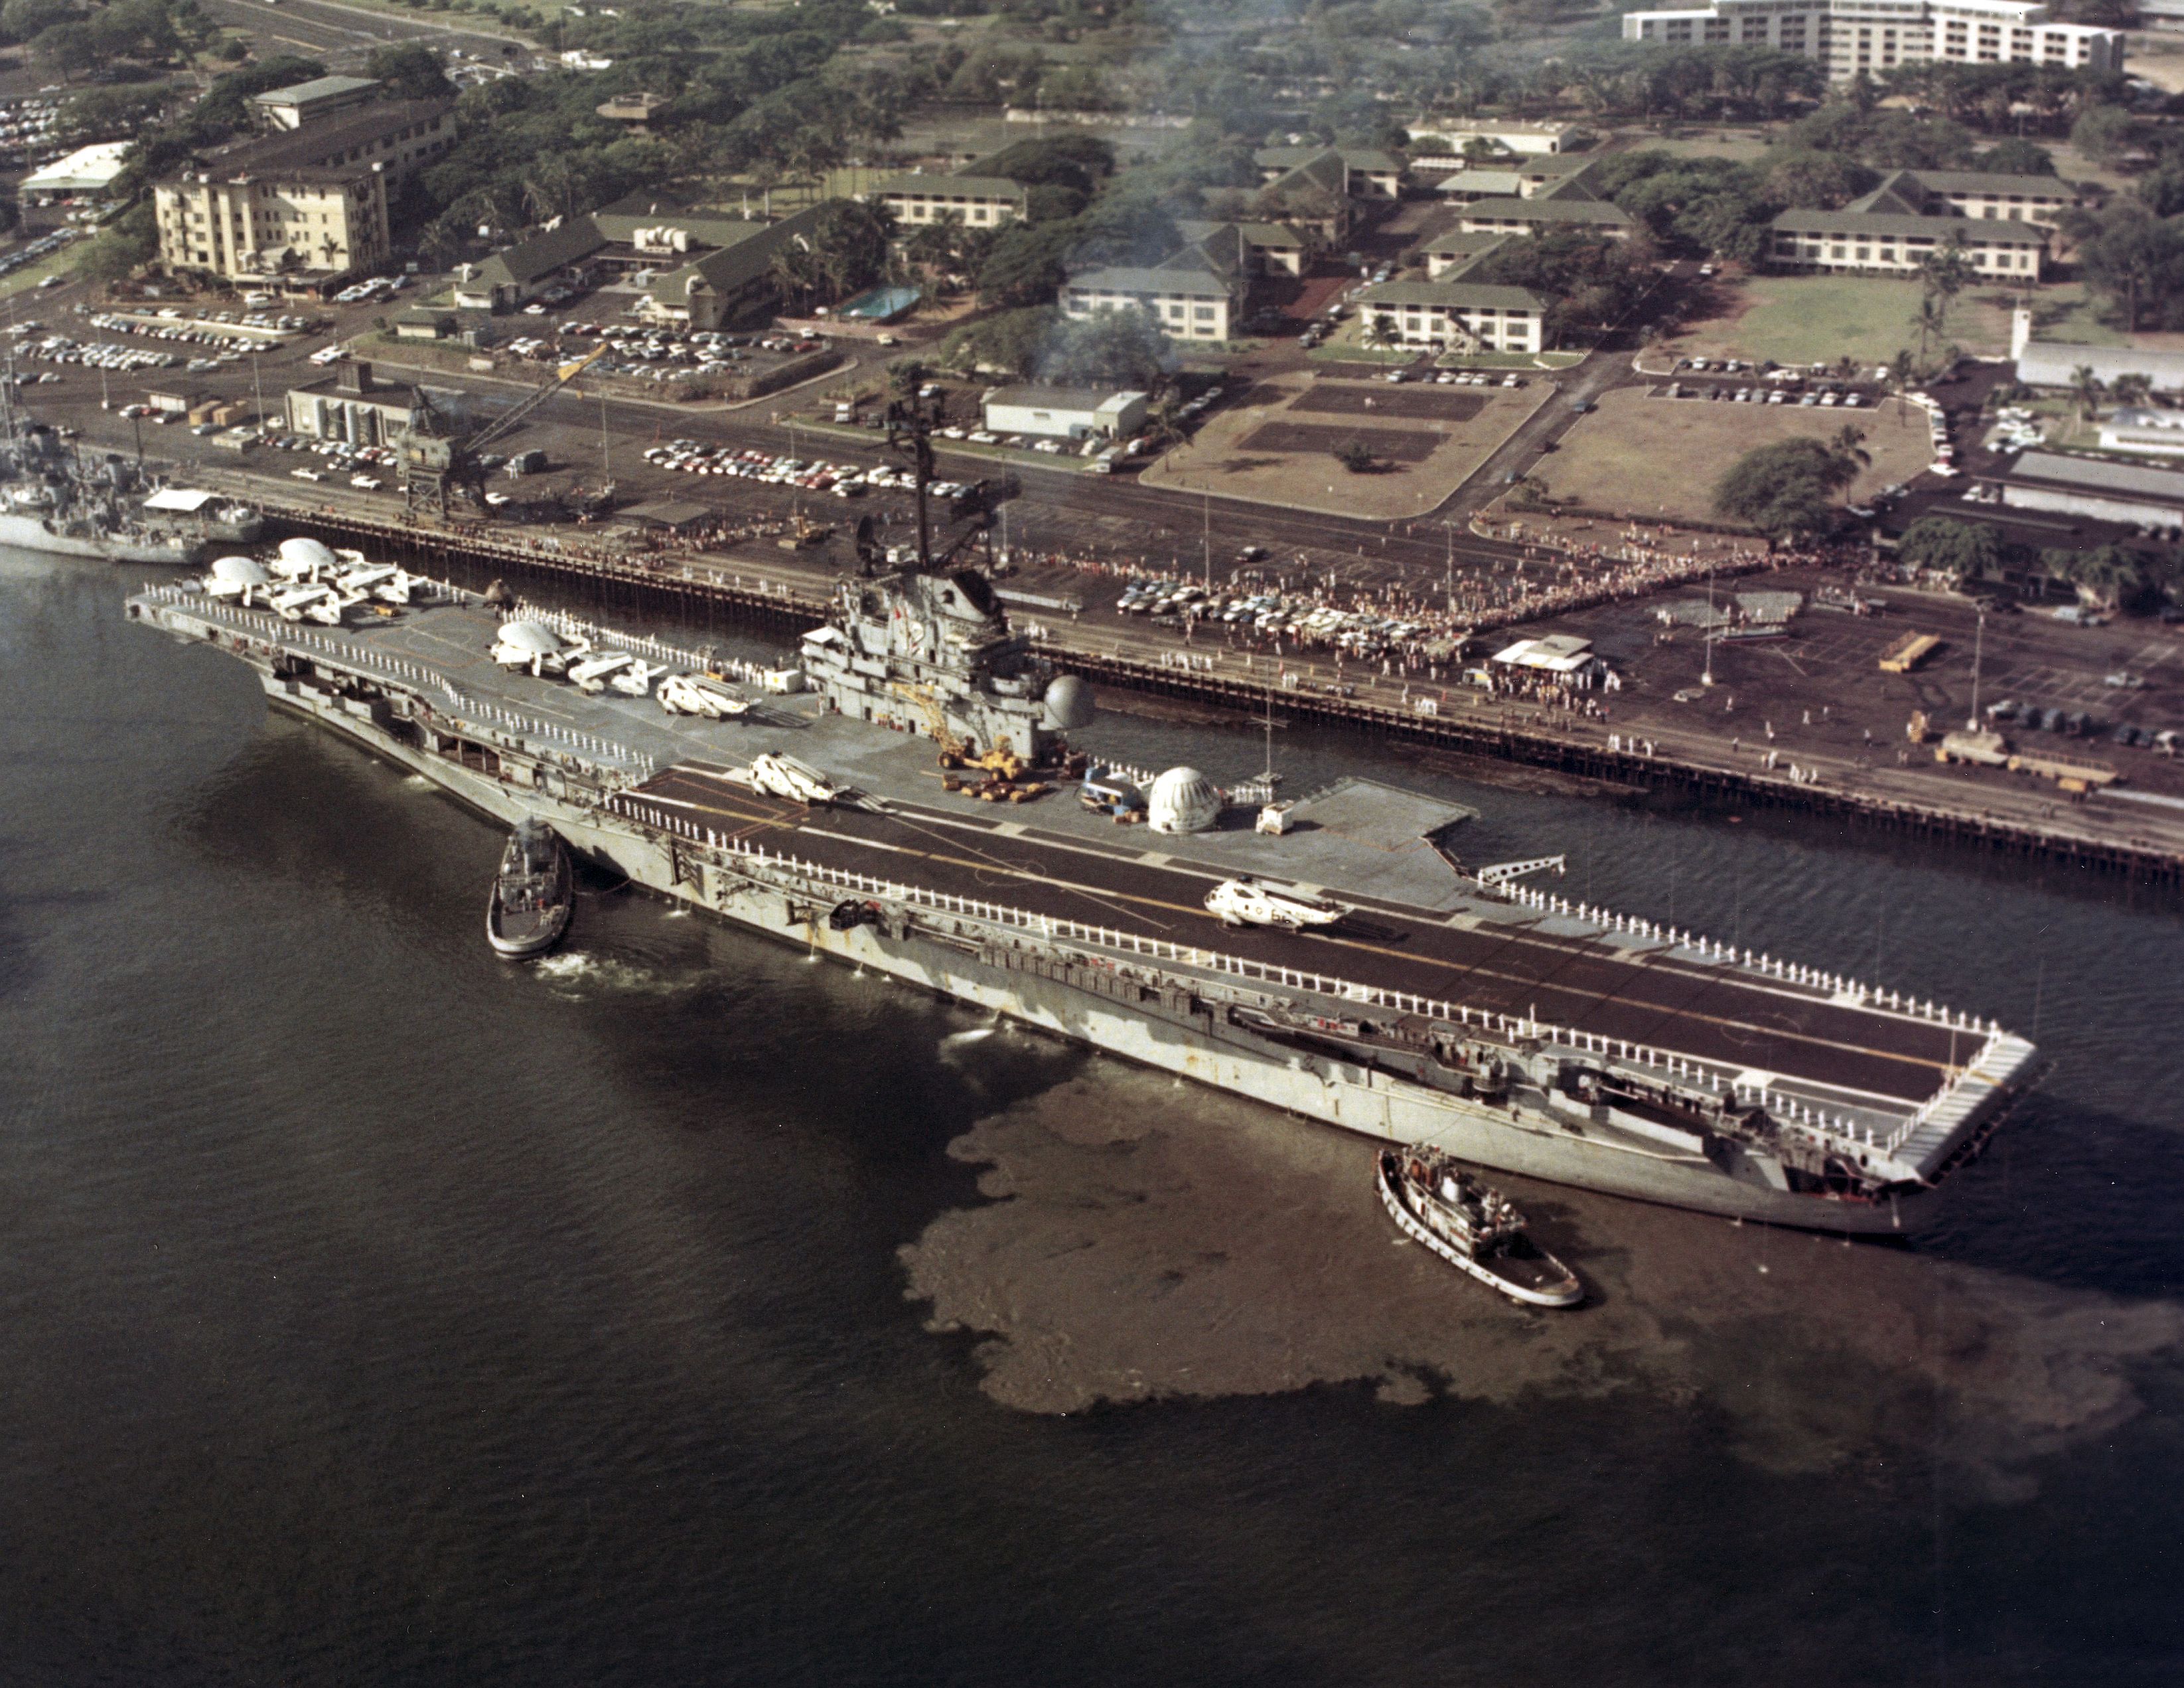
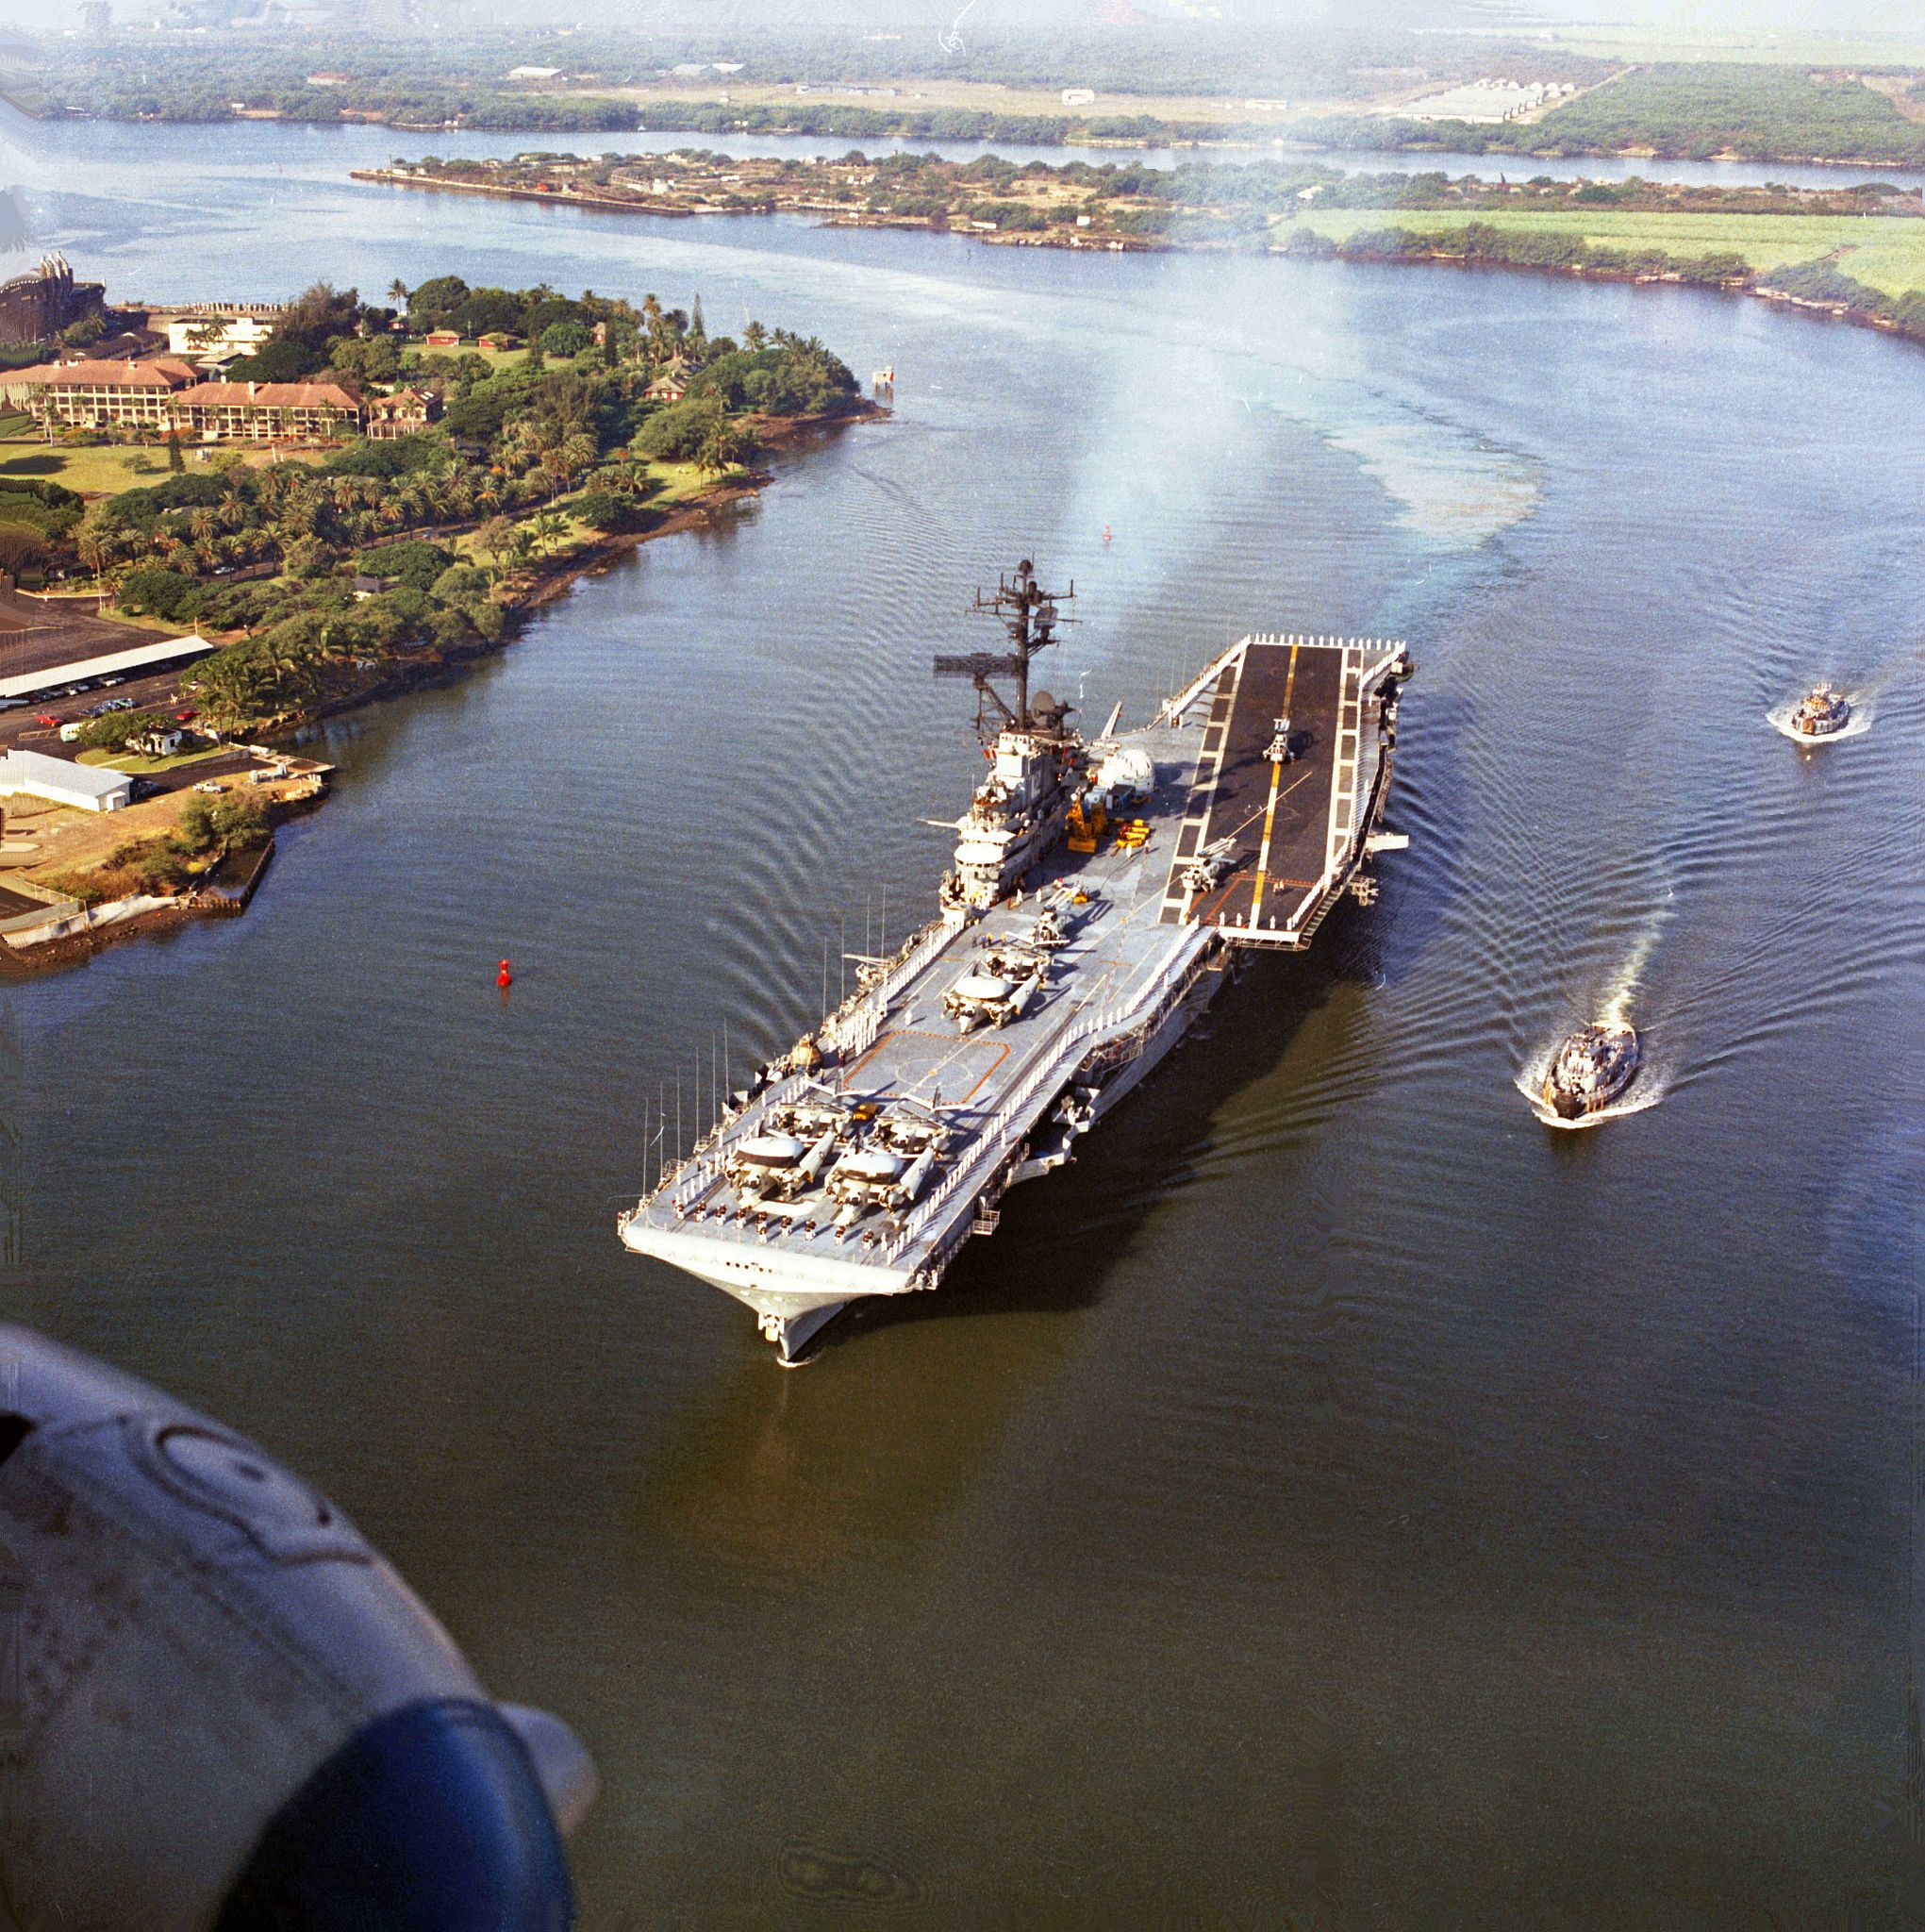 NS0212ao |
828k | Full aerial, forward port quarter view of USS Hornet (CVS-12) entering Pearl Harbor, 26 July 1969, after Apollo 11 recovery. Photo by PHCS Robert L. Lawson, National Archives and Records Administration (NARA) photo # 428-KN-18090, Service id: CVS-12-1405-7-69. |
Robert M. Cieri Bob Canchola, BT, USN (Ret.) |
|
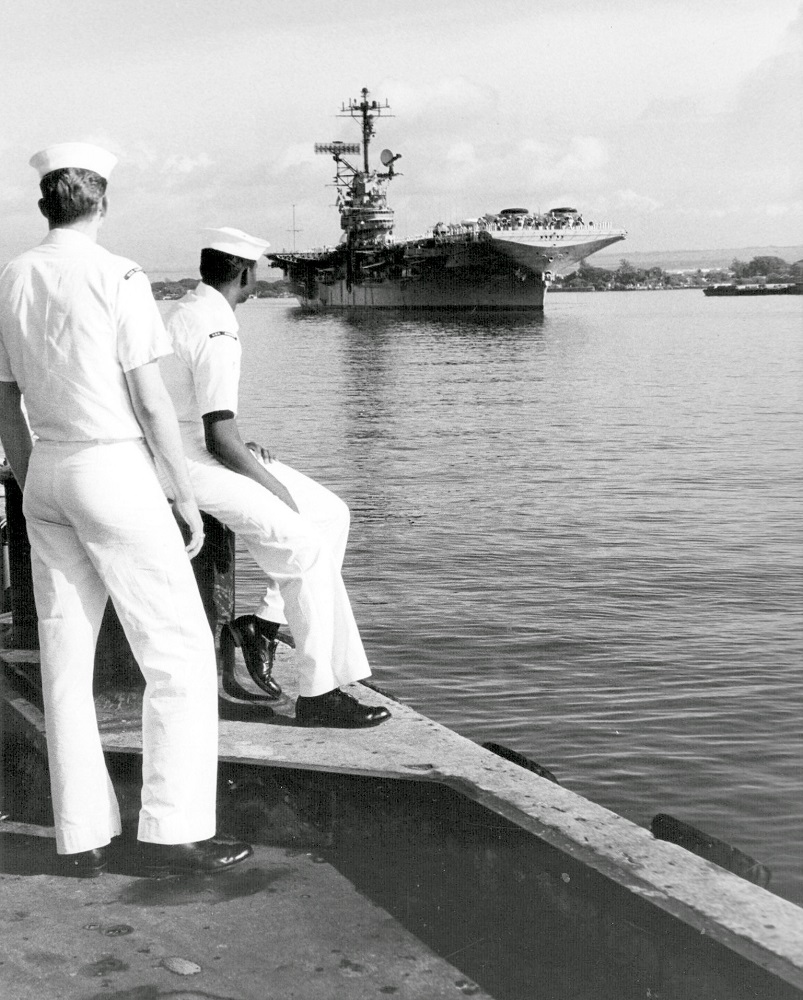 NS0212aoa |
282k | Sailors observing USS Hornet (CVS-12) as she enters Pearl Harbor Naval Base, 26 July 1969, after recovering the Apollo 11 command module and astronauts Neil Armstrong, Edwin "Buzz" Aldrin and Michael Collins. National Naval Aviation Museum (NNAM) photo, # 1996.488.245.030. |
Mike Green | |
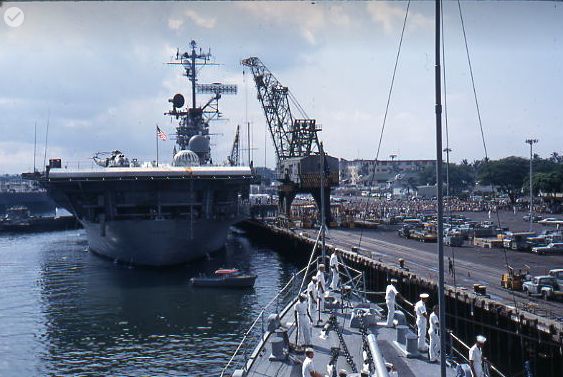
 NS-ha-094 |
659k | On the morning of 26 July, Hornet entered Pearl Harbor. With sailors manning the rails of the flight deck, and the command module Columbia displayed forward of the aircraft carrier island superstructure, she steamed past the USS Arizona Memorial and turned into the main naval base channel.
Photo by Don Blair. |
Bob Fish | |
 NS-ha-095 |
1.30M | Two tugboats gently push USS Hornet (CVS-12) towards Pier Bravo at the Pearl Harbor Naval Base. At 0832 on 26 July, her mooring lines were attached to the pier where a crowd awaited this momentous occasion when the Apollo 11 astronauts arrived back on US soil. The Apollo 11 spacecraft Columbia can clearly be seen on the forward flight deck, while the MQF with the astronauts inside is still lashed down in Hangar Deck 2 and out of sight. US Navy photo. |
Bob Fish | |
 NS-ha-096 |
50k | USS Hornet (CVS-12) with the Apollo astronauts aboard in the "Quonset hut" (officially known as the MQF). Seen from USS Goldsborough (DDG-20). |
Richard Whiteside | |
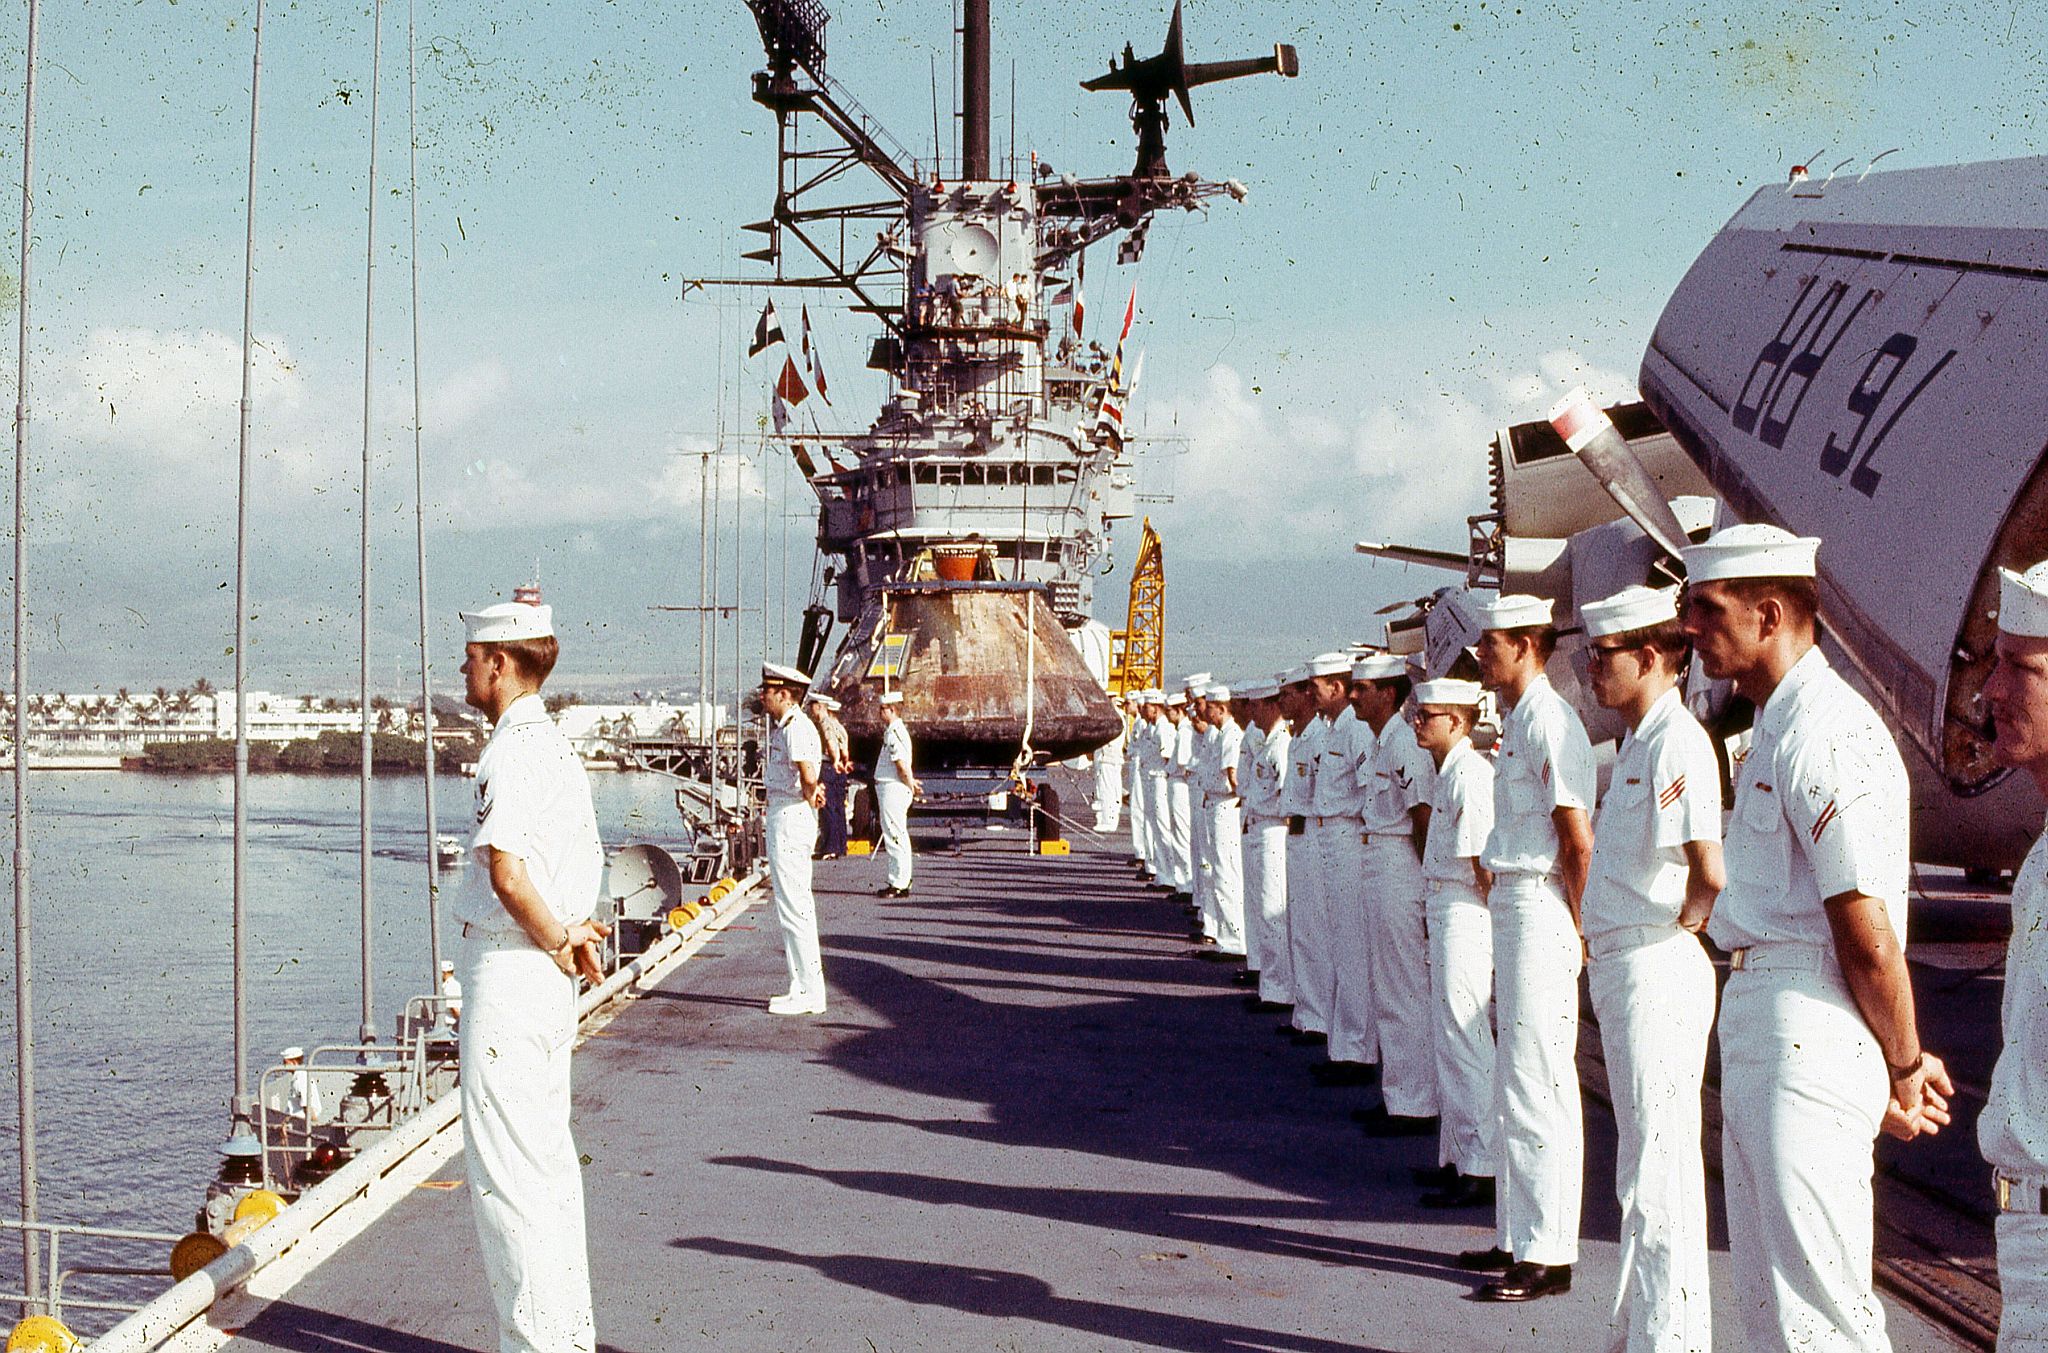
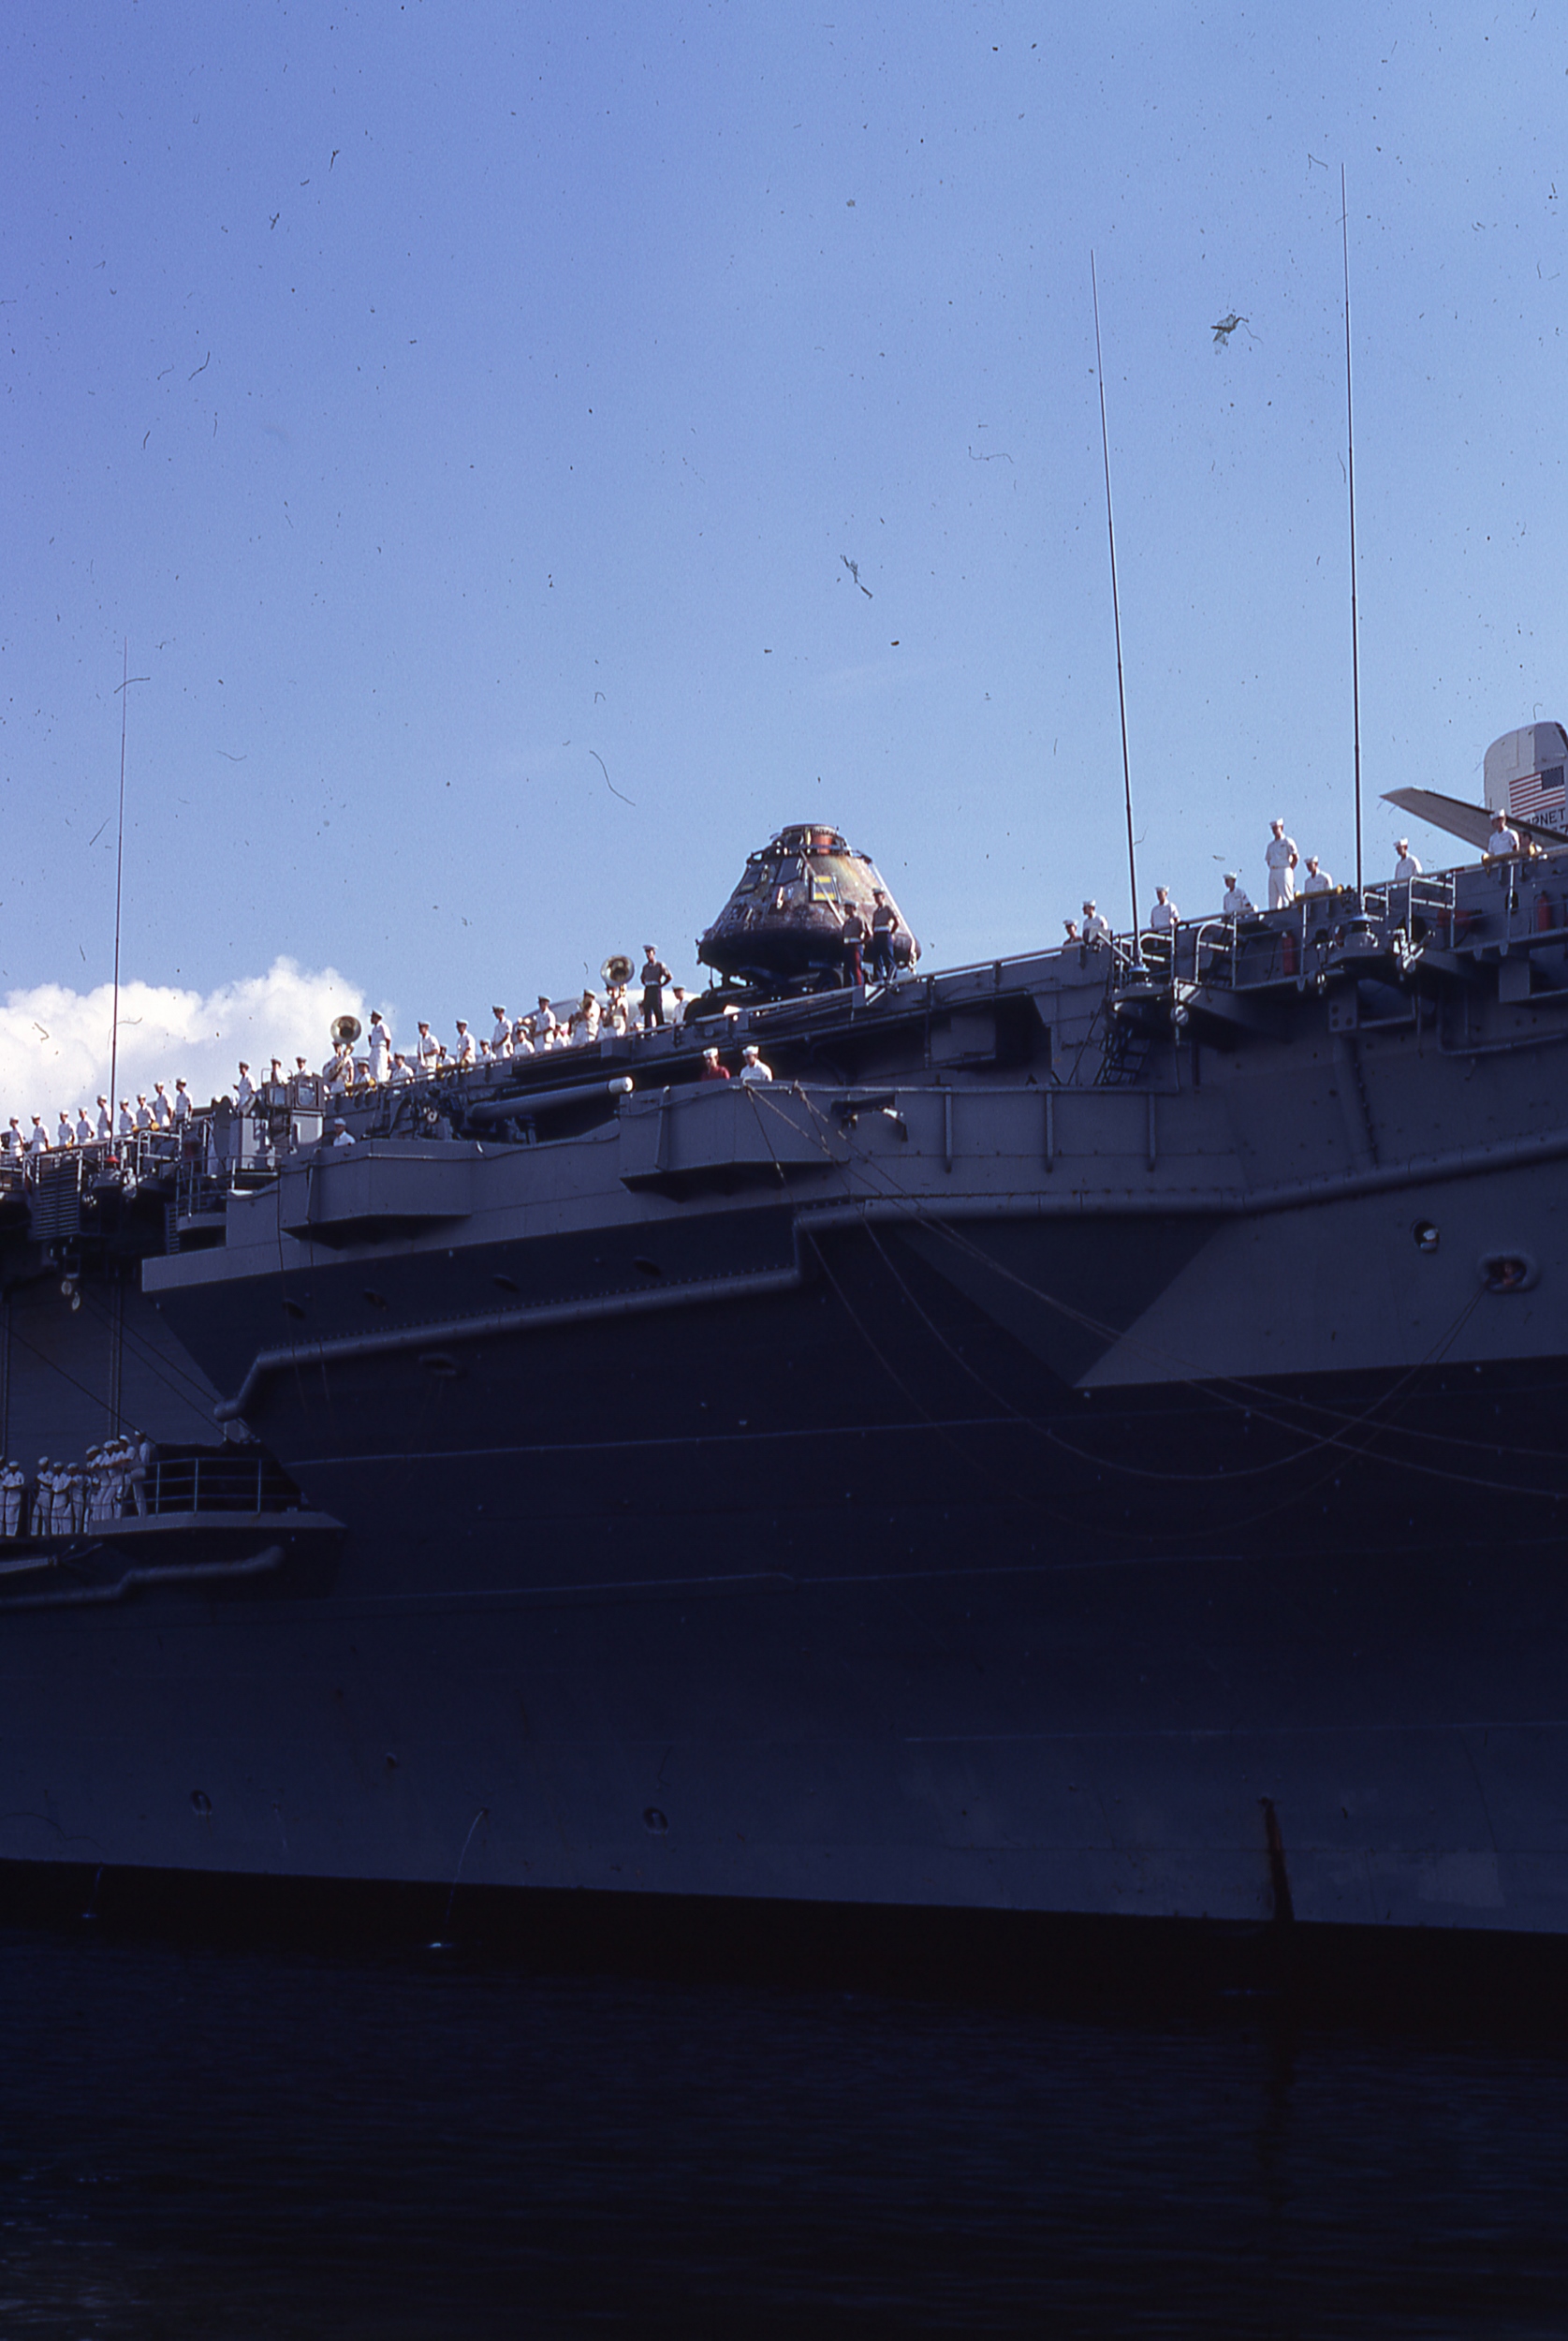 NS-ha-201 |
1.10M | Apollo 11 Command Module, Columbia, displayed on the USS Hornet flight deck. |
Photo by Mark Chambers | |
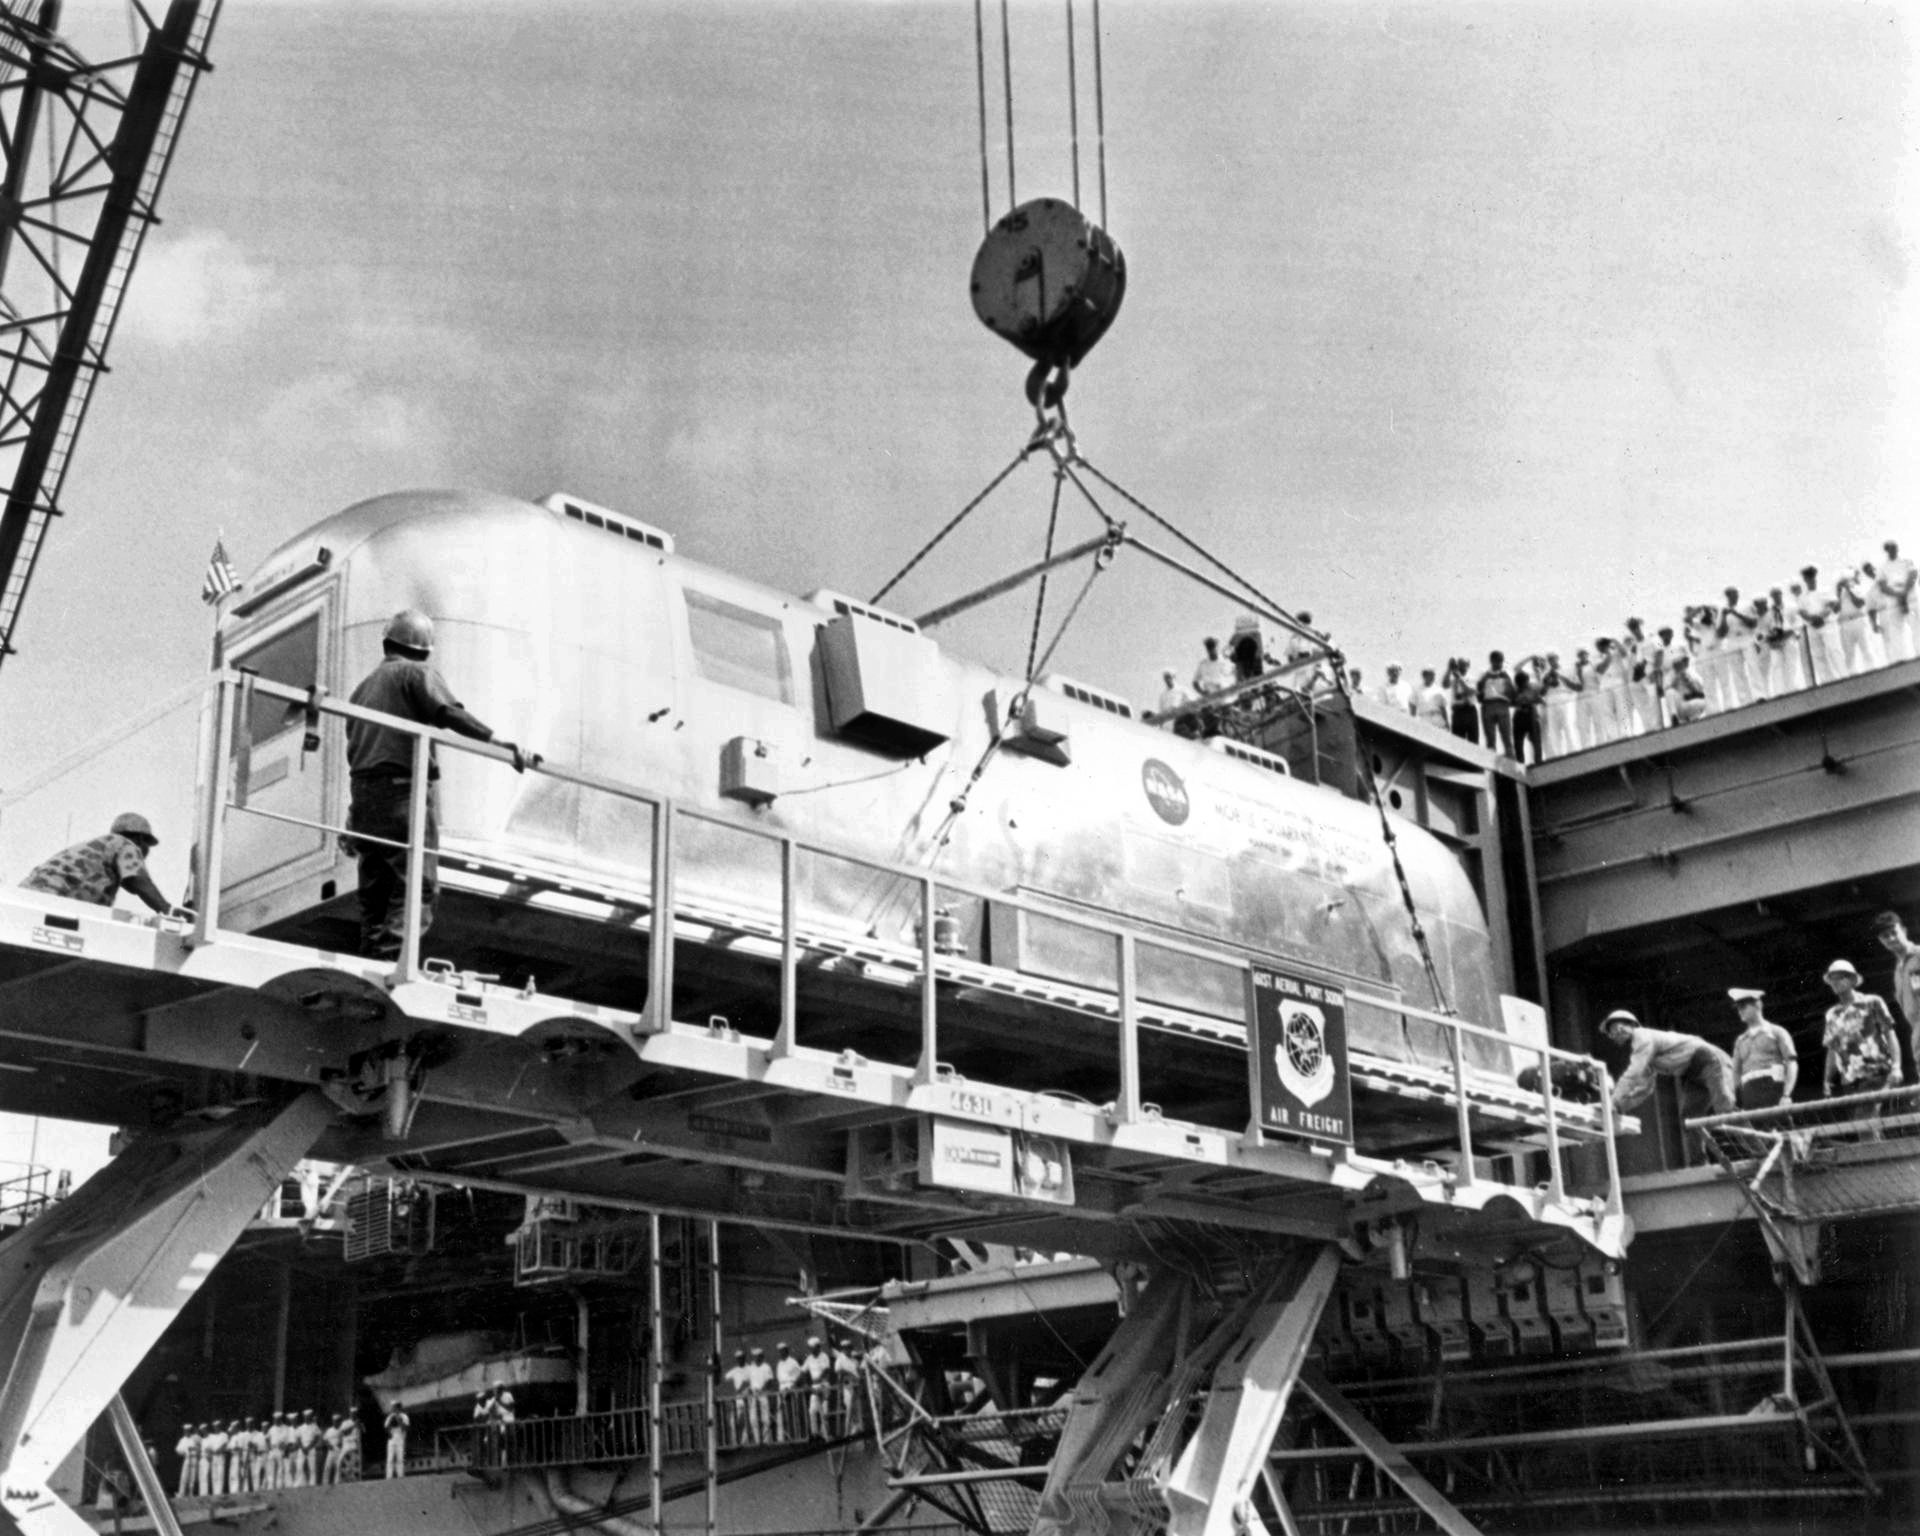 NS-ha-097a |
1.30M | Mobile Quarantine Facility (MQF) is offloaded from USS Hornet (CVS-12). Photo filed 26 July 1969. Scan by J.L. Pickering. National Aeronautics and Space Administration (NASA) photo 69-H-1223. |
Courtesy of NASA, via Bob Canchola | |
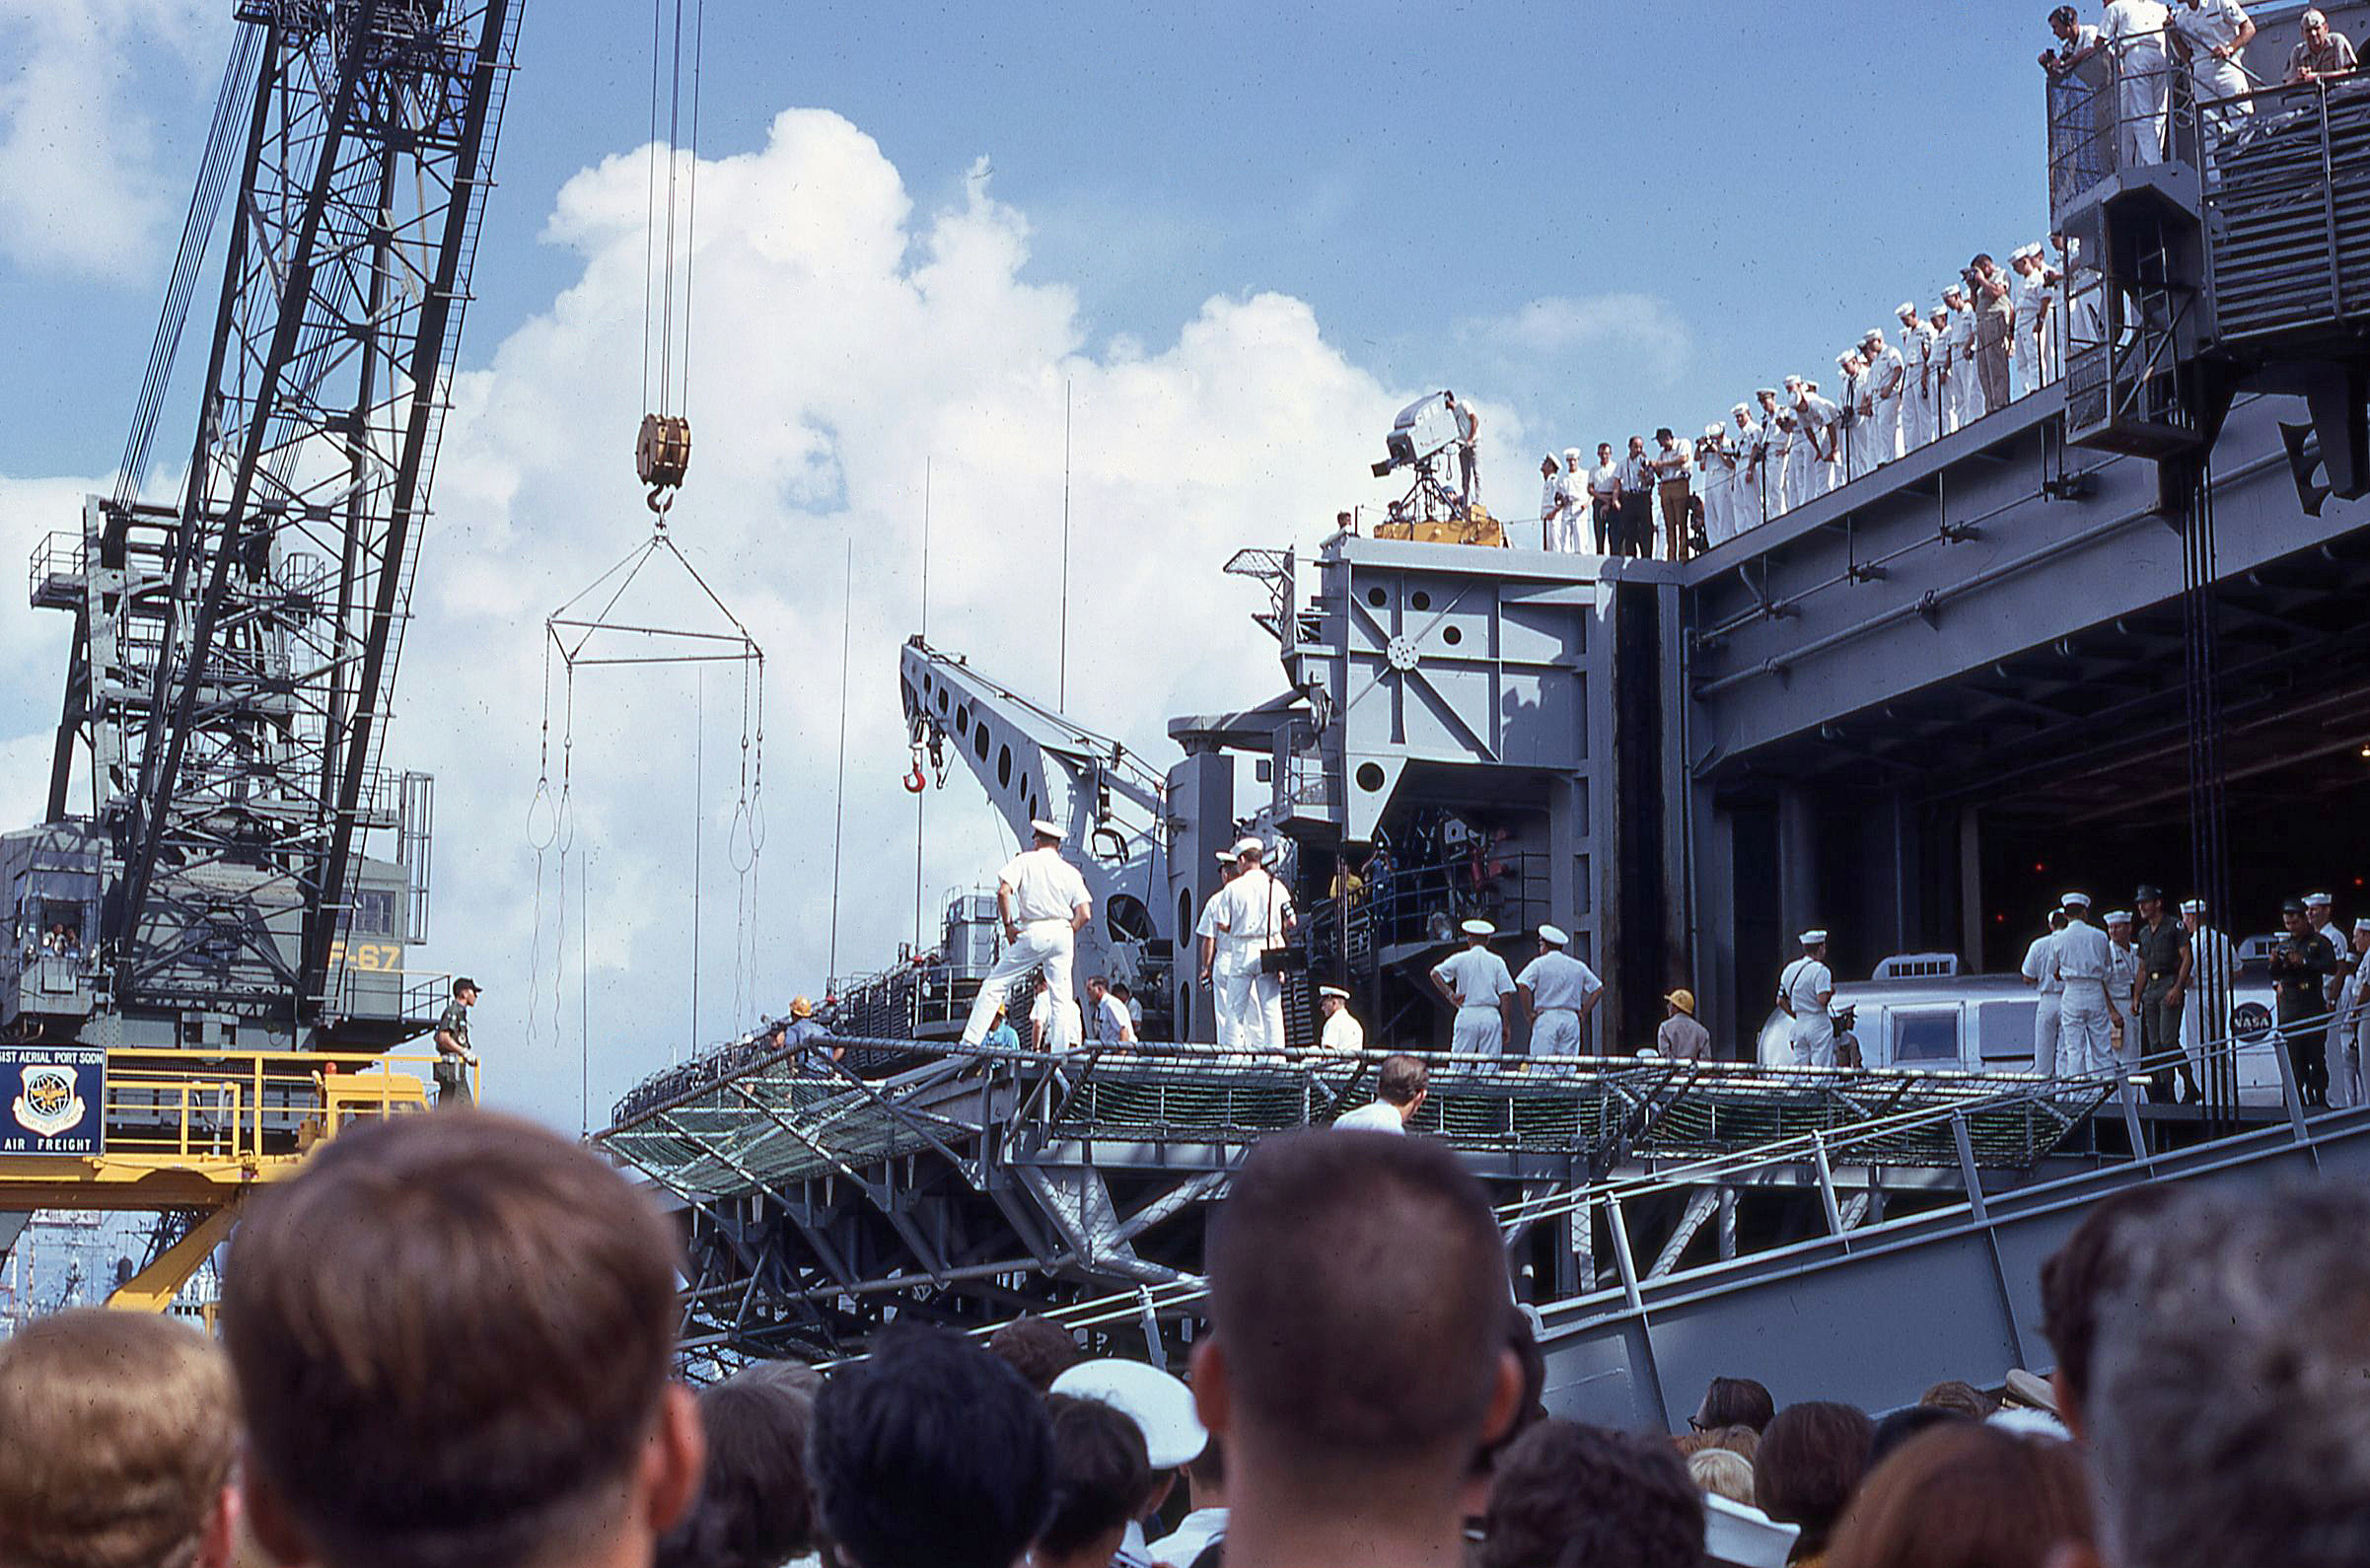
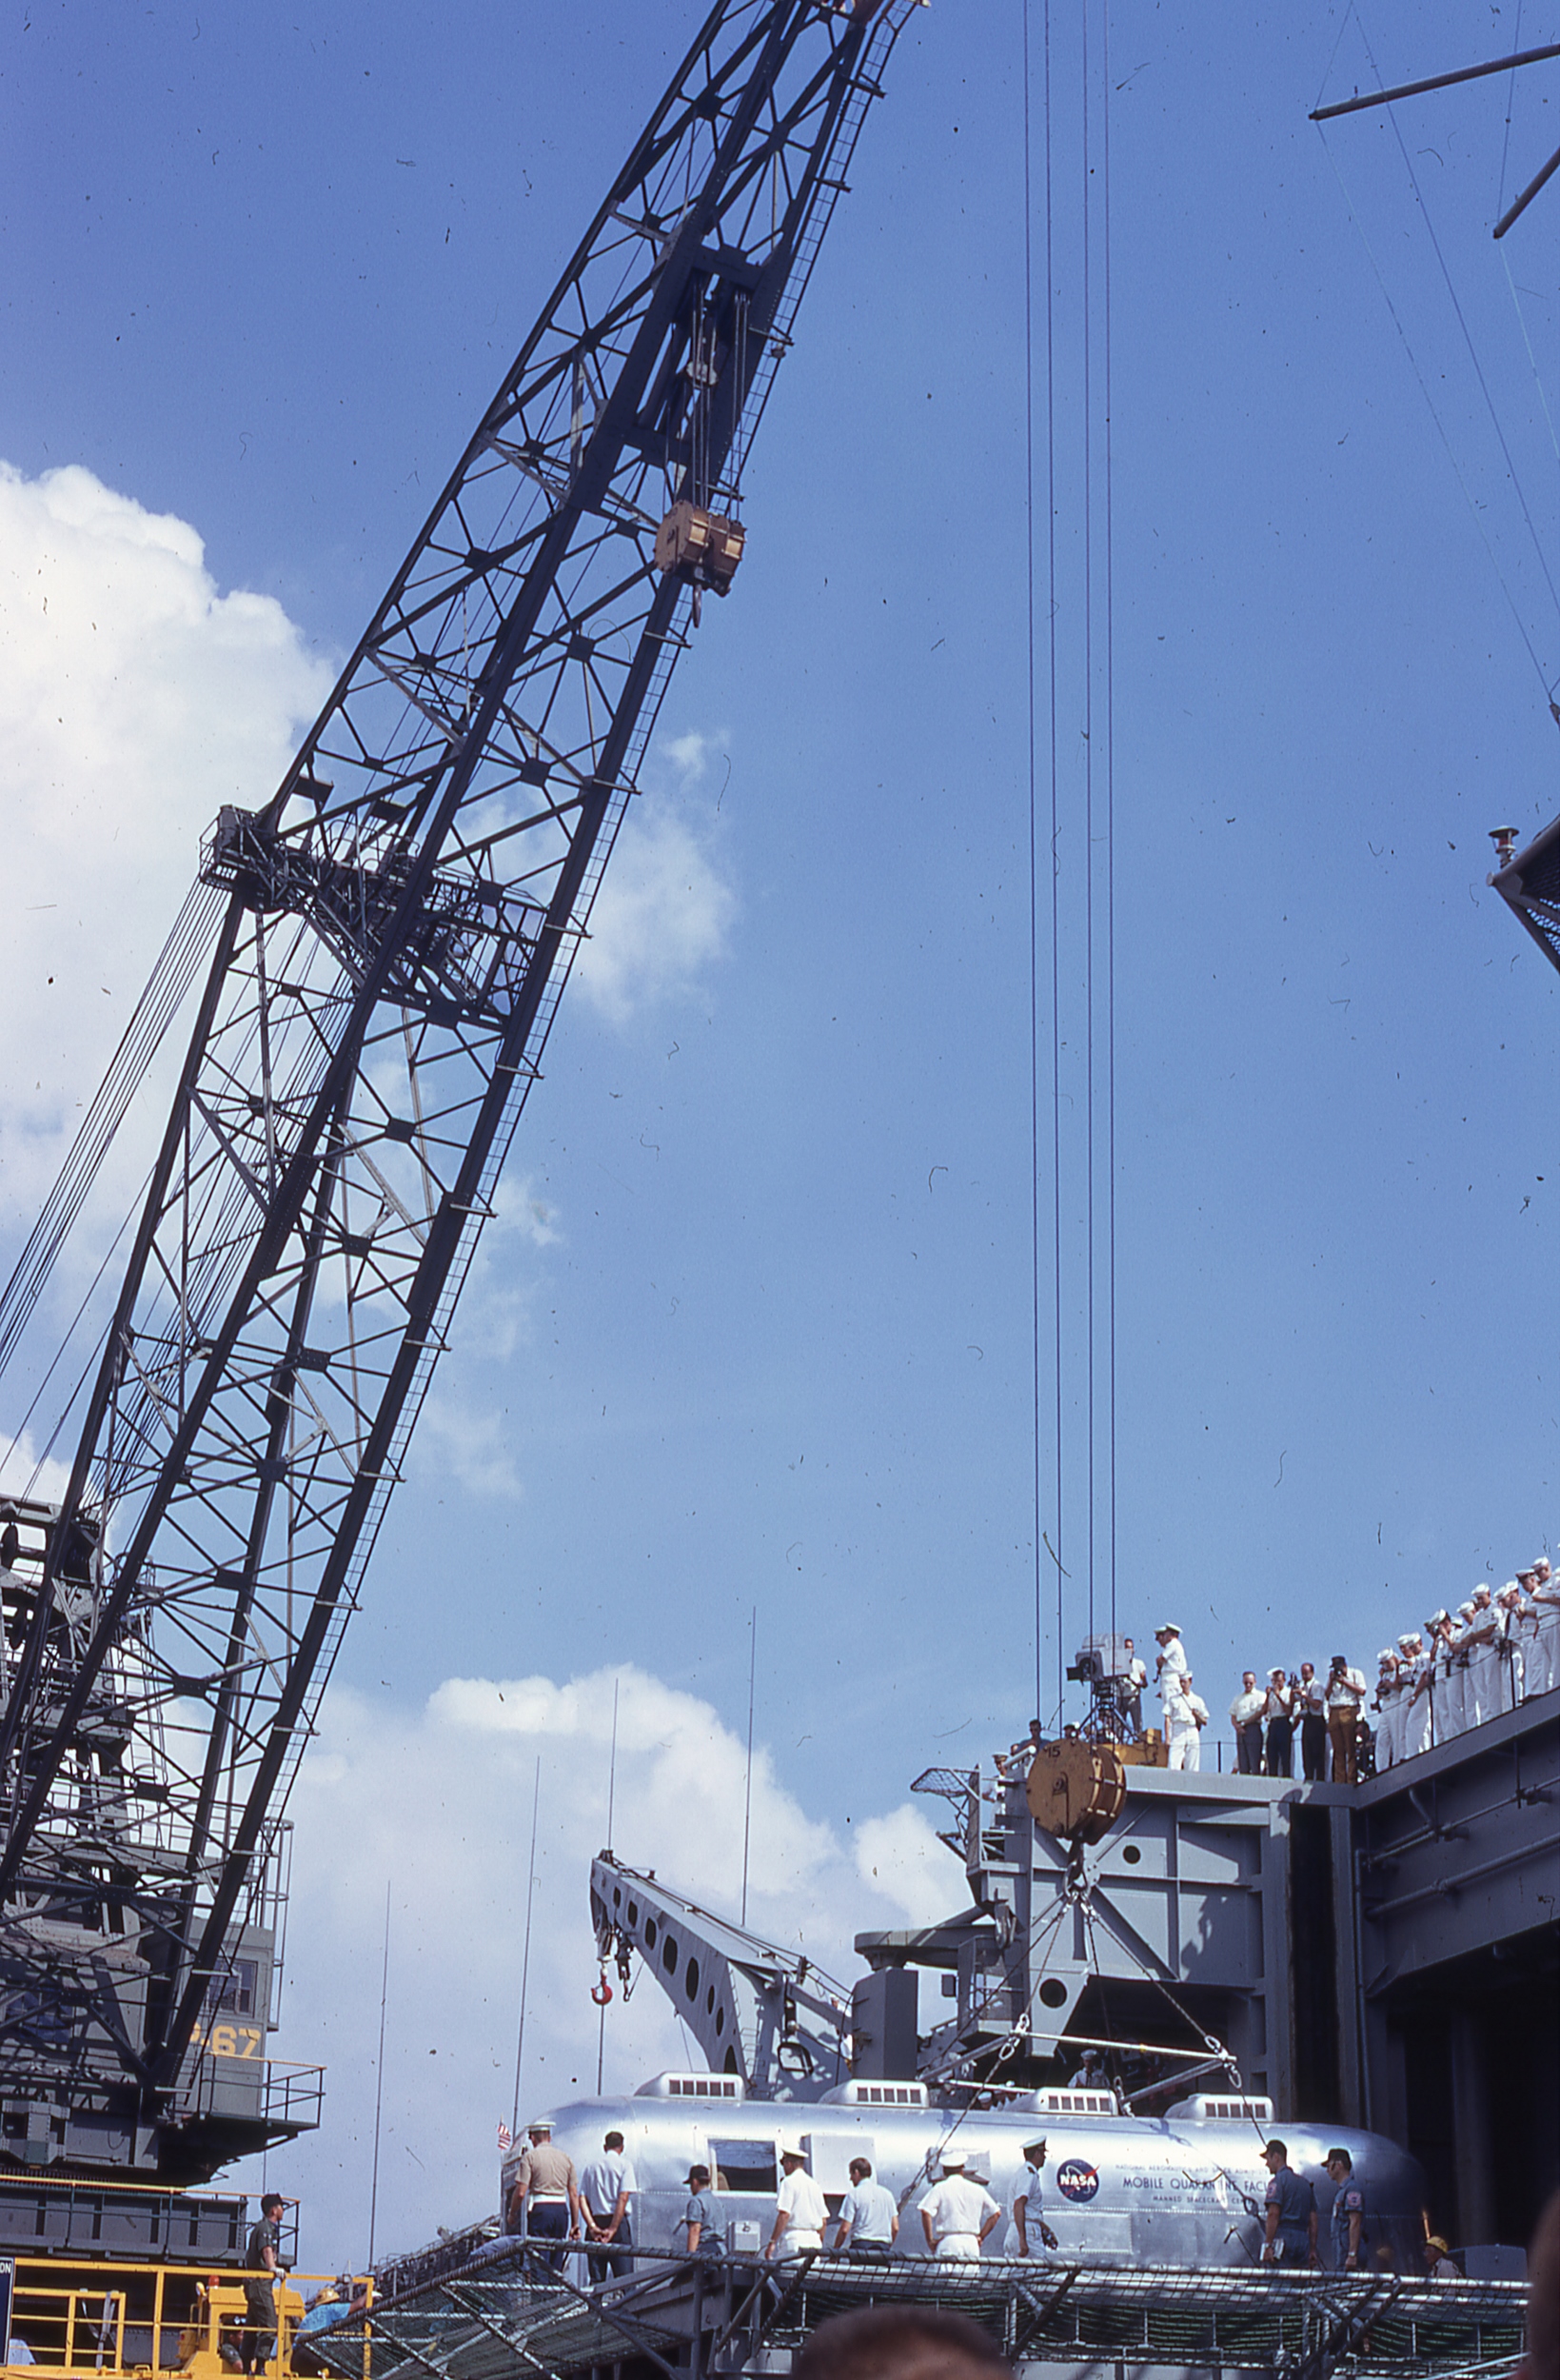
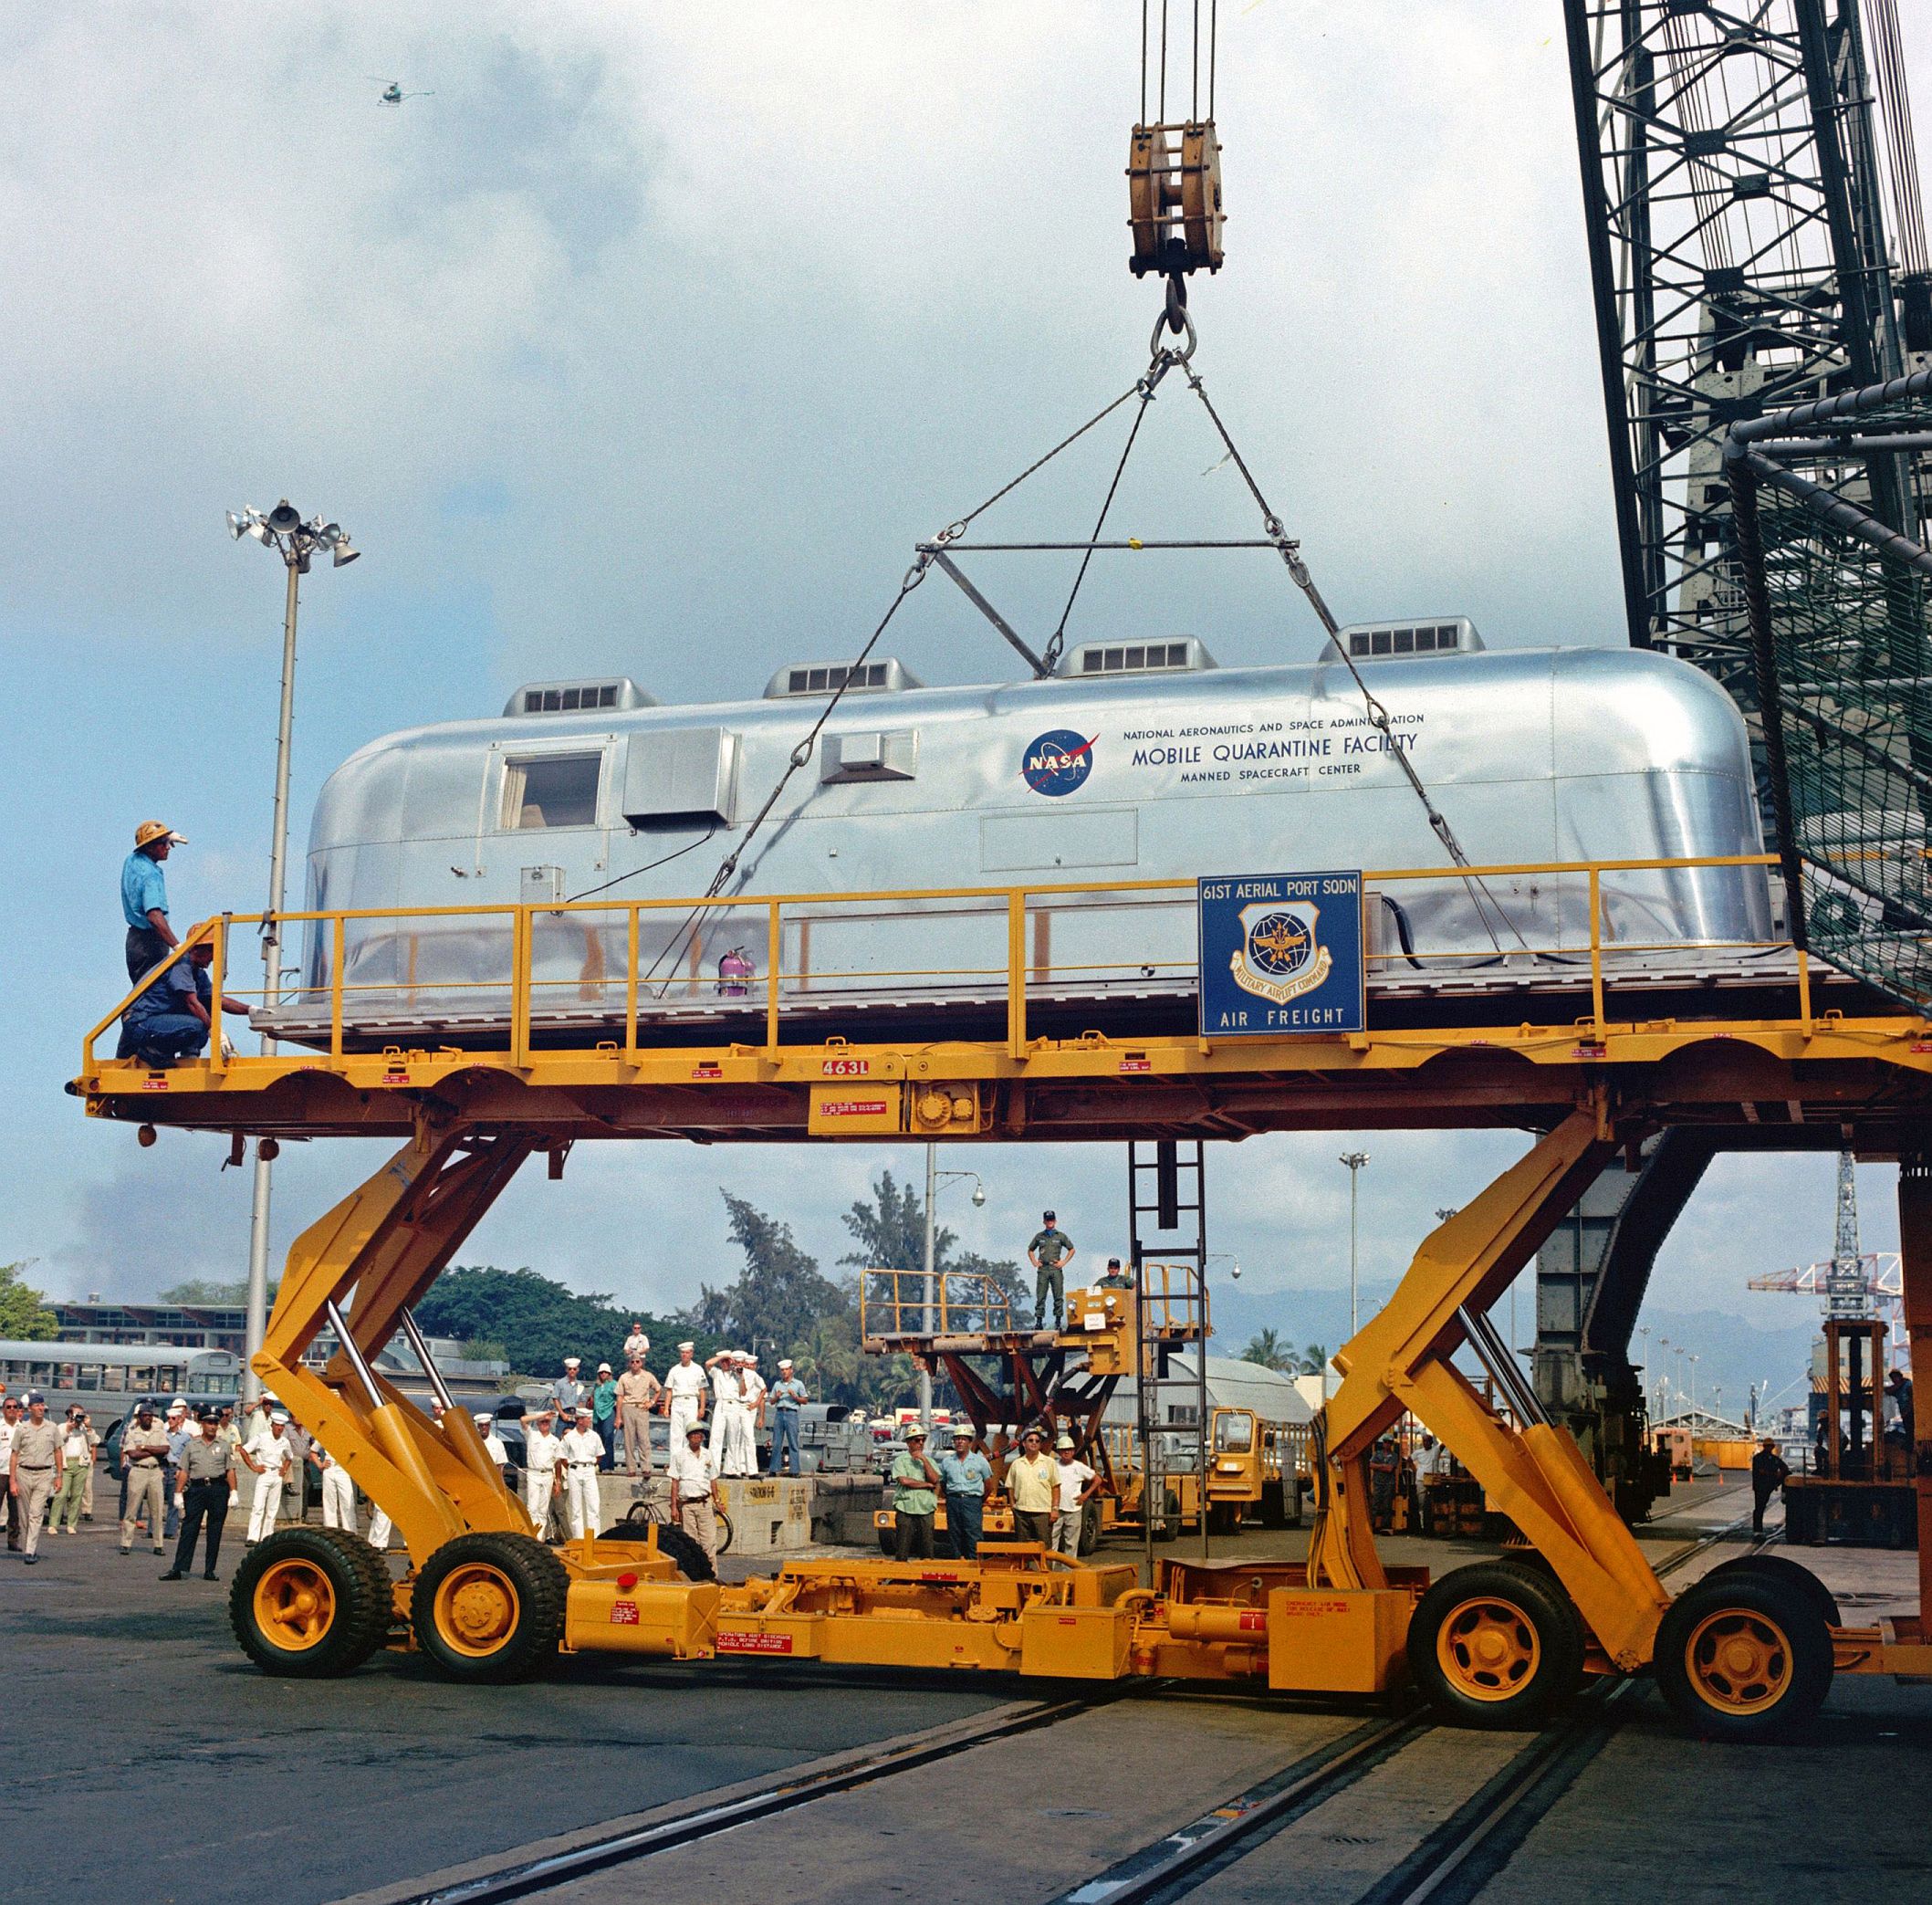 NS-ha-097 |
909k | A massive Navy Yard crane offloads the MQF from USS Hornet (CVS-12) onto a USAF cargo pallet transporter. The three astronauts, along with their flight surgeon and MQF technician, remained locked inside the quarantine facility. A local TV news helicopter hovers overhead, capturing this historic occasion. National Aeronautics and Space Administration (NASA) photo S69-21878. |
Courtesy of NASA, via Bob Fish | |
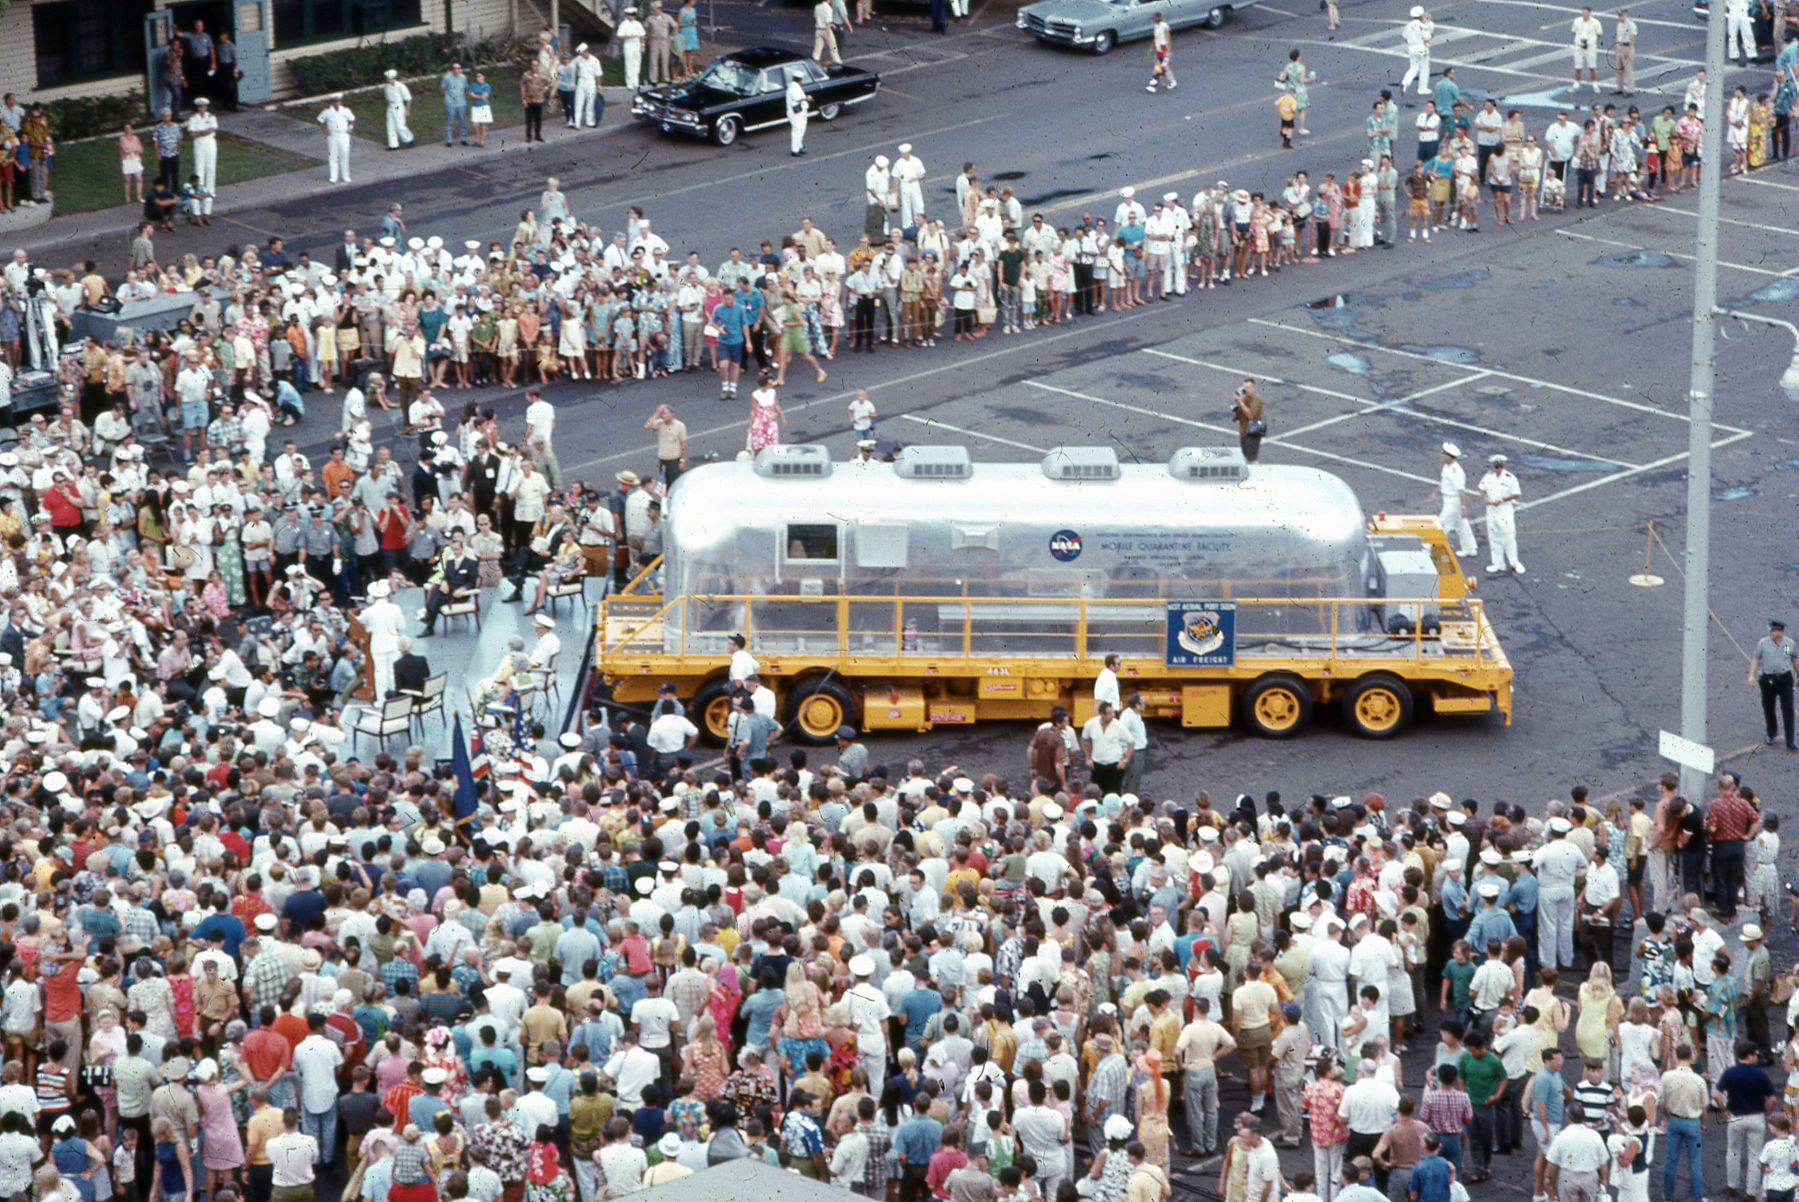 NS-ha-098 |
499k | From his perch above the Hornet flight deck, radio commentator Don Blair captured this moment after the MQF had been backed up to a stage next to Pier Bravo. The astronauts were welcomed to Hawaii by several dignitaries and hundreds of citizens who were allowed onto the Pearl Harbor Naval Base. CINCPAC, ADM John S. McCain, was speaking at this moment. Photo by Don Blair. |
Courtesy of Don Blair, via Bob Fish |
|
 NS-ha-080 |
2.21M | Hawaiian Governor, John Burns, addresses the quarantined astronauts upon their arrival at Pearl Harbor. National Aeronautics and Space Administration (NASA) photo 6901217. |
Courtesy of NASA, via Bob Fish |
|
 NS-ha-202 |
2.44M | The same scene, but from the point of view of the citizens who were allowed onto the Pearl Harbor Naval Base to welcome the astronauts. The Apollo 11 MQF was tugged to the edge of Hornet's starboard elevator and is now waiting for the giant shipyard crane to lower its lifting cables for attachment. Note the spreader bars just below the crane's hook—these were necessary to keep the thin-skinned aluminum MQF from collapsing inward when lifted. The yellow USAF cargo pallet loader awaits its new cargo, with the astronauts inside, as a TV camera on the ship's flight deck transmits live images around the world. Neil Armstrong (NS-ha-204) and Michael Collins (NS-ha-206) can be seen watching from the Mobile Quarantine Facility (MQF) window. (The MQF was a converted Airstream trailer, and was transferred to the Smithsonian Institution in 1974.) Mark Chambers, who took the pictures, lived in Hawaii from 1968 to 1972, while his father was stationed at Hickam AFB. |
Photos by Mark Chambers | |
 NS-ha-203 |
1.70M | |||
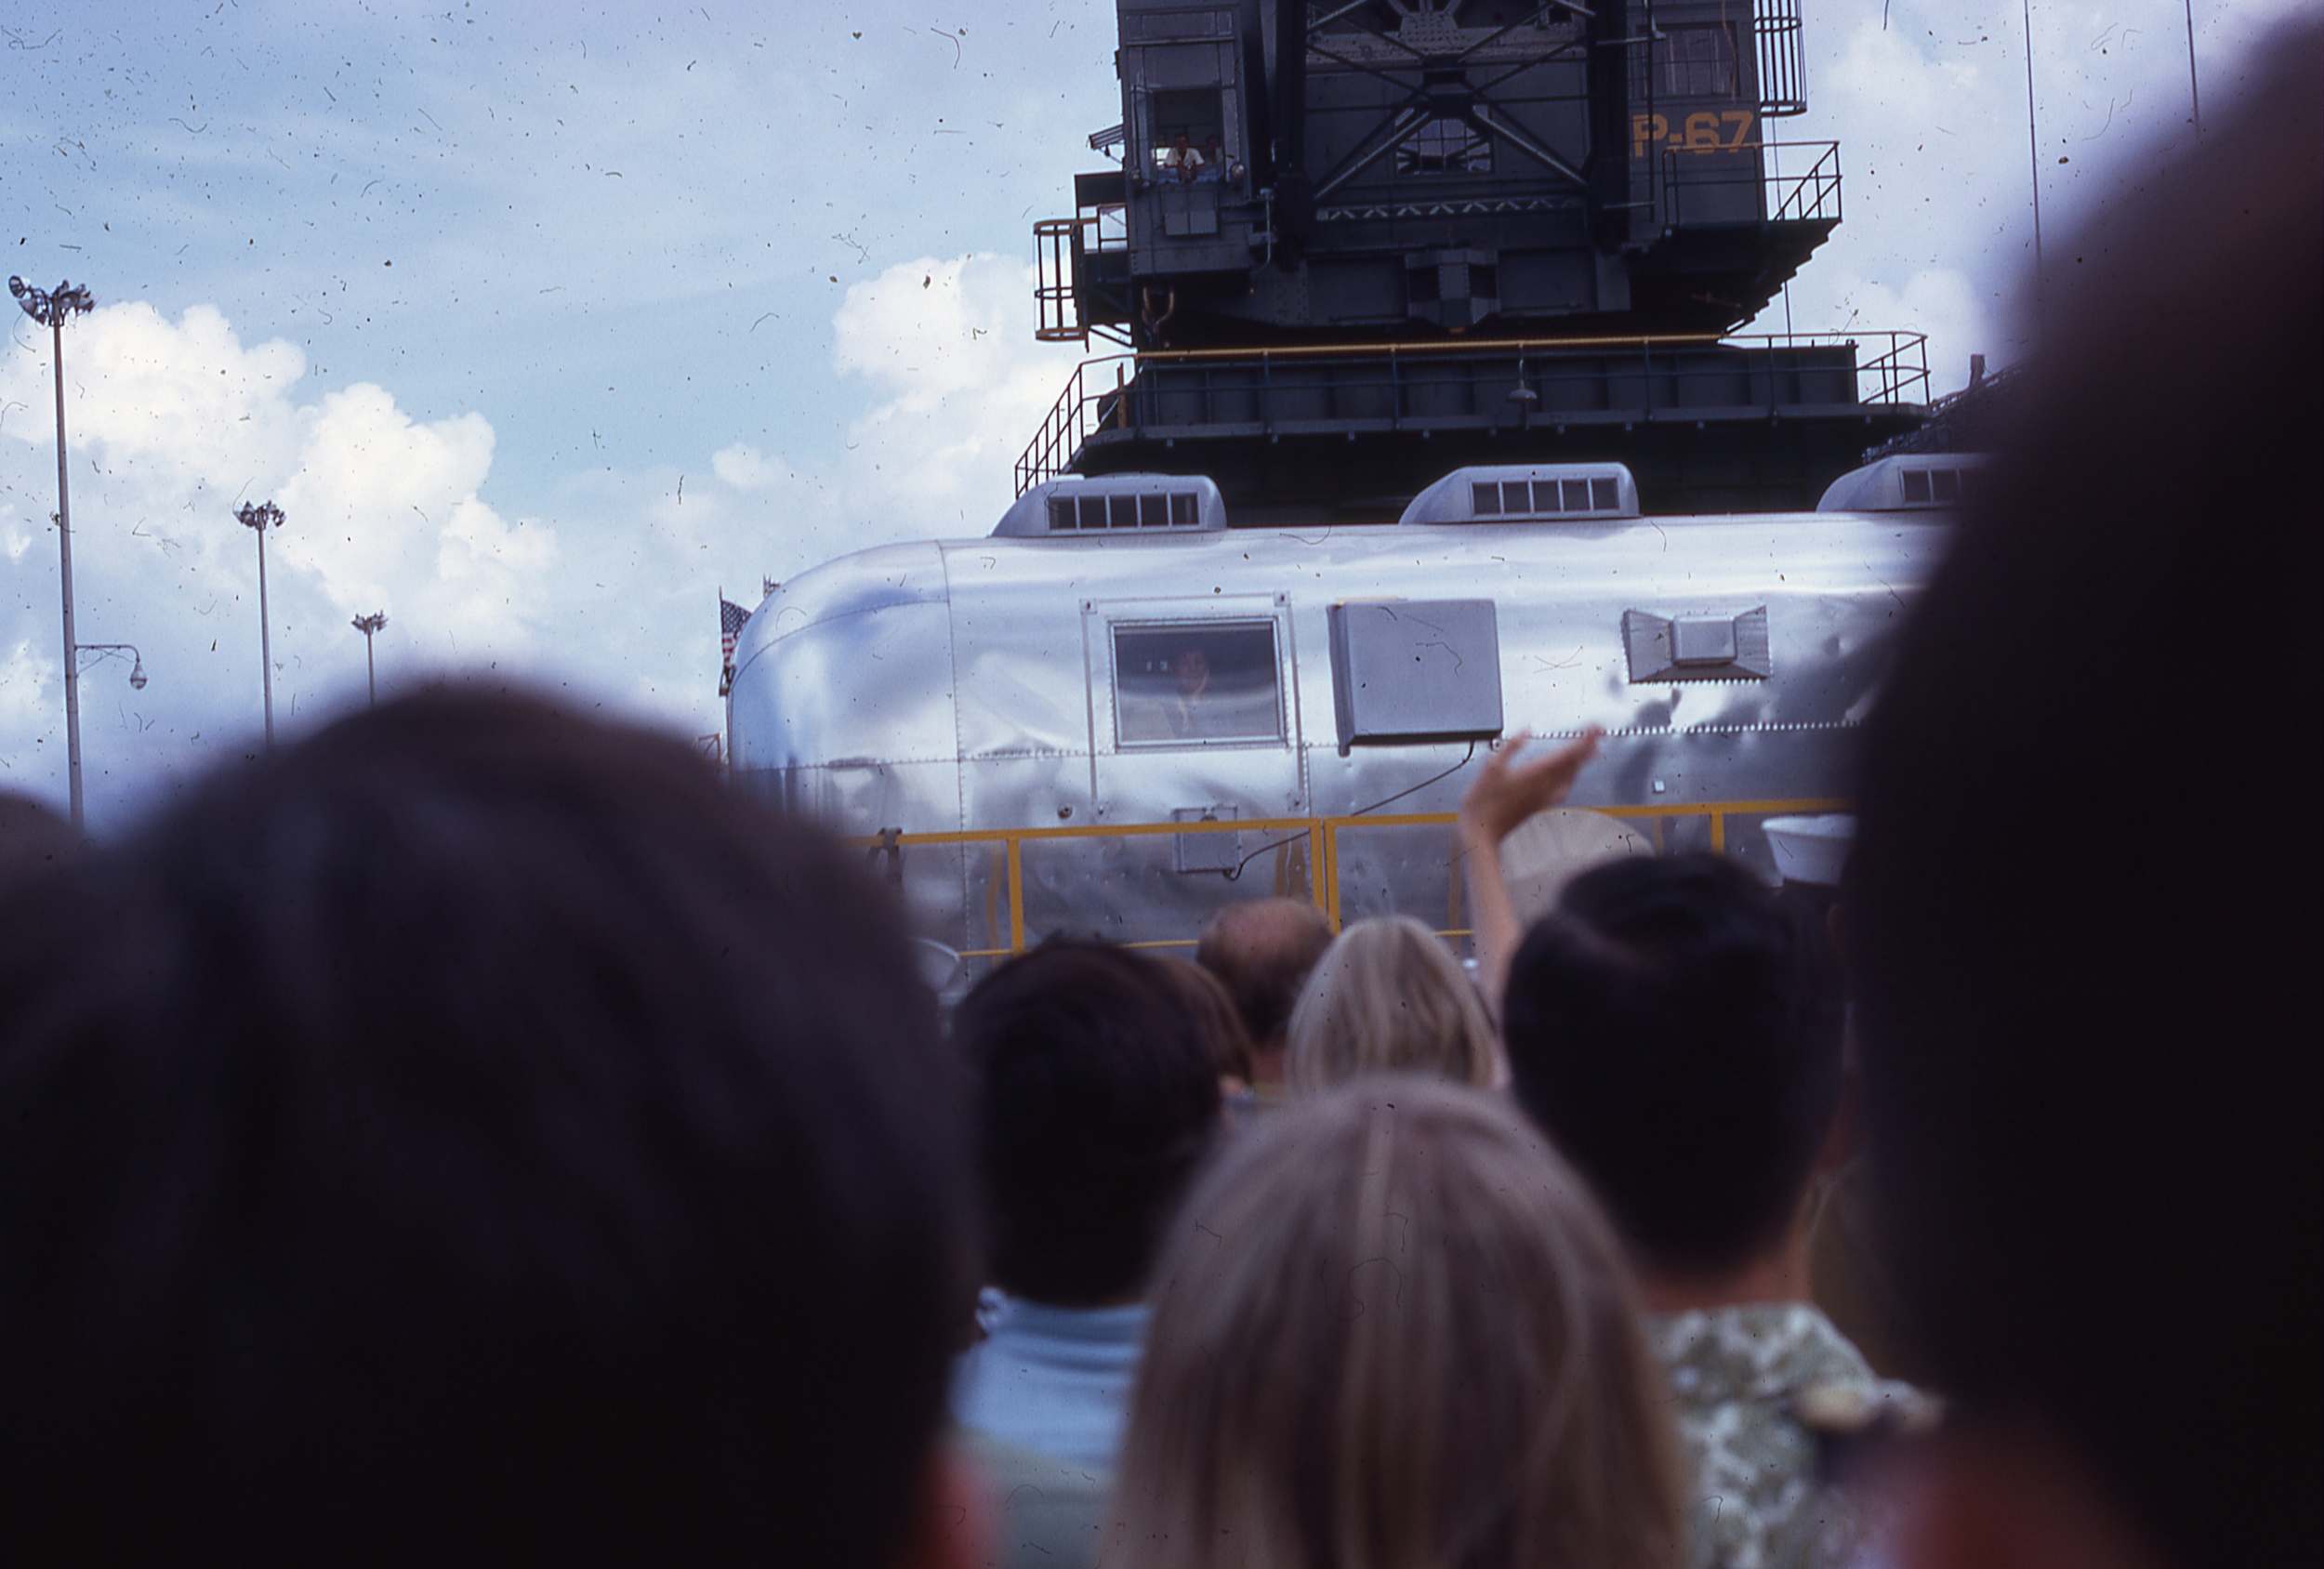 NS-ha-204 |
1.07M | |||
 NS-ha-206 |
1.17M | |||
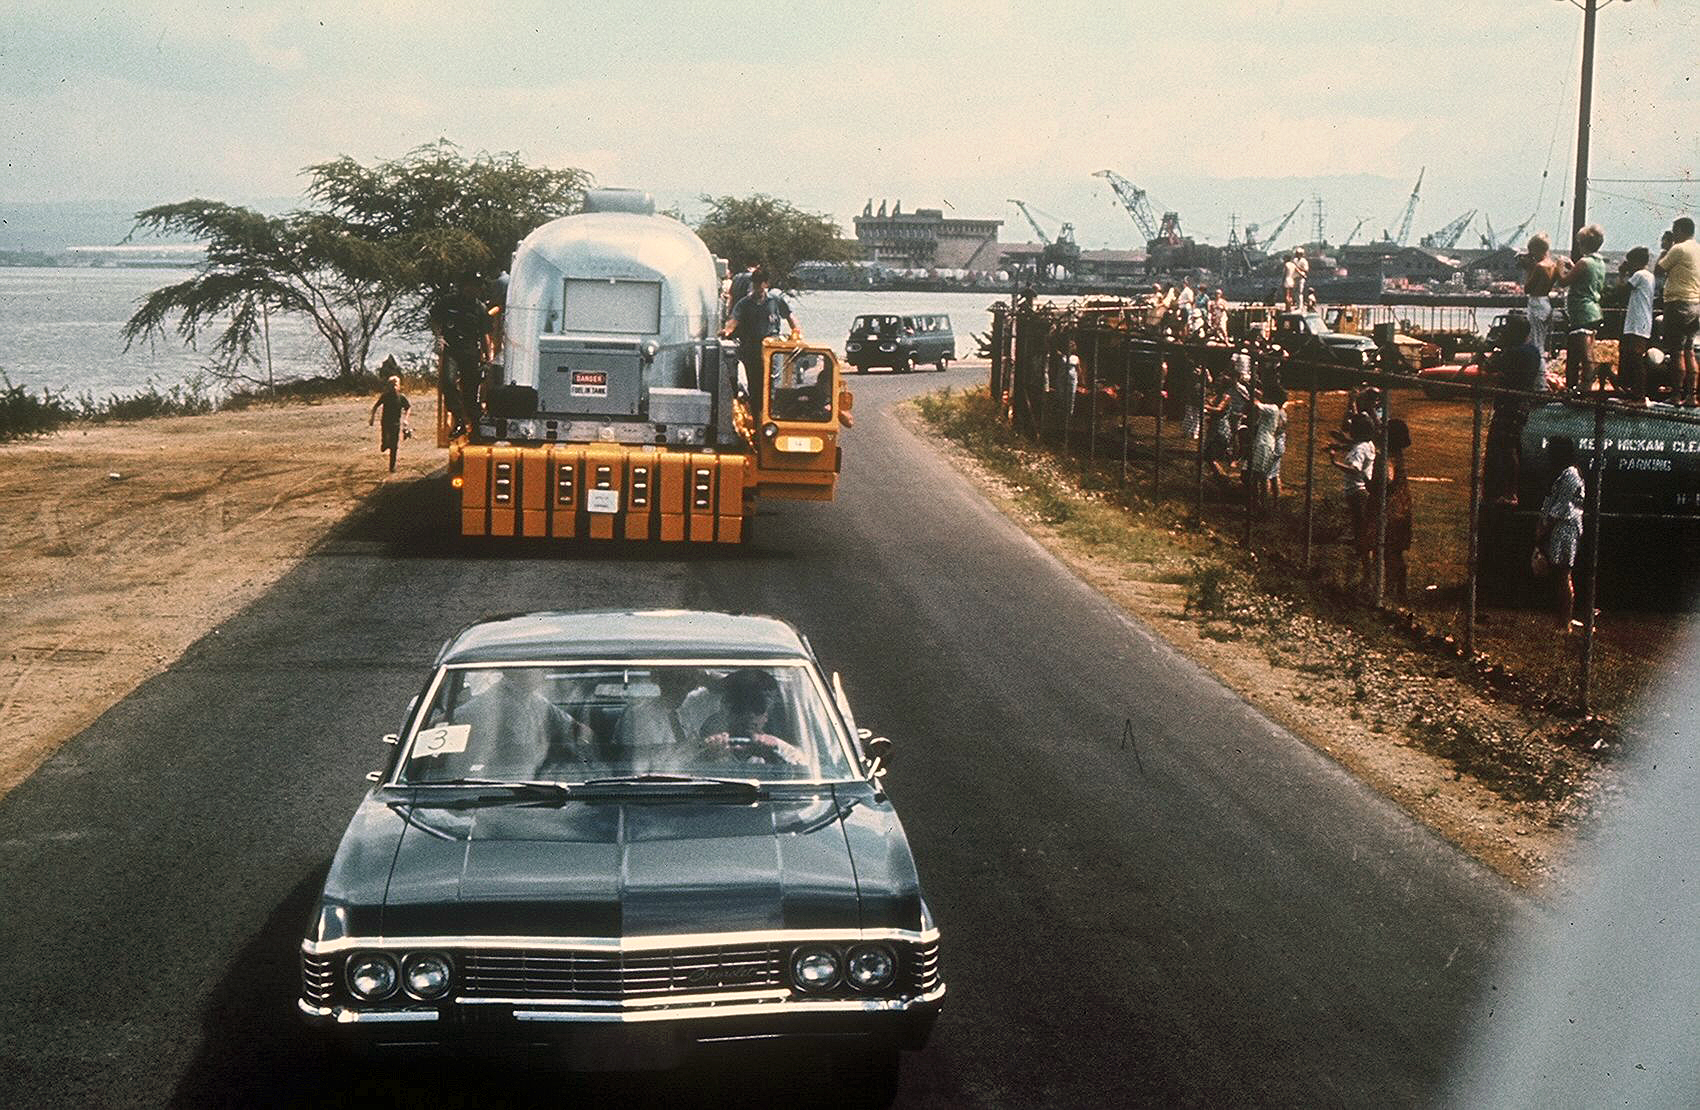 NS-ha-099 |
1.44M | After the public welcoming ceremonies at the naval base, the USAF pallet loader, with its MQF and 5 passengers, was part of a tiny motorcade whose destination was Hickam AFB, 2 miles away. Here it is just leaving Pier Bravo and passing through the rear of the naval base as families line the road to wave at the astronauts. US Navy photo. |
Bob Fish | |
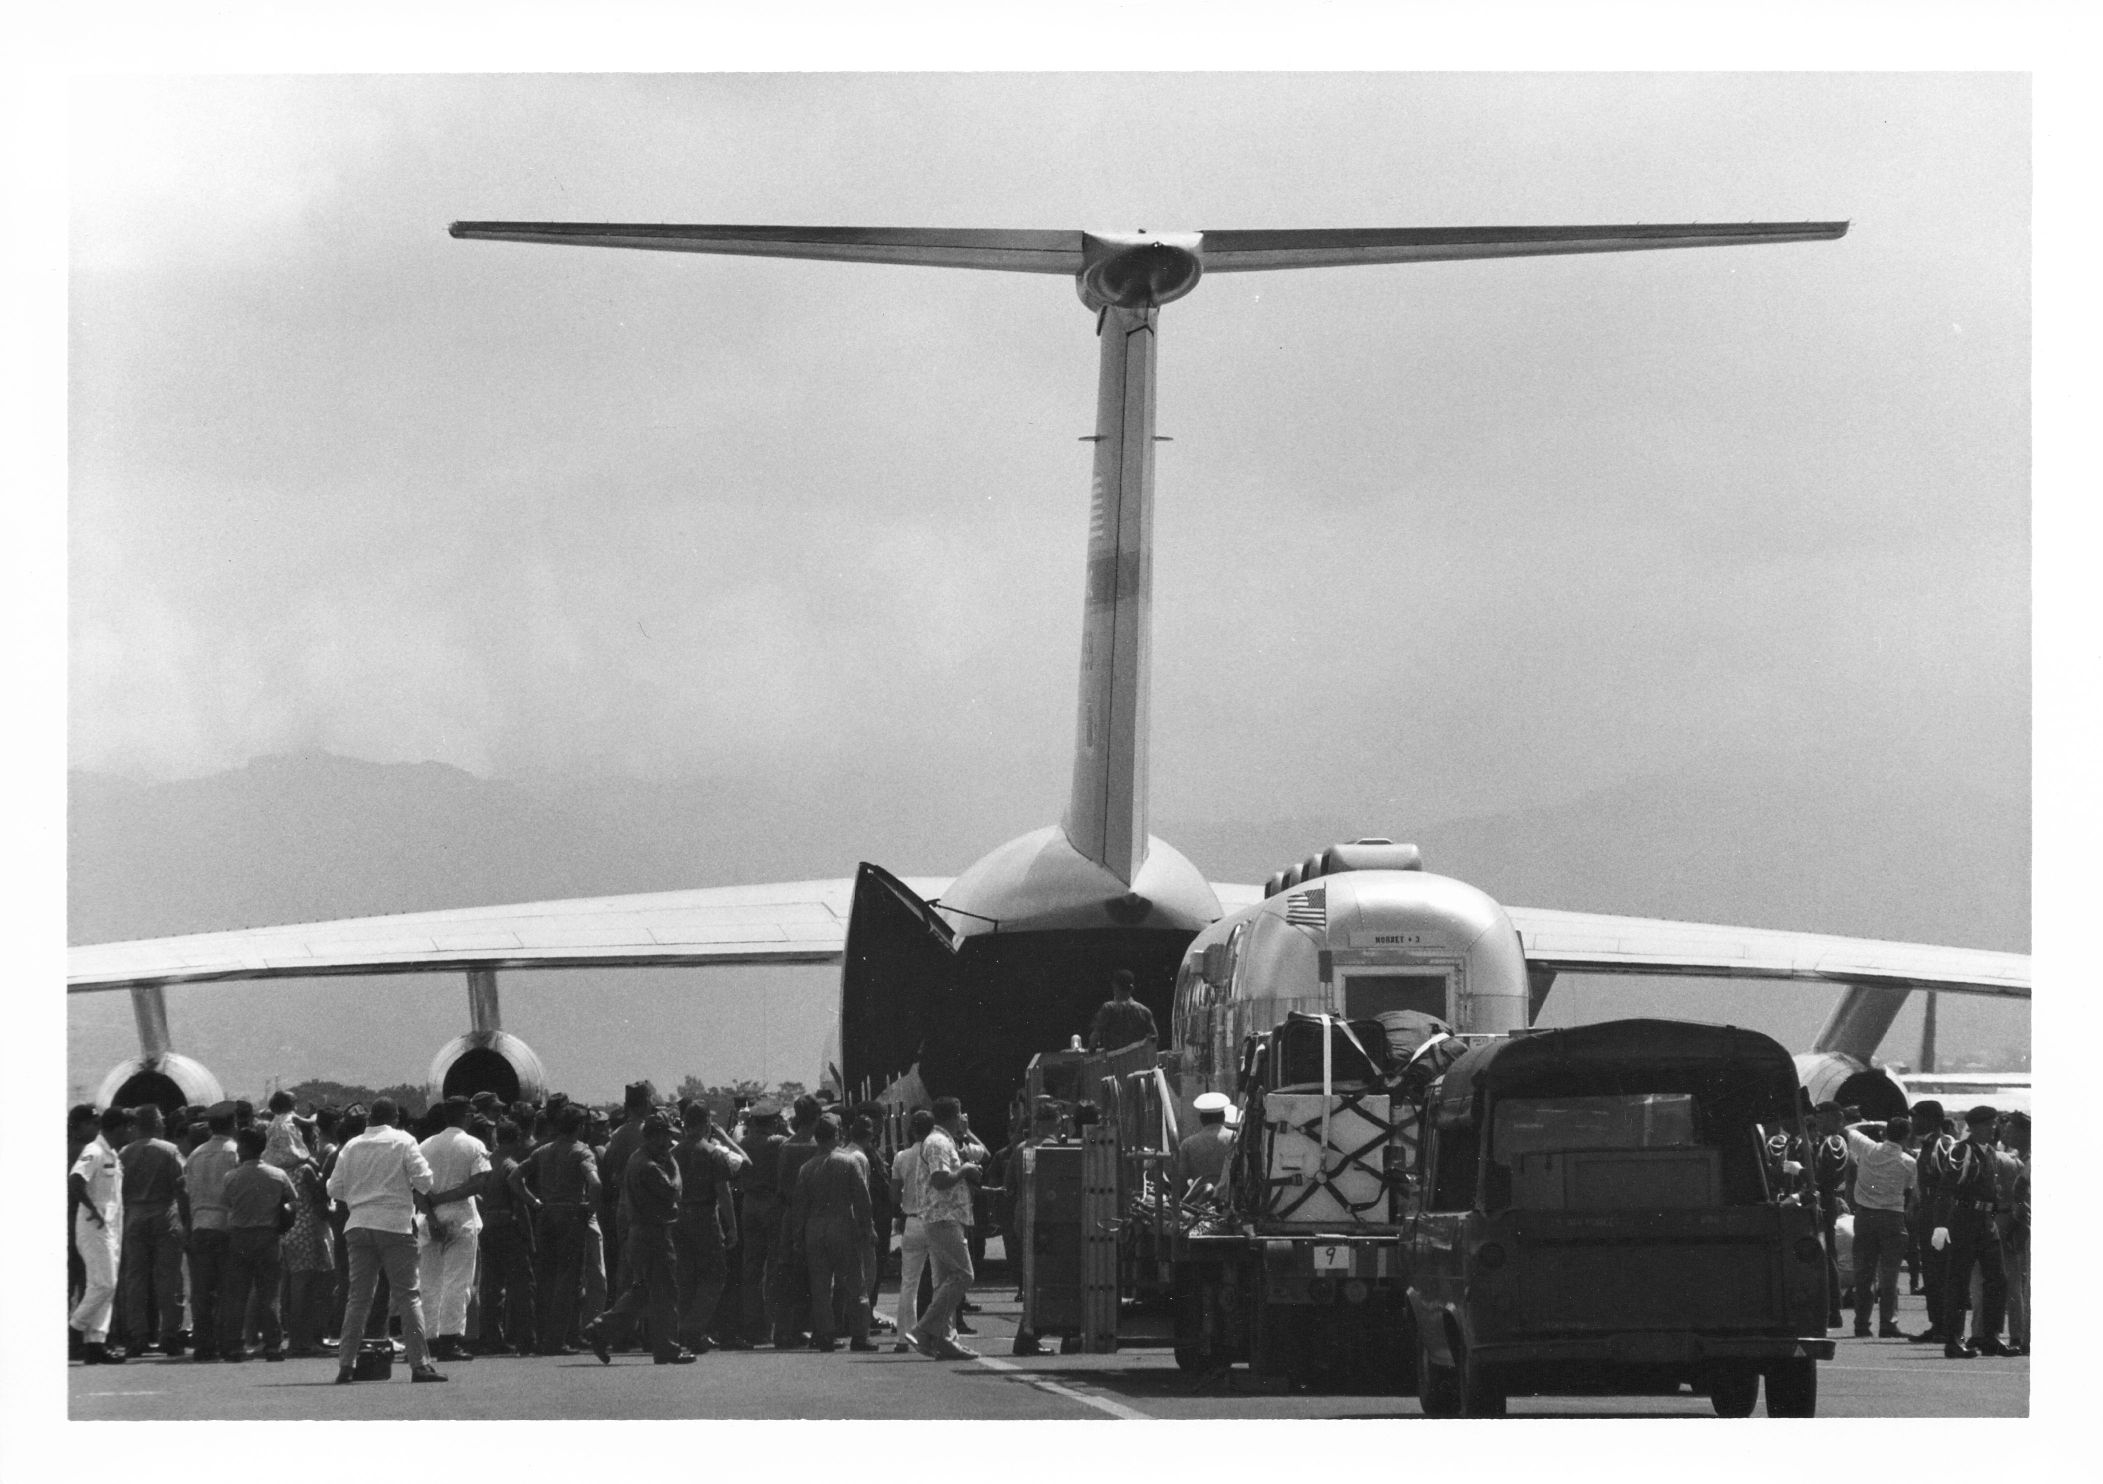 NS-ha-100 |
368k | At noon on 26 July, the MQF arrived at Hickam AFB in Hawaii. The pallet loader was preparing to transfer the MQF into the cargo hold of a C-141A Starlifter for its flight to Houston, Texas. In 8 hours, the astronauts would arrive at the Johnson Space Center to finish their quarantine period. US Air Force photo. |
Bob Fish | |
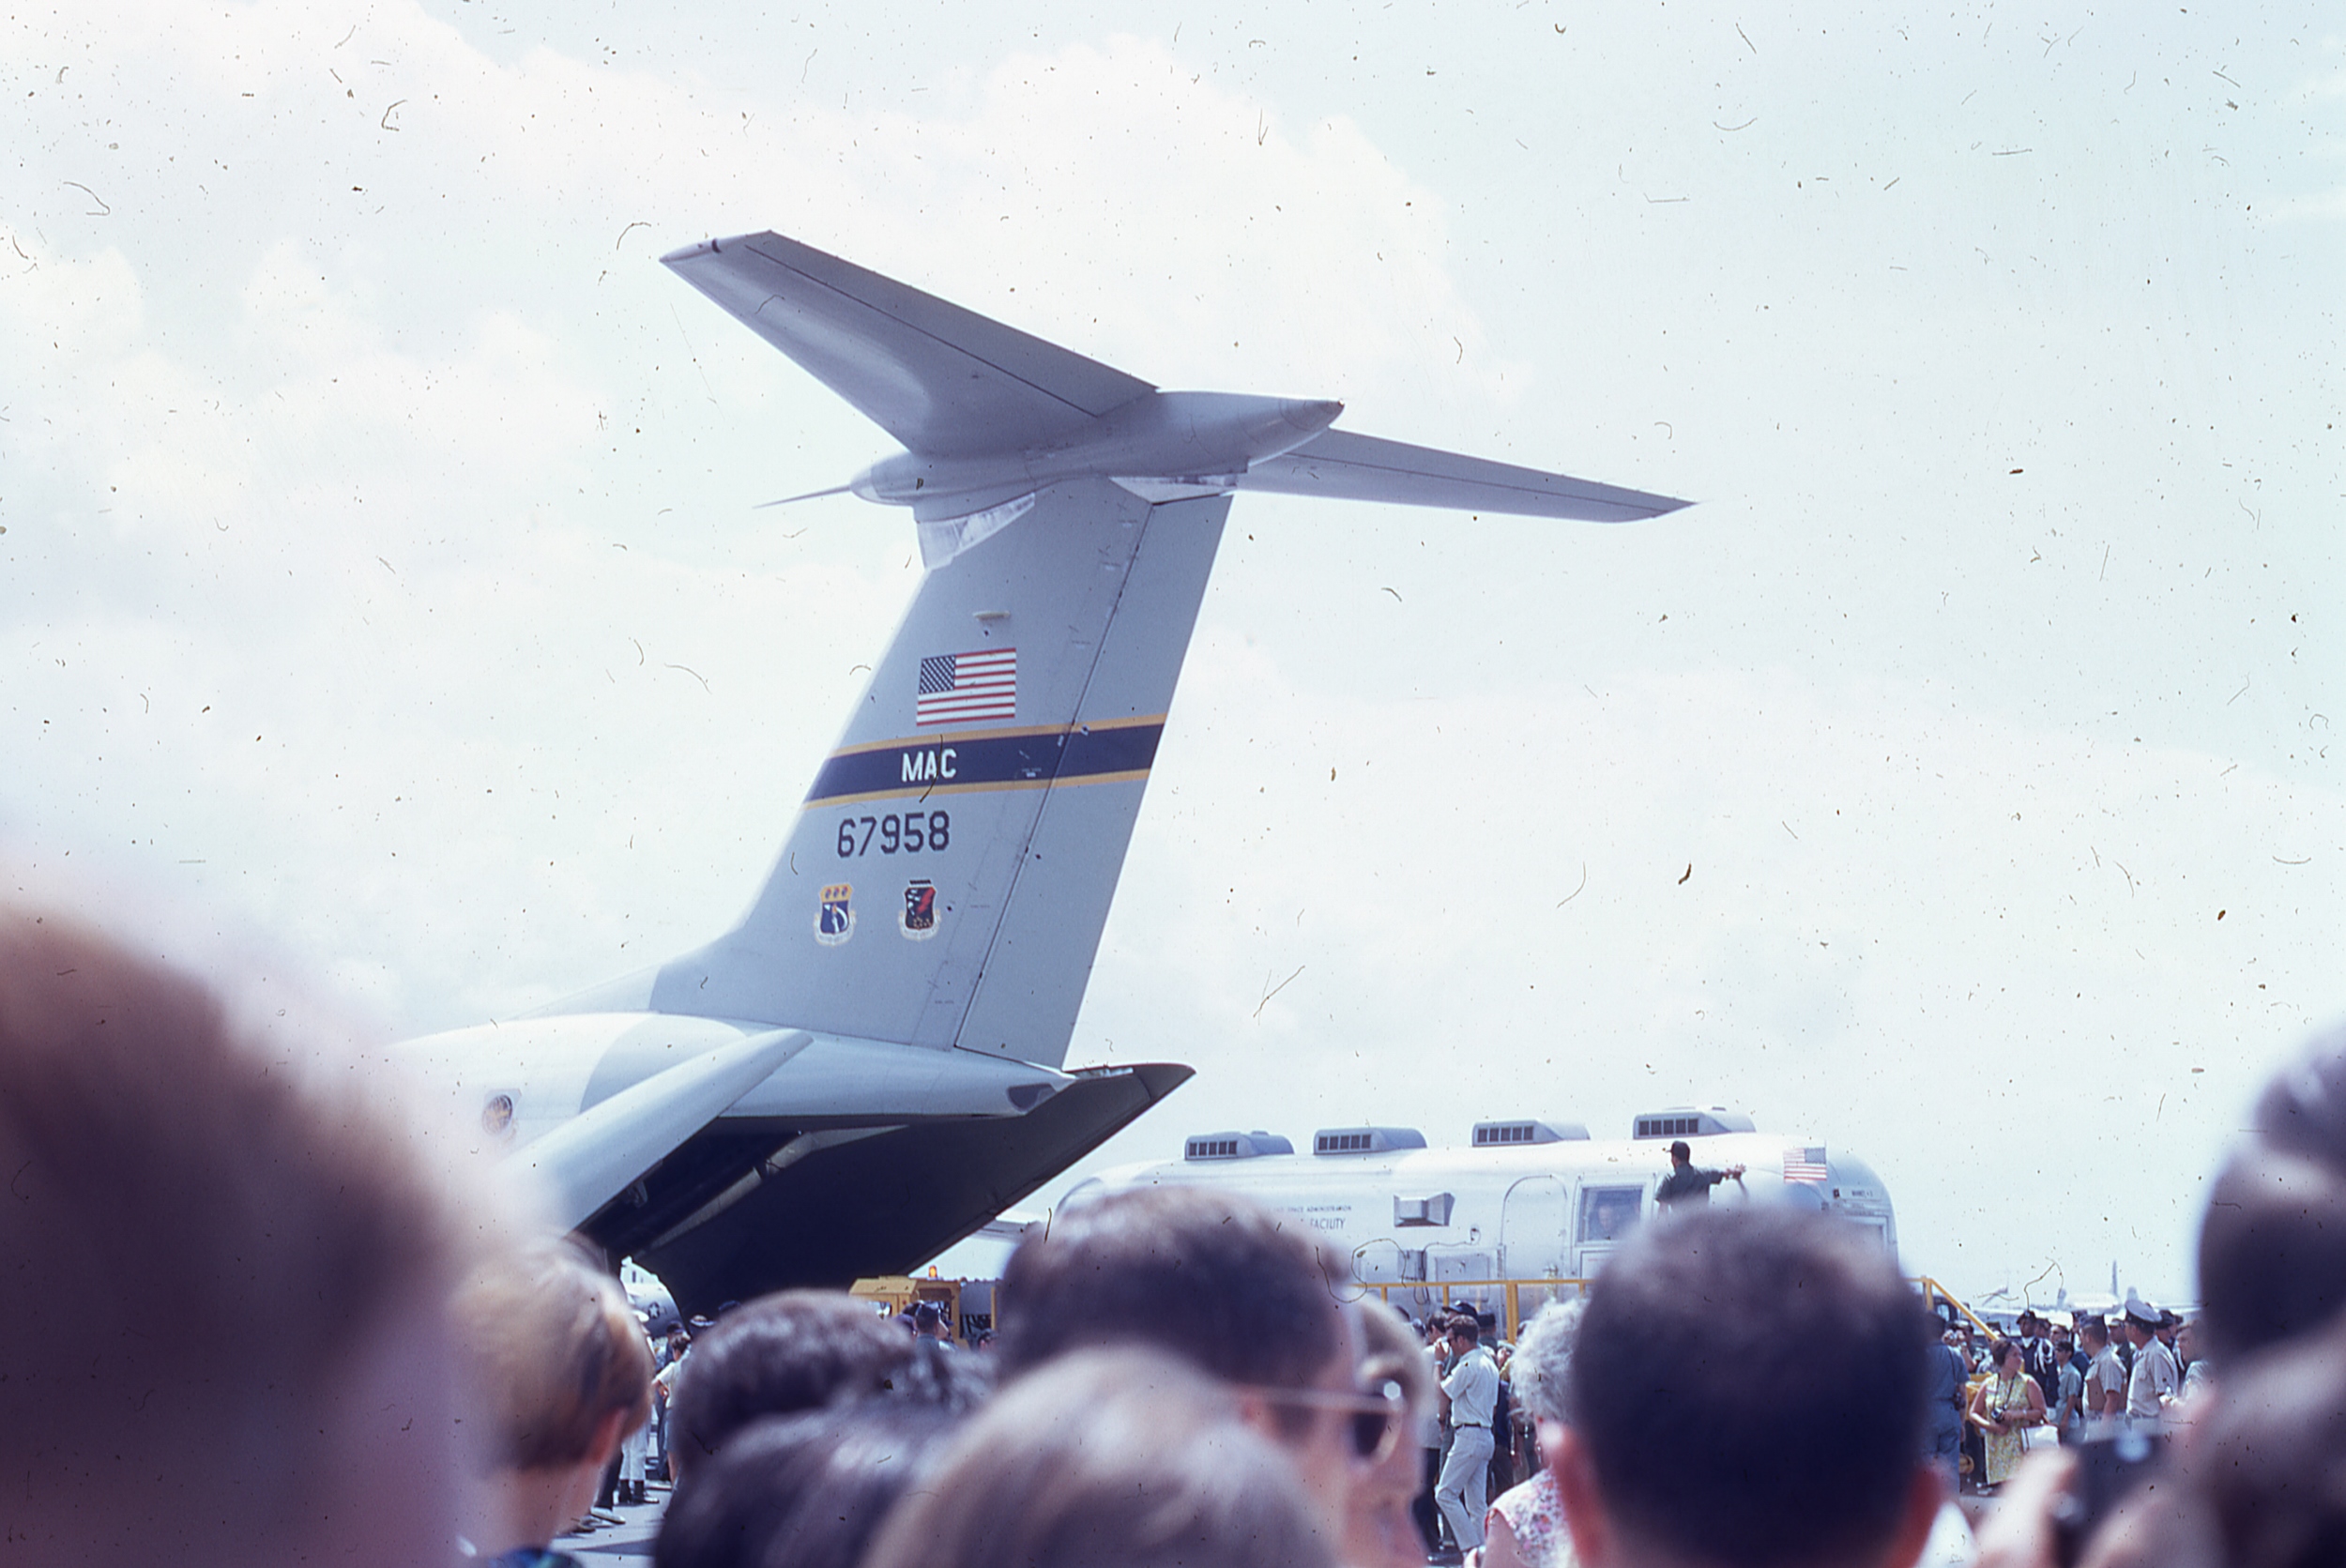 NS-ha-207 |
1.16M | The Mobile Quarantine Facility (MQF), with the Apollo 11 astronauts, being loaded into the cargo hold of a Military Airlift Command C-141A Starlifter, tail number 66‑7958. |
Photo by Mark Chambers | |
 NS-ha-563 |
2.15M | Apollo 11 Technical Crew Debriefing. Excerpted from the post-flight briefings by NASA, relates to the splashdown, BIG suits, etc. The "astronauts point of view" of the initial stages of the recovery. |
Bob Fish | |
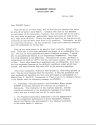 NS-ha-568 |
1.74M | Letter from Captain Carl J. Seiberlich to the Hornet family, 29 July 1969. |
Bob Fish | |
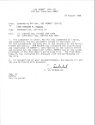 NS-ha-564 |
1.42M | Hornet Crew Commendation, Recovery of Apollo 11 and visit of President Nixon, 20 August 1969. |
Bob Fish | |
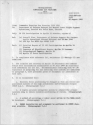 NS-ha-569 |
2.63M | Report of Task Force (TF) 130 participation in Apollo 11 Mission, from the Commander Hawaiian Sea Frontier (CTF 130) to the Department of Defense Manager for Manned Space Flight Support Operations, 20 August 1969. |
Bob Fish | |
 NS-ha-571 |
10.8M | Apollo 11 Press Kit from Commander, Manned Spacecraft Recovery Force Atlantic—Task Force (TF) 140. This document contains background information on all earlier recoveries of Mercury, Gemini and Apollo, and is loaded with information of great use for researchers. |
Bob Fish | |
| USS Hornet (CVS-12)
Primary Recovery Ship (PRS) Apollo 11 & Apollo 12 |
||||
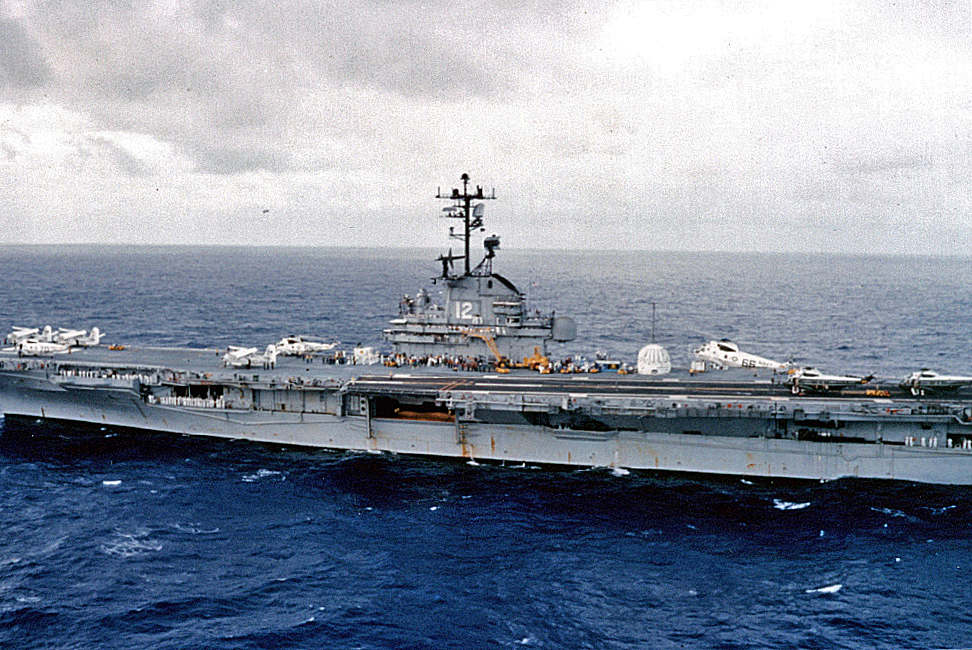
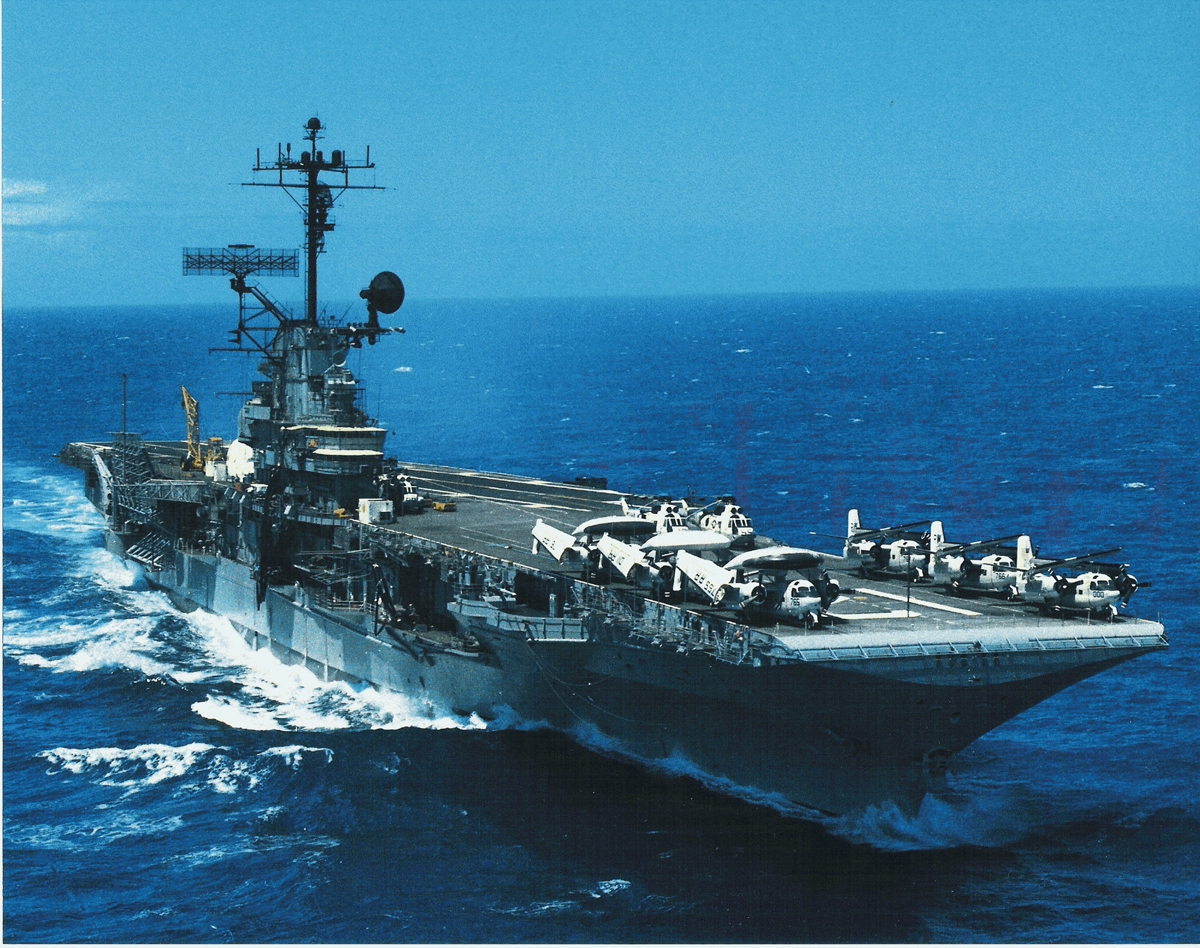 NS-ha-554 |
979k | The Primary Recovery Ship (PRS), USS Hornet (CVS-12), part of Task Force (TF) 130, steaming to a location for the recovery of an Apollo lunar landing mission:
Photos by PHCS Robert Lawson (possibly taken around 12 July). |
Wolfgang Hechler Larger copy submitted by Bob Fish |
|
 NS-ha-555 |
1.64M | Bob Fish | ||
 NS021211 |
88k | CSC H. R. Adams, USN (ret), via Larry Lee, RM1 USN (ret) | ||
| Apollo 12 |
||||
 NS-ha-607 |
320k | Portrait of the prime crew of the Apollo 12 lunar landing mission. Left to right: Charles "Pete" Conrad Jr., mission commander; Richard F. Gordon Jr., command module pilot; and Alan L. Bean, lunar module pilot. Apollo 12 was the second lunar landing mission in which the third and fourth American astronauts set foot upon the moon. This mission was highlighted by the Lunar Module, nicknamed Intrepid, landing within a few hundred yards of Surveyor 3, a probe sent to the moon in April 1967 on a mapping mission, as a precursor to landing. National Aeronautics and Space Administration (NASA) photo S69-38992. |
Courtesy of NASA | |
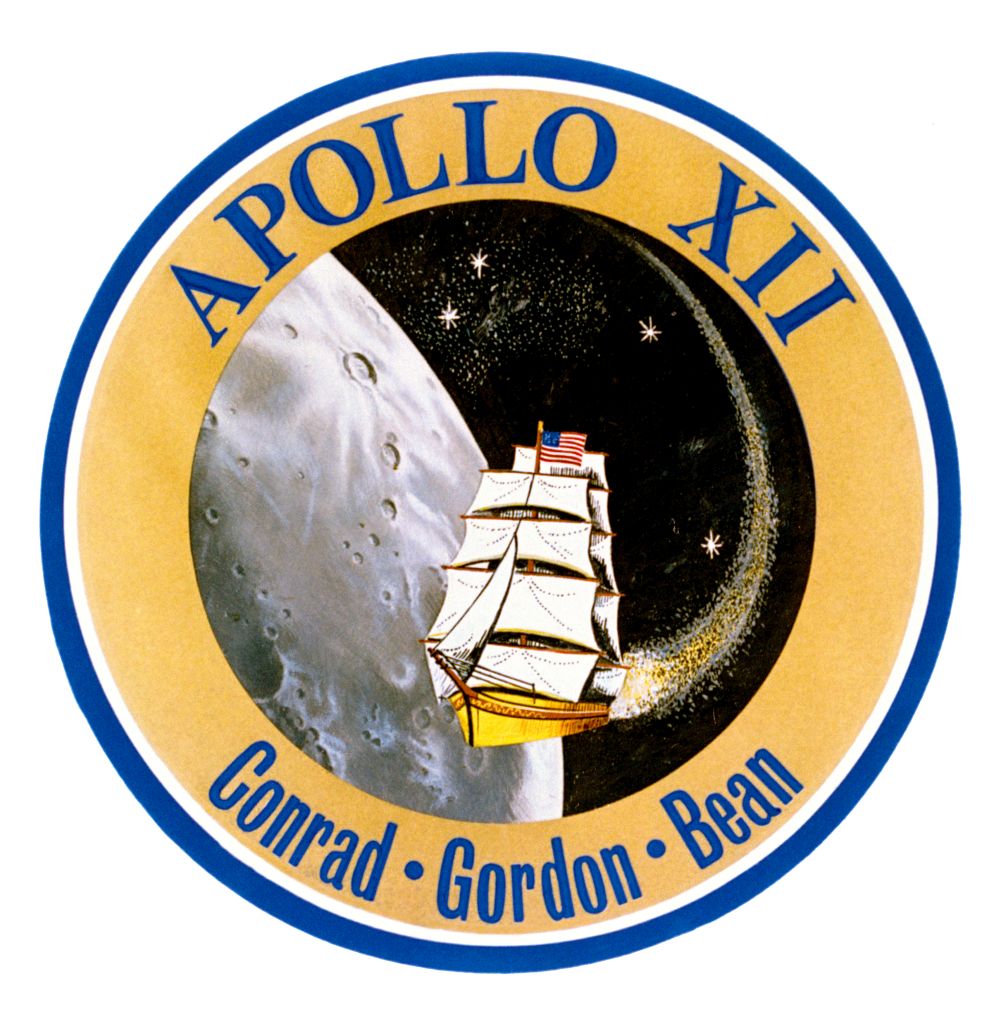 NS-ha-608 |
176k | The official crew insignia for Apollo 12, September 1969. The clipper ship signifies that the crew was all Navy and symbolically relates the era of the clipper ship to the era of space flight. As the clipper ship brought foreign shores closer to the United States and marked the increased utilization of the seas by this nation, spacecraft have opened the way to the other planets and Apollo 12 marked the increased utilization of space—based on knowledge gained in earlier missions. The portion of the moon shown is representative of the Ocean of Storms area in which Apollo 12 would land. National Aeronautics and Space Administration (NASA) photo S69-52336. |
Courtesy of NASA | |
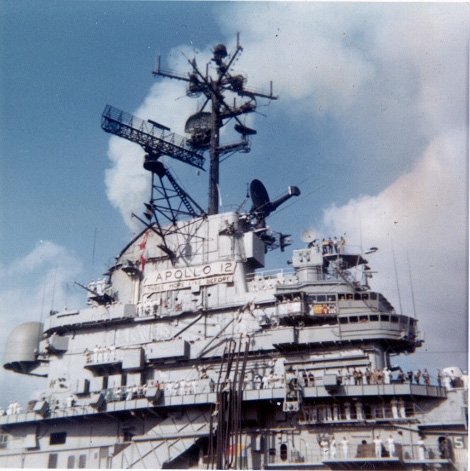
 NS021213 |
418k | USS HORNET CVS-12 + APOLLO 12 |
Tommy Trampp | |
 NS-ha-037 |
404k | Navy ships at sea for any significant duration of time need replenishment of supplies, and act called "UNREP," which stands for Underway Replenishment. In this photo, taken on 23 November 1969, the fleet oiler USS Hassayampa (AO-145) is providing many thousands of gallons of Navy Special Fuel Oil (NSFO) to Hornet for the final days of her recovery cruise. US Navy photo. |
Bob Fish | |
 NS091914526 |
207k | USS Hassayampa (AO-145) refueling USS Hornet (CVS-12), while part of the Apollo 12 recovery fleet, 23 November 1969. National Naval Aviation Museum (NNAM) photo, # 1996.488.245.042. |
Courtesy of NNAM, via Mike Green |
|
 NS-ha-612 |
45k | A rare photograph taken by one of Hornet's Photo Lab photographers from the flight deck. The Primary Recovery Ship was so close to the EOM (End Of Mission) point that Yankee Clipper, Apollo 12's Command Module, could be seen and photographed just before splashdown. |
Bob Fish | |
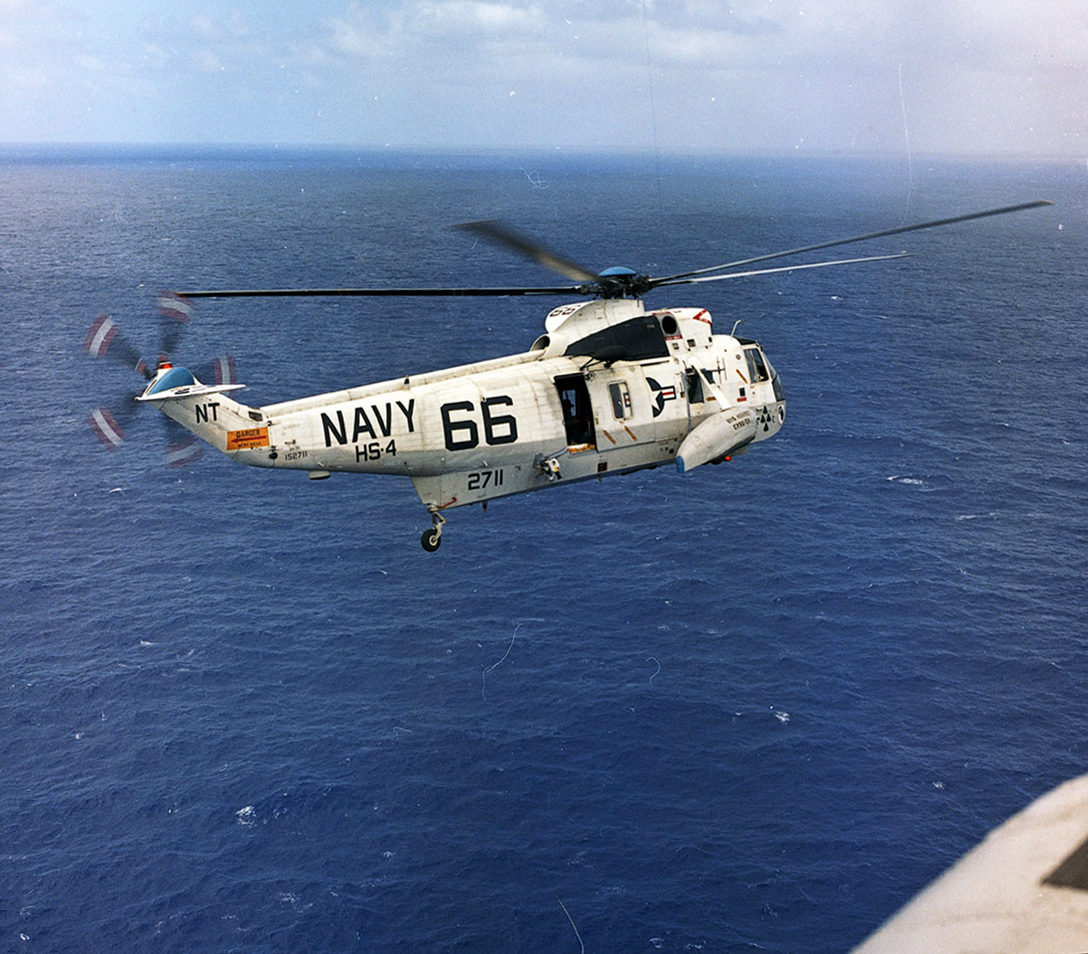
 NS-ha-609 |
1.06M | An astronaut is now in the Billy Pugh rescue net and is being hoisted into the recovery helicopter, the world-famous "Helicopter 66." In comparison to photo NS-ha-570, note that the "66" is now shown in smaller digits and the Air Group designation (CVSG-59) has been added to the starboard sponson. At this point, only three CM decals, corresponding to Apollo 8, 10, and 11, can be seen under the cockpit. |
Collection of CDR Thomas B. Ray, via Chris Stanley |
|
 NS-ha-609a |
637k | SH-3D Sea Kings BuNo 154113 (modex NT315) and BuNo 152711 (NT66), Helicopter Anti-Submarine Squadron (HS) 4, Carrier Anti-Submarine Air Group (CVSG) 59, USS Hornet (CVS-12). |
Bob Fish | |
 NS-ha-606 |
800k | A nice view of the starboard side of HS-4 "Black Nights" Sea King #66 (BuNo 152711) in flight. This photo was taken just after the recovery of Apollo 12 on Monday, 24 November 1969. Keen eyes will notice special modifications associated with the Apollo spacecraft recovery, such as the high-speed 70mm film camera mounted just aft of the cargo hatch (and aiming down) and the NASA SARAH (Search And Rescue And Homing) radio direction finding (RDF) antenna high up on the starboard landing gear strut, that provided the helicopter with the ability to home in on the spacecraft's radio beacon. By this time HS-4 side numbers had been changed to the 300 range, but 152711 had its new number painted out and replaced with the well known "66" on both sides and on the top of the fuselage, just behind the main rotor. In comparison to photo NS-ha-060, note that the "66" was now smaller and the Air Group designation, CVSG-59, had been added below "USS HORNET" on each sponson. A fourth black Apollo spacecraft decal was applied on the side of the cockpit before recovery of Apollo 12, then covered up, and uncovered as the helicopter landed with the astronauts aboard. Eventually this helicopter and HS-4 crews recovered the astronauts from five Apollo lunar flights—8, 10, 11, 12 and 13. USN photo by PHCS Robert L. Lawson. |
Bob Fish | |
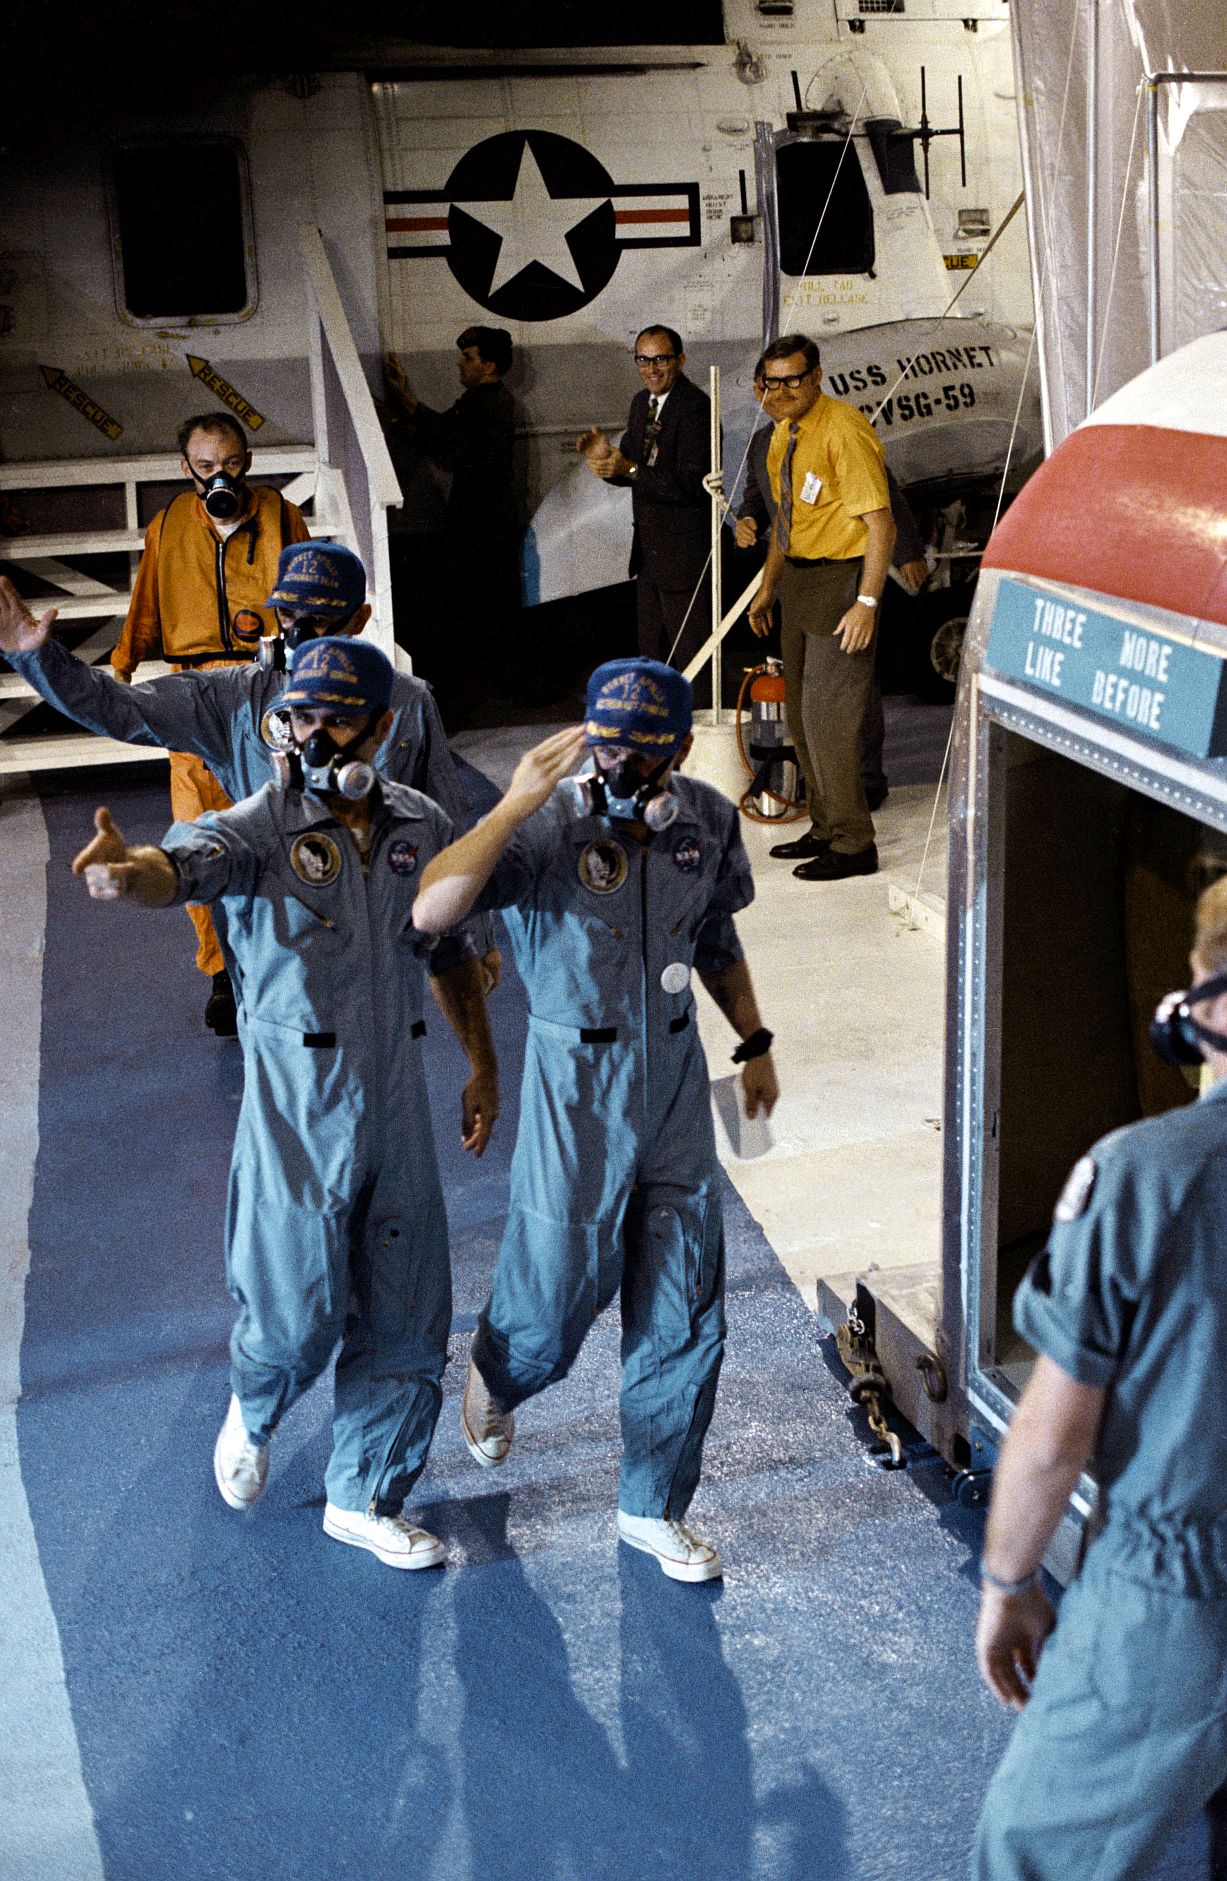
 NS021205a |
441k | The Apollo 12 astronauts, Charles F. Conrad, Jr., Richard F. Gordon, Jr., and Alan L. Bean, emerge from the SH-3D Sea King recovery helicopter of Helicopier anti-submarine Squadron Four (HS-4). They would go directly to the Mobile Quarantine Facility on the hangar deck of USS Hornet (CVS-12). Naval History and Heritage Command (HN&NC) photo USN 1142561 by PH1 J.W. Rogers. |
Courtesy of NH&HC, via Dwayne Day | |
 NS021205b |
548k | USS Hornet crewmen are greeted by the crew of the Apollo 12 lunar landing mission as the three astronauts are transferred from a US Navy helicopter to a Mobile Quarantine Facility (MQF) aboard the prime recovery vessel. Charles Conrad Jr., right, commander; Richard F. Gordon Jr., command module pilot, left front; and Alan L. Bean, lunar module pilot, splashed down safely at 1458, 24 November 1969. NASA flight surgeon in the orange flight suit following the astronauts out of helo 66 is Dr. Clarence Jernigan. The NASA MQF technician holding the MQF door is Randy "Brock" Stone. (Thanks to Bob Fish.) National Aeronautics and Space Administration (NASA) photo S69-22849. |
Courtesy of NASA | |
 NS021205c |
279k | Captain Carl J. Seiberlich, CO of USS Hornet (CVS-12), welcomes the Apollo 12 astronauts, in their Mobile Quarantine Facility on the hangar deck, aboard. Naval History & Heritage Command (NH&HC) photo USN 1142563. |
Courtesy of NH&HC, via Dwayne Day |
|
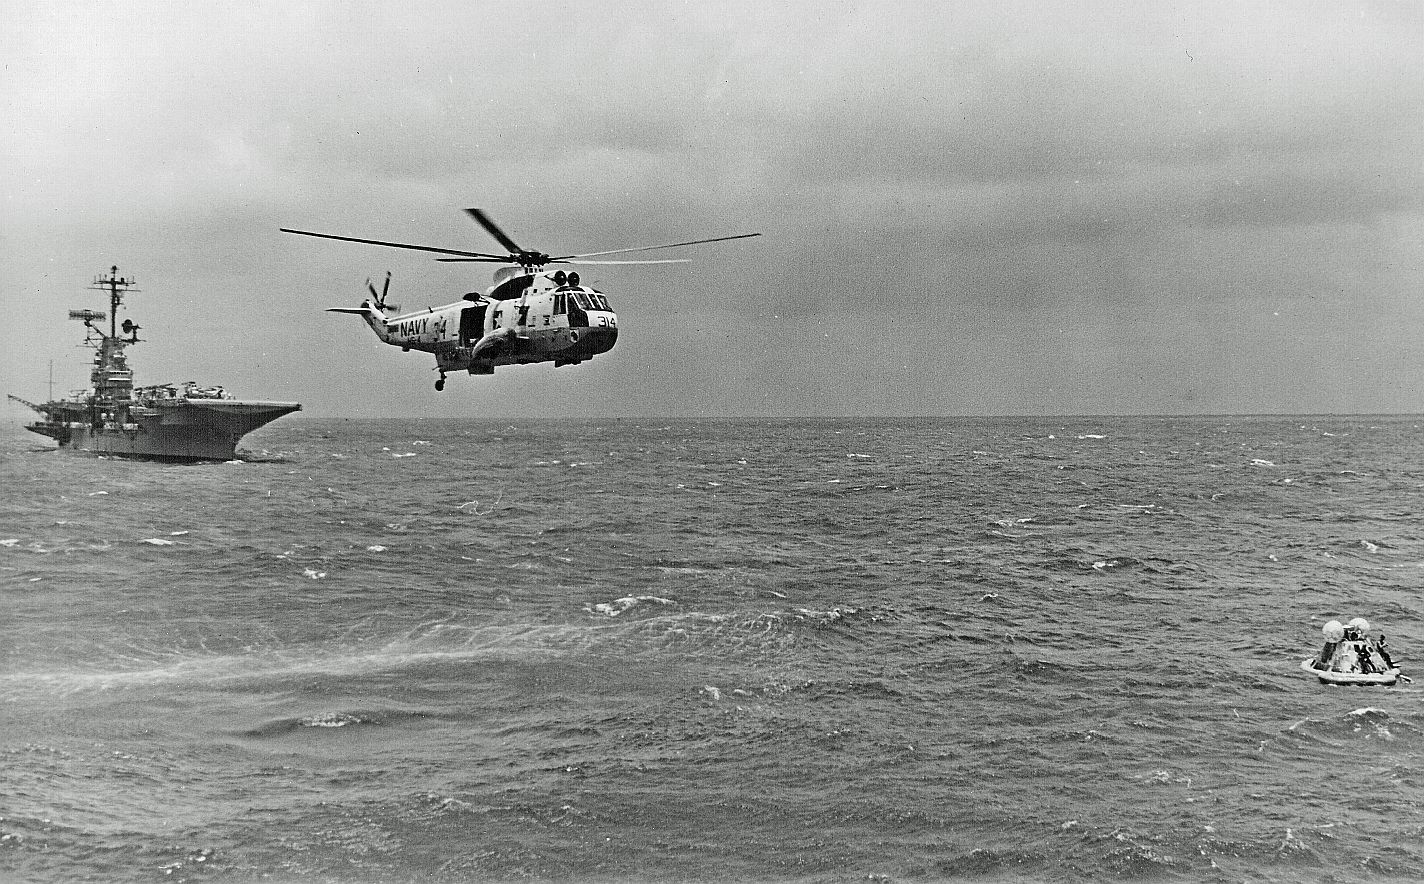
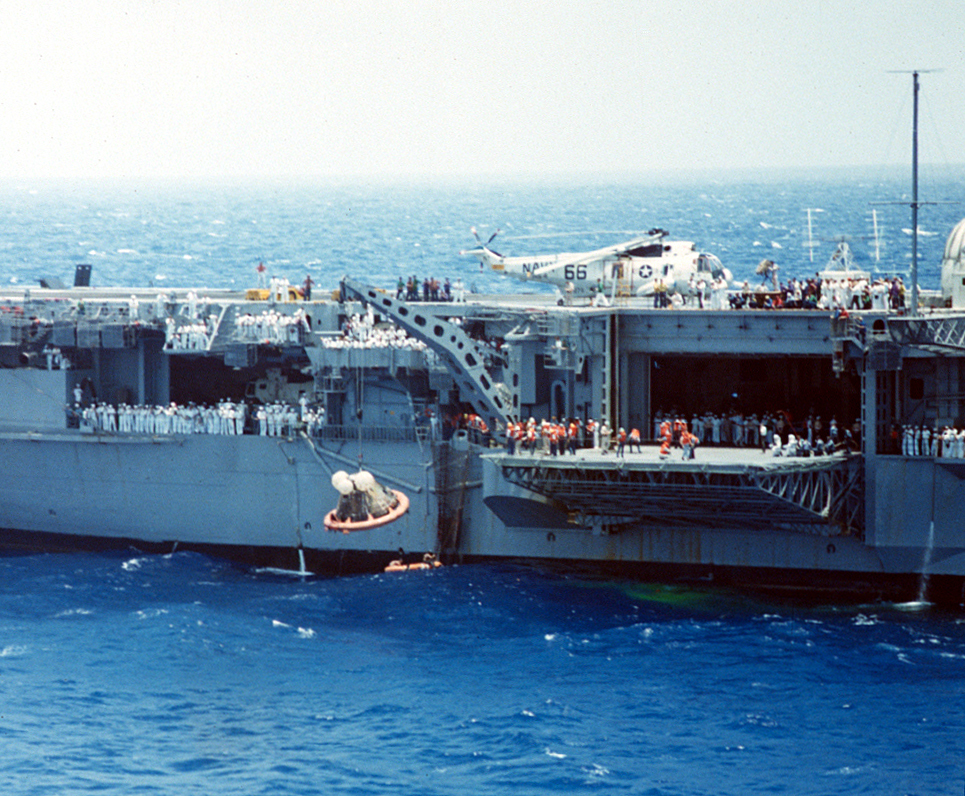
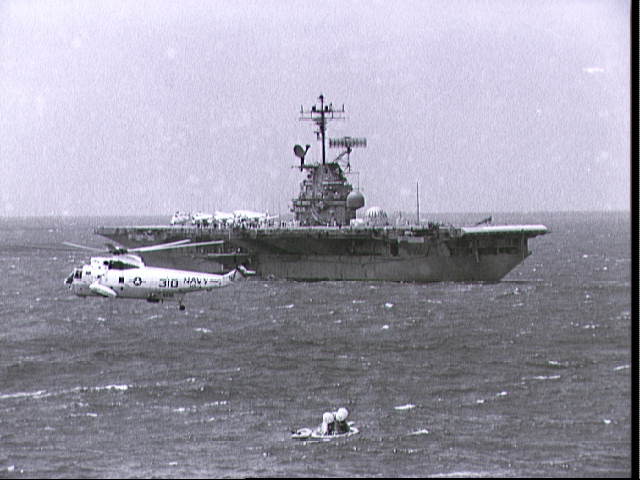 NS021205 |
592k | The prime recovery ship for Apollo 12, USS Hornet (CVS-12), maneuvers to recover the Command Module (CM), Yankee Clipper. An SH-3D Sea King helicopter from Helicopter Anti-Submarine Warfare Squadron Four (HS-4) (BuNo 154108, modex NT310), hovers over the CM to support the UDT-13 swimmers on the flotation collar. National Aeronautics and Space Administration (NASA) photo S69-22897. |
NASA | |
 NS-ha-602 |
348k | Apollo 12 Primary Recovery Ship USS Hornet (CVS-12) begins a slow approach to recover the Command Module (CM), Yankee Clipper. While the UDT-13 swimmers stand on the CM flotation collar, an HS-4 Sea King helicopter (see Naval History & Heritage Command (NH&HC) photo USN 1142563. |
Courtesy of NH&HC, via Dwayne Day |
|
NS021205 |
592k | The prime recovery ship for Apollo 12, USS Hornet (CVS-12), maneuvers to recover the Command Module (CM), Yankee Clipper. An SH-3D Sea King helicopter from Helicopter Anti-Submarine Warfare Squadron Four (HS-4) (BuNo 154108, modex NT310), hovers over the CM to support the UDT-13 swimmers on the flotation collar. National Aeronautics and Space Administration (NASA) photo S69-22897. |
NASA | |
NS-ha-602 |
348k | Apollo 12 Primary Recovery Ship USS Hornet (CVS-12) begins a slow approach to recover the Command Module (CM), Yankee Clipper. While the UDT-13 swimmers stand on the CM flotation collar, an HS-4 Sea King helicopter (see below) acts as a navigational beacon for the ship's CO, Captain Carl Seiberlich. US Navy photo by PH3 Ralph G. Howard. |
Bob Fish | |
 NS-ha-602a |
586k | SH-3D Sea King helicopter, BuNo 154112, modex NT314, was Swim TWO helicopter for the Apollo 12 recovery mission. It had been the standby helicopter for Apollo 11 (its modex was NT64 at the time). This photo was taken by PHCS Robert Lawson during a SIMEX. |
Bob Fish | |
 NS-ha-610 |
856k | USS Hornet (CVS-12) continues a careful approach to recover the Apollo 12 spacecraft, mindful of wind and drift rates. Note the ship's B&A crane is already extended and prepared for the hoist operation. National Aeronautics and Space Administration (NARA) Photo S69-22882. |
Bob Fish | |
 NS-ha-603 |
190k | Another view of USS Hornet (CVS-12), Apollo 12 Primary Recovery Ship, as she slowly approaches to recover the Command Module (CM), Yankee Clipper. UDT-13 swimmers stand on the CM flotation collar. US Navy photo by PH3 Ralph G. Howard. |
Robert M. Cieri Bob Canchola, BT, USS Oriskany, 1971–73 Bob Fish |
|
 NS-ha-604 |
514k | Swimmers from UDT-13, standing on the Apollo 12 CM flotation collar, look up at the flight deck of USS Hornet (CVS-12) as they prepare for an in-haul line to be thrown to them. Observers on the forward catwalk are reporting the distance, drift rate and direction of the CM to Captain Carl Seiberlich to assist ship maneuvering. Hornet displaced 41,200 tons of water (full load) while the Yankee Clipper weighed just 6 tons, a huge disparity in the open ocean. |
Bob Fish | |
 NS-ha-605 |
518k | Having attached several lines from USS Hornet (CVS-12) to the Apollo 12 CM, the UDT-13 swimmers are now attaching the B&A crane cable to the spacecraft recovery loop. Note the special NASA "6ft recovery strap" being connected to the CM. |
Bob Canchola, BT, USS Oriskany, 1971–73 Bob Fish |
|
 NS-ha-611 |
899k | A nice helicopter photo of Yankee Clipper just as it was lifted from the ocean by Hornet's B&A crane. On the flight deck is the astronaut recovery helicopter #66. Just in front of it is the stand from which a TV camera is broadcasting live images around the world via the satellite antenna (just a portion of its dome can be seen on the far right). Beneath the B&A crane in the raft are the UDT-13 swimmers, preparing to board the ship by climbing up a cargo net. On the far right of elevator #3, are two men in silver fire suits, ready to fight a dangerous hypergolic-fueled fire from left-over RCS propellant, should one break out when the CM is brought on board. |
USN via Bob Fish | |
 NS021205d |
446k | The Apollo 12 Command Module, Yankee Clipper, is hoisted aboard USS Hornet (CVS-12). The spacecraft splashed down less than three miles from the aircraft carrier in the Pacific Ocean, southeast of the island of Samoa, Monday, 24 November 1969. Naval History & Heritage Command (NH&HC) photo K-80890. |
Courtesy of NH&HC, via Dwayne Day |
|
 NS021262 |
531k | Crewmen man the rails of USS Hornet (CVS-12) as the carrier arrives in port at Pearl Harbor, Hawaii, with the Apollo 12 Command Module and the three astronauts aboard, Friday, 28 November 1969. Naval History & Heritage Command (NH&HC) photo K-80892. |
Courtesy of NH&HC, via Dwayne Day |
|
 NS-ha-208 |
51k | USS Hornet (CVS-12) with the banner "Three More Like Before." |
Photo by Mark Chambers | |
Comments, Suggestions or Image submissions, E-mail Carrier Information
Problems and site related matters, E-mail Webmaster
This page was created and is maintained by Fabio Peña
![]()
Last update: 17 June 2024